General Management and Integrations
QuickBooks
- Understanding QuickBooks Desktop Configuration Sync Errors
- Understanding QuickBooks Desktop Timesheets Data Integrations Errors
- Understanding QBO Configuration Sync Error Messages
- Understanding QuickBooks Expenses Data Integration Error Messages
- How to Create Expense Categories in Nexonia (QuickBooks Desktop)
- How Credit Card Transactions Export to QuickBooks Desktop: Card Transactions
NetSuite
- Nexonia and NetSuite Integration Overview
- Utilizing the Zero Tax Code for NetSuite Integrated Expenses
- How to Export Card Transactions as Expense Reports to NetSuite
- Understanding NetSuite Timesheets Data Integration Error Messages
- How to Download NetSuite Web Service Usage Logs
- Enabling the Emburse Integration Role when Importing Custom Fields using Custom Segments
Intacct
- Sage Intacct Integration Best Practices
- Understanding Intacct Timesheet Integration Error Messages
- Nexonia and Intacct Integration Overview
- Understanding Intacct Configuration Sync Error Messages
- Understanding Intacct Cash Management Data Integration Error Messages
- Configuration Sync Parameters: Synchronizing Department, Location and Class (Intacct)
Bill.com
- Synchronizing the Nexonia Configuration with Bill.com
- How to Authorize Nexonia Integration Connection to Bill.com
- Integrating an Export to Bill.com
- Understanding Bill.Com Configuration Sync Error
- Understanding Bill.com Expense Integration Errors
- How to Create Expense Categories in Nexonia (Bill.com)
Xero
- Synchronizing the Nexonia Configuration with Xero
- Understanding Xero Expense Data Integration Errors
- Understanding Xero Configuration Sync Integration Errors
- How to Create Expense Categories in Nexonia (Xero)
- Mapping Company Paid Credit Cards to Xero
- How to Add New Users in Nexonia (Xero Integration)
Managing Users
- Using Display Usage
- Setting or Modifying a User's Manager
- How to Export Your Nexonia User List
- Setting a Default Customer and Project for Users
- How to Deactivate a User in Nexonia
- Assigning an Approval Process to the User Role
Workflow
- Configuration Guide to Nexonia Approvals
- Configuration Guide to Roles and User Permissions
- Creating Approval Workflow Step: Fixed Approver
- Updating Approvers for Manager Based Approvals
- Approvals: Notify On Edit
- Creating Approval Workflow Step: User Specific Approver
Regular Maintenance
- Adding a Project in Nexonia
- Adding a New Customer and Project in Nexonia
- Managing Your Interface Theme - Logo, Color Scheme and Labels
- Change Administrator Contact
- Paying your Nexonia Invoice
- Importing Payment Data into Nexonia
Training Calendar
Submitting & Approving Expenses
Alternating schedule
How to login, upload your receipts, create and expense reports for approval, and approve expenses.
Submitting & Approving Time Off and Timesheets
Alternating schedule
A walkthrough of how to create, submit, and approve Timesheets and Time Off requests.
Reporting Module Overview
Alternating schedule
An overview on how to create and generate reports.
Configuring Expense Settings for Admins
Alternating schedule
How to manage your company's data and settings.
Configuring Timesheets & Time Off Settings for Admins
Alternating schedule
How to manage timesheets and time off settings and policies for your company.
Managing Nexonia with Intacct
Alternating schedule
An overview of how Nexonia is integrated with Intacct. Learn how to import and export data between Nexonia and Intacct, manage users, expense categories and Intacct dimensions.
Managing Nexonia with QuickBooks
Alternating schedule
An overview of how Nexonia is integrated with QuickBooks Desktop or QuickBooks Online. Learn how to import and export data between Nexonia and QuickBooks, manage users, expense categories and QuickBooks dimensions.
Managing Nexonia with NetSuite
Alternating schedule
An overview of how Nexonia is integrated with NetSuite. Learn how to import and export data between Nexonia and NetSuite, manage users, expense categories and NetSuite segments.
Travel Booking & Analytics
Alternating schedule
Review how to book travel, run reports, & view unused tickets.
Watch Nexonia's easy-to-follow brief tutorial videos here.
Training Videos
Understanding QuickBooks Desktop Configuration Sync Errors Understanding QuickBooks Desktop Timesheets Data Integrations Errors Understanding QBO Configuration Sync Error Messages Understanding QuickBooks Expenses Data Integration Error Messages How to Create Expense Categories in Nexonia (QuickBooks Desktop) How Credit Card Transactions Export to QuickBooks Desktop: Card Transactions
-
This article lists common error messages which may be returned in Nexonia or the Web Connector from QuickBooks Desktop when running the configuration sync.
To view the error messages in Nexonia, click the Integration tab > then click Configuration Sync > in the Message column on the right, the particular error message will be listed.
To view the error messages in the Web Connector, open your list of applications in the Web Connector and look in the Status column.
Error: Invalid password for username: setup/xxxx (this error is generated in the Web Connector)
Reason:
The password entered for the user who’s running the configuration sync in the Web Connector is incorrect
Solution:
Enter the correct password for the user and application you are trying to run in the Web Connector
-
This article lists common error messages which may be returned from QuickBooks Desktop when exporting Nexonia Timesheets data to QuickBooks.
To view the error messages in Nexonia, click the Integration tab > then click Timesheets > choose the integration from the drop-down menu if you have more than one > In the Message column on the right, click Failure or Partial Success from the most recent integration log entry.
Timesheet Export Errors:
Error: Message: Update aborted. Company file is locked by another client XXXXXX Description: Company file is locked by another client running at machine named at 6/28/2019 3:05:23 UTC. Please try again later.
Reason:
Chances are you're running QuickBooks on a shared Windows Server, or in a hosted scenario with someone like Right Networks, Intuit Cloud, Cloud9, etc. If so, this error means that Windows Server auto-logged-out some user and closed QuickBooks for them, but is still holding the file lock on the QuickBooks company file. Windows will automatically release the file lock after a short amount of time (usually 30 minutes to an hour).
Solution:
You will have to wait for a while and then try again until the lockout period expires.
-
This article lists common error messages which may be returned from QuickBooks Online when running a configuration sync with QuickBooks Online.
In Nexonia, view these error messages from QuickBooks Online > Configuration Sync.
Please Note: This may be labelled differently in your configuration.
Error: Some other Exception in SDK or network happened: ERROR CODE:120, ERROR MESSAGE:Authorization Failure, ERROR DETAIL:AuthorizationFailure: --11014-You do not have access to use QuickBooks Online Plus., statusCode: 401
Reason:
This is an intermittent issue with QuickBooks Online that usually gets resolved by disconnecting and then reconnecting your credentials to it.
Solution:
Go to the Quickbooks Online tab > Integration Setup > Edit Parameters > Disconnect. After disconnecting the integration, follow the steps outlined in this article to re-connect the integration.
-
This article lists common error messages which may be returned from QuickBooks when exporting Nexonia expense data to QuickBooks. To view the error messages in Nexonia, click the Integration tab > then click Expense Reports > choose the integration from the drop-down menu if you have more than one > In the Message column on the right, click Failure or Partial Success from the most recent integration log entry.
Expense Export Errors:
Error: QuickBooks Message: 6210 The account period has closed and the account books cannot be updated through the QBO Services API. Please use the QBO website to make these changes. Account Period Closed, Cannot Update Through Services API (ref: ‘1056:7’)
Reason: The error message is caused by the expenses attempting to export to a closed QuickBooks period.
Solution: 1) Re-open the month in QBO to allow the expenses to sync, or 2) Change the export settings for the Bill Transaction Date to the Export date. This will change the bill’s posting date to the date that you run the export in Nexonia. You can change this setting by going to the Integration tab > Integration Setup > Edit Parameters > Expense – Page 2 set Bill Transaction Date to Export Date > OK to Save. After doing so, run the export again; it should transfer successfully at that point.
Note that this is applicable only for Vendor Bills, not Card Transactions.
Error: QuickBooks Message: An attempt was made to modify a CreditCardCredit with a date that is one or before the closing date of the company. If you are sure you really want to do this, please ask a user with Admin privileges to remove the password for editing transactions on or before to closing date (this setting is in the Accounting Company Preferences), then try again.
Reason: This error is generated when the transaction is dated on or before the closing date in QuickBooks. When a Close Date and Password are set in QuickBooks, the password is required for changes that would alter the balances for the closed accounting period.
Solution: 1) Change the closing date in QuickBooks to be before the date of the transaction and run a configuration sync. Remember to reset the closing date after exporting, or 2) A QuickBooks user with Admin privileges needs to remove the password for editing transactions on or before the closing date (this setting is in the Accounting Company Preferences in QuickBooks), then run the export again.
Error: QuickBooks Message: 2050 String length specified does not match the supported length. Min:0 Max: 21 supported. Supplied length:38 String length is either shorter or longer than supported by specification.
Reason: The Nexonia field that is mapped to the QuickBooks Bill Reference Number exceeds the 21 character limit for that QuickBooks field.
Solution: There is likely a custom field that is entered on the expense report header level which is used to populate the QuickBooks Bill Reference Number. You can check which specific field is mapped to the Bill Reference Number by going to the Integration tab > Integration Setup > Edit Parameters > Expense – Page 1 > check the field next to Bill Reference Number (new). It’s likely going to contain a value along the lines of $(report.custom{‘referencenumber’)]. The value contained with the [] brackets can be used to identity what the name of the custom field is. Go to Settings > Company > Custom Fields > Expense > look for the field of which the "Number" field value corresponds to the ['referencenumber'] value. Now that you've identified the name of the field causing the error, go into the affected expense report(s) and shorten the amount of characters entered into this field so that you're not exceeding 21 characters.
Errror: QuickBooks Message: 2500 Invalid Reference Id : Something you're trying to use has been made inactive. Check the fields with accounts, customers, items, vendors or employees. Invalid Reference Id
Reason: One or more values entered in mandatory fields for expense items have been made inactivate after that information was entered in the affected expense report(s). For instance, it could be that the value entered for Customer, Project, Category or Payee was made inactive. It could also be that the Account value (GL account) mapped in the expense category has been made inactive.
Solution: Open the affected expense report and check if any of the fields contains a value ending in (inactive)/(deleted). If you see a value like that, either activate the value in QuickBooks and run a configuration sync if imported, or activate in Nexonia if not imported. If you don't see any values ending in (inactive)/(deleted), there's a chance that the GL account mapped to the expense category is inactive. Go to Settings > Company > Expenses > Categories > click into the expense categories that expenses in the affected report are coded to > click on the drop-down next to "Account". If you see a value in the drop-down before clicking on it that disappears after you click, the account is inactive. You can either activate it in QuickBooks and run a configuration sync, or choose a different account. Sometimes you'll see two accounts with the same name in this drop-down; change it from the currently selected value to the other one. Click "Apply" at the bottom of the screen to save.
Error: QuickBooks Message: There is an invalid reference to QuickBooks Payee Entity "80000XXX-XXXX" in the CreditCardCharge. QuickBooks error message: The currency of the account needs to be the same as the currency of the customer or vendor or the home currency.
Reason: This is caused by credit card transactions that are submitted in another currency than the QuickBooks vendor's home currency. QuickBooks only allows one currency per vendor, so if a vendor is set up with CAD for instance, they won't be able to accept USD expenses.
Solution: : 1) Create new vendors in QB which are configured with the currency that you're trying to export, then sync those vendors over as users into Nexonia and assign the cards with this currency to those users. You can consult the following articles for instructions on how to sync over the new QB vendors, assign the cards, and map them for export:
- https://nexonia.zendesk.com/hc/en-us/articles/235522328-How-to-Add-New-Users-in-Nexonia-QuickBooks-Online-Integration-
- https://nexonia.zendesk.com/hc/en-us/articles/115000773668-How-to-Add-New-Users-in-Nexonia-QuickBooks-Desktop-Integration-
- https://nexonia.zendesk.com/hc/en-us/articles/230665047-Assigning-New-Company-Credit-Cards-to-Users
- https://nexonia.zendesk.com/hc/en-us/articles/115003014187-Mapping-Company-Paid-Credit-Cards-to-QuickBooks-Online
- https://nexonia.zendesk.com/hc/en-us/articles/115003926811-Mapping-Company-Paid-Credit-Cards-to-QuickBooks-Desktop
OR 2) Stop using the cards which use a currency other than the one already configured for the applicable QuickBooks vendors.
Error: QuickBooks Message: 6000 Business Validation Error: When you use Accounts Receivable, you need to choose a customer. If you are refunding the customer's A/R balance, choose the customer in the Purchased From or Pay to the Order Of field at the top of the screen. Otherwise, choose the customer in the Customer field in the Split table at the bottom of the screen. If you don't see a Customer field, Expense tracking by customer is turned off. To turn it on, you can go to Preferences and find it under Vendors & Purchases. A business validation error has occurred while processing your request (ref: '1004:23')
Reason: The error message indicates that one or more of the items in the affected report are coded to categories with GL accounts that are configured as Account Receivables accounts in QuickBooks. Nexonia expenses can only be exported to Expense accounts in NetSuite. You'll find the report numbers of the affected report to the left of the error message.
Solution: Change the GL accounts coded to the affected categories in Nexonia to GL accounts configured as Expense accounts in QuickBooks. This can be done by going to Settings > Company > Expenses > Categories > click into the affected categories > change the Account coding > OK to save.
Error: QuickBooks Message: QuickBooks Message: 2090 Invalid Number : xxxxx Invalid Number
Reason: The error is caused by expense categories for expenses in the listed reports being mapped to either no accounts or accounts that are inactive in QuickBooks.
Solution: Check if the expense categories in question are mapped to QuickBooks accounts by going to Settings > Company > Expenses > Categories > check the account section. If the categories are mapped to accounts, ensure that those accounts are active in QuickBooks.
Error: QuickBooks Message: User ‘[user.name] has no QB Vendor linked to it
Reason: This user has a missing or invalid QuickBooks vendor value associated with their user record
Solution: Update the user record with a valid QB vendor value (Company > Users > Users) then reattempt the export. If this is a new user and you don’t see their QB value available in the dropdown list, make sure the value has been added in QB Online, run the configuration sync, and you should see it in the list
Error: QuickBooks Message: Can't export report '1094': item #1, can't resolve account for category 'Software Expense'
Reason: Expense Item #1 in report #XXXX has an expense category with a missing or invalid G/L
Solution: Update the expense category with a valid QB G/L (Company > Expenses > Expense Category) then reattempt the export. If this is a category with a new G/L and you don’t see their G/L available in the dropdown list, make sure the G/L has been added in QB Online, run the configuration sync, and you should see it in the chart of accounts
-
For Nexonia accounts integrated with QuickBooks, once the G/L accounts are integrated in Nexonia via the Web Connector, you can manually create Expense Categories in Nexonia and link each Expense Category to a G/L Account.
To create Expense Categories in Nexonia, log in to Nexonia as an Administrator and navigate to Settings > Company > Expenses.
You’ll then see series of subtabs related to Expenses. Click on the Categories tab.
With a brand new Nexonia account, you’ll see a list of pre-existing expense categories. These are common business expense categories (e.g. airfare, car rental, office supplies etc.) that may be relevant to your organization. You can use these pre-existing categories as a start and/or create brand new expense categories.
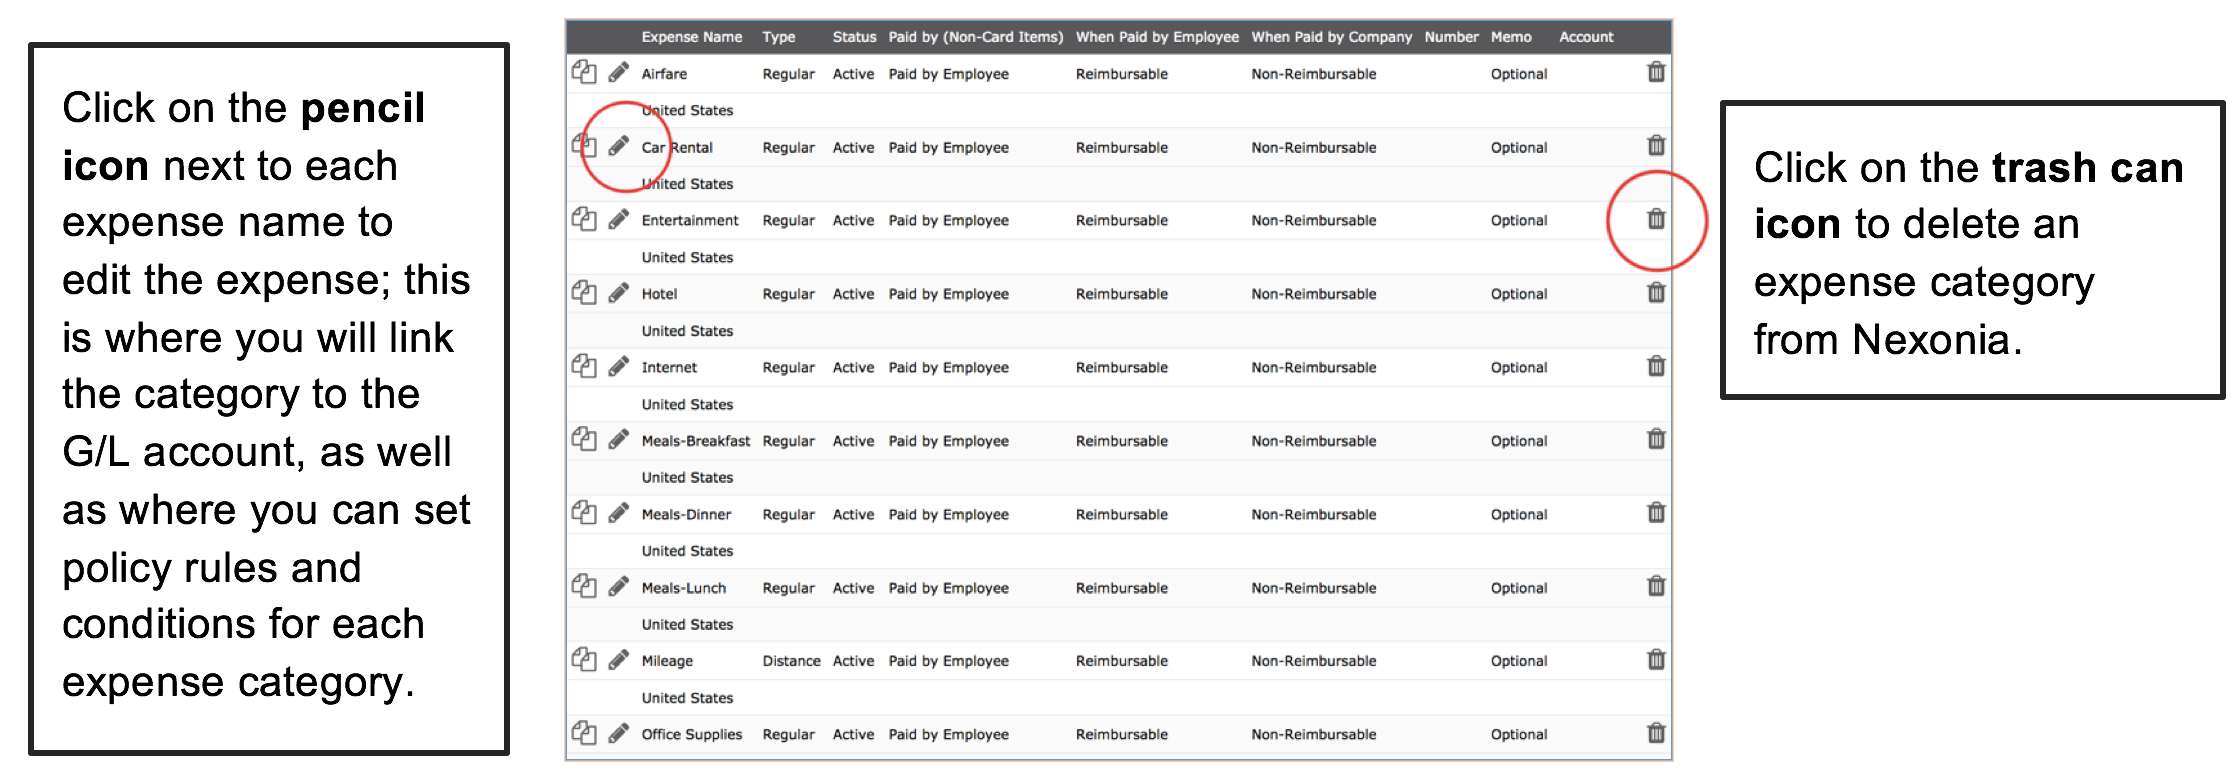
In order to use the pre-existing expense categories, you must link each category a G/L account. To do this, click on the pencil icon next to the Expense Name. You’ll be brought to a General tab. Be sure to select the correct Account from the dropdown list.
This is also where you can set policy rules and conditions for each expense category. To learn more click here: Configuring Rules and Policies for Expense Categories
Then click Apply.
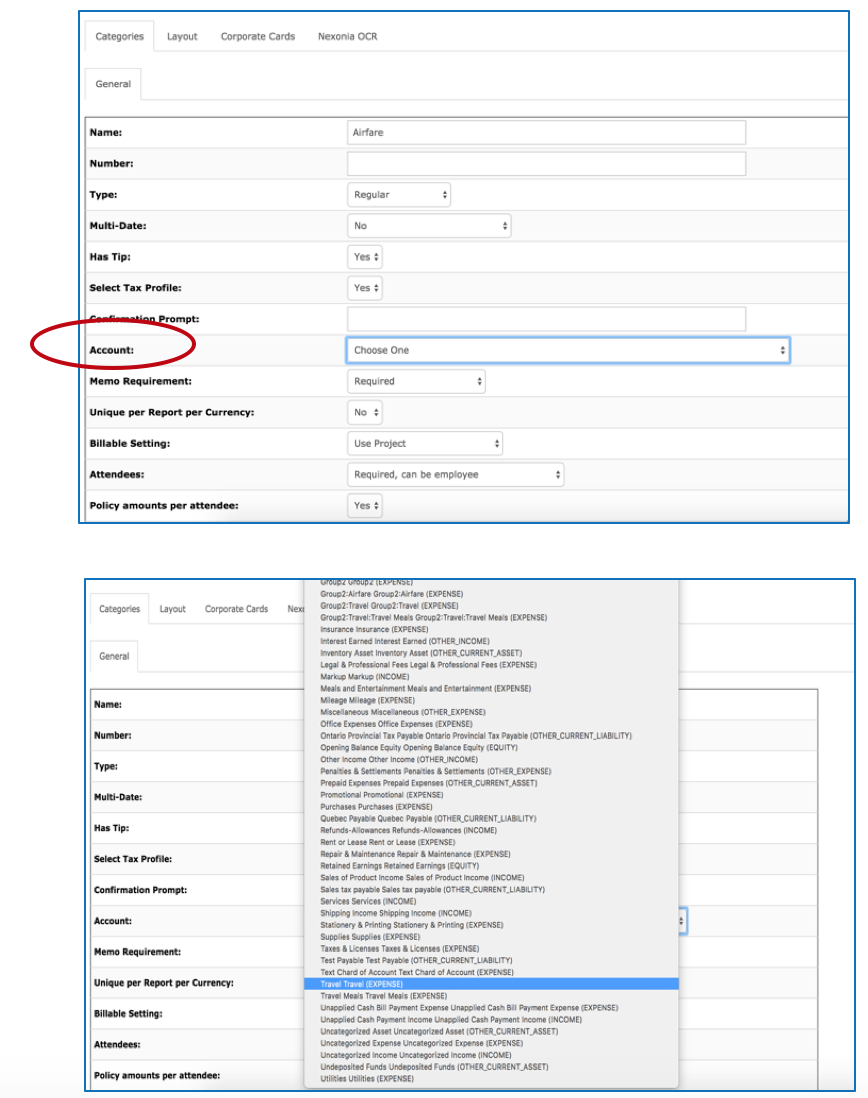
To create a brand new expense category, click the Add button and fill out the details for that expense category under the General tab. Again, be sure to link it to a G/L by selecting the correct account from the Account dropdown menu. Then click Apply.
 Helpful Tip: you can clone a pre-existing expense category by clicking on the clone icon next to the Expense Name. This will create an exact duplicate category, allowing you to quickly and easily create additional categories that may be similar to ones that you already have created. Simply edit the cloned category as needed.
-
Nexonia can export fully approved company paid credit card expenses to QuickBooks Desktop (QBD) as "Card Transactions".
In QuickBooks Desktop, we'll need a credit card GL account to assign the charges to.
In Nexonia, the Configuration Parameters will need to be set to export the card export to export as "Card Transactions". You would then see a list of your credit card sources and select which GL account the card transactions should be exported to.
Link: Mapping Company Paid Credit Cards to QuickBooks Desktop
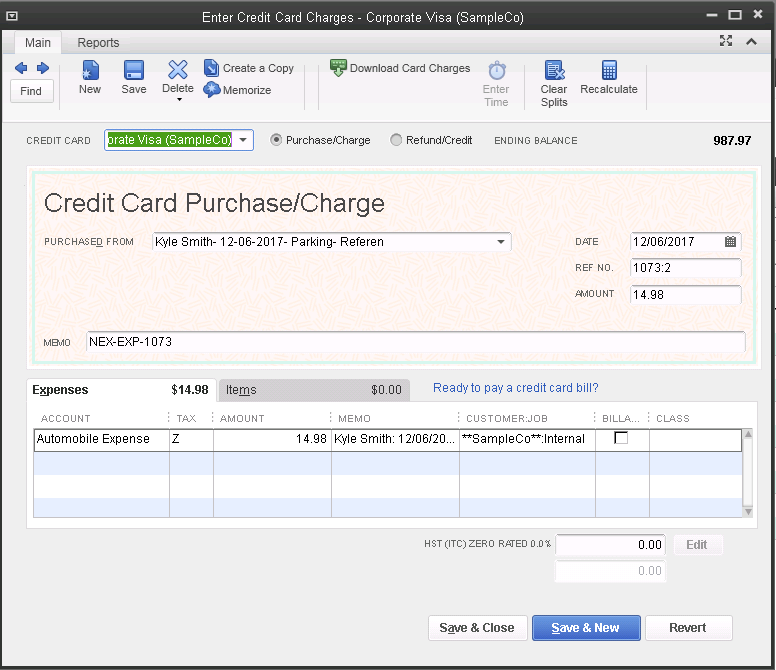
Below we see an expense report #1073 from Nexonia, with 5 credit card expenses:
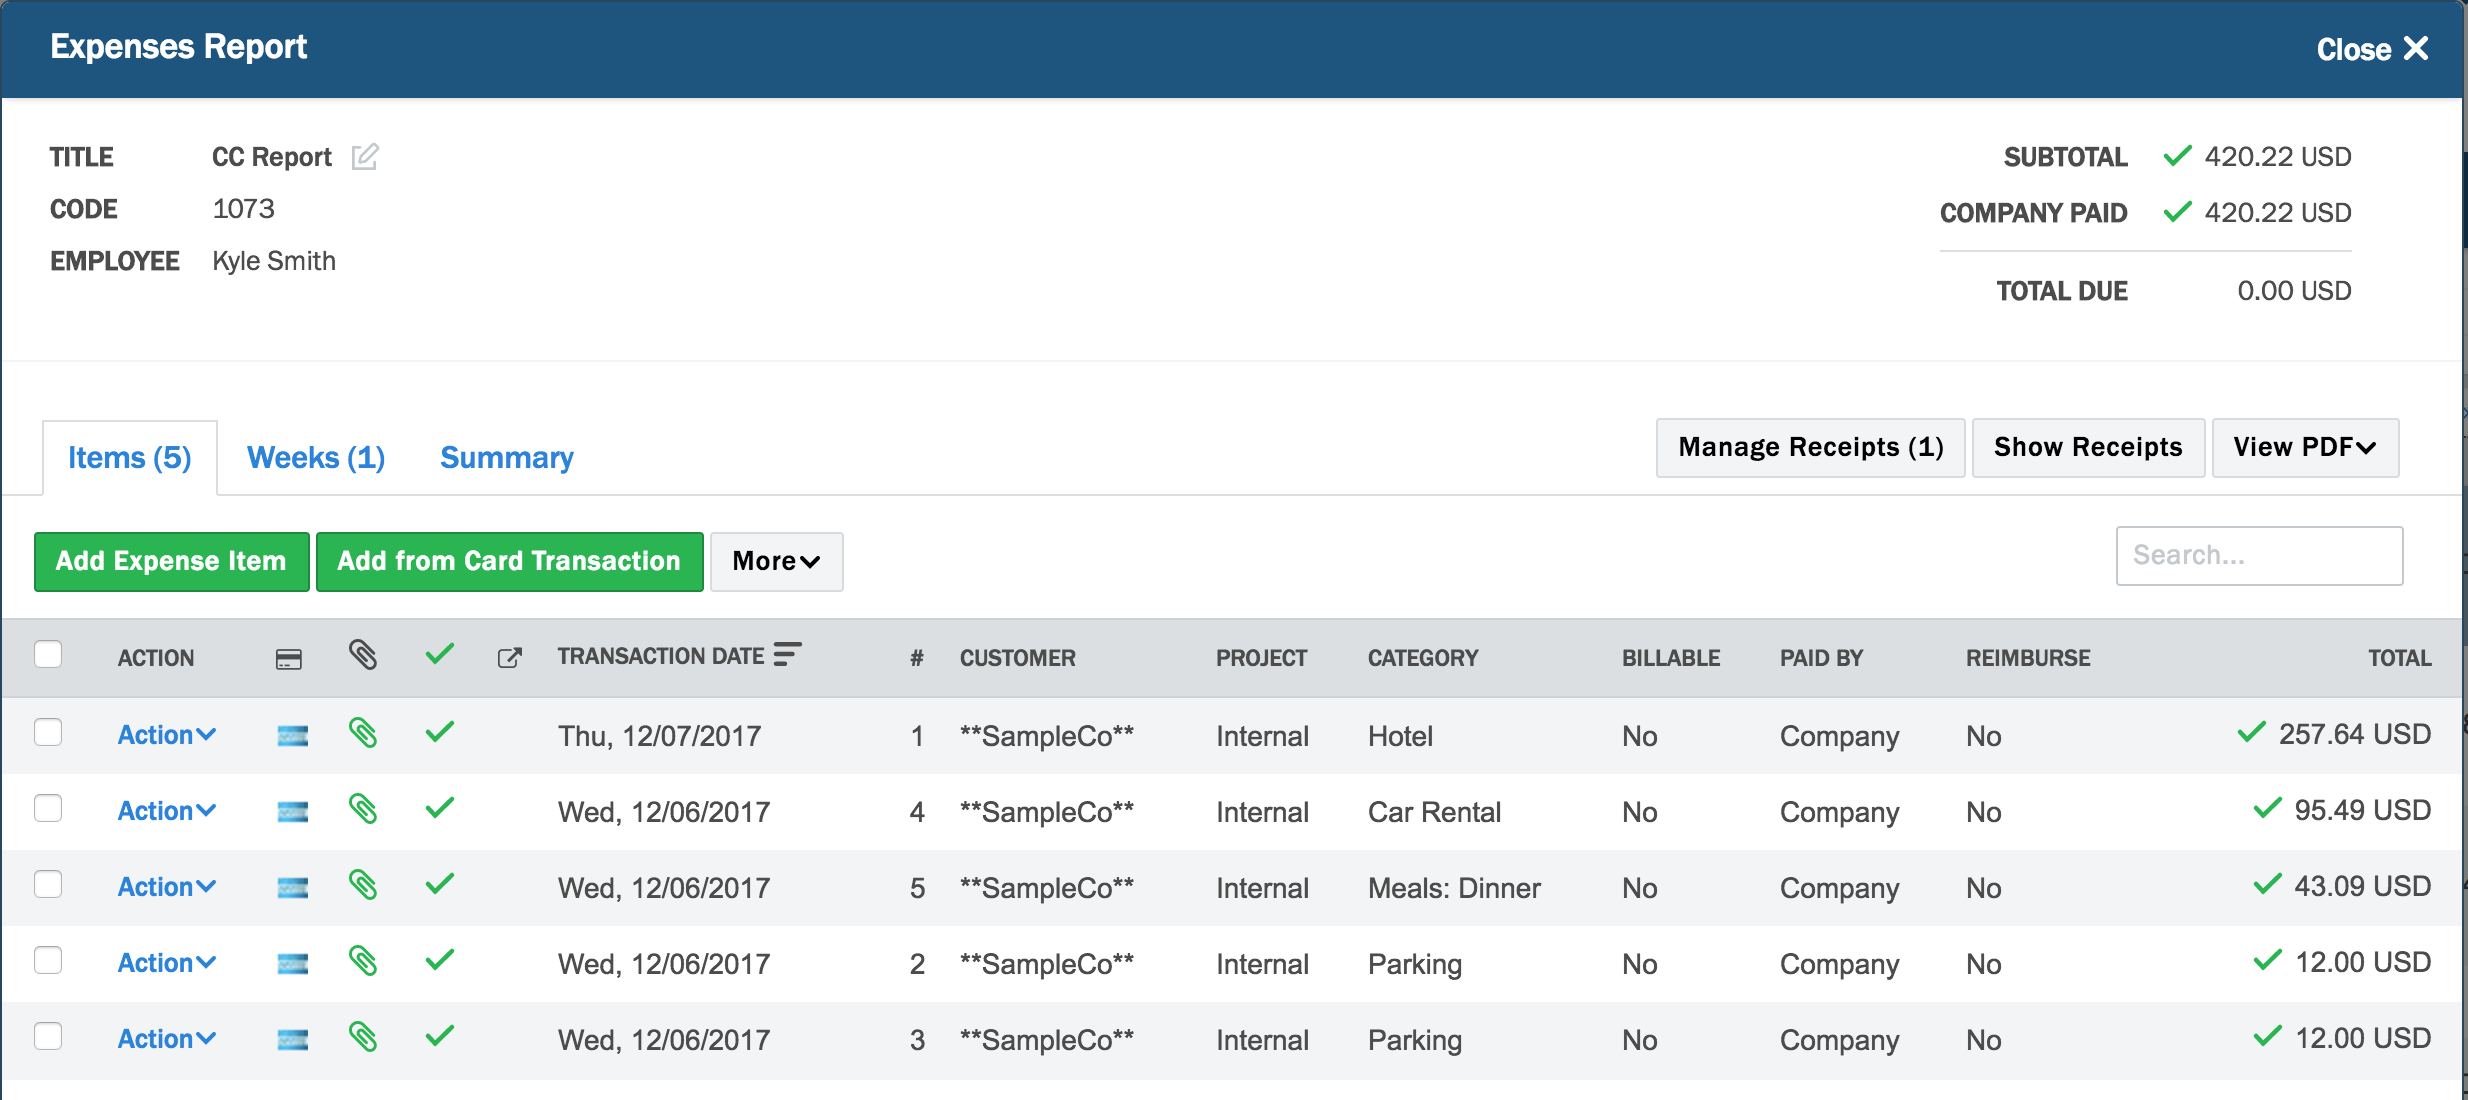
Once the report has been approved and exported it created 5 individual transactions as Card Transactions in QBD:
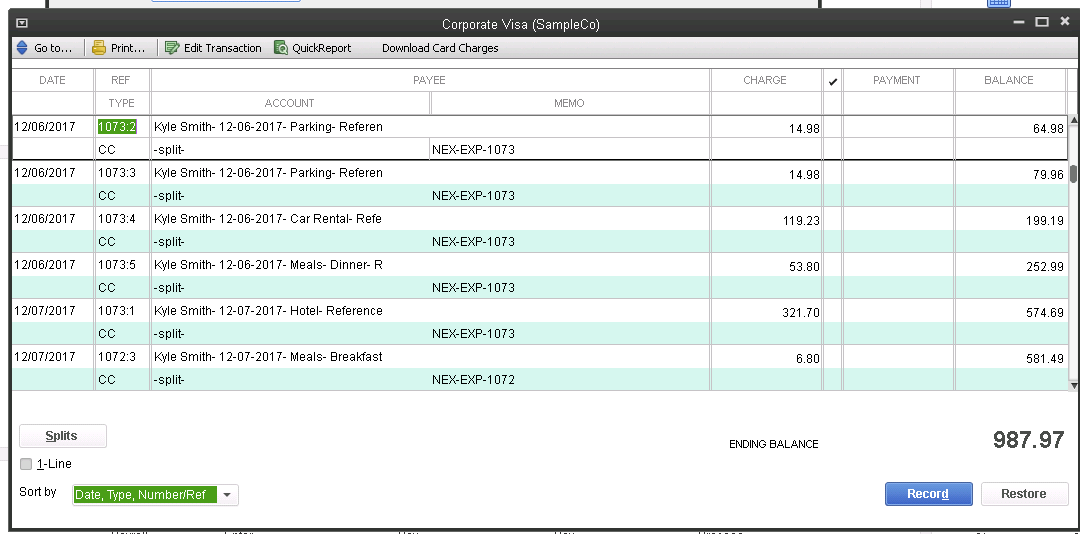
Here's an example of what the individual card transaction looks like. It's been recorded as a Purchase/Charge and an Expense. The transaction indicates the employee and expense report it came from in Nexonia, the GL account for the expense type, as well as customer and job (class can also be included):
Nexonia and NetSuite Integration Overview Utilizing the Zero Tax Code for NetSuite Integrated Expenses How to Export Card Transactions as Expense Reports to NetSuite Understanding NetSuite Timesheets Data Integration Error Messages How to Download NetSuite Web Service Usage Logs Enabling the Emburse Integration Role when Importing Custom Fields using Custom Segments
-
The following is an overview of how Nexonia and NetSuite integrate. For any assistance on configuring your NetSuite account, please contact your NetSuite representative.
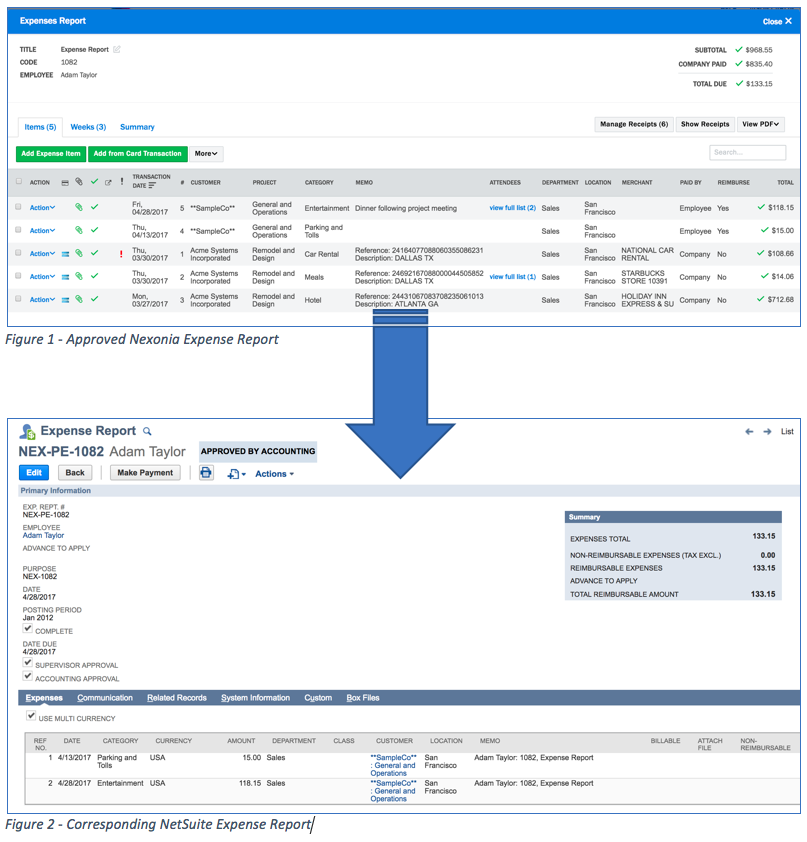
Nexonia integrates with NetSuite via SuiteTalk web services. The SuiteTalk API allows Nexonia to use NetSuite as a source of record/validation table - NetSuite dimensions and values are integrated into Nexonia and can be used in Nexonia for coding of expenses, timesheets and workflow.
Nexonia’s integration with NetSuite supports export of fully approved expense items and timesheets into NetSuite.
The integration may be triggered by an automated daily sync, or on-demand.
Nexonia Integration: Imported Data
Nexonia can integrate with the standard NetSuite Dimensions:
- Customers
- Projects
- Employees
- Vendors
- Departments
- Locations
- Classes
- Items
There are a number of other NetSuite values we can integrate with. Some of the most common:
Expense Categories
Project Managers
Project Resourcing
Project Tasks: task resourcing, synchronizing tasks with service items
Employees: supervisors, defaults for department, location, class
Billable: billable flag, tasks in NetSuite will be linked to service items
Custom Fields can integrated from NetSuite
Advanced Field Mapping can be used with Expenses to map Nexonia values to NetSuite fields, such as mapping the credit card merchant for a transaction to a custom field.
Nexonia integrates with single entity and One World multi-entity environments, as well as offering multi-currency support.
Integrated NetSuite FeaturesThese are some key NetSuite features that would need to be enabled in order for Nexonia to integrate with your NetSuite account:
SuiteTalk WebServices - Required
SuiteTalk WebServices must be enabled in order for Nexonia to connect with NetSuite via the web services application program interface (API).
Time & Expenses: Expense Reports - Required for Expenses
The Expense feature must be enabled in order to integrate Nexonia Expenses. For expenses, this is the module where expense categories are created with associated general ledger accounts and integrated with Nexonia. This feature also allows Nexonia to export expense reports as NetSuite expense reports.
Note: even if employees are being reimbursed via vendor bills, this feature must be enabled, as this is where Nexonia will integrate the expense categories from.
Time & Expenses: Time Tracking - Required for Timesheets
In order for Nexonia Timesheets to integrate, this feature must be enabled in NetSuite.
Integrated Exports to NetSuite: Employee Paid Expenses
Employee Expense Reports
Employee paid expenses can be exported from Nexonia to NetSuite as an Expense Report. We would need the Nexonia user being reimbursed to have an employee record in NetSuite. A PDF of the expense report and the associated receipts can be exported from Nexonia to NetSuite as an attachment.
Payables: Vendor Bill
Employee paid expenses can be exported from Nexonia to NetSuite as a Vendor Bill. We would need the Nexonia user being reimbursed to have a vendor record in NetSuite. A PDF of the expense report and the associated receipts can be exported from Nexonia to NetSuite as an attachment.
Note that the Expense Reports feature is still required in order to integrate the expense categories from NetSuite.
Integrated Exports to NetSuite: Company Paid Expenses (Credit Cards)
Payables: Vendor Bill
Company paid credit card expenses can be exported from Nexonia to NetSuite as a Vendor Bill associated with the credit card vendor. A PDF of the expense report and the associated receipts can be exported from Nexonia to NetSuite as an attachment.
Integrated Exports to NetSuite: Timesheets
Time & Expenses - Staff Timesheets
Nexonia timesheets will be exported to NetSuite as Timesheets in the Time & Expense module.
Additional Integrations
PDF Export
Nexonia can export a PDF of an expense report into NetSuite where it can be linked as an attachment at the Expense Report or Bill level.
Additional Exports
Nexonia allows for additional exports, such as a .csv file based on a reporting template. Exports can apply filtering for what should be included or not in the export file.
Payment Status
Nexonia can import the Payment Status from NetSuite for any exported expenses. Once payment has been issued in NetSuite, we can import the payment status back into Nexonia via the sync, with an option to notify the employee of the details.
Implementation: Things To Consider Before You Start
The NetSuite environment should be configured to the point where you are able to create and successfully post an Expense Report and/or Vendor bill in your NetSuite environment for Expenses, and create and successfully save a Staff Timesheet for the Timesheet module.
If you cannot successfully perform a function manually when logged into NetSuite, then Nexonia will not be able to do so through the web services API.
For example, if you can’t choose Departments when you try to create an Expense Report in NetSuite, then we wouldn’t be able to use “Departments” as part of the integration in Nexonia.
You don’t have to have all your employees, expense categories, projects or tasks created in order to do the initial synchronization. Some initial values will be enough to get started and configure the account. New values will be brought in later via the integration.
Implementation: Requirements for Expenses
Prior to integrating Nexonia Expenses with your NetSuite Environment the following requirements must be in place:
- Expense Reports must enabled with Expense Categories created.
- Web Services must be enabled.
- Any employees who will be using Nexonia need to be created in NetSuite as either an Employee (when using Expense Reports) or as a Vendor (when sending expense reports to NetSuite’s Payables as Bills).
- The record needs to at minimum include the first name, last name, and the email address for that user to be integrated with Nexonia.
- If integrating Vendors as users, Nexonia will need to filter which Vendors should be integrated. Create a Custom Field in NetSuite on the Vendor and Nexonia can filter using the Field ID. Filtering is also an option for the Employee records.
- Nexonia’s implementation will require the customer’s contact who will be leading the setup with Nexonia to have full Administrator access to that NetSuite account.
Implementation: Requirements for Timesheets
Prior to integrating Nexonia Timesheets with your NetSuite Environment the following minimum requirements must be in place:
- Time Tracking must enabled with Project Tasks and Service Items created.
- Web Services must be enabled.
- NetSuite’s Timesheets needs to be active and configured to the point you can create and save a timesheet.
- Nexonia will create user accounts based on employee records. Any employee who will be creating a timesheet will need to be created in NetSuite as an employee. The employee needs to at minimum include a first name, last name, and email address as part of the contact info.
- Note: if you only want select employee records to be imported to Nexonia as users, you can use an NetSuite custom field to identify which records should be filtered.
- Nexonia’s implementation will require the customer’s contact who will be leading the setup with Nexonia to have full Administrator access to that NetSuite account.
Implementing a Nexonia Integration with NetSuite
A typical implementation of Nexonia will involve the following steps once your NetSuite environment is configured:
- Configure the Nexonia and NetSuite Integration in Nexonia;
- Run the initial Nexonia configuration sync;
- Configure the Nexonia export to NetSuite;
- Create and export a test transaction;
- Configure the Nexonia account settings, such as expense policy rules and approval processes.
Commonly Asked Questions
Does someone need to be an NetSuite User in order to use Nexonia?
No - we would need the person to be set up as either an Employee or Vendor in NetSuite in order to generate a Nexonia User account for them.
We would need at least one NetSuite User with Administrator credentials in order to integrate Nexonia and NetSuite. This allows us to have the permission to integrate via web services.
Will Nexonia bring in all my Employees and Vendors?
It doesn’t have to be all or nothing - by default, we will bring in all the values for an NetSuite dimension, but we can also filter which values should be imported. For Employee and Vendors, we can use an NetSuite custom field on the dimension to support filtering. If that custom field is checked off on the dimension, and we’re filtering for that Field ID, that can filter whether that value is imported into Nexonia or not.
Vendor must be filtered
What if I delete or deactivate an Employee in NetSuite?
Once Nexonia syncs with NetSuite, if the employee record is no longer active then the corresponding Nexonia User record will be rendered Inactive as well.
What if I change an NetSuite value in Nexonia?
Nexonia’s sync with NetSuite doesn’t author new dimension values in NetSuite. NetSuite is our source of record in the integration, acting as a validation table: if the value in Nexonia isn’t valid in NetSuite, then it would be rendered Inactive once Nexonia is synced with NetSuite. If Nexonia tries to export an expense with an invalid dimension value, then an export error will occur.
Can I add customers or projects in Nexonia?
No - any changes to any integrated dimensions and values would be done on NetSuite, then once Nexonia syncs that value will be updated in Nexonia. For example, you would add new customers, employees, or projects in NetSuite, and that value will be integrated into Nexonia via the sync.
What if I use Timesheets and Expenses, but reimburse employee expenses via Accounts Payable as Vendors? (rare)
We can support that. Timesheets requires an NetSuite employee value. If your employees are using timesheets and their expenses are being reimbursed via Vendor Bills, we would need to:
- Integrate their Nexonia user profile from an employee record
- For expenses, we would add the NetSuite Vendor dimension at the report level in Nexonia to identify the vendor needed to create the Vendor Bill.
You can set the user’s default vendor in Nexonia and make the field read only for the user group.
How will I know if my configuration synchronization or export fails?
All syncs and exports are logged on Nexonia. If a failure occurs, the administrator will be able to see the error message, which will give details on what item failed and why. Administrators can troubleshoot the error themselves, they can look for a solution in the Nexonia online Help Center, or contact Nexonia’s Support Desk for additional help if needed.
Administrators can also be automatically sent an e-mail notification in the event of a sync or export error.
What if I need to fix an expense item in NetSuite after it was exported?
Best practices is for the entire approval process to occur in Nexonia, as any changes made to exported items in NetSuite are not reflected in Nexonia. However, if you have an exported item that needed a correction, an administrator would be able to correct the item in Nexonia and re-export it. You will need to delete the erroneous item from NetSuite first, otherwise you may create a duplicate expense item.
You can also manually update each record individually: in Nexonia and in Netsuite.
What if I need to fix a timesheet entry in NetSuite after it was exported?
Best practice is for the entire approval process to occur in Nexonia, as any changes made to exported items in NetSuite are not reflected in Nexonia.
However, if you have an exported item that needed a correction, an administrator would be able to correct the item in Nexonia and re-export it. You will need to delete the entire timesheet for that period if your NetSuite configuration doesn’t permit duplicates.
You can also manually update each record individually: in Nexonia and in Netsuite.
-
In some instances, NetSuite may require a tax profile to be selected on an expense in order to go through successfully. If the expense does not have any associated taxes, one way to work around this requirement involves utilizing the "Zero Tax Code" in NetSuite.
This would cover instances where tax is required, but the expense does not have any taxes associated. The Zero Tax Code can be linked to Nexonia per subsidiary.
To do this in Nexonia, please navigate to NetSuite/Integration* >> Integration Setup >> Edit Parameters in the Configuration Data section >> Subsidiaries >> locate the subsidiary and input the NetSuite Internal ID for the Zero Tax Code associated with that particular subsidiary in NetSuite.
Note: The NetSuite Internal ID for the Zero Tax Code can be found by going to Setup >> Accounting >> Tax Codes in NetSuite. This will generally appear as a numeric value.
Once complete, click OK to apply this change.
*May be labelled differently in your Nexonia instance
-
Previously, NetSuite supported sending non-reimbursable credit card transactions to their Accounts Payable module as a Vendor Bill.
NetSuite made changes to their software to allow for credit card transactions to be placed on expense reports alongside reimbursable expenses. We have further enhanced our integration with NetSuite to allow for this new workflow.
This article will show you how to configure this in your account.
First, navigate to NetSuite/Integration* >> Integration Setup >> Edit Parameters in the Configuration Data section >> Expenses - 1 >> and set Export As NetSuite Corporate Cards to Yes.
*May be labelled differently in your Nexonia instance
A new tab will appear where you can map your corporate credit cards to their respective accounts.
When exported to Netsuite you will be able to see the totals broken out by corporate card, the account the card is mapped to, and Corporate Card Yes / No on the line item detail.
-
Error: Invalid department reference key xx for subsidiary z.
Solution:
The listed timesheet or user has a department which is not active or enabled for that user in NetSuite. Locate the department with the listed internal ID in NetSuite and enable it for the affected user. After doing so, trigger another export.
Error: Invalid casetaskevent reference key xxxx for customer zzzz.
Solution:
Navigate to the listed task in NetSuite and go to Preferences. Check mark the setting called Allow allocated resources to enter time to all tasks and save. After having done this, trigger another export in Nexonia.
Error: NetSuite Message: You must enter a service item for this customer.
Solution:
This error is likely occurring because the entries in question are marked as billable in Nexonia. This typically requires a service item against which to record billable time in NetSuite. Check NetSuite and confirm if a service item is a required field for billable time.
Error: NetSuite Message: You do not have permissions to set a value for element is billable due to one of the following reasons: 1) The field is read-only; 2) An associated feature is disabled; 3) The field is available either when a record is created or updated, but not in both cases.
Solution:
The listed task is set up as non-billable in NetSuite whereas the timesheet entry/entries in Nexonia are configured as billable. Either change the Nexonia entries to be non-billable, or change the task in NetSuite to be billable.
Error: NetSuite Message: Invalid customer reference key XYZ for entity AB.
Solution:
This error indicates that the customer selected (XYZ is likely the NetSuite ID for the customer) is no longer available for user AB (entity means user) in NetSuite to when creating an timesheet entry. For instance, it could be that the Project/Customer is in closed/completed/on hold status, or that the Project/Customer is not active for this specific user’s subsidiary. Try creating a time entry manually in NetSuite for the same employee using the same parameters as the timesheet from Nexonia. Thi should help indicate which value isn't available, and if so you can correct the value in NetSuite and re-run the Nexonia export.
-
If you are encountering any errors with your NetSuite integration in NetSuite, you might be requested to provide SOAP Web Service Usage Logs from NetSuite. These are integration logs that show Nexonia's request when a configuration sync or export is initiated, and NetSuite's response to Nexonia's call.
Step 1: To pull these, in Netsuite hover over Setup. Then, hover over Integration and click SOAP Web Services Usage Log.
Step 2: You will see a list of all integration calls between Nexonia and NetSuite.
Note: If your NetSuite instance utilizes other integrations, please ensure that the logs downloaded correspond with the Nexonia Integration as per the Integration column.
Find the entries that list a FAILURE and coincide with the timestamp of the error(s) in Nexonia and download both REQUEST and RESPONSE.
Step 3: If an additional request has been made by the support team to get the Login Audit Trail, go to Setup >> Users/Roles >> View Login Audit Trail.
Step 4: Check mark USE ADVANCED SEARCH >> click Results.
Step 5: Add the fields Detail and Request URI.
Download the login audit trail for which the timestamp matches the error in Nexonia.
-
When importing Custom Fields with Custom Segments into Nexonia, you first need to enable access for the Emburse Integration Role in each Custom Segment.
Please Note: You may not have Custom Segments enabled in your NetSuite environment, in which case this part of the process should be skipped.
To enable this access:
Step 1: On your NetSuite homepage, click Customization. Then, click Custom Segments.
Step 2: Click Edit next to the applicable Custom Segment.
Step 3: Go to the Permissions tab and set the Role to Nexonia Admin.
Step 4: Set the following fields as follows:
- Default Record Access: Edit
- Default Search/Reporting Access Level: Edit
- Value Management Access Level: Full
- Record Access Level: Edit
- Search/Reporting Access Level: Edit
Step 5: Click Save to complete. The Custom Segment is now fully configured to pull into Nexonia via its associated Custom Field. If needed, repeat this process for other Custom Fields.
Sage Intacct Integration Best Practices Understanding Intacct Timesheet Integration Error Messages Nexonia and Intacct Integration Overview Understanding Intacct Configuration Sync Error Messages Understanding Intacct Cash Management Data Integration Error Messages Configuration Sync Parameters: Synchronizing Department, Location and Class (Intacct)
-
Intacct Best Practices
Emburse Nexonia integrates with Sage Intacct via a web-services API. This automates many of your setup, maintenance, and transactional postings. With this in mind, we have put together a few best practices to get the most out of your Nexonia and Sage Intacct integration:
1. Keep your Nexonia configuration up to date.
Inbound syncs can be scheduled to run any day of the week to refresh your Nexonia account with any updates made within Intacct or can be run manually at any time.
Click here to learn more about syncing Nexonia with Intacct, and click here to learn how to export expense reports.
2. Set an Export Schedule
Determine your export schedule for posting approved data from Nexonia to Intacct. Exports can be triggered on demand or scheduled. Automated exports may be scheduled weekly, multiple times per week, or even hourly depending on your accounting practices. In the Send Errors To field, enter an email address for notifications if there are any issues in posting that you need to address.
For more information on error messaging, review the articles linked below:
3. Review Failures
Review failures for any items that have not been posted successfully. Each export batch will include a success or failure status. A failed export may be an indicator that your Nexonia and Intacct configuration may need some fine-tuning.
4. Configure Intacct Integration
Nexonia offers multiple configuration settings to support your Intacct accounting needs. Ensure your filters are set to import any required dimensions and keep your account maintenance healthy. Good data in, good data out.
Intacct Review Failures Window
To streamline processing time with your Intacct integration, and reduce export failure rates, Nexonia has made updates to our Review Failures pop-up window. Rather than reviewing a long queue of error messages, admins now only have one consolidated message to review for each failed export.
Note: At the moment, the Review Failures window is only available for Expense Report exports.
1. Navigate to the Intacct integration page, and click the Expense Reports tab.
2. After an automated or manual sync, click the Review Failures button.
3. Review the listed expense reports for errors, then click either the Export Again or Mark as Exported buttons.
Note: Export Again will add affected expenses to the export queue to be included in the next export. Mark as Exported will instead treat the expense report as though it's already exported.
-
This article lists common error messages which may be returned from Intacct when exporting Nexonia timesheet data to the Intacct Time & Expenses modules.
In Nexonia, view these error messages from Intacct* > Timesheets > choose the Integration from the drop-down menu if you have more than one > in the Message column on the right, click "Failure" or "Partial Success" from the most recent integration log entry.
*May be labelled differently in your configuration
Timesheet Export Errors:
Error: Intacct Message: A task is required. Could not create Timesheet record!
Reason:
This error tells us that a task is not assigned to the time entry.
Solution:
Try to create the same timesheet entry manually in Intacct - this can help you see if the tasks is available for that employee or project.
- Ensure that tasks are assigned if tasks are being assigned to employees/projects in Intacct
- Ensure that the task is present and active in the Nexonia Timesheet.
Error: Intacct Message: The Project '#####' does not exist or the employee 'XXXXXX'
is not assigned to this project.
Could not create Timesheet record!Reason:
This error tells us that a project is not available for this time entry.
Solution:
Try to create the same timesheet entry manually in Intacct - this can help you see if the project is available for that employee.
- Ensure that project exists and has an "Active" status in Intacct.
- Ensure that the project is available for the employee to use in a timesheet.
Error: Intacct Message: The Project 'P001' has a project status that prevents Timesheet submittal.
Could not create Timesheet record!Reason:
The project in Intacct has a status which is not allowing time to be coded against it. It is likely closed or suspended.
Solution:
Either update the project status in Intacct, or change the project selected in the Nexonia Timesheet to transfer the entry over.
Error: Intacct Message: The timesheet begin date must be on a week start day.
Could not create Timesheet record!Reason:
The Timesheet start of week in the integration settings must match the start of week day in Intacct.
Example: If the timesheet in Intacct starts on a Monday, ensure that the day under Integration Setup>Edit Parameters>Timesheets>Start of Week is also set to Monday.
Link: How to Change the Start of Week Day for Timesheets
If you have a bi-weekly time period setting in the integration, ensure that the date selected still falls on a day which matched the start of week day in Intacct.
-
The following is an overview of how Nexonia and Intacct integrate. For any assistance on configuring your Intacct account, please contact your Intacct representative.
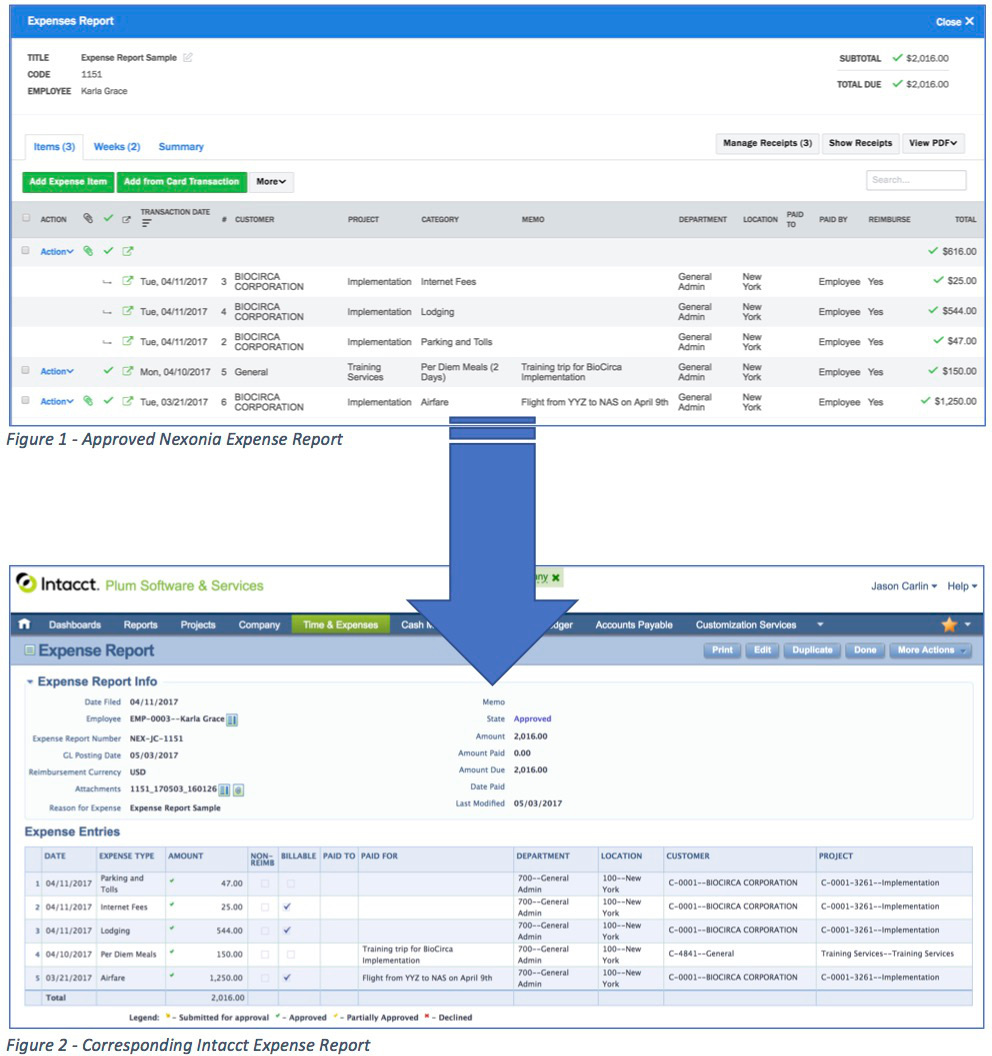
Nexonia integrates with Intacct via Web Services. The Web Services API allows Nexonia to use Intacct as a source of record/validation table - Intacct dimensions and values are integrated into Nexonia and can be used in Nexonia for coding of expenses, timesheets and workflow.
Nexonia’s integration with Intacct supports export of fully approved expense items and timesheets into Intacct.
The integration may be triggered by an automated daily sync, or on-demand.
Nexonia Integration: Imported Data
Nexonia can integrate with the standard Intacct Dimensions:
- Customers
- Projects
- Employees
- Vendors
- Departments
- Locations
- Classes
- Items
There are a number of other Intacct values we can integrate with. Some of the most common:
Projects: project managers, project types, project resourcing and task resourcing
Expenses: expense types, payment types
Timesheets: project tasks, time types (as tasks)
Employees: supervisors, defaults for department, location, class
Billables: billable flag, expense types and tasks in Intacct can be linked to Items to support billable expenses and time entries.
User Defined Dimensions (UDD) can be integrated with Nexonia Expenses.
Advanced Field Mapping can be used with Expenses to map Nexonia values to Intacct fields, such as mapping the credit card merchant for a transaction to a Paid To field, memo field, or custom field.
Nexonia integrates with single entity and multi-entity environments, as well as offering multi-currency support.
Supported Intacct ModulesTime & Expenses - Optional
The Time & Expense module in Intacct is available for integration with Nexonia Expenses or Timesheets. For expenses, this is the module where Expense Types are created with associated general ledger accounts and integrated with Nexonia. Nexonia can export expense reports to this module as Staff Expenses, and timesheet are exported as Staff Timesheets. We can generate the Nexonia user records based on the Employee records, from Intacct. We can also generate Tasks and Task resources.
Nexonia can integrate with the Intacct project module. This allows us to integrate the customer and project hierarchy, project tasks, project and task resourcing, and project managers.
If you aren't using the Projects module, we can still integrate the Customer and Project dimensions to Nexonia as fields for expenses or timesheets.
Accounts Payable - Optional
Nexonia can export expenses as vendor bills in Intacct's Accounts Payable module. Vendor bills can be created based on employee paid expenses if the employee has been created as an Intacct vendor. We can also export company paid credit card transactions as a bill and associate them with the credit card vendor.
Cash Management - Optional
Company paid credit card transactions can be exported from Nexonia expense reports as charge card transactions.
Integrated Exports to Intacct: Employee Paid Expenses
Time & Expenses - Staff Expenses
Employee paid expenses can be exported from Nexonia to Intacct as Staff Expenses. We would need the Nexonia user being reimbursed to have an employee record in Intacct. A PDF of the expense report and the associated receipts can be exported from Nexonia to Intacct as an attachment.
Accounts Payable - Vendor Bill
Employee paid expenses can be exported from Nexonia to Intacct as a Vendor Bill. We would need the Nexonia user being reimbursed to have a vendor record in Intacct. Expense categories would be created in Nexonia and mapped to the Intacct chart of accounts. A PDF of the expense report and the associated receipts can be exported from Nexonia to Intacct as an attachment.
Integrated Exports to Intacct: Company Paid Expenses (Credit Cards)
Accounts Payable - Vendor Bill
Company paid credit card expenses can be exported from Nexonia to Intacct as a Vendor Bill associated with the credit card vendor. A PDF of the expense report and the associated receipts can be exported from Nexonia to Intacct as an attachment.
Cash Management - Charge-Card Transaction
Company paid credit card expenses can be exported from Nexonia to Intacct as a Charge-Card Transaction in the Cash Management module. The linked receipt image for the expense can also be exported from Nexonia to Intacct as an attachment.
Journal Entry
Employee paid reimbursable expenses and company paid credit card expenses can be exported from Nexonia to Intacct as a Journal Entry.
Integrated Exports to Intacct: Timesheets
Time & Expenses - Staff Timesheets
Nexonia timesheets will be exported to Intacct as Timesheets in the Time & Expense module.
Additional Integrations
PDF Export
Nexonia can export a PDF of an expense report into Intacct where it can be linked as an attachment at the Expense Report or Bill level.
Additional Exports (such as Bill.com)
Nexonia allows for additional exports, either of a .csv file based on a reporting template, or via web services with such sites such as Bill.com. Exports can apply filtering for what should be included or not in the export file.
Payment Status
Nexonia can import the Payment Status from Intacct for any exported expenses. Once payment has been issued in Intacct, we can import the payment status back into Nexonia via the sync, with an option to notify the employee of the details.
Implementation: Things To Consider Before You Start
The Intacct environment should be configured to the point where you are able to create and successfully post an Expense Report and/or Vendor bill in your Intacct environment for Expenses, and create and successfully save a Staff Timesheet for the Timesheet module.
If you cannot successfully perform a function manually when logged into Intacct, then Nexonia will not be able to do so through the web services API.
For example, if you can’t choose Departments when you try to create an Expense Report in Intacct, then we wouldn’t be able to use “Departments” as part of the integration in Nexonia.
You don’t have to have all your employees, expense types, projects or tasks created in order to do the initial synchronization. Some initial values will be enough to get started and configure the account. New values will be brought in later via the integration.
Implementation: Requirements for Expenses
Prior to integrating Nexonia Expenses with your Intacct Environment the following requirements must be in place:
- Any employees who will be using Nexonia need to be created in Intacct as either an Employee (when using T&E Staff Expenses) or as a Vendor (when sending expense reports to Intacct’s Accounts Payable module).
- The record needs to at minimum include the first name, last name, and the email address for that user to be integrated with Nexonia.
- If integrating Vendors as users, Nexonia will filter which Vendors should be integrated. Create a Custom Field in Intacct on the Vendor and Nexonia can filter using the Field ID. Filtering is also an option for the Employee records.
- Nexonia’s integration will require the credentials of an Intacct User. That user will typically be the customer’s contact who will be leading the setup with Nexonia and should have full Administrator access to that Intacct account.
- Your Intacct account should be subscribed to Web Services.
- If integrating with Intacct's Time and Expense module, have your Expense Types created. The module should be active and configured to the point where you can create and save an expense report.
Implementation: Requirements for Timesheets
Prior to integrating Nexonia Timesheets with your Intacct Environment the following minimum requirements must be in place:
- Intacct’s Time and Expense module needs to be active and configured to the point you can create and save a timesheet.
- Nexonia will create user accounts based on employee records. Any employee who will be creating a timesheet will need to be created in Intacct as an employee. The employee needs to at minimum include a first name, last name, and email address as part of the contact info.
- Note: if you only want select employee records to be imported to Nexonia as users, you can use an Intacct custom field to identify which records should be filtered.
- Nexonia’s integration will require the credentials of an Intacct User. That user will typically be the customer’s contact who will be leading the setup with Nexonia and should have full Administrator access to that Intacct account.
- Your Intacct account should be subscribed to Web Services.
Implementing a Nexonia Integration with Intacct
A typical implementation of Nexonia will involve the following steps once your Intacct environment is configured:
- Configure the Nexonia and Intacct Integration in Nexonia;
- Run the initial Nexonia configuration sync;
- Configure the Nexonia export to Intacct;
- Create and export a test transaction;
- Configure the Nexonia account settings, such as expense policy rules and approval processes.
Commonly Asked Questions
Does someone need to be an Intacct User in order to use Nexonia?
No - we would need the person to be set up as either an Employee or Vendor in Intacct in order to generate a Nexonia User account for them.
We would need at least one Intacct User with Administrator credentials in order to integrate Nexonia and Intacct. This allows us to have the permission to integrate via web services.
Will Nexonia bring in all my Employees and Vendors?
It doesn’t have to be all or nothing - by default, we will bring in all the values for an Intacct dimension, but we can also filter which values should be imported. For Employee and Vendors, we can use an Intacct custom field on the dimension to support filtering. If that custom field is checked off on the dimension, and we’re filtering for that Field ID, that can filter whether that value is imported into Nexonia or not.
What if I delete or deactivate an Employee in Intacct?
Once Nexonia syncs with Intacct, if the employee record is no longer active then the corresponding Nexonia User record will be rendered Inactive as well.
What if I change an Intacct value in Nexonia?
Nexonia’s sync with Intacct doesn’t author new dimension values in Intacct. Intacct is our source of record in the integration, acting as a validation table: if the value in Nexonia isn’t valid in Intacct, then it would be rendered Inactive once Nexonia is synced with Intacct. If Nexonia tries to export an expense with an invalid dimension value, then an export error will occur.
Can I add customers or projects in Nexonia?
No - any changes to any integrated dimensions and values would be done on Intacct, then once Nexonia syncs that value will be updated in Nexonia. For example, you would add new customers, employees, or projects in Intacct, and that value will be integrated into Nexonia via the sync.
What if I use Timesheets and Expenses, but reimburse employee expenses via Accounts Payable as Vendors?
We can support that. Timesheets requires an Intacct employee value. If your employees are using timesheets and their expenses are being reimbursed via Vendor Bills, we would need to:
- Integrate their Nexonia user profile from an employee record
- For expenses, we would add the Intacct Vendor dimension at the report level in Nexonia to identify the vendor needed to create the Vendor Bill.
You can set the user’s default vendor in Nexonia and make the field read only for the user group.
We want to use Intacct’s Cash Management module for credit card charges, but it doesn't capture billable details. How can we solve this and still use Cash Management?
Nexonia can work around this limitation by exporting a Card Transaction simultaneously as a Charge Card Transaction and Time & Expense item with a non-reimbursable payment type. This means the Card Transaction can be used in T&E for billing and also use the Cash Management module for credit card reconciliation.
How will I know if my configuration synchronization or export fails?
All syncs and exports are logged on Nexonia. If a failure occurs, the administrator will be able to see the error message, which will give details on what item failed and why. Administrators can troubleshoot the error themselves, they can look for a solution in the Nexonia online Help Center, or contact Nexonia’s Support Desk for additional help if needed.
Administrators can also be automatically sent an e-mail notification in the event of a sync or export error.
What if I need to fix an expense item in Intacct after it was exported?
Best practices is for the entire approval process to occur in Nexonia, as any changes made to exported items in Intacct are not reflected in Nexonia. However, if you have an exported item that needed a correction, an administrator would be able to correct the item in Nexonia to match any correction made in Intacct.
If it was a large number of changes to a report are being made, the administrator may make the changes in Nexonia, roll back the export status on the expense report and re-export it. You will need to delete the erroneous item from Intacct first, otherwise you may create a duplicate expense item.
What if I need to fix a timesheet entry in Intacct after it was exported?
Best practice is for the entire approval process to occur in Nexonia, as any changes made to exported items in Intacct are not reflected in Nexonia.
However, if you have an exported time entry that needed a correction, an administrator would be able to correct the time entry in Nexonia to match any correction made in Intacct.
If it was a large number of changes being made, the administrator may make the changes in Nexonia, roll back the timesheet back to draft status, re-submit it through the approvals process and re-export it. You will need to delete the erroneous item from Intacct first, otherwise you may create a duplicate time entry.
-
Sign-in information is incorrect / "Invalid session..." (followed by a string of characters)
These error messages mean that the Intacct credentials that Nexonia uses to connect to Intacct could not be validated, so Nexonia could not connect to Intacct to run the Configuration Sync.
If the Intacct Administrator username and/or password have changed recently, that is likely the cause.
In Nexonia, please navigate to Intacct* > Integration Setup > Edit Parameters, and ensure that the Company ID, User ID and User Password are correct and match the Intacct Administrator credentials as entered on the Intacct login form.
You can then initiate a configuration sync from Intacct* > Configuration Sync > Synchronize Now.
Invalid session : This user is in INACTIVE state
This error message means that the Intacct administrator account associated with the login credentials that Nexonia uses to connect to Intacct is no longer active, so Nexonia could not connect to Intacct to run the Configuration Sync.
In Nexonia, please navigate to Intacct* > Integration Setup > Edit Parameters, and ensure that the Company ID, User ID and User Password are correct and match the credentials of an active Intacct Administrator.
If the Intacct administrator has recently been made inactive, they should either be re-activated in Intacct, or the Intacct login credentials stored in Nexonia should be updated to match those of an active Intacct Administrator.
You can then initiate a configuration sync from Intacct* > Configuration Sync > Synchronize Now.
Invalid session : This user is in LOCKEDOUT state
This error message means that the Intacct administrator account associated with the login credentials that Nexonia uses to connect to Intacct is locked out from the Intacct side, so Nexonia could not connect to Intacct to run the Configuration Sync.
This is likely the result of repeated login attempts with invalid credentials, either by the automated Nexonia integration, or directly on the Intacct login form by the Intacct administrator.
The administrator's Intacct access can be restored directly from the Intacct login form by attempting to log in and then following the prompts.
If the login credentials are changed, please update them in Nexonia by navigating to Intacct* > Integration Setup > Edit Parameters, and ensuring that the Company ID, User ID and User Password are correct and match the credentials of an active Intacct Administrator who is not currently locked out.
You can then initiate a configuration sync from Intacct* > Configuration Sync > Synchronize Now.
No permission for API operation 'READ' on objects of type <object name>
Nexonia uses a set of Intacct login credentials to connect to Intacct. This error message usually means that the Intacct Administrator to whom those credentials belong does not have the necessary permissions in Intacct to access an object that is part of the configuration sync.
The object name will appear in the error message.
To resolve this, ensure that the Intacct administrator user has the necessary role permissions/subscriptions in Intacct to access the object referenced in the error message.
UnknownHostException: api.intacct.com
The connection attempt to Intacct failed. In a nutshell, Nexonia called, but Intacct didn't answer. Usually this is a temporary issue and initiating the sync manually from Intacct* > Configuration Sync > Synchronize Now will result in a successful sync.
There is no harm in re-attempting the configuration sync when you see this error.
'<user name>' is the user running this synchronization and would be disabled as a result of running this integration. Please make sure that the integration is run manually by a user that's part of the integration.
The synchronization to Intacct will align the Nexonia active user list with the Intacct employees and/or vendors that qualify for integration. This error message means that the logged-in user who has initiated the synchronization was not synchronized from Intacct and/or does not have a matching employee or vendor record in Intacct.
As a best practice, user creation should take place in Intacct, as employees or vendors. New users will be created during the integration.
To work around this particular error message, either ensure that the user running the integration accurately matches an Intacct employee or user that qualifies for the integration, or navigate to Settings > Users > locate the user > Edit > set "Ignore for Integration: Yes" > Apply. Note that the latter method will result in user account duplication if an Intacct employee or vendor is later created for this user.
Unexpected error
The configuration sync failed due to a problem on the Nexonia side or received an error message from Intacct that couldn't be interpreted. Please contact help@nexonia.com or submit a request through this portal.
*This label may appear differently in your Nexonia instance.
Unexpected element (uri:"", local:"html"). Expected elements are <{}response>
Typically this is due to a bad request. This is rarely a recurring issue.
To resolve, manually trigger another configuration sync:
Integration > Configuration Sync > Synchronize Now
Please contact help@nexonia.com or submit a request through this portal if the issue is not resolved via a manual sync attempt.SSLHandshakeException: Remote host closed connection during handshake
Typically this is due to temporary connection issues. This is rarely a recurring issue.
To resolve, manually trigger another configuration sync:
Integration > Configuration Sync > Synchronize Now
Please contact help@nexonia.com or submit a request through this portal if the issue is not resolved via a manual sync attempt.There are too many operations running for this company.
This error means that Intacct was busy or had too many concurrent operations running and had to stop the sync.
To resolve, manually trigger another configuration sync:
Integration > Configuration Sync > Synchronize Now
Please contact help@nexonia.com or submit a request through this portal if the issue is not resolved via a manual sync attempt.
-
This article lists common error messages which may be returned from Intacct when exporting Nexonia company card transaction expense data to the Intacct Cash Management module.
In Nexonia, view these error messages from Intacct* > Integration Setup > Expense Reports > [Choose the Integration from the drop-down menu if you have more than one] > [In the Message column on the right, click "Failure" or "Partial Success" from the most recent integration log entry].
1967: 1967(13): source 'COMPANY CARD' is not exported
The company credit card used on expense report 1967 belongs to comes from a transaction import source that is not enabled for export to Intacct Cash Management.
To resolve this error:
- In Nexonia, go to Intacct* > Integration Setup > Edit Parameters > Cash Management
- Locate the transaction source name and change "Not Exported" to "Exported".
- Scroll down and locate the "Charge Card" field for all cards that come from this transaction source.
- Populate those fields with the Charge Card Account ID from Intacct Cash Management.
- Initiate the data integration again from within Nexonia at Intacct* > Expense Reports > [choose the Cash Management if you have more than one] > Transfer Now.
6666(33): card 'User Name, Cardholder Name XXXX********9999' doesn't have an Intacct Charge Card ID
The company credit card used on expense report #6666 item #33 comes from a transaction import source that is enabled for export to Intacct Cash Management, but this particular card is not mapped to an Intacct Cash Management "Charge Card Account".
To resolve this error:
- In Nexonia, go to Intacct* > Integration Setup > Edit Parameters > Cash Management
- Scroll down and locate the "Charge Card" field for the card referenced in the error message.
- Populate that field with the Charge Card Account ID from Intacct Cash Management.
- Initiate the data integration again from within Nexonia at Intacct* > Expense Reports > [Choose the Cash Management option if you have more than one] > Transfer Now.
4242: Intacct Message: Your transaction date (MM/dd/yyyy) is within a period that's been closed. You can add, modify, or delete a transaction only if the date of that transaction is within a period that's open.Enter a date that occurs on or after the date of the relevant entity, listed below. Note that different entities may have different dates: ENTITYID--Entity Name ( MM/dd/yyyy )
The accounting period into which the card transaction from report #4242 falls is closed in Intacct. The transaction date at the start of the error message is earlier than the start date of the oldest open accounting period shown at the end of the error message.
Intacct Cash Management transactions do not have separate posting and transaction dates; the transaction date is the posting date.
To resolve this error:
- In Intacct, re-open this accounting period for the entity mentioned in the error message
OR
- In Nexonia, set an export override for the transaction date. The transaction date itself will be changed to allow Intacct to accept the transaction (a Cash Management transaction has no separate posting date). Consider the implications of this step for your reconcilation process
- Navigate to Intacct* > Integration Setup > Configuration Data > Edit Parameters > Cash Management
- Set "Open Periods Only: Yes"
- In the field "Period Close Date Override", enter a date that is after the start date of the oldest opening accounting period in the Intacct Entity. Exported tanasction dates that fall before this date will be exported to this date. The dates will not be changed in Nexonia.
- Click "OK"
The credit card 'card name' is invalid.
Currently, we can't create the transaction.
The entire transaction in this operation has been rolled back due to an error.The charge card in Intacct likely has a an expiration date set in the past which is invalidating the card. To correct this you will have to edit the expiration date in the Intacct platform for the charge card.
- Log in to your Intacct platform. Ensure that you have the access permissions necessary to edit charge cards in Intacct.
- Navigate to Applications > Cash Management > Set up > Credit Card > [Click "Edit" next to the charge card ID which is producing the error in Nexonia] > Under "Credit Card details" you will see the field "Expiration"] > [Update this field with a date in the future] > Save
- In Nexonia, attempt another export by navigating to Intacct* > Expense Reports > [Choose the Cash Management option if you have more than one] > Transfer Now.
- The transfer should now be successful.
1037: The credit card '<card name>' doesn't exist. [Support ID: wBBRm%7EX5vOcWENBSR3RRU9SkLyUQAAAA0] Currently, we can't create the transaction The entire transaction in this operation has been rolled back due to an error.
This means that the card name in the Nexonia Integration does not actually exist in your Intacct environment. You need to update the card names in the Nexonia integration so that they match the card names as they are in Intacct. To do so, in Nexonia, navigate to:
1. Intacct* > Integration Setup > Configuration Data > Edit Parameters > Cash Management > [For the cards that are stated in the error, edit the names in the text fields to correct them] > OK
2. Attempt triggering another export and the issue should be resolved.
*May be labelled differently in your configuration
-
Nexonia can integrate with Intacct's department, location, and class dimensions. This allows Nexonia to import these dimensions into Nexonia in a variety of forms, such as an expense item-level custom field, a project-level field, or utilize the value present on the Intacct Employee/Vendor to contribute to the department exported to Intacct.
To locate this setting in Nexonia, please navigate to Intacct* >> Integration Setup >> Edit Parameters.
*May be labeled differently in your Nexonia instance
Within the General tab, scroll down and locate Synchronize Department, Synchronize Class, and Synchronize Location. These values can be enabled by setting them to "Yes" for the dimension(s) you wish to include as part of the integration.
Once enabled, a new tab will appear for Department, Location and/or Class.
Selecting any of these tabs will display various settings to control the way in which these fields are synced into Nexonia.
This would include the ability to synchronize the field at the user level, which will display the value on the user profile based on the value present on the Intacct Employee. This will be displayed as the User Department, User Class and/or User Location.
Note: This only appears if syncing Nexonia Users from Intacct Employees.
Additionally, various sections will appear per module (i.e. Timesheets, Expenses, etc), each with its own option to indicate whether you wish to synchronize the dimension for that specific module.
If you do wish to sync the dimension, this can be achieved by setting the value to anything other than "No".
This will result in the following options:
User Value - This setting would make it such that the value present in Intacct at the Employee-level will determine the selected Department/Location/Class for any associated record (i.e. timesheet, expense report, etc). This value will not appear in Nexonia unless enabled in the "Users" section.
Project Value - This setting will assign the corresponding dimension per project in Nexonia based on the configuration present in Intacct. For example, Project A is assigned Department X. This means that any record that uses project A will also include the value for Department X when exported to Intacct.
Project Value then User Value - This setting follows the same rule as the previous two options; however, both options are utilized. Project value is prioritized, and if no value is present for the project, the user value would be used.
Customer Value - This is similar to the Project Value setting, except the dimension is coded at the customer-level instead.
Optional (most common) - This setting would create the specified dimension as an item-level custom field and is ideal in scenarios where it's necessary to control the selected department/location/class on an item-by-item basis. This option also allows for the field to be left blank.
Required - This setting is identical to the Optional setting. However, the field cannot be left blank, and a value has to be selected per individual item or entry.
Once the dimension has been configured to be synchronized based on the above, several options will appear below, which can be left to their default settings unless there is a specific requirement.
For instance, if you wish to only sync specific departments from Intacct into Nexonia, this can be done by creating a custom checkbox in Intacct and then inputting the field ID into the Field ID for Department Filter section. This will ensure that only those with the value enabled will appear in Nexonia.
Synchronizing the Nexonia Configuration with Bill.com How to Authorize Nexonia Integration Connection to Bill.com Integrating an Export to Bill.com Understanding Bill.Com Configuration Sync Error Understanding Bill.com Expense Integration Errors How to Create Expense Categories in Nexonia (Bill.com)
-
The Configuration Synchronization is an integration process that reads setup dimensions (chart of accounts, vendor lists, dimensions etc.) and relationships in Bill.com and updates the Nexonia configuration accordingly. The "Config Sync" does not involve the transfer of any data from system to system, and does not change any settings in either environment.
 Note: Each Nexonia environment can be linked with a single Bill.com Company
In most Bill.com integrated Nexonia instances, the Config Sync is configured to run automatically each night. You can view or change the scheduling of the automated sync from within Nexonia at Bill.com* > Integration Setup > Configuration Data > Edit Schedule.
Regardless of the scheduling of the automated sync, a Nexonia administrator can initiate a sync at any time, from within Nexonia at Bill.com* > Configuration Sync > Synchronize Now.

If you see an error message in the synchronization log, you can review the error and troubleshoot. Once you've resolved the error, you can re-rerun the configuration sync.
If you need further assistance solving an error, please contact help@nexonia.com.
*May be labelled differently in your configuration
-
You can connect Nexonia to your Bill.com account to support a web services integration. This integration allows Nexonia to integrate configuration information directly from Bill.com, and export approved expenses directly in to Bill.com as vendor bills. A linked PDF of the expense report and receipts will also be sent.
The integration will automatically integrate the following:
- Expense Types from the Chart of Accounts - used to map expense categories
- Vendor List - used to map users and credit card exports
Additional dimensions can be integrated to Nexonia as custom fields:
- Departments
- Locations
- Classes
- Customers
- Projects
The configuration sync and exports can be schedule to run automatically on a daily basis, and administrators can also trigger a sync or export on-demand.
 Note: Each Nexonia environment can be linked with a single Bill.com Company
Authenticate Your Connection to Bill.com
To authenticate your connection to Bill.com, follow these steps:
1. Log in to Nexonia and go to: Bill.com* > Integration Setup > click on the Edit Parameters link.
*May be labelled differently in your integration
2. You'll see the Configuration Sync window appear. Select the Integration Type as "Bill.com". You'll now see the configuration settings appear for Bill.com.
3. Send errors to: enter the email address of whomever should be alerted if there’s an error with the synchronization, typically the administrator.
4. Under the General tab, enter the following information:
Company Name = your Bill.com company name
User ID/Email = your Bill.com user credential ID (should be Administrator level)
Password = your Bill.com user password
The following fields can also be integrated into Nexonia, depending on whether you're using them in Bill.com as part of the vendor bill layout:
- Synchronize Departments = No, Optional, Required
- Synchronize Locations = No, Optional, Required
- Synchronize Classes = No, Optional, Required
- Synchronize Customers = No, Optional, Required
- Synchronize Projects = No, Optional, Required
5. Click the "OK" button to save your configuration settings.
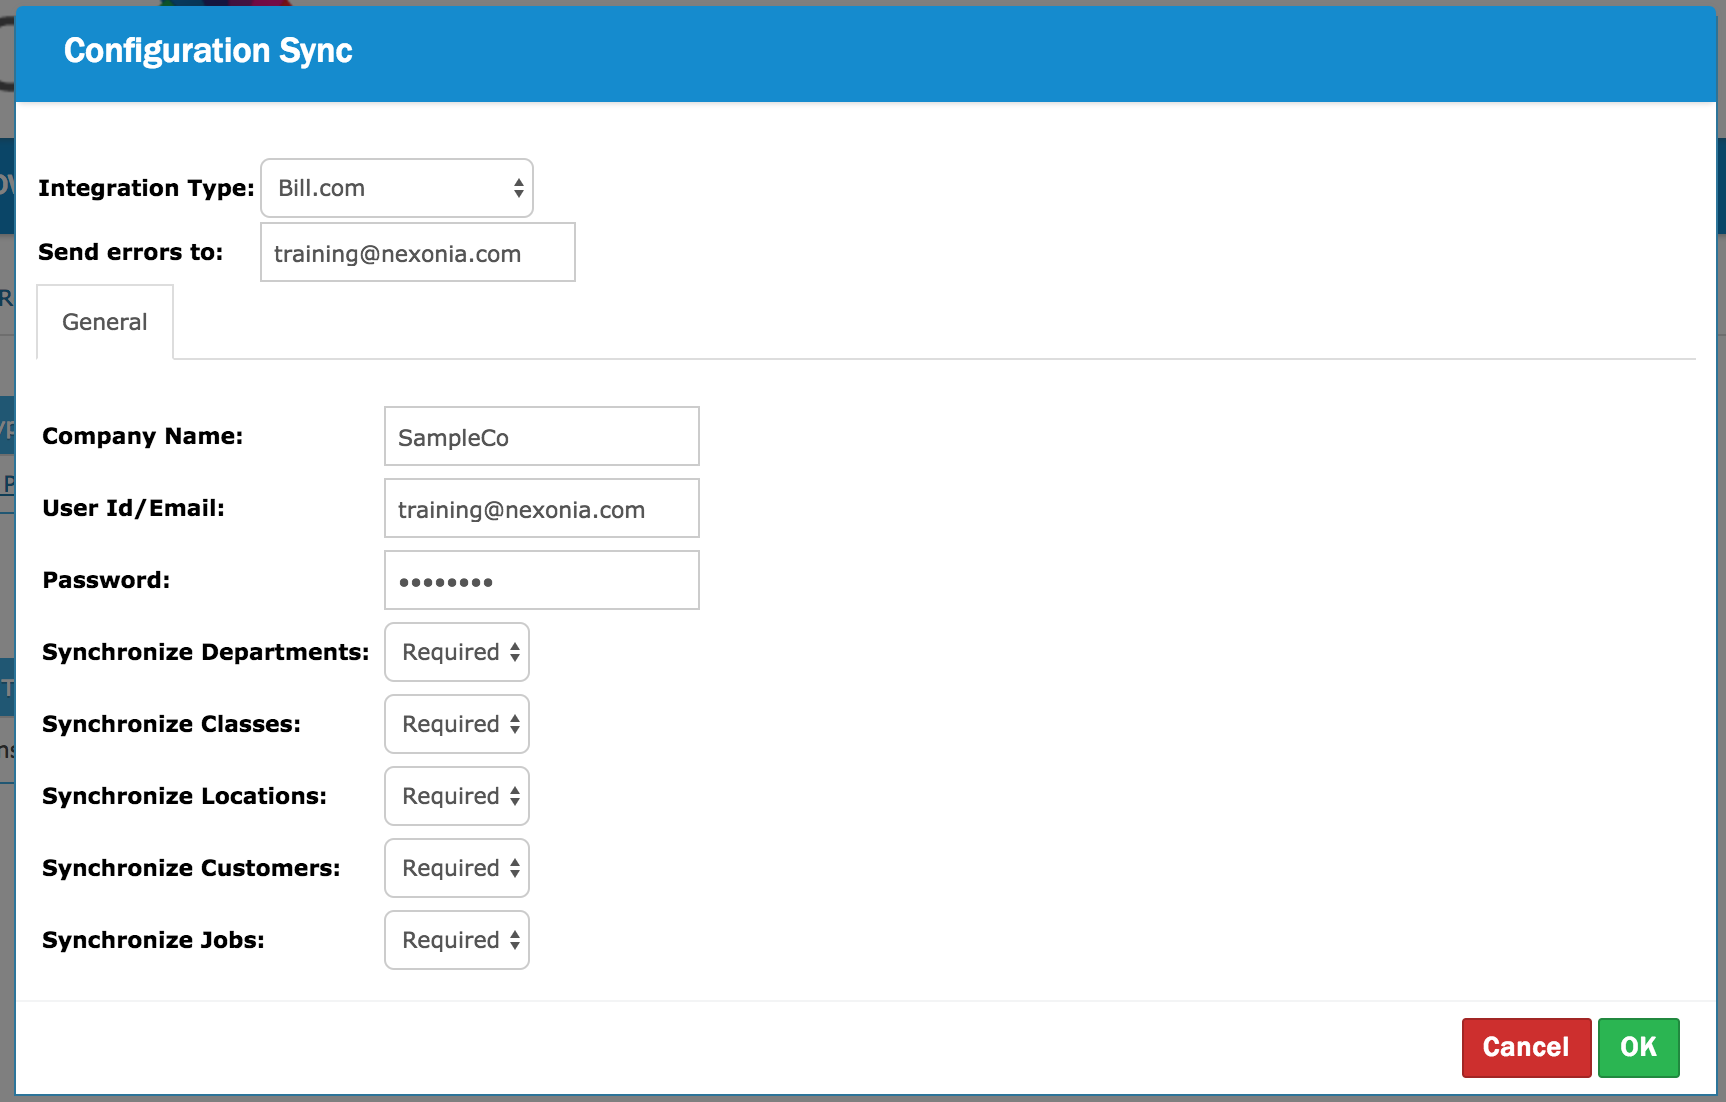
You can now initiate your first configuration sync with Bill.com, add your users and expense categories, and configure the Bill.com export.
- Synchronizing the Nexonia Configuration with Bill.com
- How to Add New Users in Nexonia (Bill.com Integration)
- How to Create Expense Categories in Nexonia (Bill.com)
- Integrating an Export to Bill.com
 Note: your dimensions (Customers, Projects, Locations, Departments, Classes) will be integrated as expense item custom fields. They can be found by navigating to Settings > Company > Custom Fields.
You also may be interested in the following articles:
-
Nexonia can be integrated with Bill.com, so that your reimbursable and non-reimbursable expense reports will export to create bills. We can send over all expenses to Bill.com, or filter which ones should be sent to Bill.com, such as only the reimbursable expenses.
 Note: Each Nexonia environment can be linked with a single Bill.com Company
Nexonia would typically be integrated with your accounting software such as QuickBooks, Intacct, NetSuite, Xero as our source of configuration data, and the export would be synced to Bill.com. This article will cover how to integrate your Bill.com account with Nexonia.
If you already have a Bill.com account and are integrated with other accounting software such as QuickBooks, QuickBooks Online, Intacct, etc., be sure to synchronize your data first. Once you have synced your Bill.com account with the most updated information, we can link it with Nexonia.
 Note: a PDF of the expense report will export to Bill.com automatically. There is no additional expense receipt export from Nexonia required.
Integrating Nexonia with Bill.comBefore you start the Bill.com integration, you'll want to do the following:
- Have Administrator level login credentials for Bill.com
- If Bill.com is integrated with your accounting software, you'll want to ensure it's been synchronized recently.
Your first step would be to integrate your Nexonia account with your accounting platform. These instructions assume this has already been done.
To confirm your integration, navigate to Integration* > Integration Setup > Configuration Data. You'll see your accounting platform under the Integration Type.
*This tab is typically relabelled with the name of your accounting platform or ERP.
Once Nexonia is syncing with your accounting platform, you can set up the Bill.com export:
Go to Integration* > Integration Setup.
Click the Add Data Integration button.

You should see a dialogue window asking you to choose the Data Type - select "Expense".
You'll now see a window for the Data Integration. Configure the following:
Data Integration: Main Tab
Export Number - you can give this export a specific number to more easily identify it when viewing export status for expenses.
Name - name your export (e.g. "Bill.com Export")
Mark reimbursable expenses as paid - if enabled, this will update any expense reports as "Paid" when the export is run.
Send errors to - enter the email address where any error notifications should be sent to.
Active - check this box to enable this export
Scheduling - you can choose whether to turn on the scheduled automated export to Bill.com. To enable it, click the Edit link and check Activate Scheduling
Your scheduling options are:
- Overnight (default) - the default is to send the export Everyday. Unchecking the Everyday box allows you to choose specific days of the week for the export.
- Hourly
Integration Type - choose Bill.com - you should now see two new tabs in this Data Integration, "Filtering" and "Parameters" which you'll need to configure.
View Pending Report - this allows you to preview which expenses will be exported using a report template from the Reporting Module. If you don't have a specific template you want to use, just choose "Detailed Expenses by Month (Approved)".
Data Integration: Filtering Tab
The filtering tab is used if you want to filter which items export to Bill.com. If all expenses will be exported, you can leave this tab as is. If you wish to filter, check off the values to filter here. Some commonly applied filters:
Item Type - allows you to filter reimbursable and non-reimbursable expenses
- Standard and Personal = reimbursable employee expenses
- Company Card Standard/Personal = non-reimbursable credit card expenses
Transaction Source - allows you to filter a specific company credit card feed
Data Integration: Parameters
The Parameters tab is where you will be connecting Nexonia to Bill.com. Starting from the Setup tab:
Under Setup, enter the following:
- Company Name - this will be your Bill.com company name that you want to integrate with.
- User ID/Email - your Bill.com login name.
- Password - your Bill.com password.
Once you've filled in those three values, click the Synchronize button. This will establish the integration between Nexonia and Bill.com. If there's an error, it'll the synchronization will stop and you can click on the Synchronization Failure tab to see what the error message is.
Once the synchronization is successfully run, you should now see 4 tabs under Parameters - Setup, General, Users/Vendors, and Categories/Accounts.
Setup - this is where your Bill.com credentials are saved. If your Bill.com password changes, you'll need to come back here, update the password and rerun the synchronization.
General - this tab manages the information we're entering on the vendor bill in Bill.com.
Value-Added Taxes (VAT)s - if VAT are being written to the bills, switch this to Yes.
Invoice Number - this defines what value we're going to use in the Bill.com invoice number. By default, we enter the Nexonia expense report number as the invoice number. You could modify this with a prefix if needed (e.g. NEX-${report.exportCode} would result in the invoice number NEX-####)
Invoice Description - defines what will be entered as the invoice description. By default, we'll populate the name of the expense report.
Multi Currency - if multi currency is supported in Bill.com, you can switch this to Yes. If not, leave at the default No.
Currency - if multi currency is "No", then you will see this currency field. This defines which currency you want to use for the Bill.com export.
Send Billable Flag - if expenses are being tracked as billable, setting this to Yes will send the billable flag as part of the line item.
Invoice Date, Posting Date, Due Date - by default, the Export Date will populate these dates in Bill.com. You can adjust the values accordingly if you want to use the Report Creation Date, the date of the oldest expense item or date of the newest item.
Company Paid Cards - if you intend to send company paid card transaction to Bill.com, turn this setting to Yes. It'll add a Company Paid Cards tab to the parameters.
Non-Credit Card Company Paid Expenses (rarely used) - if you have non-credit card expenses that are managed as "Company Paid", this setting will need to be enabled for the export.
Export Approval Status (rarely used) - this setting is rarely used as exported expenses will be moving through any approval processes set in Bill.com if one has been set.
Data Integration: Users/Vendors
The Users/Vendors tab is where you will can map Nexonia users to their Bill.com Vendor values. This will need to be done for any employees whose reimbursable expenses will be exported to Bill.com. The list of vendors seen here will be integrated from Bill.com and any new vendors you add to Bill.com will push an update to the Nexonia list of vendors.
If a user has been newly created and is not mapped to a Vendor, or a user was linked to a Vendor that has since been made inactive in Bill.com, their expenses will not export to Bill.com
To map a Nexonia user profile to a Bill.com vendor, from the Users/Vendors tab, choose the appropriate Bill.com vendor for each Nexonia user in the list.
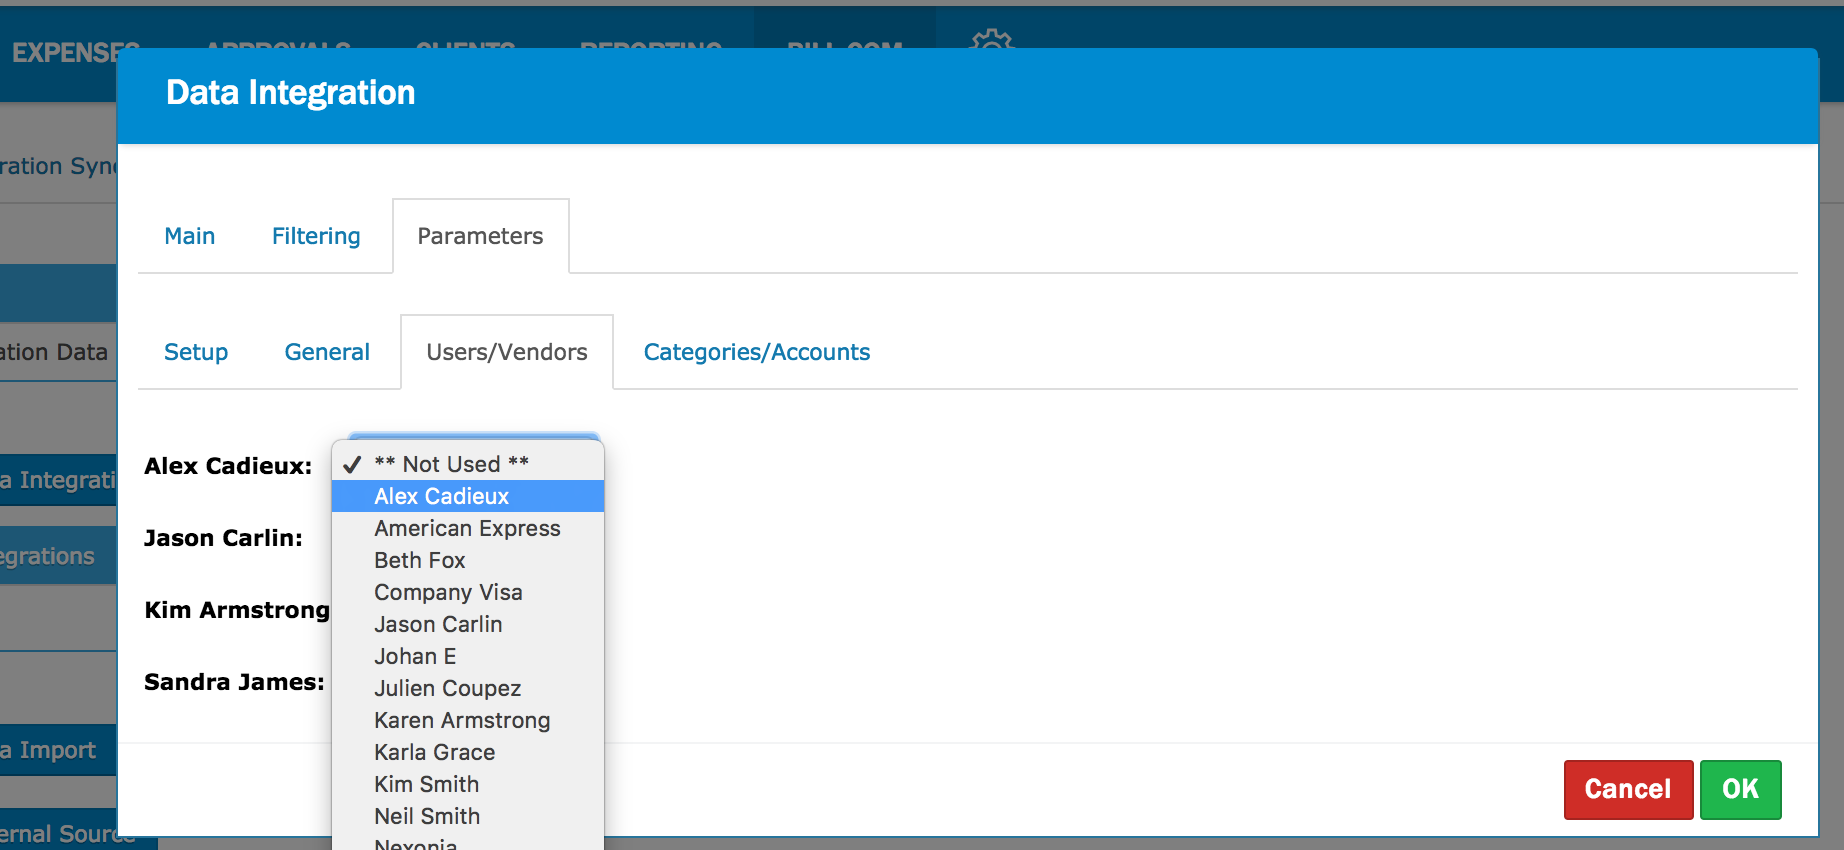
Data Integration: Categories/Accounts
The Categories/Accounts tab is where Nexonia expense categories will be mapped to the Bill.com accounts.
To export expense data to Bill.com, the Nexonia expense categories must first be associated with accounts from Bill.com.
If an expense category has been newly created and is not mapped to an account, or an expense category was linked to an account that has since been made inactive in Bill.com, expenses that are created using that category will not be exported to Bill.com.
To map a Nexonia expense categories to Bill.com accounts, from the Users/Vendors tab:
To map all Nexonia expense categories to the same Bill.com account, select "Split Account: No" and choose the Bill.com account from the drop-down menu.
To map each Nexonia expense category to separate Bill.com accounts, select "Split Account: Yes" - you'll see a list of your Nexonia expense categories with the integrated list of Bill.com accounts on the right. Choose the Bill.com account from the drop-down menu for each Nexonia expense category.
If you don't see the Bill.com account in the drop-down menu on the Categories/Accounts page but you know it is active in Bill.com, click Setup > Synchronize to update the list with the currently available accounts from Bill.com.
If that's all the tabs you have available, click the OK button to save the settings and close the window.
Data Integrations: Company Paid Cards (if applicable)
The Company Paid Cards tab is where your Nexonia integrated corporate credit cards will be mapped to the Bill.com vendors. This tab only appears if you enabled Company Paid Cards under the Parameters > General tab.
When you navigate to the Company Paid Cards tab, you should see a list of the corporate cards you've integrated in Nexonia. Each row represent a specific Nexonia credit card feed. On the right will be the integrated list of Bill.com vendors.
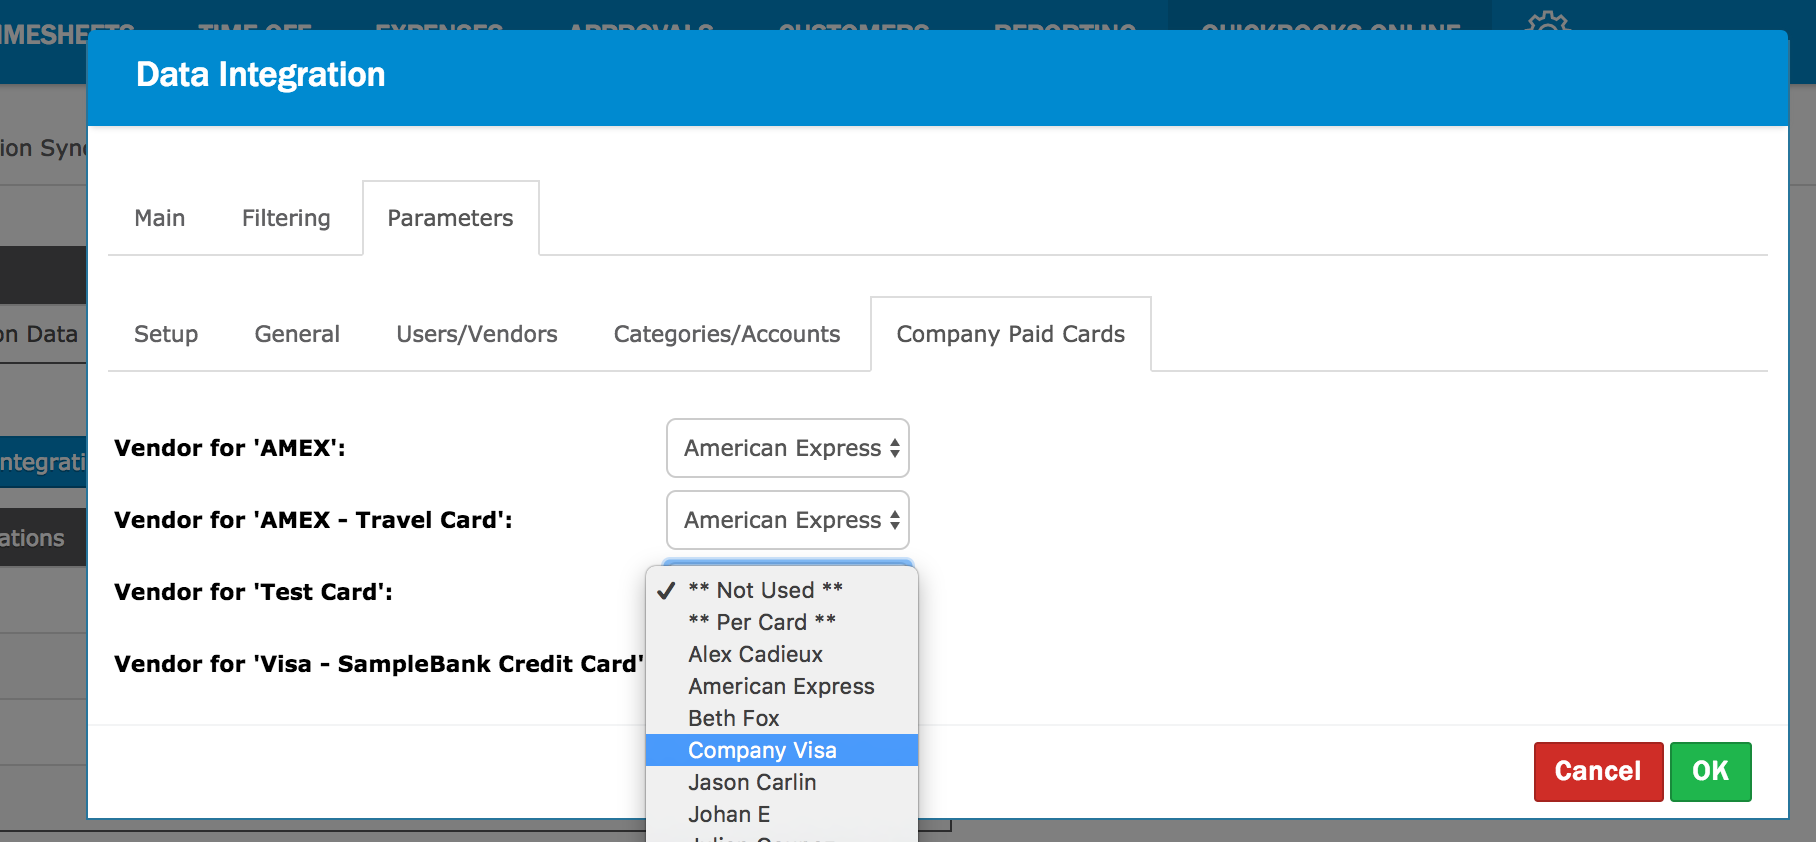
For each row, choose the vendor you would like to export to, from the drop-down menu. Afterwards, click OK to save the settings and close the window.
Running the Bill.com Export
Once you've configured the Bill.com integration, your Bill.com export should now be active.
To view the export log or to run the export manually, navigate to Integration* > Expense Reports.
*This tab is typically relabelled with the name of your accounting platform or ERP.
The Bill.com export will be found under "Expense Reports". If you have more than one expense export, you'll find Bill.com in the Integration dropdown menu. You'll be able to view any export logs or click Transfer Now to export approved expenses to Bill.com

-
This article lists common error messages which may be returned from Bill.com when running the configuration sync in Nexonia.
To view the error messages in Nexonia, click the Integration tab > then click Configuration Sync > in the Message column on the right, the particular error message will be listed.
Error: BDC_1145 - Current user or organization does not have valid permissions.
Reason:
This error will occur if you are entering the credentials of a non-administrator bill.com user for the integration in Nexonia.
Solution:
Enter the credentials of an administrator-level user in Nexonia by going to the Integration* tab > Integration Setup > Edit Parameters > General > fill out User ID/Email and Password > click OK to save.
-
This article lists common error messages which may be returned from Bill.com when exporting Nexonia expense data to Bill.com
In Nexonia, view these error messages from Intacct* > Expense Reports > choose the Integration from the drop-down menu if you have more than one > in the Message column on the right, click Failure or Partial Success from the most recent integration log entry.
Expense Export Errors:
Error: Can't export report for '[user name]'. as this user is not part of the integration
Reason:
This is caused by the user whose name is listed not being active in Nexonia.
Solution:
You may be integrated with an ERP from which users are synced, in which case they need to be re-activated in your ERP first to get activated in Nexonia. If your users aren't integrated from another ERP, they need to be activated in Nexonia. Go to Settings > Users > click into the applicable user profile > Edit > set Active to Yes > Apply to save.
Error: Category: '[category name]' is not part of the integration
Reason: This is caused by the categories that are listed with this error not being mapped for export to Bill.com.
Solution:
To resolve, go to the Integration* tab > Integration Setup > Data Integrations > click Edit next to the Bill.com expense integration > Parameters > Categories/Accounts > map the categories listed in the error to the applicable Bill.com accounts > OK to save.
Error: Department/Location/Class not found
Reason:
This is caused by one or more items in the referenced report(s) being coded to an inactive Department/Location/Class value
Solution:
If your Departments/Locations/Classes are integrated from another ERP, you can re-activate the values in your ERP and run a sync in Nexonia to activate the values in there. You can also code the affected expenses to other values that are already active.
Error: Bill.com Message: BDC_1161:Invalid Id: none.
Reason:
This is caused by a Nexonia user with fully approved expenses not being mapped to a Bill.com vendor via the Bill.com integration settings.
Solution:
Map the Nexonia user to the respective Bill.com vendor at following click path in Nexonia: Integration > Integration Setup > Edit the Bill.com data integration > Parameters > Users/Vendors > OK
Error: Data integration ‘Bill.com’ for X’: Connection Reset
Reason:
It is likely that the connection between Bill.com and Nexonia at the time of export was dropped due to a Bill.com connection issue/service down/maintenance.
Solution:
These issues are typically resolved on their own and subsequent exports are successful.
-
For Nexonia accounts integrated with Bill.com, you can manually create Expense Categories in Nexonia and link each Expense Category to a Bill.com Expense Type in the export integration.
Link: Mapping Expense Categories to Bill.com Accounts
Finding the Expense Category List
To create Expense Categories in Nexonia, log in to Nexonia as an Administrator and navigate to Settings > Company > Expenses.
You’ll then see series of subtabs related to Expenses. Click on the Categories tab.
With a brand new Nexonia account, you’ll see a list of pre-existing expense categories. These are common business expense categories (e.g. airfare, car rental, office supplies etc.) that may be relevant to your organization. You can use these pre-existing categories as a start and/or create brand new expense categories.

Editing an Existing Expense Category
You can edit and modify the pre-existing expense categories, including changing the name or configuring expense policy rules. To do this, click on the pencil icon next to the Expense Name. You’ll be brought to a General tab.
This is also where you can set policy rules and conditions for each expense category. To learn more click here: Configuring Rules and Policies for Expense Categories
Then click Apply.
Adding a New Expense Category
To create a brand new expense category, click the Add button and fill out the details for that expense category under the General tab.
This is also where you can set policy rules and conditions for each expense category. To learn more click here: Configuring Rules and Policies for Expense Categories
Then click Apply.
 Helpful Tip: you can clone a pre-existing expense category by clicking on the clone icon next to the Expense Name. This will create an exact duplicate category, allowing you to quickly and easily create additional categories that may be similar to ones that you already have created. Simply edit the cloned category as needed.
Synchronizing the Nexonia Configuration with Xero Understanding Xero Expense Data Integration Errors Understanding Xero Configuration Sync Integration Errors How to Create Expense Categories in Nexonia (Xero) Mapping Company Paid Credit Cards to Xero How to Add New Users in Nexonia (Xero Integration)
-
The Configuration Synchronization is an integration process that reads setup dimensions (chart of accounts, vendor lists, dimensions etc.) and relationships in Xero and updates the Nexonia configuration accordingly. The "Config Sync" does not involve the transfer of any data from system to system, and does not change any settings in either environment.
 Note: Each Nexonia environment can be linked with a single Xero Company
In most Xero integrated Nexonia instances, the Config Sync is configured to run automatically each night. You can view or change the scheduling of the automated sync from within Nexonia at Xero* > Integration Setup > Configuration Data > Edit Schedule.
Regardless of the scheduling of the automated sync, a Nexonia administrator can initiate a sync at any time, from within Nexonia at Xero* > Configuration Sync > Synchronize Now.
If you see an error message in the synchronization log and need further assistance, please contact help@nexonia.com.
*May be labelled differently in your configuration
-
This article lists common error messages which may be returned from Xero when exporting Nexonia expense data to Xero.
In Nexonia, view these error messages from Xero> Expense Reports > choose the Integration from the drop-down menu if you have more than one > in the Message column on the right, click Failure or Partial Success from the most recent integration log entry.
Expense Export Errors:
Error: Can't export report for 'XXXX'. as this user is not part of the integration
Reason:
This is caused by the listed user being inactive in Xero
Solution:
Activate the user in Xero and trigger another export
Error: Xero Message: Invoice not of valid status for modification
Reason:
There is likely already an invoice with the same number in Xero
Solution:
A prefix can be added to the invoice number in Xero, such as NEX-[followed by invoice number]. Go to the Xero tab > Integration Setup > Edit Parameters > Expense - Page 1 > if you look in Bill Reference, it will probably say ${report.exportCode}. Make that NEX-${report.exportCode} to add NEX- to the exported invoices in Xero, preventing invoices from having the same number causing errors.
-
This article lists common error messages which may be returned from Xero when importing data into Nexonia via the Configuration Sync.
In Nexonia, view these error messages from Xero > Configuration Sync > in the Message column on the right, click Failure or Partial Success from the most recent integration log entry.
Configuration Sync Errors:
Error: token_rejected. Authorize Nexonia (Visit Xero)
Reason:
The Xero token for Nexonia needs to be re-authorized.
Solution:
Go to the Xero tab > Integration Setup > Edit Parameters > General > Authorize Nexonia > click Visit Xero. You will be forwarded to Xero and be able to request a token to re-authorize the Nexonia integration. Run another configuration sync after doing so to confirm that it is running again.
-
For Nexonia accounts integrated with Xero, once the G/L accounts are integrated in Nexonia via the Configuration Sync, you can manually create Expense Categories in Nexonia and link each Expense Category to a G/L Account.
To create Expense Categories in Nexonia, log in to Nexonia as an Administrator and navigate to Settings > Company > Expenses.
You’ll then see series of subtabs related to Expenses, including Categories, Layout, Corporate Cards, Nexonia OCR. Click on the Categories tab.
With a brand new Nexonia account, you’ll see a list of pre-existing expense categories. These are common business expense categories (e.g. airfare, car rental, office supplies etc.) that may be relevant to your organization. You can use these pre-existing categories as a start and/or create brand new expense categories.

In order to use the pre-existing expense categories, you must link each category a G/L account. To do this, click on the pencil icon next to the Expense Name. You’ll be brought to a General tab. Be sure to select the correct Account from the dropdown list.
This is also where you can set policy rules and conditions for each expense category. To learn more click here: Configuring Rules and Policies for Expense Categories
Then click Apply.

To create a brand new expense category, click the Add button and fill out the details for that expense category under the General tab. Again, be sure to link it to a G/L by selecting the correct account from the Account dropdown menu. Then click Apply.
 Helpful Tip: you can clone a pre-existing expense category by clicking on the clone icon next to the Expense Name. This will create an exact duplicate category, allowing you to quickly and easily create additional categories that may be similar to ones that you already have created. Simply edit the cloned category as needed.
-
When a new credit card source has been added to your Nexonia environment, you'll need to update the Configuration Parameters to map the new card for your Xero export.To update the credit card export mapping:Navigate to Integration* > Integration Setup
*may be relabelled as "Xero" in your Nexonia interface
Navigate to the Configuration Data box and click the Edit Parameters link to access the configuration parameters.
Navigate to the tab labelled Expenses - Page 2. This is where the export values and preferences are set.Scroll down to the setting Export Cards. Select how the card transactions should be exported to Xero.Depending on where credit card transactions are being exported to in Xero, you'll need to select a corresponding Xero value to support the export:Export As: Select: Bank Transactions GL Account for the credit card transactions Vendor Bills AP Vendor for the credit card Once you've made your selection, you'll see additional set up tabs appear:Cards as Bank Transactions
If sending as Bank Transactions, use the "Cards as Bank Transactions" to map the cards to the Xero accounts. You can map the card source to a single account - choose from the dropdown - or "per card" which will open additional tabs that allow you to map the individual cards to accounts.Cards as Vendor Bills
If sending as Vendor Bills, use the "Cards as Vendor Bills" tab to map the cards to the Xero vendors. You can map the card source to a single vendor - choose from the dropdown - or "per card" which will open additional tabs that allow you to map the individual cards to vendors.Once you've made your selections, click the OK button. Your settings have now been updated and any fully approved expenses based on the credit card transactions will export to Xero.
Tip: if you don't see the GL Account or AP Vendor you need, ensure it's been added in your Xero and run the Nexonia configuration sync to update the list of GL and Vendor values in Nexonia. -
When exporting expense items to Xero as Vendor Bills, all employees who will be using Nexonia need to be created in Xero as Vendors. The Xero Vendor list will be imported in Nexonia via the configuration sync. Nexonia Users are then created manually in Nexonia and linked to a Xero Vendor profile.
 Tip: When creating vendors for employees in Xero, starting the name with "(e)" will group the employee vendors at the top of your vendor list, making them easier to find.
ex. "(e) Tom Training"
Follow these instructions to create new users in Nexonia:
HOW TO ADD USERS IN NEXONIA
1. Ensure employees are set up as Vendors in Xero.
2. Log in to Nexonia as an administrator on the web and run a configuration sync between Xero and Nexonia. To do this, go to the Integration/Xero tab > Configuration Sync and click on the Synchronize Now button. This will import the Vendor list from Xero making each Vendor profile available in Nexonia.
3. In Nexonia, go to Settings > Users > Users > Add. Once you click Add you’ll see a blank template under the User settings tab. Enter the details for this user profile. While many of these fields are optional, you are required to provide the following information at a minimum:
- Email Address
- First Name
- Last Name
- Role - The role defines their permissions in Nexonia; typically, most will be User.
- Expenses: Xero Vendor - Select the correct Xero vendor/name from the dropdown menu. This list will be imported from Xero via the configuration sync.
4. Click Apply. The new user has now been created and mapped to the appropriate Xero vendor!
 Helpful Tips:
 Manager: As you add users in Nexonia, they will appear as a selection option from the "Manager" dropdown menu. In some instances, and depending on your company's approval process, the "Manager" may be how Nexonia knows who to send the expense report to for approval. In this instance, be sure to select the user's manager from the dropdown menu.
Customer (Default) and Project (Default): Default values for users can be set in Nexonia for integrated dimensions such as Customer, Job, Location, or Class.
Login credentials will not be issued automatically to the Nexonia user upon adding them as a User, unless initiated by the Nexonia Administrator.
Using Display Usage Setting or Modifying a User's Manager How to Export Your Nexonia User List Setting a Default Customer and Project for Users How to Deactivate a User in Nexonia Assigning an Approval Process to the User Role
-
As a Nexonia Admin, use Display Usage to track users within your billing period to anticipate overages charged by Nexonia. This allows you to know how much a vendor will bill you for their services in advance.
This article shows you, a Nexonia Admin, how to use display usage.
Step 1: From the Nexonia homepage, navigate to Company Settings>>Subscription>>Account Usage.

Step 2: To see further details of usage, click any month.

Step 3: You also have the option to download the monthly report in CSV format. This can be saved for further record keeping or downloading for additional data manipulation.

-
Depending on your organization's accounting/ERP system, the users' manager may not be synchronized from your accounting/ERP system. If the users' manager is not a synchronized value, Nexonia Administrators can manually configure it directly in Nexonia.
Log in to Nexonia on the web as an Administrator.
Navigate to: Settings > Users > Users > Find User > Edit (pencil icon) > Manager > select the User's manager from the drop-down menu > Apply.
 Notes:
- As Users are added in Nexonia, they will appear as a selection option from the "Manager" dropdown menu. In some instances, and depending on your company's approval process, the "Manager" may be how Nexonia knows who to send the items to for approval. In this instance, be sure to select the user's manager from the dropdown menu.
- Any changes made in the "Manager" field will be reflected in the company's Hierarchy.
-
Nexonia allows administrators to extract a list of your users as a .csv file. You can also select which fields from the user profile are included in the export.
Tip: if running the export to identify which Nexonia modules your users access, that data isn't available as part of the export. If this is your goal, we recommend modifying the name of your Roles to indicate which modules the users with this role are accessing, and including the role in the export.
To begin, log in as an Administrator and navigate to Settings > Users > Users.
You should be seeing your user list at this point. Scroll to the bottom of the menu and you'll see a link Export Users. Click this link to begin selecting the fields for the user export.

To include inactive users in the extract, select Show Inactive on Settings > Users, prior to clicking Export Users, and make sure that Enabled is one of the values selected to export.
You'll now be prompted to choose the fields from the user profiles you wish to export. Check off which fields you wish to include, or click "Select All" at the top of the list to include all fields.
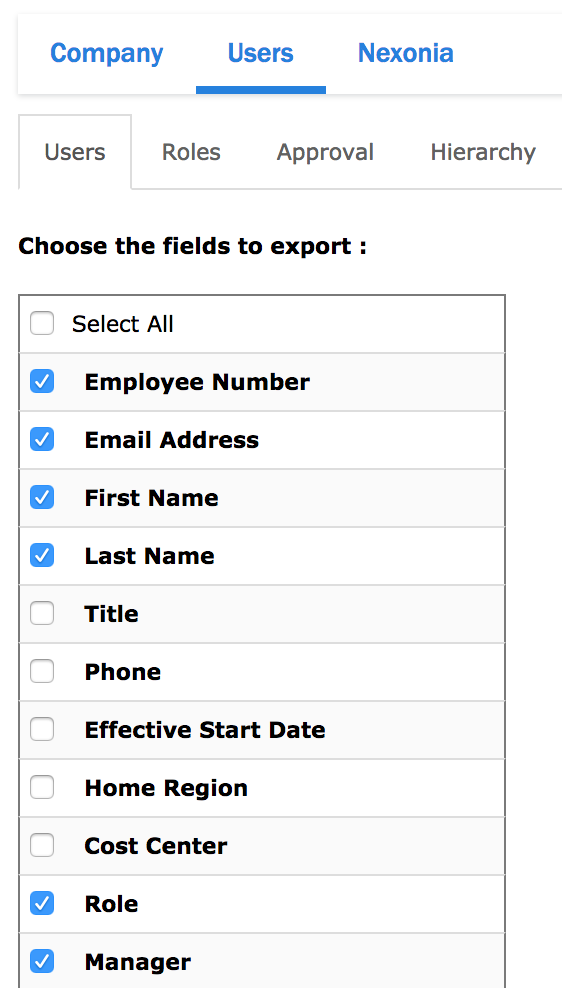
Please Note: This is a raw extract from the data and columns will be labeled with the internal IDs for those dimensions.
Once you've selected your fields, scroll to the bottom and click the Export button. Nexonia will generate the .csv export file and download it to your computer.

-
A Nexonia administrator can set a default Customer and Project* as part of the user profiles. This can help users if there's a particular customer or project value they use the majority of the time.
Example: Jeff's expenses are primarily related to Overhead, so it would save him time if his customer and project were defaulted to an internal or general value.
*"Customer" and "Project" may be relabelled based on your organization's Nexonia configuration.
Note: selecting a default value for Customer or Project will enforce a default value universally for the user in any modules the user has access to, such as both expenses and timesheets.
To begin, log in to Nexonia as the administrator:
1) In Nexonia, navigate to Settings > Users > Click on the name of the User(s) for whom, you would like to select default client/project > click the Edit button.
2) Scroll down the user profile and find the 'Customer (Default)' and 'Project (Default)' fields (they are in the bottom half of the page) and then select the default value from the drop down menu.
3) Click on Apply at the bottom of the profile to save the change.

-
As an Administrator, you will be responsible for deactivating user profiles in Nexonia. Non-Administrators cannot do this themselves. This must be done by an internal Administrator within your company.
Note for Accounts with Web-Integrated Users
If your Nexonia account is integrated via web services with an ERP listed below, please click on the link for specific instructions for how users are rendered inactive via ERP integration. In general, if Nexonia users are auto-provisioned via your integration, you'll need to update the record in the ERP/accounting platform to "inactive" or remove a filter for the record, then run the Nexonia configuration sync to deactivate the user:
- Deactivating a User in Nexonia with Intacct Integration
- Deactivating a User in Nexonia with NetSuite Integration
User can be deactivated manually in Nexonia using the method below, but if their record is still active in the ERP/accounting platform then their Nexonia user record would be reactivated after the configuration sync is run.
Best Practices: Deactivating Users, Not Deleting
As a best practice, we recommend deactivating users rather than deleting them. Deactivating a user will remove said user's access. The deactivated user will no longer be able to access Nexonia and you will not be billed for them in the subsequent billing period. However, you can restore said user should the need ever arise, either because they return, or for audit purposes.
While this can be accomplished by deleting a user, deletion is a much more permanent option. There is no option to restore a deleted user.
Deactivating a User in Nexonia
To deactivate a user profile in Nexonia, please follow these instructions:
- Navigate to Settings > Users > Users.
- Navigate to the user record you want to deactivate - on the far right side is a column labelled Active.
- Uncheck the Active checkbox for that user.
- You'll be asked "Are you sure that you want to deactivate this user?"
- Click Yes to confirm.
- The user is now deactivated.
Viewing Inactive Users
Inactive users are typically filtered from view in the user list. You can control this by checking or unchecking the Show Inactive checkbox at the top left of the user list. Any inactive users will be italicized with a lighter font color.

Reactivating Inactive Users
To reactivate a user, use the Show Inactive filter to find their user record, and recheck the Active box on the right side. This will reactivate the user. If you need to reissue their login permission, click the key icon to the left of the user record.
-
In Nexonia, an approval process is assigned to one or multiple Nexonia user roles (not to an individual user). This is how the system knows which approval process to route entries through - based on the role of the user.
This allows for assignment of different approval workflows for different user groups, and also for the different modules (e.g. expenses, timesheets, payables).
Note: when you create a new role, you'll need to assign the approval workflow for that role.
To assign an approval process to a specific user role, take the following steps:
In Nexonia, navigate to Settings > Users > Roles and then click on the name of the role to which you would like to assign an approval process.Once you're viewing the role, you should see a tab on the right called "Approvals".
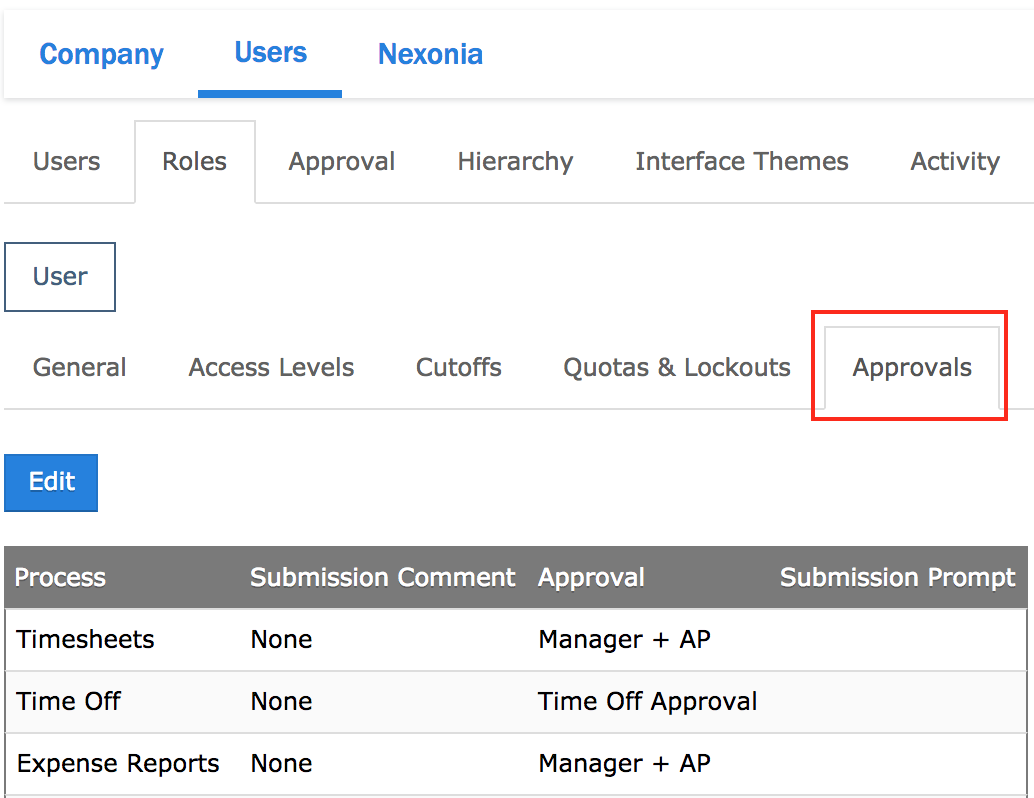
Click on Approvals and then Edit.
If you want to assign the approval process for Expenses, then find the process name (Expense Reports) and then select the approval process (e.g. Approval Process for Expenses) under the Approval column.
You have additional options which affect submissions for the role:
Submission Comment: You can define the option for the user to leave a comment, when submitting the expenses. The default is "None", which means user are not given an option to provide a submission comment. You can select either Optional or Required depending on your requirements.
Submission Prompt: If you want a message shown to the users before they click “OK” to submit, you can enter that text here. For example: “By submitting this expense report, I acknowledge…” or for timesheets “Please note that once submitted, you cannot change your hours”.
Click on Apply to save the change. This change will apply to any entries submitted from this point forward.
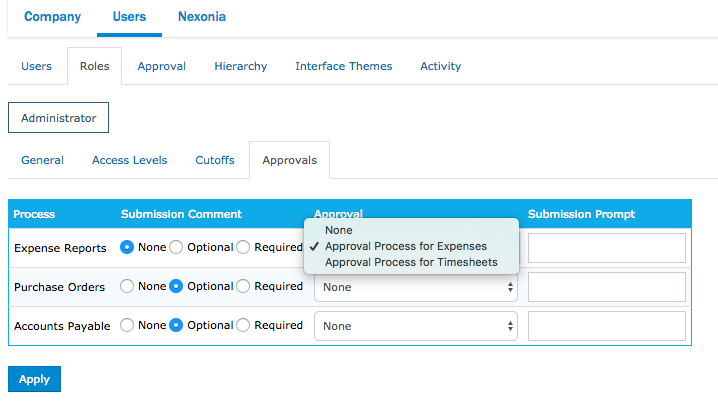
Configuration Guide to Nexonia Approvals Configuration Guide to Roles and User Permissions Creating Approval Workflow Step: Fixed Approver Updating Approvers for Manager Based Approvals Approvals: Notify On Edit Creating Approval Workflow Step: User Specific Approver
-
Approvals are found in Nexonia under Settings > Users > Approvals.
In Nexonia, an approval process is a step-based construct that determines the flow that an entry will take from the point of submission to full approval by the customer's organization. Approval processes can be a single step, or multiple-step based on a combination of criteria.
Approval processes are linked to the role of the user. An organization can have multiple approval processes defined but each role can have only a single approval process assigned to it at any time.
When a Nexonia profile is created, it has a default approval process labelled “Manager” which will send the submitted expenses one step up the reporting hierarchy, based on the Manager value in the user’s record.
We’ll explain how approval processes are set below, but also provide an example of setting up a simple 2-step approval process and setting a rule to route expenses for a specific submitter
Approval Terminology
Author – the Nexonia user that created the entry. Note, if an administrator or proxy creates an entry on behalf of user A, user A is considered the entry's author. However, if such a user submits on behalf of user A, that user is considered the submitting user.
Assignee – the Nexonia user with whom the entry currently sits for approval
Entry – a Nexonia expense item, expense report, timesheet, time off request, A/P bill item, A/P bill, purchase order item or purchase order. Please note that Timesheets and Time Off submissions are also referred to as 'entries' in a related but more specific context.
When a Nexonia account is created, it’s created with a default approval process called “Manager”:
Here we see a step called “Manager”.

The “Assigned To” section directs who an expense would be directed to at this step – this process we see is sending the expense up the hierarchy, one level above the Author (user).
Approval Settings
Step – the name of this step of the approval process
Assigned To - when an entry reaches this step in the approval process, the Nexonia user specified in this section – either explicitly or implicitly - becomes the current assignee unless a bypass condition is satisfied. The two most common assignment levels use either a Relative Level (using a hierarchy) or Fixed User (using a specific user for assignment).
- Relative Level– relative positioning is determined by the organization’s user hierarchy (viewable at Setup > Users > Hierarchy)
A user becomes the current assignee if they are n (where n >= 0) positions above the reference user (specified in the far-right drop down) in the reference user's hierarchy path. When n = 0, the user in the drop down becomes the current assignee. So, if it should go 1 level above the author, then n=1. If it should go 2 levels, then n=2, and so forth.
Author is the most commonly used value here. This drop down also has referential values (rather than explicit user names) that are typically defined in one of the following locations, typically used with a n = 0 value as these are usually treated as absolute values:
- the Owner field on the Customer record
- the Manager field on the Project record (common, used if Project Manager needs to approve project related expenses)
- the Invoicer field on the Project record
- the Finance field on the Project record
- a custom field on the User record
- Absolute Level– absolute positioning is determined by the organization’s user hierarchy at (3). A user becomes the current assignee if they are at position n (n > 0) in the hierarchy path of the reference user (specified in the far-right drop down). Note that if the would-be assignee is at a lower position than the reference user (i.e. their hierarchy number is greater than that of the reference user), the approval step will be bypassed.
- Fixed User– the Nexonia user selected from the drop down becomes the current assignee.
The following table provides a summary of the settings and options available on the approval process configuration page:
Field
Possible values
Explanation/Examples
Editable
Yes/No + Notify on Edit
Ability for the approver to edit entries during the approval stage. You can also have a notification of edit sent to the author
Policy Violation
No/Out of Pocket/All
In case of policy violation, a warning is displayed to the approver when reviewing the entry in approval section
Permissions
All with approval edit permission
Approval proxy cannot approve their own entries
Only approver (no proxy)
Ability for a user to act on approvals for his proxies
Bypass (report only)
If already approved within limits (Expenses)
If a previous hierarchy level is at least
If amount is at most
If pre-approval amount is at most
If cash advance is at most
If already approved by same user
If it's a resubmit and it was further in the cycle
If assignee is author
If submitted by author
If submitted by assignee
According to selected condition when reaching this step, the item will go right to the next step of this approval process if bypass condition is validated.
For example, if you have a multi-step approval process where an entry could potentially land with an approver twice, you could put a bypass condition on the second step to skip this step “if already approved by the same user”.
You can also use Other field here to direct this step to affect a specific user.
To include only a specific user
report.user.fullName != “<insert user name>"
For example, if we created an approval step we want for Olivia’s expense reports, in the Other field we’d enter “report.user.fullName != “Olivia Sterling"
Bypass (report only)
Other
The Administrator can set special condition for a bypass. e.g."!logicalItem.policyViolation"
Approve or Reject by Email
Yes or No
The approver will receive an email in which there will be buttons to approve or reject directly via email.
Buttons only available for following modules: PO, AP, Time off and Time Allocation.
Approval/Rejection Comment
None/Optional or Required
The Administrator can force comments on approval or rejections
Inserting and Reordering Steps
To insert (and thus, create) a step immediately before an existing step in the approval process, click the Insert link shown in the following image:

To re-position an existing step in the approval process, use the up and down arrows just to the right of the Insert link in the above image.
Editing An Existing Step
To edit the settings for an existing step, begin by,
- i) Clicking the pencil icon for the approval process to which the step belongs at (1), or
- ii) Click the process name at (1) -> Edit
Either of the two steps above will make the approval process editable. To edit a step, click the step’s name in the table shown in Figure 1. Once the updates have been made, click Modify at the bottom of the page.
Deleting a step
To delete an existing step from the approval process, ensure the approval process is editable, click the step’s name in the table shown in Figure 1 and click Delete at the bottom of the page.
Approval Bypass Logic:
The approval Bypass field includes a text field called “Others:”. In this field, you can enter conditions. These conditions evaluate as true or false. If the logical statement joining all the conditions evaluates to true, the approval level is skipped. If it evaluates to false, the approval level is not skipped.
This logic can be used to route submitted expense reports based on specific conditions:
- Bypass/Routing Expenses for a Specific Submitter
- Bypass/Routing Expenses by a Nexonia Custom Field value, such as Departments (if configured as a Nexonia custom field) or other custom fields at the item or report level.
You can use the logical AND (&&) and logical OR (||) operators to join conditions, in conjunction with brackets if necessary. You can use an exclamation mark “!” to create an inclusion rather than a bypass.
Some code samples are below, with plain language translation of the code below:
Bypass this step if the full name of the user who submitted the expense report is Jim O’Rourke.
report.user.fullName = "Jim O'Rourke"
This would cause any reports from Jim to skip this step.
Bypass this step unless the full name of the user who submitted the expense report is Olivia Sterling.
!(report.user.fullName = 'Olivia Sterling')
This would cause only reports submitted by Olivia to be affected by this step.
Bypass this step unless the Department on the Expense Item is Engineering ( 400)
!(item.custom['department'] = '400')
This would cause only expenses coded to the Engineering department to be affected by this step.
In this scenario, Department is a custom field in Nexonia, and has an internal ID of “400”. Using the internal ID of the custom field value is advised when using the bypasses.
Sample Approval Process: Second Approver
A common approval process is to require a second approver on the approval workflow, typically someone in finance who reviews the expense, allowing them to catch any errors prior to export.
Here, we’ll modify the default approval process and add a second step:
- Click on the Settings icon on the top menu bar.
- Click the Users > Approval tab.
- By default, Nexonia creates an approval process called “Manager” – click the Modify icon to modify this process
- By default, step 1 “Manager” is set to send the submitted items 1 level above the author in the hierarchy.
- Click the “Add” link to add a second step.
- Assigned To: check Fixed User, assigned to your specific Nexonia user. Here, we’ve chosen Alice Abell.
- Set Editable to “Yes” so that our second approver is allowed to edit entries during the approval review.
- Set a bypass condition “if already approved by the same user”.
- Click the [Add] button.
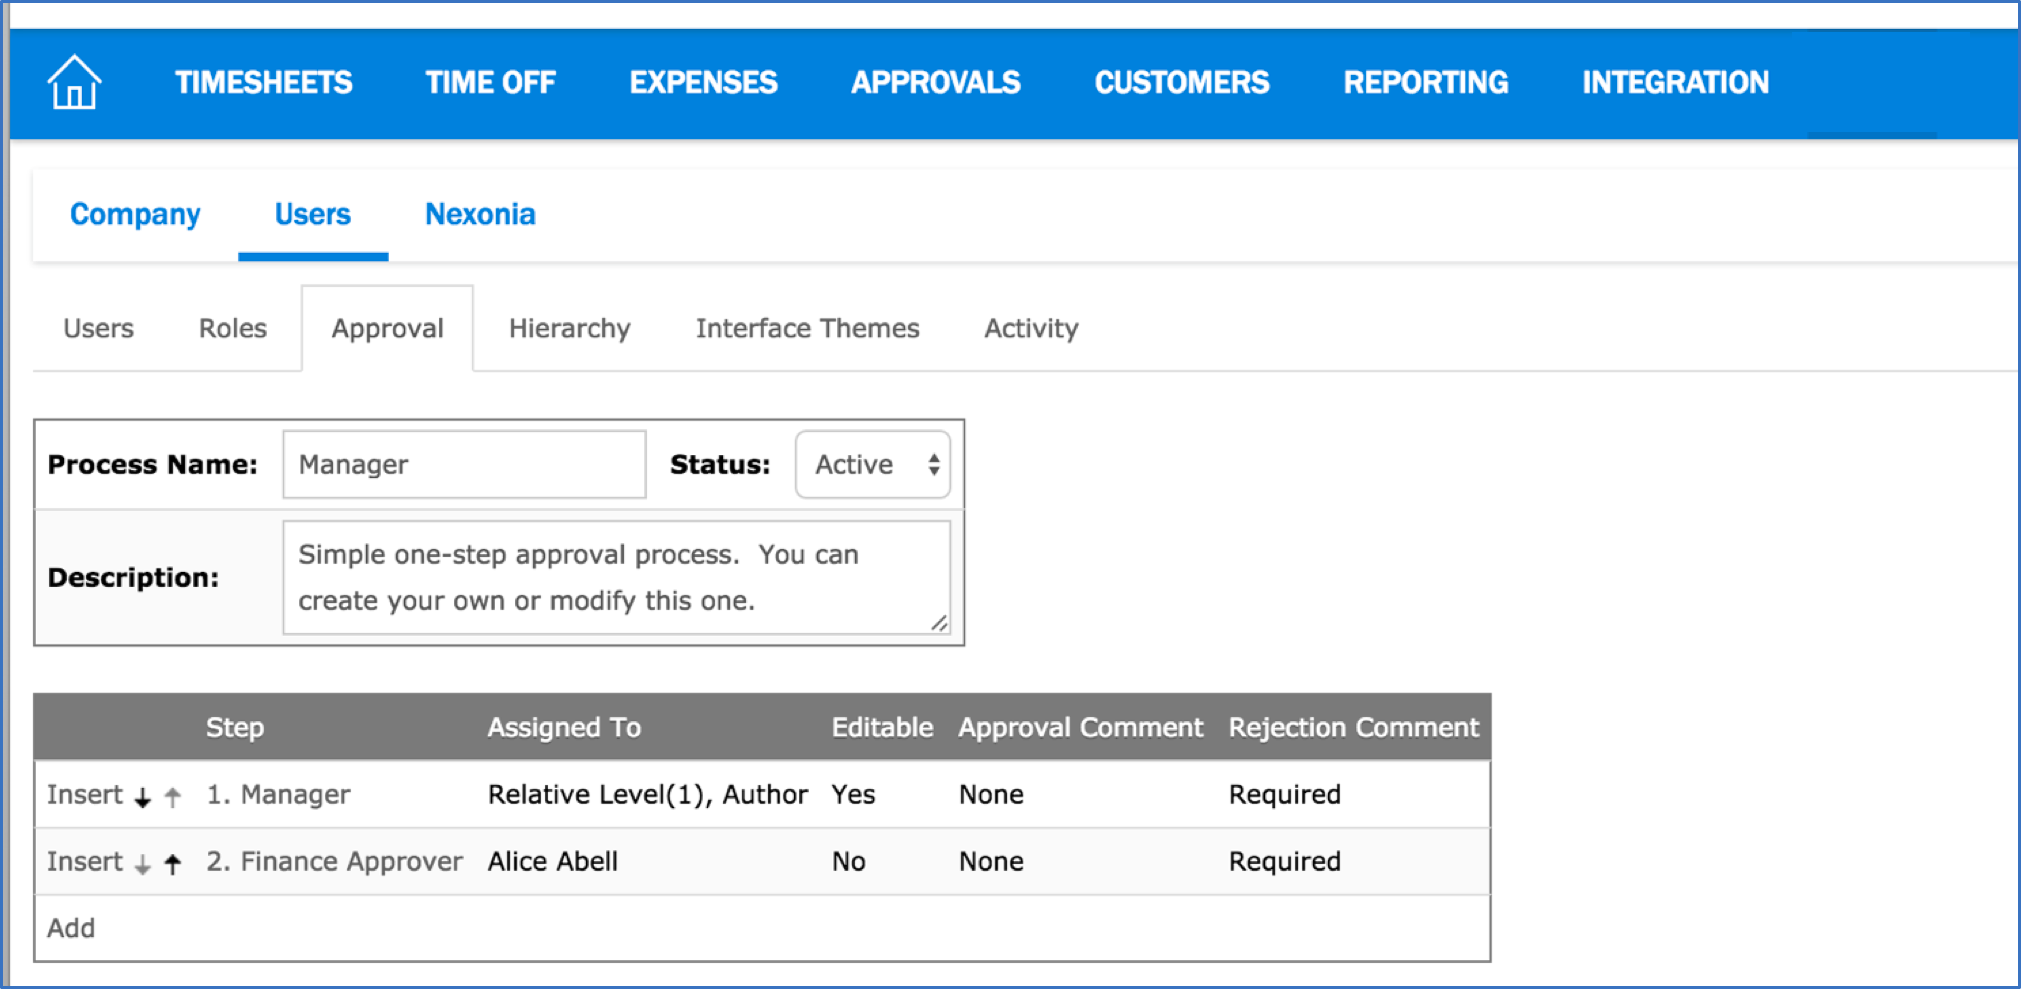
Sample Approval Step: Routing For A Specific Submitter
A common approval step is to require an approval routing for a specific submitter. A common example is, if using a hierarchy for approvals, how should the top-level submitters on the hierarchy be routed? This sort of approval step is commonly used for managing executive level reports.
The approval step has two parts:
For the Assigned To: value, you’ll set a “Fixed User” who will be the approver.
In the Bypass: you’ll be entering a formula in the Others field- this formula’s result will be “Bypass this step if your name is not (User Name).” The formula is:
report.user.fullName != “User Name”
Here, we’ll modify an existing approval process and insert a step to route Olivia Sterling’s expenses:
- Click on the Settings icon on the top menu bar.
- Click the Users > Approval tab
- Click the “Modify” icon (pencil) to edit the approval workflow.
- Click either “Add” link to add a new step or “Insert” to insert this step into the existing process.
- Assigned To: check Fixed User, assigned to your specific Nexonia user. Here, we’ve chosen Dorothy Chou.
- In the Bypass field, in the Others field enter your formula:
!(report.user.fullName = 'Olivia Sterling')
- Click the [Add] button.
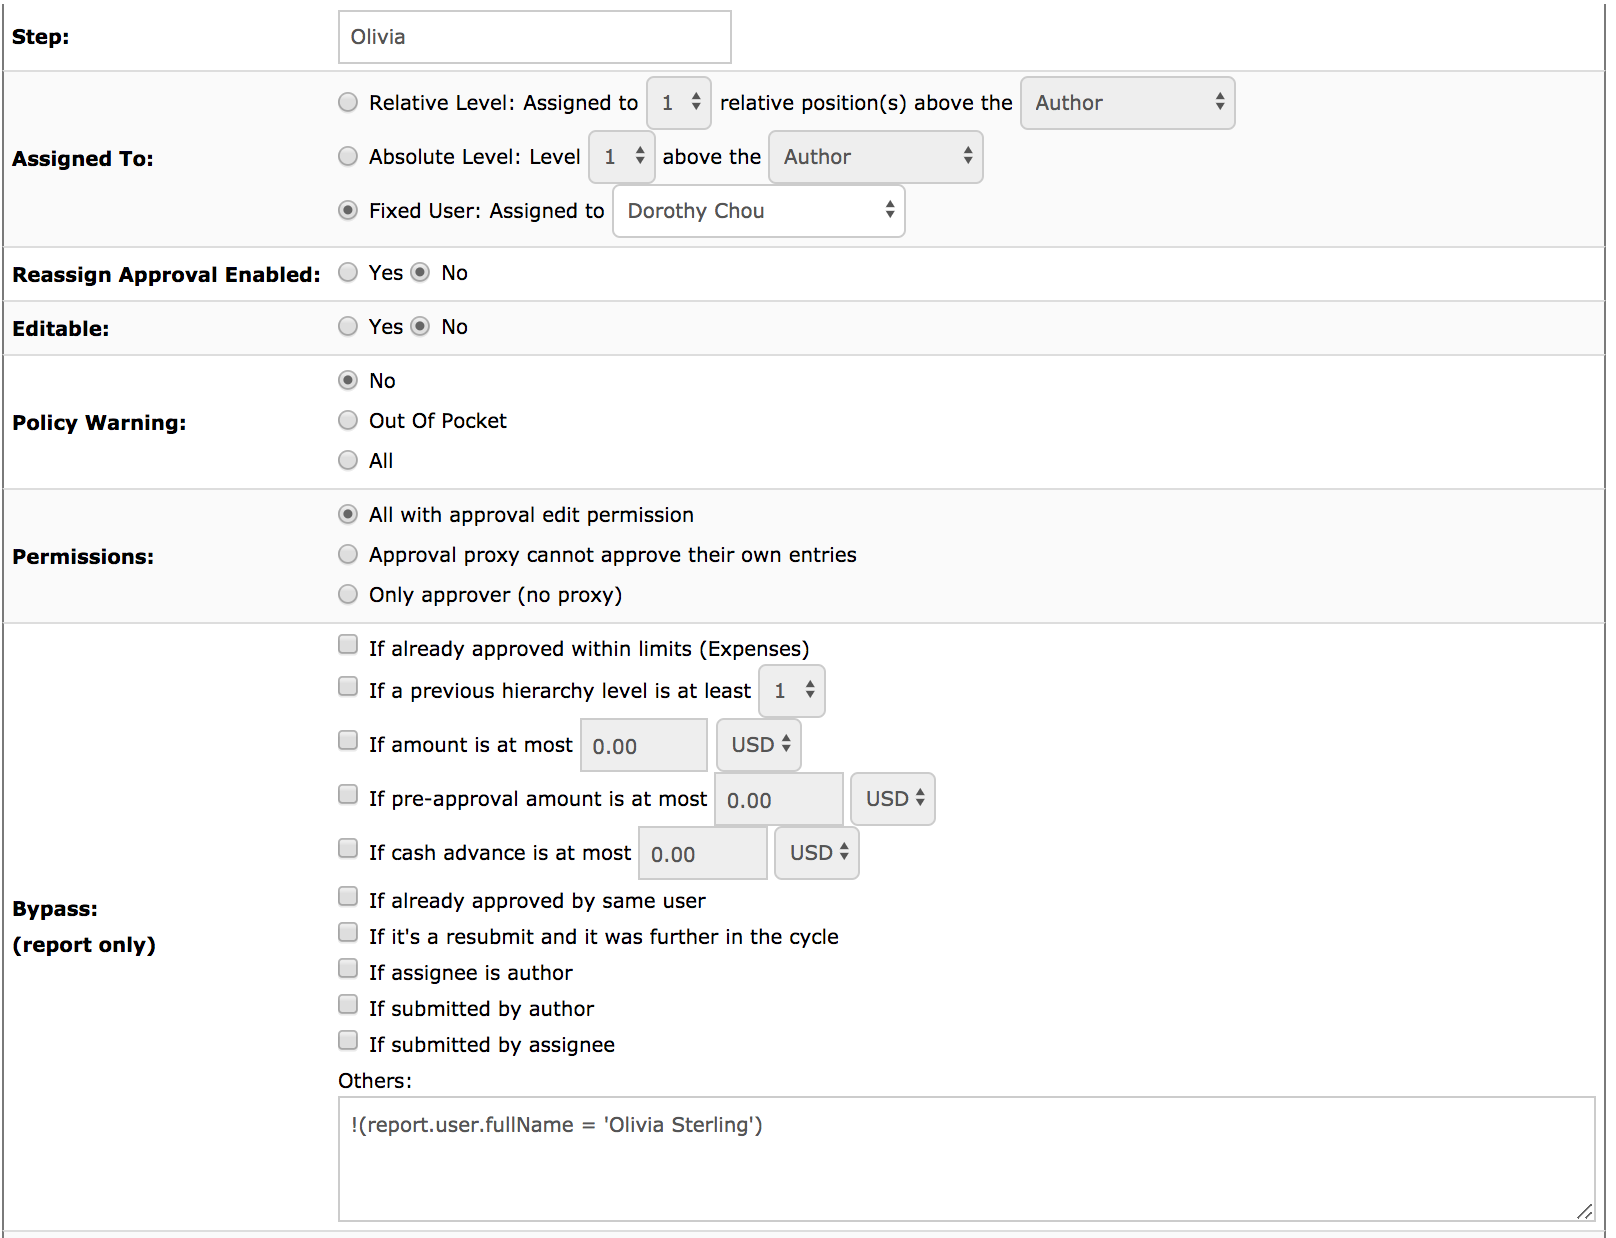
Approval Step routing Olivia's expenses to Dorothy
-
Roles control the access for a Nexonia user - what modules can they access, what read and edit permission they may have, which approval process should they be routed through. You could also use the role and filter which expense categories a user group “role” would have access to. Each User record requires a Role.
Roles are found under Settings > Users > Roles.

When you create a Nexonia account, it’s created with the default Administrator and User roles. You can modify these roles and create new roles, such as a Manager role with enhanced permission, a Finance User with limited administrative permission or a Reporting role with full reporting permission.
Note: you do not have to create a specific role for approver. The permission to approve expenses is driven by the approval process.
- To modify a role, click on the Modify (pencil) icon to the left of the Role name.
- To create a role, click the Add icon
We’ll go through the settings for roles, and cover some specific role permissions you may want to create.
Role Configuration
Roles have 4 tabs to them:
- General: general settings for the role
- Access Levels: this defines the access permissions for this role
- Cutoffs: (rarely used) creates lockout periods for this role
- Approvals: defines the approval routing for this role
General Settings

Role Name: name of role
Description: description of role
Interface theme: you can link the role to a specific interface theme. This way, you could create different interface themes to reflect specific branding or labels you want for a specific group
Don’t show “Approve” and “Reject” in the approvals report listing: this changes the Approval module for this role so that they don’t see the default Approve or Reject buttons at the Pending Approvals Queue level – this means they can’t do a quick approval, but must open the report and approve or reject from within the report. This would be used if you want to ensure approvers are opening and reviewing the items within the reports
Reassign Approval Enabled: allows users with this role to reassign submitted expenses that are pending their approval to a different approver
Access Levels (Permissions)
The Access Levels tab controls what the system permissions are for this role.

Features controls which modules this role can access and what permission they have. Above, we see the default for the User role.
Permission can be:
- None – no permission
- Edit – this means they can use the module
- Read – this is Read Only permission. This means you can see information but not alter it This can be useful as Read Only information can be pulled into the Reporting tool
In this example, this role can create Expense Reports for themselves, and has Read Only permission to view their subordinates' (users who report to them) expenses.
Under All Users there is an extra permission available: Administration. This would grant the role Administration rights. THIS SHOULD BE GIVEN SPARINGLY. This permission allows this role to modify items regardless of their status and bypass any policy rules in the system, such as submit blockers.
Note: Approvers only need an Approval: Edit permission to access the Approvals module and approve items assigned to them for approval. The default User role here would work for both expense report submitters and approvers.
Configuration are administrative permissions, or ones shared with enhanced users, such as a Finance Administrator or Reporting user
Customers & Projects: access to the Customers module – Edit would mean that this role can create new customers and projects
Manager (Project): access to Projects within the Customers module, but only for those projects where the user is listed as the Project Manager within the project
Users: access to the Users tab (Users, Roles, Approval) within the Settings
Company: access to the Company tab (Features, Expenses, Notifications, Financial) within the Settings
HR Data: access to see and edit any User custom fields marked as “HR Data”
Reports: access to the Reporting module. The permissions are:
None: no access to the Reporting module
Run: access to the Reporting module, but can only run existing report templates
Design: access to the Reporting module, and can run reports and design their own reporting templates
Share: access to the Reporting module, can run reports and design their own reporting templates, as well as share reporting templates with other users
Note: this setting controls access to the reporting tool. The data that can be pulled in the reports is controlled by the permissions in the above Features section. So, if this role needs to run reports for everyone’s data, they’d need All Users – Read permission as well.
Integration: access to the Integration module where the export integrations are
None: no access to the Integration module
Read: access to the Integration module, but Read Only permission
Run: access to the Integration module and can run any integrations, such as the export generation
Edit: access to the Integration module and can run any integrations, as well as modify any integration settings
Cards: access to the Cards Gateway, where they can manage credit card programs.
None: no access to the Cards Gateway.
Read: access to the Cards Gateway, where they can view the list of Cards and Card Programs.
Edit: access to the Cards gateway, and can re-sync, add, or remove Card Programs.
Can manage ship-tos: not relevant to Expenses, leave at “None”
Sample Role Configurations
Finance Role - this type of role would be able to run reports on any user data for expenses and modify expense policy rules:
Section
Setting
Permission
Expense Reports/Approvals
All Users
Read
Configuration
Company
Read or Edit (if they need to be able to modify expense policy rules or link credit cards to users)
Configuration
Reports
Design, or Share (full permission)
Reporting Role - this type of role would be able to run reports on any user data for expenses:Section
Setting
Permission
Expense Reports/Approvals
All Users
Read
Configuration
Reports
Design, or Share (full permission)
Human Resources Role - this role would be able to modify User records only:Section
Setting
Permission
Configuration
Users
Edit
Configuration
HR Data
Edit
Project Managers - this role would be able to view expenses related to any projects they're assigned to as Project Manager:Section
Setting
Permission
Expense Reports
Project Team
Read
Configuration
Manager (Projects):
Edit
Configuration
Reports
Design, or Share (full permission)
Auditor Role - this role would have read-only permission to run or build reports:Section
Setting
Permission
Expense Reports/Approvals
Self
None
Expense Reports/Approvals
All Users
Read
Configuration
Reports
Design, or Share (full permission)
Cutoffs (Lockout Periods)
Cutoffs can be configured if you want to prevent the creation of expenses older than a particular period.

Choose the lockout period and when it will be effective. In our example, we've set a rule that expenses can’t be older than 10 business days.
Below is what a user would see if they tried to draft an expense earlier than the cutoff:

Approvals (Routing)
This tab is used to set which approval process items should be submitted through for this role.
If you only have one approval process set, it would be the default. But if you have different approval processes for different modules or groups, you would set the workflow here:
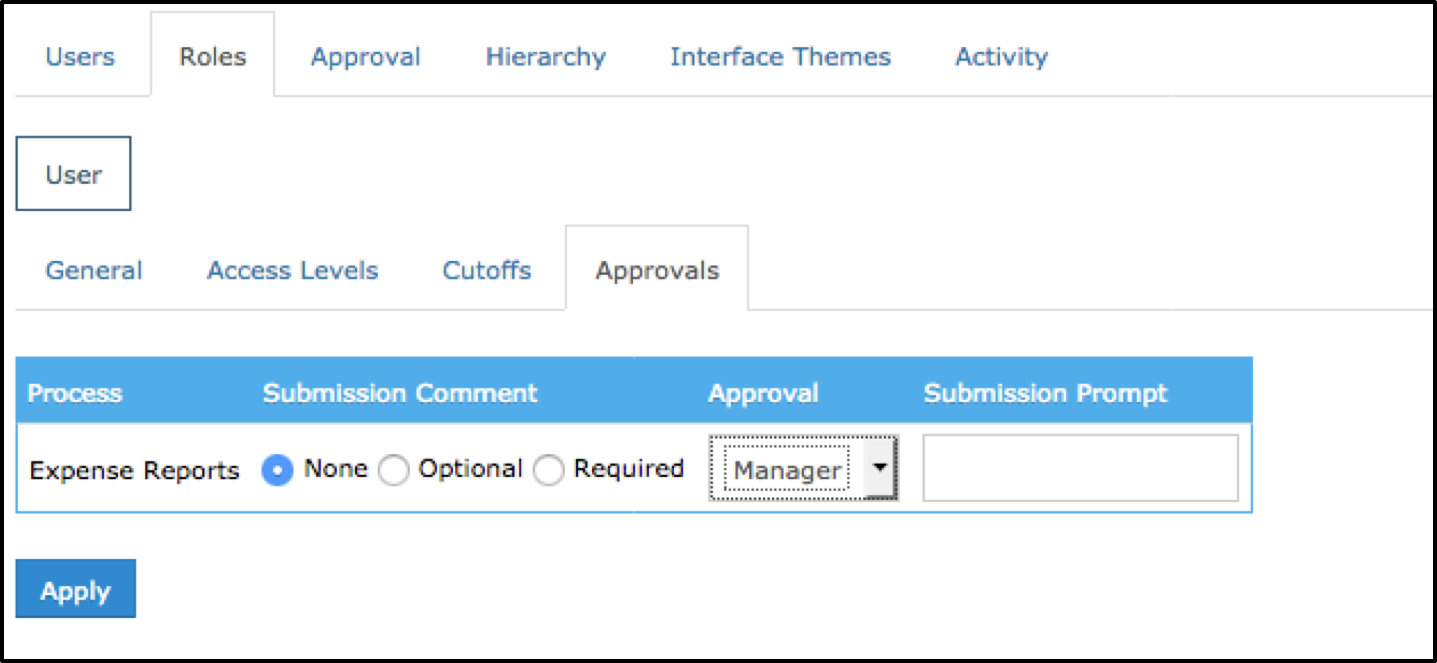
Submission Comment: if you require a comment upon submission of the expense, you can make it optional or required
Approval: which approval process should this role be routed through
Submission Prompt: if you want a message to be displayed to the users before they click “OK” to submit, you can enter that text here. For example: “By submitting this expense report, I acknowledge…”
-
The following instructions will guide you through how to create a step in the approval process that directs submitted content to a specific approver. A common example of this would be setting up a Finance Department approver as the final step of an approval process.
Navigate to: Settings > Users > Approval > Click the edit pencil on the workflow. Click Add. This opens the field to allow modifications for the step.
In the Step field, provide a descriptive name about what this approval process step represents (ie. Finance Approval)
In the Assigned To field: select the Fixed User radio button. From the drop down list, select the Nexonia user that should be assigned to this approval step.
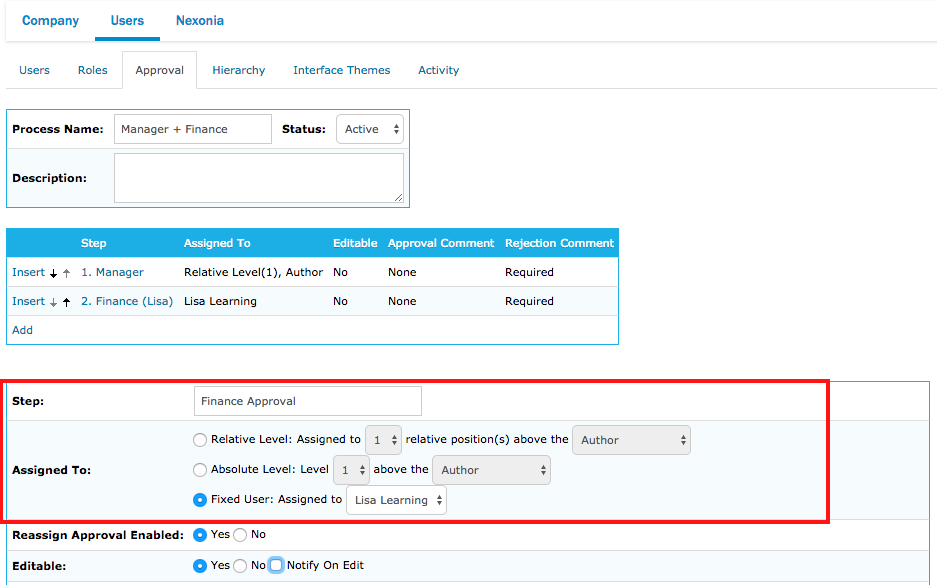
 Tip: You can add enhanced approval permission in this step if needed. Two common ones are:
 Reassign Approval Enabled - allows an approver at this step to reassign the submitted item to another approver if needed.
Editable - allows an approver at this step to edit the submitted item during the approval review.
Once finished, click Add button at the bottom.
 Note: If you’re using an approval workflow for more than one module, then creating this type of step will require a separate approval workflow for each module.
 -
As an Administrator, you will be responsible for maintaining user profiles in Nexonia. For organizations using manager based approval processes, administrators will need to keep the Manager field for their users up to date in order to properly direct submitted items into the approval process.
The instructions below will take you through updating the manager value for a user.
 Note: If your Nexonia account is integrating your users from Employee records from Intacct or NetSuite, you will have to update the Supervisor/Manager value in your ERP and then sync it to Nexonia in order to update the Manager field.Please click on the link for instructions for syncing updated user information via ERP integration:If syncing users from Vendor records, you'll update the Manager manually in Nexonia as described below.
Updating a Manager in Nexonia
To update the manager for a user profile in Nexonia, please follow these instructions:
- Navigate to Settings > Users > Users.
- Scroll to the user you need to update.
- Click the Edit icon (pencil symbol) button to the left of the user profile you want to edit.
You should be seeing the detailed user profile and be able to edit the profile fields.
Scroll down to Manager field, and select from the dropdown menu who the manager should be for this user.
Scroll to the bottom and click the Apply button when done.
You also may be interested in the following article:
-
Nexonia Administrators can manage the approval workflow under Settings > Users > Approval.
In Nexonia, an approval process is the flow that an entry will take from the point of submission to full approval. Approval processes can be a single step or multiple steps based on a combination of criteria.
Approval steps can be Editable (Yes/No).
If Editable is set to No, the approver will not have the ability to edit entries during the approval stage.
If Editable is set to Yes, the approver will have the ability to edit entries during the approval stage. If the approval step is editable, an email notification can be sent to the author informing them if their entry has be modified/edited by the approver.
Follow the instructions below to set an approval step as editable and to notify the author via email if edits have been made by the approver.
Settings > Users > Approval > Modify/Edit Approval Process > Choose Step > Editable - Yes > Notify On Edit.

 To learn more about how to set up an approval process see Configuration Guide to Nexonia Approvals.
 -
The following instructions will guide you through how to create a step in the approval process that directs submitted content to a specific Nexonia user as indicated on the submitter's user settings.
To begin, create a User-level custom field. Article: How to Create User-level Custom Fields. Be sure to set the Type field as Select User.
To set who the approver should be for a particular user, navigate to: Settings > Users > Users > Click the edit pencil on user > scroll down and select a name from the Approver drop down list > Apply.

Navigate to: Settings > Users > Approval > Click the edit pencil on the workflow. Click Add. This opens the field to allow modifications for the step.
In the Step field, provide a descriptive name about what this approval process step represents (ie. Approval based on User-level Setting).
In the Assigned To field: select the Relative Level radio button. Adjust the parameters to 0 relative position(s) above the User: Approver (this option is available once you have created the custom field). All submitted content will be sent to the Nexonia user that has been selected based on the author.

Once finished, click Add at the bottom.
Note: If the Approver field is blank at the user level, this approval workflow step will be skipped.
Adding a Project in Nexonia Adding a New Customer and Project in Nexonia Managing Your Interface Theme - Logo, Color Scheme and Labels Change Administrator Contact Paying your Nexonia Invoice Importing Payment Data into Nexonia
-
The following article outlines how to add a project directly in Nexonia.
 If your Nexonia account is integrated with your ERP or accounting platform via web services - Intacct, NetSuite, QuickBooks - your customers and projects must be imported directly from those platforms. Any new customers and projects must be added in your ERP and then synced into Nexonia. Please refer to the following article:
- Synchronizing the Nexonia Configuration with Intacct
- Synchronizing the Nexonia Configuration with NetSuite
- Synchronizing the Nexonia Configuration with QuickBooks Online
- Synchronizing the Nexonia Configuration with QuickBooks Desktop via Web Connector
Adding the Project
Nexonia's Customer module manages a hierarchy of customers (parent) and projects (child). Depending on your configuration, these values may be repurposed to reflect other reporting dimensions - such as clients and jobs or locations and business units. All Nexonia modules require at least one customer and project to be in place for the users.
Administrator-level role permission is required in order to manage customers and projects.
To start, log in to Nexonia as the Administrator and click on the Customers module in the top menu bar.

Under the Customer tab, scroll to the customer you want to add the project under and click on the link that is the customer's name.
You'll be inside the Customer record now and see a General and a Projects tab. Click the Projects tab.
To add additional projects, either click the Add button or you can clone an existing active project (clone icon to the left of the project) and modify it.
You'll see a General tab of information to fill in for the project. The following values are commonly used:
Name (required) = project name
Type (required) = select the project type
Manager (optional) = project manager, can be used in configuring approval workflows and in setting role permissions
Timesheets/Expense Reports = enables the project to be used in the Nexonia modules you subscribe to; must be set to "Yes" in order to enable.
Timesheets/Expense Reports Billable (required) = default billable behaviour for this project in the listed module (i.e. timesheets or expense items):
- Yes = always defaults to billable
- No = always defaults to non-billable
- Overridable = allows the user to change the default in the timesheet entry or expense item
Timesheets/Expense Reports Memos = memo requirement for this project. Defaults to follow the memo requirements for the task or expense category
Regions (required)= must be enabled for at least one Region
Status (required)= Active or Inactive, must be Active to be used
Number (optional) = internal ID for the project, can be used in reporting or exports
Click the Apply button to save and create the project.

To Edit a Project
From inside the Customer record, click the Projects tab.
Locate the name of the project you wish to edit, and click it.
Click the Edit button, which will open the fields for editing.
Make your updates to the project and click Apply to save your changes.
You also may be interested in:
- How to Filter Users by Project
- To relabel the Customer and Project fields: Managing Your Interface Theme - Logo, Color Scheme and Labels
- Setting a Default Customer and Project for Users
- Configuration Guide to Roles and User Permissions
-
The following article outlines how to add a new customer and project directly in Nexonia.
 If your Nexonia account is integrated with your ERP or accounting platform via web services - Intacct, NetSuite, QuickBooks - your customers and projects must be imported directly from those platforms. Any new customers and projects must be added in your ERP and then synced into Nexonia. Please refer to the following article:
- Synchronizing the Nexonia Configuration with Intacct
- Synchronizing the Nexonia Configuration with NetSuite
- Synchronizing the Nexonia Configuration with QuickBooks Online
- Synchronizing the Nexonia Configuration with QuickBooks Desktop via Web Connector
1. Adding the Customer
Nexonia's Customer module manages a hierarchy of customers (parent) and projects (child). Depending on your configuration, these values may be repurposed to reflect other reporting dimensions - such as clients and jobs or locations and business units. All Nexonia modules require at least one customer and project to be in place for the users.
Administrator-level role permission is required in order to manage customers and projects.
To start, log in to Nexonia and click on the Customers module in the top menu bar.

Under the Customer tab, click the Add button.
You'll see a General tab of information to fill in for the customer. The following values are commonly used:
Company Name (required) = customer name
Type (required) = External or Internal
Status (required)= Active or Inactive, must be Active to be used
Regions (required)= must be enabled for at least one Region
Owner (optional) = customer owner, can be used in configuring approval workflows
Number (optional) = internal ID for the customer, can be used in reporting or exports
All other fields are optional.
Click the Apply button to save and create the customer.
Now that you've added a customer, you need to add at least one project in order for this customer to be available in Nexonia modules. Note: if you intend to only use customers but not projects, you still need to add a "General" project to the customer in order to use Nexonia.
2. Adding the Project
After creating the customer, you should be inside the customer record and see a General and a Projects tab. Click the Projects tab to add the project.
You'll see a General tab of information to fill in for the project. The following values are commonly used:
Name (required) = project name
Type (required) = select the project type
Manager (optional) = project manager, can be used in configuring approval workflows and in setting role permissions
Timesheets/Expense Reports = enables the project to be used in the Nexonia modules you subscribe to; must be set to "Yes" in order to enable.
Timesheets/Expense Reports Billable (required) = default billable behaviour for this project in the listed module (i.e. timesheets or expense items):
- Yes = always defaults to billable
- No = always defaults to non-billable
- Overridable = allows the user to change the default in the timesheet entry or expense item
Timesheets/Expense Reports Memos = memo requirement for this project. Defaults to follow the memo requirements for the task or expense category
Regions (required)= must be enabled for at least one Region
Status (required)= Active or Inactive, must be Active to be used
Number (optional) = internal ID for the project, can be used in reporting or exports
Click the Apply button to save and create the project.
To Create Additional Projects
From inside the Customer record, click the Projects tab.
To add additional projects, either click the Add button or you can clone an existing active project (clone icon to the left of the project) and modify it.
To Edit a Project
From inside the Customer record, click the Projects tab.
Locate the name of the project you wish to edit, and click it.
Click the Edit button, which will open the fields for editing.
Make your updates to the project and click Apply to save your changes.
You also may be interested in:
- How to Filter Users by Project
- To relabel the Customer and Project fields: Managing Your Interface Theme - Logo, Color Scheme and Labels
- Setting a Default Customer and Project for Users
- Configuration Guide to Roles and User Permissions
-
Nexonia uses an Interface Theme to define the look of your Nexonia environment. This interface theme is where your logo and color scheme are configured, as well as labelling for Nexonia values. Each new Nexonia environment will have a default Nexonia interface theme you can modify, and you can also create new interface themes. The interface theme is then linked to the Role of a user - this can allow you to manage multiple interface themes for different users groups, such as different entities.
Note: any changes you make to the interface theme will be visible to anyone with a role linked to that theme. If you want to test an interface configuration, we recommend creating a separate interface theme you can link to your Administrator role.
To edit your Interface Theme:
Logged in as an Administrator, go to Settings > Users > Interface Themes

You can either:
Click the Edit icon next to an existing interface theme;
Click Add to create a new interface theme; or
Click the Clone icon next to an existing interface theme to make a copy of it and edit that copy.
Either option will take you to where you can edit the theme.
Once you can edit the theme, you'll see the basic information at the top:
Name - name of your interface theme
Description -description for your theme (can be same as name)
Status - Active or Inactive
Below, we'll cover your logo, color scheme and labelling.
Logo
Corporate Logo - this is where you can upload your company's avatar, which will appear in the top right corner of your Nexonia environment on the web.

To upload the logo:
Please Note: Companies without a corporate logo will default to the Nexonia logo.
Step 1: Click the Gear icon to open the Company Settings page. Next, open the Users tab and select Interface Themes.

Step 2: Click the Pencil icon to edit the Interface Theme.

Step 3: Next to Organization Square Logo, click Choose File to upload a logo that meets the image requirements.

It won't be applied to the interface until you click the Apply button at the bottom of the interface configuration. Once you do that, you'll see the new logo.
Other settings related to your logo:
URL if image click - this is where you can paste a website address where users should be directed to if they click the logo. This would typically be your organization's website.
Logo for PDF files - this logo will apply only to PDF copies of the Expense Reports. This should usually be twice the size of your corporate logo. We recommend you scale the logo for the PDF files to around 95px - 120px total, including padding.
Custom Mobile Logo - this logo will be visible on the mobile app along the main menu bar. If left blank, we'll show the default Nexonia logo. The mobile company logo must meet the following requirements:
- It should be in the PNG format.
- The width should be between 124 and 785 pixels.
- The height should be exactly 124 pixels.
To obtain the best results, we recommend:
- Using a white logo, on a transparent background.
- Make the visible part of the logo use up the full height of the image.
Color Scheme
Your color scheme defines the colors used in your Nexonia environment. Color codes are entered as Hex Color Codes, which start with a ‘#’ and 6 alpha-numeric digits (ex. #98C02A).
For the color scheme, create a color scheme that matches your organization's brand identity and isn’t distracting. There are many image tools online that can help you to identify a main or “primary” color and a complementary color scheme.
The fields in the interface theme related to color are:
Primary color - Primary color used in customer’s brand identity. Avoid yellow if possible.
Secondary color - Secondary color from the customer’s brand identity, a lighter version of the primary color, or a medium grey (#7A7A7A). Avoid red.
Key button background color - Key color should complement or contrast with your primary color, so that it stands out.
Header Footer background color - We recommend using white (code #FFFFFF).
Custom Mobile Color - The color will be visible in many parts of the mobile apps. Since we adopted a light theme, we recommend choosing a color that will make a good contrast with white.
Once you enter your values, scroll to the bottom of the menu and click Apply. You should see the results on the web immediately. Changes to mobile app themes should appear once the mobile app user syncs the app.
Custom Labels
Below the logo and color scheme options you’ll see some options to customize the labels. The values in the quotation marks are Nexonia’s default names for dimensions or values. You can relabel these to use the terminology for your organization. For example, the “Customer” label could be relabeled “Client” or “Program”; “Project” could be relabeled “Job” or “Fund”.
Note: if dimensions are being integrated from a web-based ERP such as Intacct or NetSuite, the names for those dimensions will be driven from the ERP through the integration.
For Custom Fields, those labels are managed in the Custom Field settings under Settings > Company > Custom Fields.
For some values, you’ll see options for the singular to the left, and plural on the right.

A common one you may want to customize is "Integration" Label, which appears along the top menu bar. The label should be the name of the ERP/Accounting system and/or other integrated system or export.
Some other possible fields for relabelling:
- "Task Category" - for timesheet tasks.
- "Expense Category" - for expense items.
- "Add Expense Item" Label - label for the button in the expense report which users use to create employee-paid expenses. You may prefer "Add Out of Pocket Item" or "Add Reimbursable Expense".
- Expenses "Memo" - for expense items. For example, you may prefer "Business Purpose".
- "Expenses" Label:- label for the Expenses module.
- "Timesheets" Label - label for the Timesheets module
Once you enter your values, scroll to the bottom of the menu and click Apply.
Linking Interface Themes to Roles
The interface theme a Nexonia user sees is based on their role. If your Nexonia environment only has one interface theme, that becomes the default for everyone. If you have multiple interface themes, you can link them in the Role settings.
Roles are found under Settings > Users > Roles.
To modify a role, click on the Modify (pencil) icon to the left of the Role name.
In the role, under the General tab, you'll find the setting Interface Theme.
Select the interface theme to be used for this role.
Scroll to the bottom and click Apply. Any users with that role will now see the new interface theme the next time they refresh their browser or app, or log in to Nexonia for the first time.
Linking Interface Themes to Users
If necessary, you can link a Nexonia user to a specific interface theme using their User profile. By default, this field defaults to the Role for the interface theme, but you can override that by selecting a specific interface.
Users are found under Settings > Users > Users.
To modify a user profile, click on the Modify (pencil) icon to the left of the user's name.
In the user, under the General tab, you'll find the setting Interface Theme. The default is "Role Default", which means it pulls the interface theme based on this user's role.
Select the interface theme to be used for this user.
Scroll to the bottom and click Apply.
-
One or more Administrators can be identified as an internal point of contact for users in your organization to reach out to with questions about policies or procedures.
The contact information for the Administrator(s) selected is displayed on the "home" page (the first page users see upon login) and at the bottom of system-generated email notifications to users:
You can choose the Administrator(s) separately for each Nexonia Region* in your organization. Users will see the Administrator contacts for their own "Home Region" (Settings > Users > look at the Region column).
To set or change the Administrators for a Region, go to Setup > Company > Regions > choose a region > Administrators > Edit > select / de-select as necessary > Apply.
*If your Nexonia instance is integrated with a multi-entity Intacct environment or a multi-subsidiary NetSuite environment, the Regions in Nexonia will be aligned with the Intacct entities or NetSuite subsidiaries

-
As a Nexonia Administrator, you can pay your Nexonia invoices directly in the user interface.
Step 1: Navigate to Settings > Subscription > Billing.

Step 2: Enter the Invoice Number, Invoice Amount, and Invoice Currency.

Step 3: Click Submit.

Step 4: A new tab will open where you enter the Billing Information/Payment Details. Click Pay to process the payment.
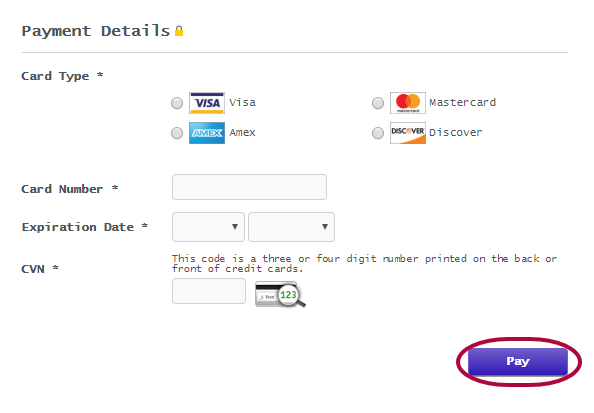
-
Reimbursable expenses that are exported from Nexonia into Intacct, NetSuite, or Bill.com can be marked as paid in those ERPs. We can then import that payment information into Nexonia so that the user sees that their expenses have been paid out and to give administrators an overview of which reports in Nexonia have been paid. To transfer that data into Nexonia, it is required to set up a new data import integration.
This article will show you how to set up a new data import integration.
Step 1: Open the Integration tab and click Integration Setup.

Step 2: Click Add Data Import.
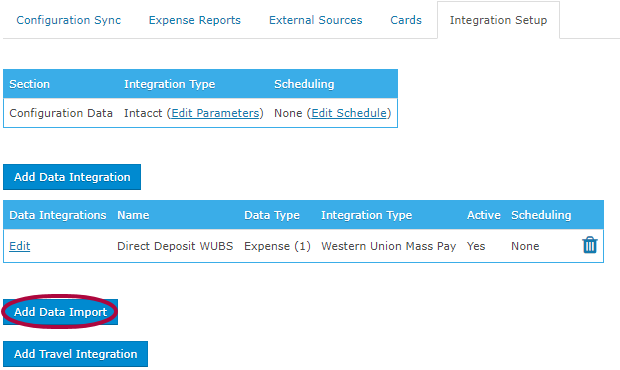
Step 3: Choose Expense Payments in the Data Type drop-down menu.
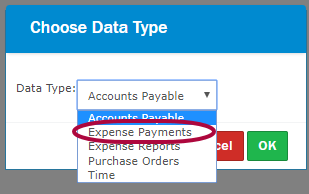
Step 4: Click OK.
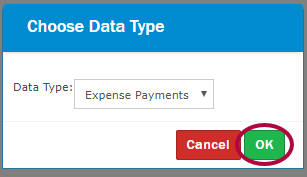
Step 5: The Data Import window appears. Enter the following information:
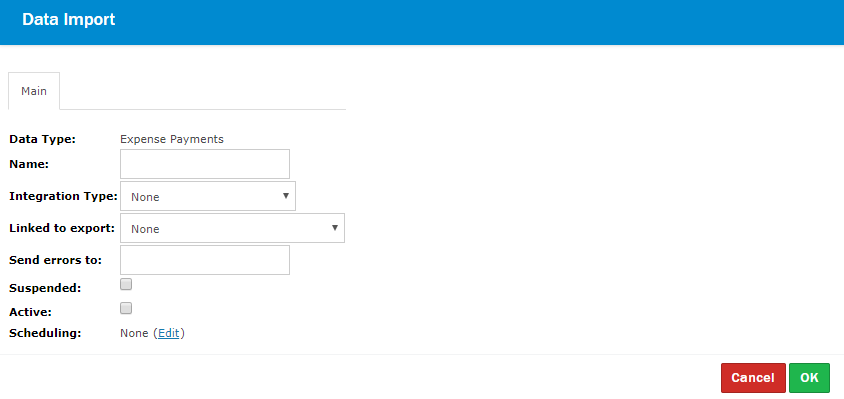
- Name: Enter the name of the data import
- Integration Type: Choose the applicable ERP (Bill.com/Intacct/NetSuite)
- Linked to Export: Every integration is defined by a bracketed number (you can see this in the Data Integrations list). In the screenshot below, the data import has been linked to the Reimbursable Expenses Integration which is defined by number 1.
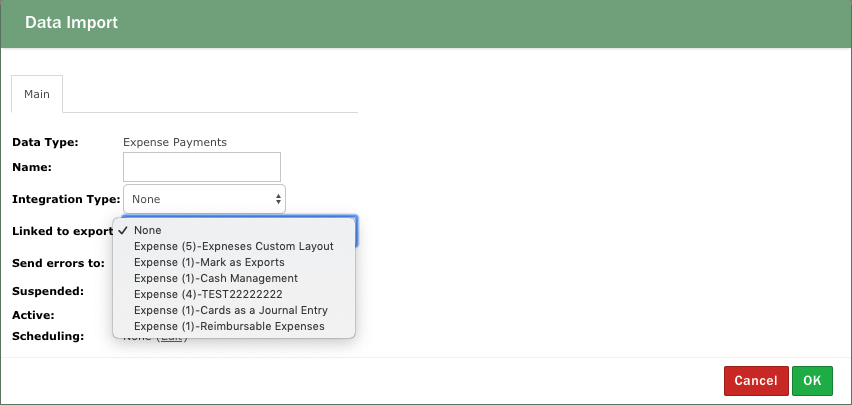
- Send errors to: You can enter the email address of an administrator who should be receiving any error messages for this integration.
- Active: Check mark this option
- Scheduling: If you want payments to import automatically, click the Edit button. Then, check mark Activate Scheduling. Next, choose the frequency of the import, and click OK.
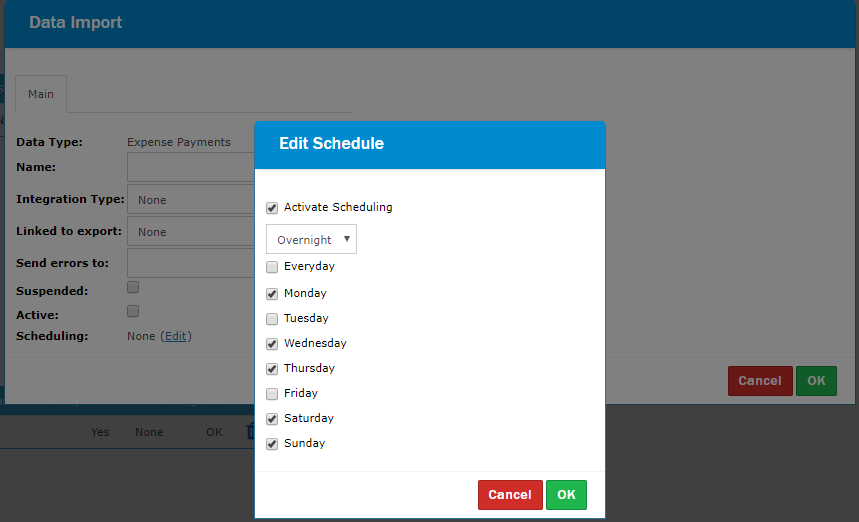
Step 6: When you choose the Integration Type, a Parameters tab will appear. Click into it.
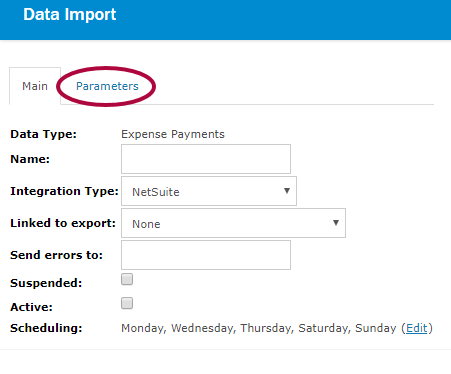
Step 7: Here, define how far back payment data is imported from. The default setting is 90 days. Click OK to save.
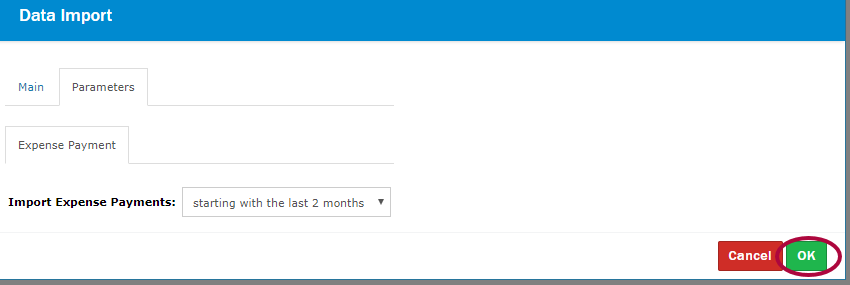
Step 8: When the data import integration has been finalized, you will see a new tab called Expense Payments next to the other integration tabs. You can trigger the first import manually instead of waiting for the integration to run overnight by clicking the Transfer Now button in the Expense Payments tab.