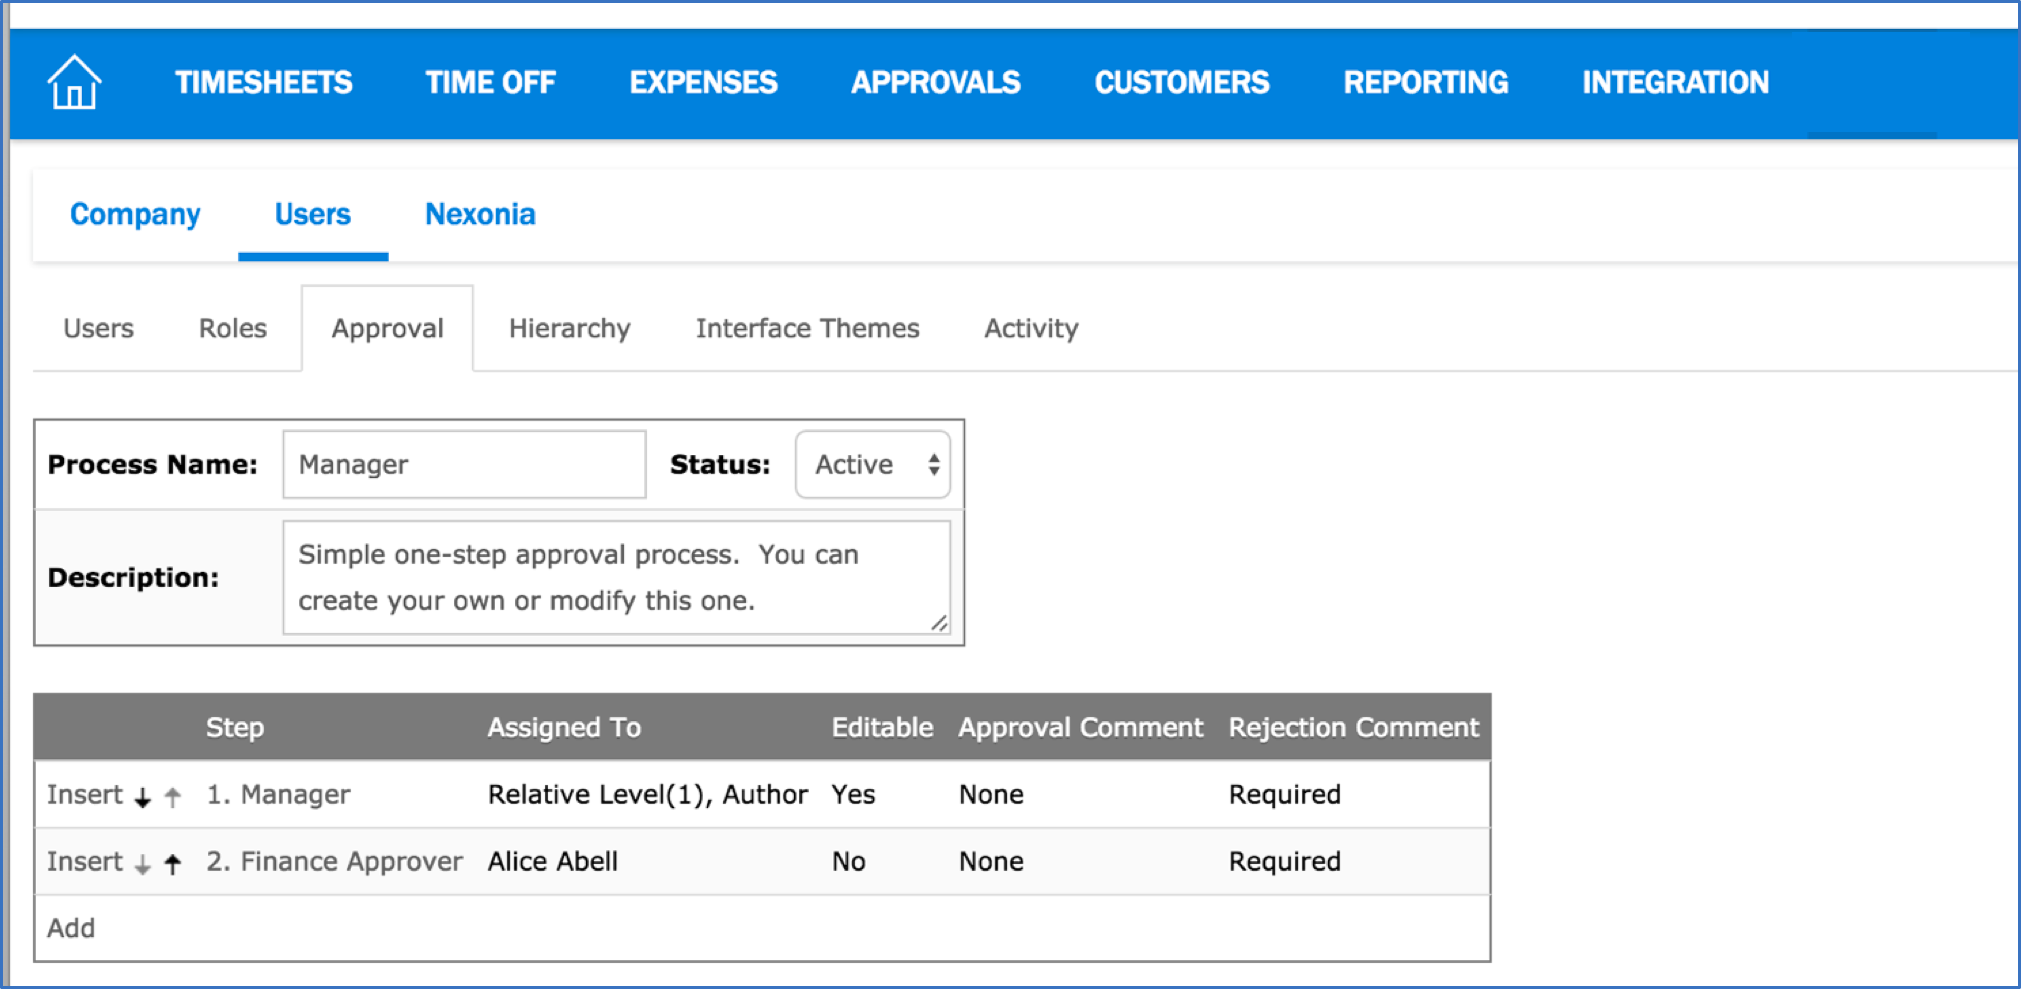
Approvals are found in Nexonia under Settings > Users > Approvals.
In Nexonia, an approval process is a step-based construct that determines the flow that an entry will take from the point of submission to full approval by the customer's organization. Approval processes can be a single step, or multiple-step based on a combination of criteria.
Approval processes are linked to the role of the user. An organization can have multiple approval processes defined but each role can have only a single approval process assigned to it at any time.
When a Nexonia profile is created, it has a default approval process labelled “Manager” which will send the submitted expenses one step up the reporting hierarchy, based on the Manager value in the user’s record.
We’ll explain how approval processes are set below, but also provide an example of setting up a simple 2-step approval process and setting a rule to route expenses for a specific submitter
Approval Terminology
Author – the Nexonia user that created the entry. Note, if an administrator or proxy creates an entry on behalf of user A, user A is considered the entry's author. However, if such a user submits on behalf of user A, that user is considered the submitting user.
Assignee – the Nexonia user with whom the entry currently sits for approval
Entry – a Nexonia expense item, expense report, timesheet, time off request, A/P bill item, A/P bill, purchase order item or purchase order. Please note that Timesheets and Time Off submissions are also referred to as 'entries' in a related but more specific context.
When a Nexonia account is created, it’s created with a default approval process called “Manager”:
Here we see a step called “Manager”.

The “Assigned To” section directs who an expense would be directed to at this step – this process we see is sending the expense up the hierarchy, one level above the Author (user).
Approval Settings
Step – the name of this step of the approval process
Assigned To - when an entry reaches this step in the approval process, the Nexonia user specified in this section – either explicitly or implicitly - becomes the current assignee unless a bypass condition is satisfied. The two most common assignment levels use either a Relative Level (using a hierarchy) or Fixed User (using a specific user for assignment).
- Relative Level– relative positioning is determined by the organization’s user hierarchy (viewable at Setup > Users > Hierarchy)
A user becomes the current assignee if they are n (where n >= 0) positions above the reference user (specified in the far-right drop down) in the reference user's hierarchy path. When n = 0, the user in the drop down becomes the current assignee. So, if it should go 1 level above the author, then n=1. If it should go 2 levels, then n=2, and so forth.
Author is the most commonly used value here. This drop down also has referential values (rather than explicit user names) that are typically defined in one of the following locations, typically used with a n = 0 value as these are usually treated as absolute values:
- the Owner field on the Customer record
- the Manager field on the Project record (common, used if Project Manager needs to approve project related expenses)
- the Invoicer field on the Project record
- the Finance field on the Project record
- a custom field on the User record
- Absolute Level– absolute positioning is determined by the organization’s user hierarchy at (3). A user becomes the current assignee if they are at position n (n > 0) in the hierarchy path of the reference user (specified in the far-right drop down). Note that if the would-be assignee is at a lower position than the reference user (i.e. their hierarchy number is greater than that of the reference user), the approval step will be bypassed.
- Fixed User– the Nexonia user selected from the drop down becomes the current assignee.
The following table provides a summary of the settings and options available on the approval process configuration page:
|
Field |
Possible values |
Explanation/Examples |
|
Editable |
Yes/No + Notify on Edit |
Ability for the approver to edit entries during the approval stage. You can also have a notification of edit sent to the author |
|
Policy Violation |
No/Out of Pocket/All |
In case of policy violation, a warning is displayed to the approver when reviewing the entry in approval section |
|
Permissions |
All with approval edit permission Approval proxy cannot approve their own entries Only approver (no proxy) |
Ability for a user to act on approvals for his proxies |
|
Bypass (report only) |
If already approved within limits (Expenses) If a previous hierarchy level is at least If amount is at most If pre-approval amount is at most If cash advance is at most If already approved by same user If it's a resubmit and it was further in the cycle If assignee is author If submitted by author If submitted by assignee |
According to selected condition when reaching this step, the item will go right to the next step of this approval process if bypass condition is validated. For example, if you have a multi-step approval process where an entry could potentially land with an approver twice, you could put a bypass condition on the second step to skip this step “if already approved by the same user”. You can also use Other field here to direct this step to affect a specific user. To include only a specific user report.user.fullName != “<insert user name>" For example, if we created an approval step we want for Olivia’s expense reports, in the Other field we’d enter “report.user.fullName != “Olivia Sterling" |
|
Bypass (report only) |
Other |
The Administrator can set special condition for a bypass. e.g."!logicalItem.policyViolation" |
|
Approve or Reject by Email |
Yes or No |
The approver will receive an email in which there will be buttons to approve or reject directly via email. Buttons only available for following modules: PO, AP, Time off and Time Allocation. |
|
Approval/Rejection Comment |
None/Optional or Required |
The Administrator can force comments on approval or rejections |
Inserting and Reordering Steps
To insert (and thus, create) a step immediately before an existing step in the approval process, click the Insert link shown in the following image:
![]()
To re-position an existing step in the approval process, use the up and down arrows just to the right of the Insert link in the above image.
Editing An Existing Step
To edit the settings for an existing step, begin by,
- i) Clicking the pencil icon for the approval process to which the step belongs at (1), or
- ii) Click the process name at (1) -> Edit
Either of the two steps above will make the approval process editable. To edit a step, click the step’s name in the table shown in Figure 1. Once the updates have been made, click Modify at the bottom of the page.
Deleting a step
To delete an existing step from the approval process, ensure the approval process is editable, click the step’s name in the table shown in Figure 1 and click Delete at the bottom of the page.
Approval Bypass Logic:
The approval Bypass field includes a text field called “Others:”. In this field, you can enter conditions. These conditions evaluate as true or false. If the logical statement joining all the conditions evaluates to true, the approval level is skipped. If it evaluates to false, the approval level is not skipped.
This logic can be used to route submitted expense reports based on specific conditions:
- Bypass/Routing Expenses for a Specific Submitter
- Bypass/Routing Expenses by a Nexonia Custom Field value, such as Departments (if configured as a Nexonia custom field) or other custom fields at the item or report level.
You can use the logical AND (&&) and logical OR (||) operators to join conditions, in conjunction with brackets if necessary. You can use an exclamation mark “!” to create an inclusion rather than a bypass.
Some code samples are below, with plain language translation of the code below:
Bypass this step if the full name of the user who submitted the expense report is Jim O’Rourke.
report.user.fullName = "Jim O'Rourke"
This would cause any reports from Jim to skip this step.
Bypass this step unless the full name of the user who submitted the expense report is Olivia Sterling.
!(report.user.fullName = 'Olivia Sterling')
This would cause only reports submitted by Olivia to be affected by this step.
Bypass this step unless the Department on the Expense Item is Engineering ( 400)
!(item.custom['department'] = '400')
This would cause only expenses coded to the Engineering department to be affected by this step.
In this scenario, Department is a custom field in Nexonia, and has an internal ID of “400”. Using the internal ID of the custom field value is advised when using the bypasses.
Sample Approval Process: Second Approver
A common approval process is to require a second approver on the approval workflow, typically someone in finance who reviews the expense, allowing them to catch any errors prior to export.
Here, we’ll modify the default approval process and add a second step:
- Click on the Settings icon on the top menu bar.
- Click the Users > Approval tab.
- By default, Nexonia creates an approval process called “Manager” – click the Modify icon to modify this process
- By default, step 1 “Manager” is set to send the submitted items 1 level above the author in the hierarchy.
- Click the “Add” link to add a second step.
- Assigned To: check Fixed User, assigned to your specific Nexonia user. Here, we’ve chosen Alice Abell.
- Set Editable to “Yes” so that our second approver is allowed to edit entries during the approval review.
- Set a bypass condition “if already approved by the same user”.
- Click the [Add] button.

Sample Approval Step: Routing For A Specific Submitter
A common approval step is to require an approval routing for a specific submitter. A common example is, if using a hierarchy for approvals, how should the top-level submitters on the hierarchy be routed? This sort of approval step is commonly used for managing executive level reports.
The approval step has two parts:
For the Assigned To: value, you’ll set a “Fixed User” who will be the approver.
In the Bypass: you’ll be entering a formula in the Others field- this formula’s result will be “Bypass this step if your name is not (User Name).” The formula is:
report.user.fullName != “User Name”
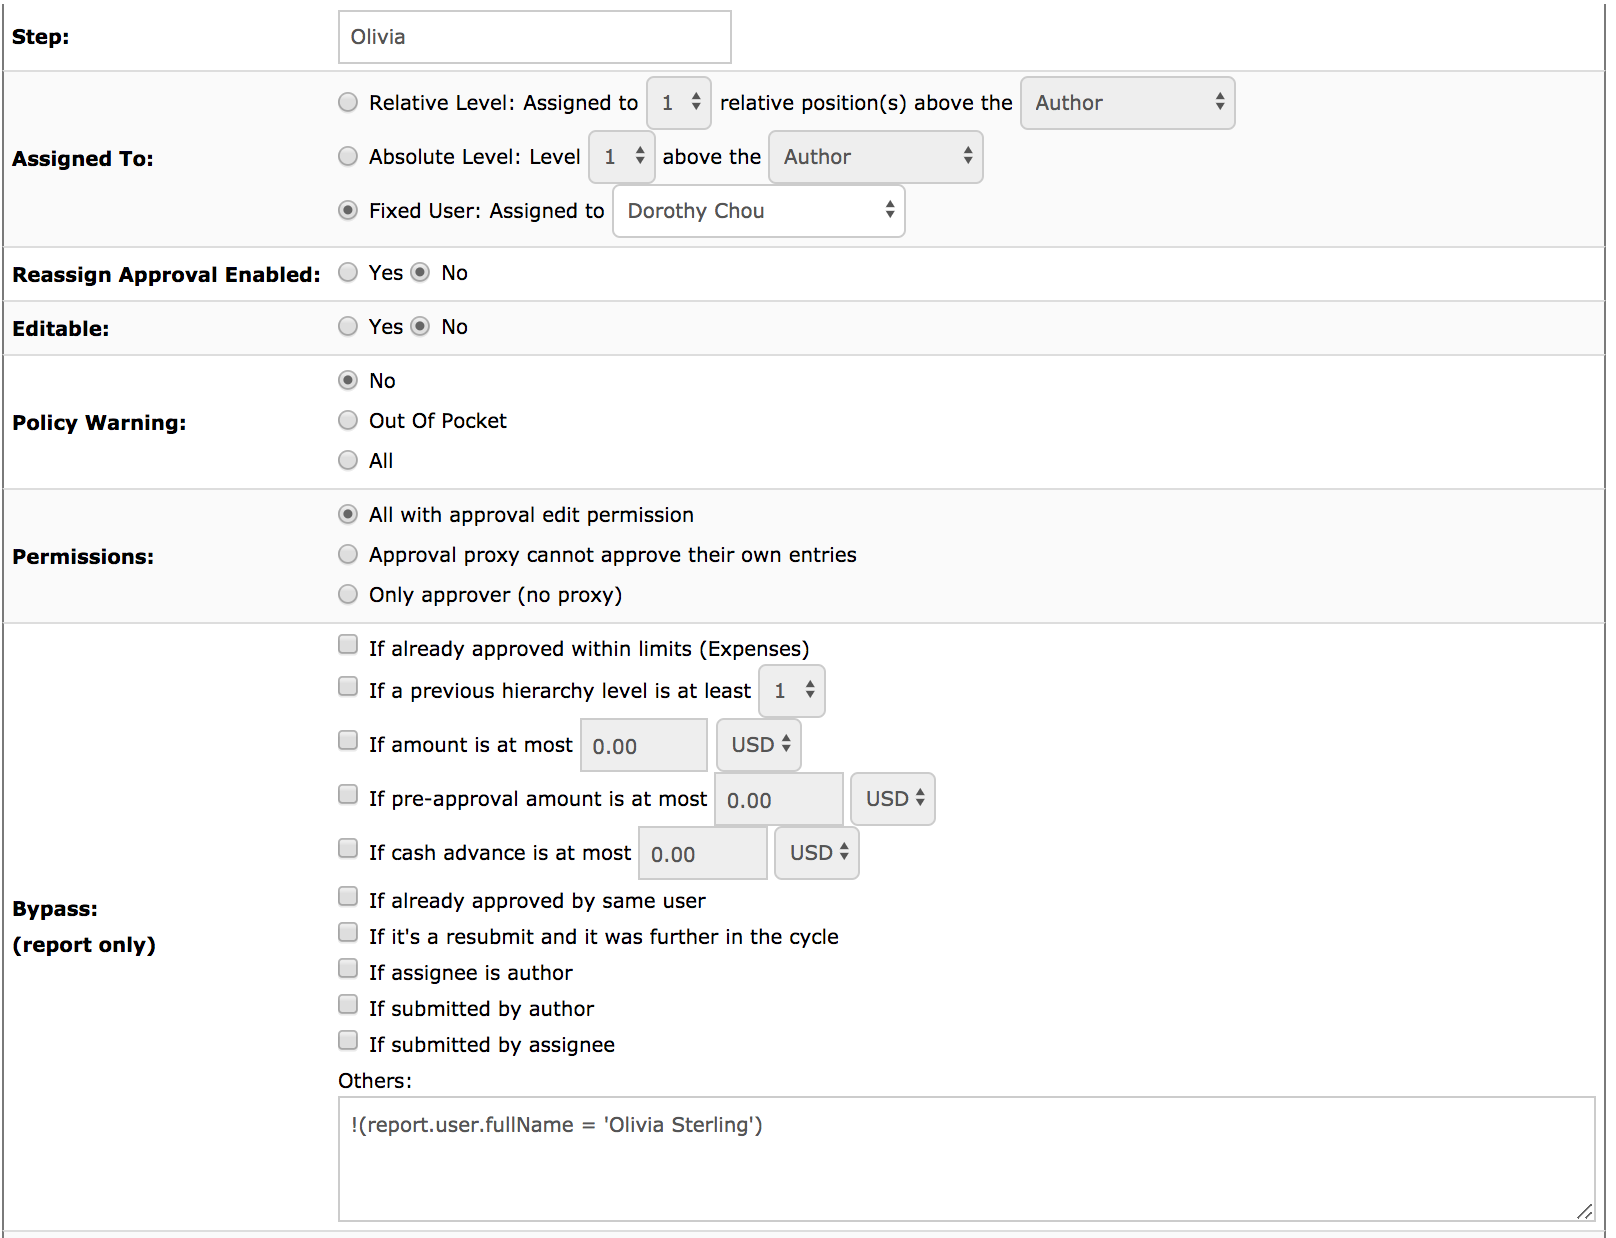
Here, we’ll modify an existing approval process and insert a step to route Olivia Sterling’s expenses:
- Click on the Settings icon on the top menu bar.
- Click the Users > Approval tab
- Click the “Modify” icon (pencil) to edit the approval workflow.
- Click either “Add” link to add a new step or “Insert” to insert this step into the existing process.
- Assigned To: check Fixed User, assigned to your specific Nexonia user. Here, we’ve chosen Dorothy Chou.
- In the Bypass field, in the Others field enter your formula:
!(report.user.fullName = 'Olivia Sterling')
- Click the [Add] button.

Approval Step routing Olivia's expenses to Dorothy

Comments
0 comments
Article is closed for comments.