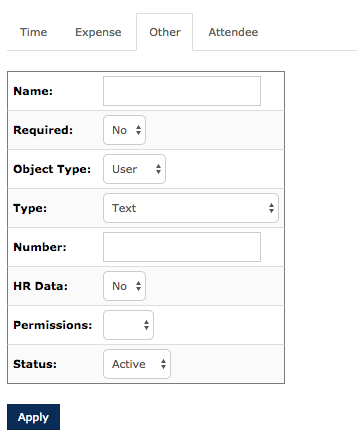
Custom fields can be created for user records to track different pieces of information such as bank deposit info or to assist with some configuration such as a custom approval route.
Nexonia Custom Fields are created by the administrator directly in Nexonia. Custom fields at the user level can be optional or required to be filled in and configured with a specific input method such as a text field or a drop down to select another active Nexonia user.
Creating and Configuring Custom Fields
Log in to Nexonia as an administrator.
Navigate to Setup > Company > Custom Fields
You’ll see a tab for “Other”
- To add a field, click Add.
- To modify a field, navigate to the field you wish to modify and click the pencil icon to edit it.
Once you configure the custom field, click the Apply button to save the configuration.
Settings
The following information will define how each of the fields can be configured. Just be sure to set the Object Type to User first.

Name – Name of the field.
Required – Per your needs, you can set your custom field required or optional
- Yes – required
- No – optional
Object Type - Set this to User for this purposes of this article.
Type – You can create a custom field based on different types of input options:
- Text – open text field
- Date – date-based entry field
- Boolean – Yes or No option
- Select – presents a list of values created by the administrator as Choices in a dropdown menu. When this type is selected, a Choices field will appear where you’ll add the Choices they can choose from. You can type them, or copy and paste the values in from an external document.
- Select user – presents a list of the Nexonia users in a dropdown menu.
- Select Multiple User - redundant
- Select a Name/Value - presents a list of values created by the administrator in a dropdown menu. The name or label would be what the user sees, the value would be a corresponding value linked to that name and typically used in an export report. When this type is selected, a Choices field will appear where you’ll add the Choices they can choose from. You can type them, or copy and paste the values in from an external document.
- Amount – amount entry field
- Select Multiple Name/Value – redundant
Number - the internal ID for this field, which would typically be used if this field is being included in an export file. It may be text or numeric.
Permissions - What permissions would you like to grant the end user to the field:
- No - The user will not even see the field
- Read - The user can see the field and values entered, but can't adjust
- Edit - The user will be able to edit the field
Status - This option controls if the custom field is active or inactive in the system

Comments
0 comments
Article is closed for comments.