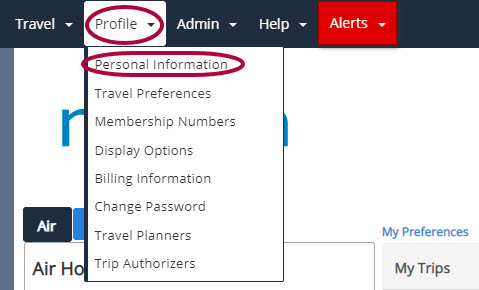
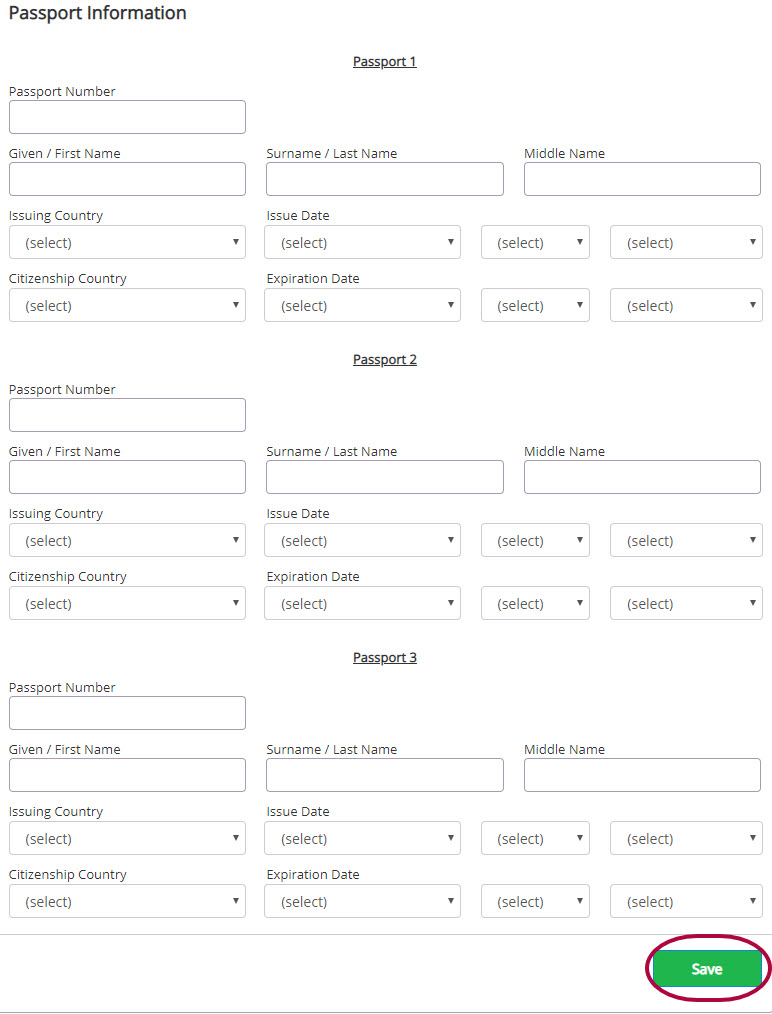
Step 3: In the Passport Information section, enter your passport details for up to three passports. Click Save.
Submitting & Approving Expenses
Alternating schedule
How to login, upload your receipts, create and expense reports for approval, and approve expenses.
Submitting & Approving Time Off and Timesheets
Alternating schedule
A walkthrough of how to create, submit, and approve Timesheets and Time Off requests.
Reporting Module Overview
Alternating schedule
An overview on how to create and generate reports.
Configuring Expense Settings for Admins
Alternating schedule
How to manage your company's data and settings.
Configuring Timesheets & Time Off Settings for Admins
Alternating schedule
How to manage timesheets and time off settings and policies for your company.
Managing Nexonia with Intacct
Alternating schedule
An overview of how Nexonia is integrated with Intacct. Learn how to import and export data between Nexonia and Intacct, manage users, expense categories and Intacct dimensions.
Managing Nexonia with QuickBooks
Alternating schedule
An overview of how Nexonia is integrated with QuickBooks Desktop or QuickBooks Online. Learn how to import and export data between Nexonia and QuickBooks, manage users, expense categories and QuickBooks dimensions.
Managing Nexonia with NetSuite
Alternating schedule
An overview of how Nexonia is integrated with NetSuite. Learn how to import and export data between Nexonia and NetSuite, manage users, expense categories and NetSuite segments.
Travel Booking & Analytics
Alternating schedule
Review how to book travel, run reports, & view unused tickets.
Watch Nexonia's easy-to-follow brief tutorial videos here.
Travel Planners have the permission to select other travelers in the company and manage travel for them. In order to act as a travel planner on behalf of a traveler, you must be added to the traveler’s profile as a travel planner.
As a Travel Planner, you have the following abilities
Step 1: On the right side of the menu bar, select the dropdown menu to access the option for Select Another User.

Step 2: Click Select Another User. Any previously selected users will be listed and you will also have the option of “More…".

Select More… to search the company for the user you need to book for.

Note: Results are limited to profiles that list you as a Travel Planner.


Step 1: Select the View icon for a credit card in your profile.

Step 2: Check the Allow me to select this card when booking for a selected traveler radio button.


Note: You will be able to edit the information that is populated but it will not update the traveler’s profile.
As mentioned above, you must be listed as a Travel Planner in a traveler’s profile for access. See the online guide for Adding a Travel Planner for information.
This article describes the Nexonia Travel User Roles and their capabilities.
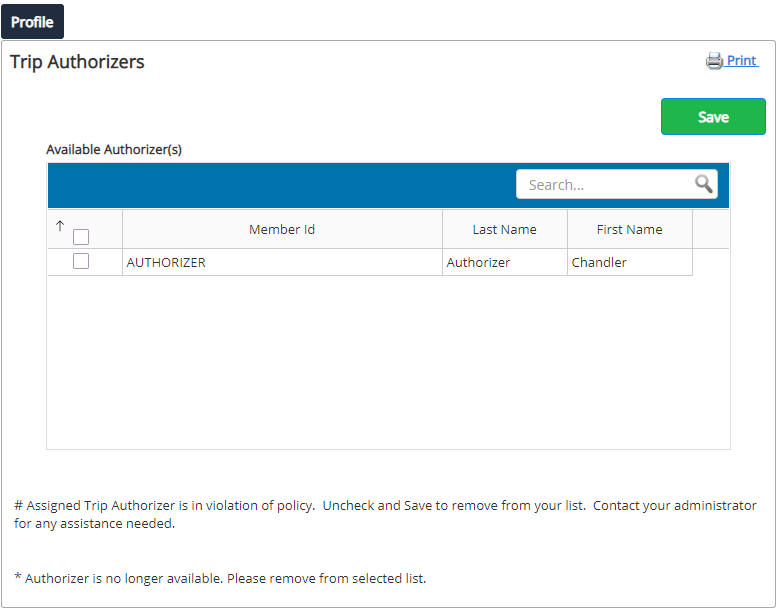
A Basic Traveler is the role given to the main group of travelers in a company. These users can:
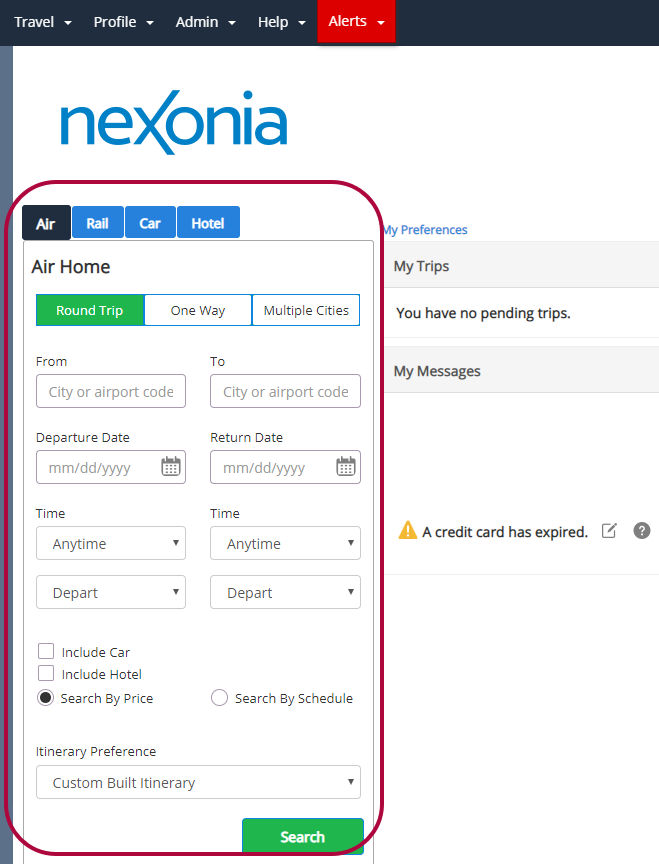
An Executive Traveler is a traveler that requires a more flexible travel policy. These users may have the ability to book business class, where Basic Travelers can only book coach. Like Basic Travelers, Executive Travelers can book their own travel, and update their profile.
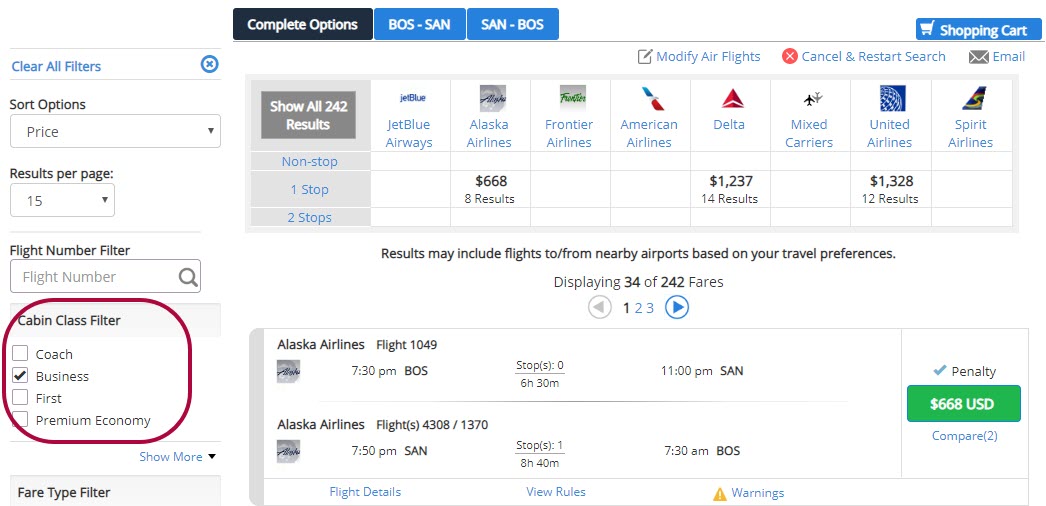
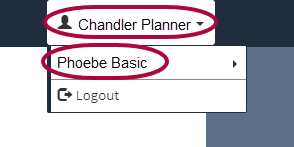
A Travel Planner can book travel on behalf of another person in their company. These users also have the same permissions as Basic and Executive Travelers.
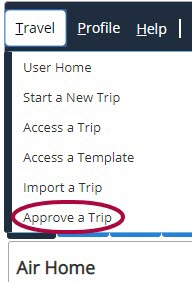
A Trip Authorizer can approve travel for other users. These users also have the same permissions as Basic and Executive Travelers.
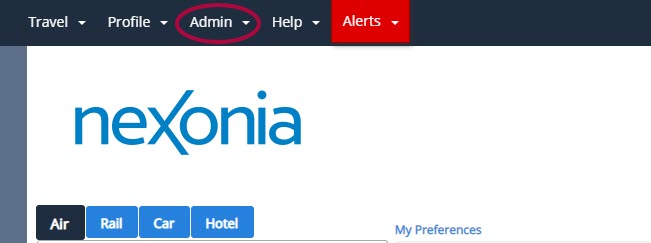
A Company Travel Administrator is the employee who oversees the entire travel program. In addition to having the same permissions as all of the users above, these users can:
A TMC Administrator is an employee who manages a Nexonia Travel account on behalf of a company. Unlike a Company Travel Administrator, TMC Admins are users outside of the company they are administering. These users can:
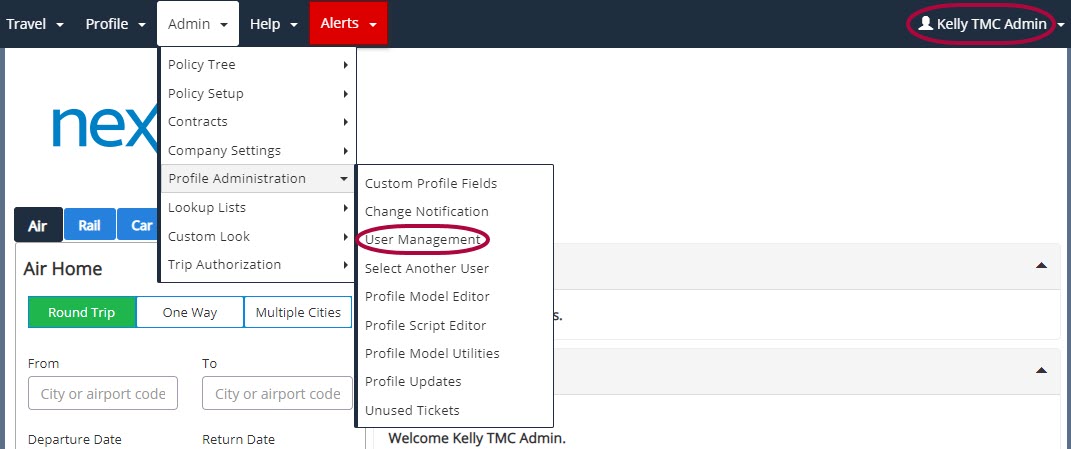
Nexonia Travel offers you the option to save a credit card to your account. Saving a credit card will allow you to select a payment method with a single click without having to re-enter your card information. The following article will show you how to add your credit card to your Nexonia Travel account.
Step 1: From the Nexonia homepage, select the Travel menu to be sent to the Nexonia Travel homepage.

Step 2: Click the Profile menu. Then, select Billing Information.
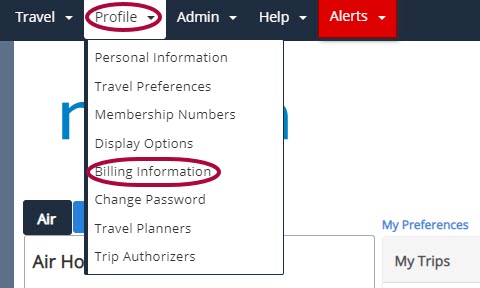
Step 3: Select Add a New Credit Card.
Please Note: Any company cards that you have been given permission to use will also be viewable here.

Step 4: Enter the credit card information in the fields provided.
Step 4: Click Save to add the card to your profile.
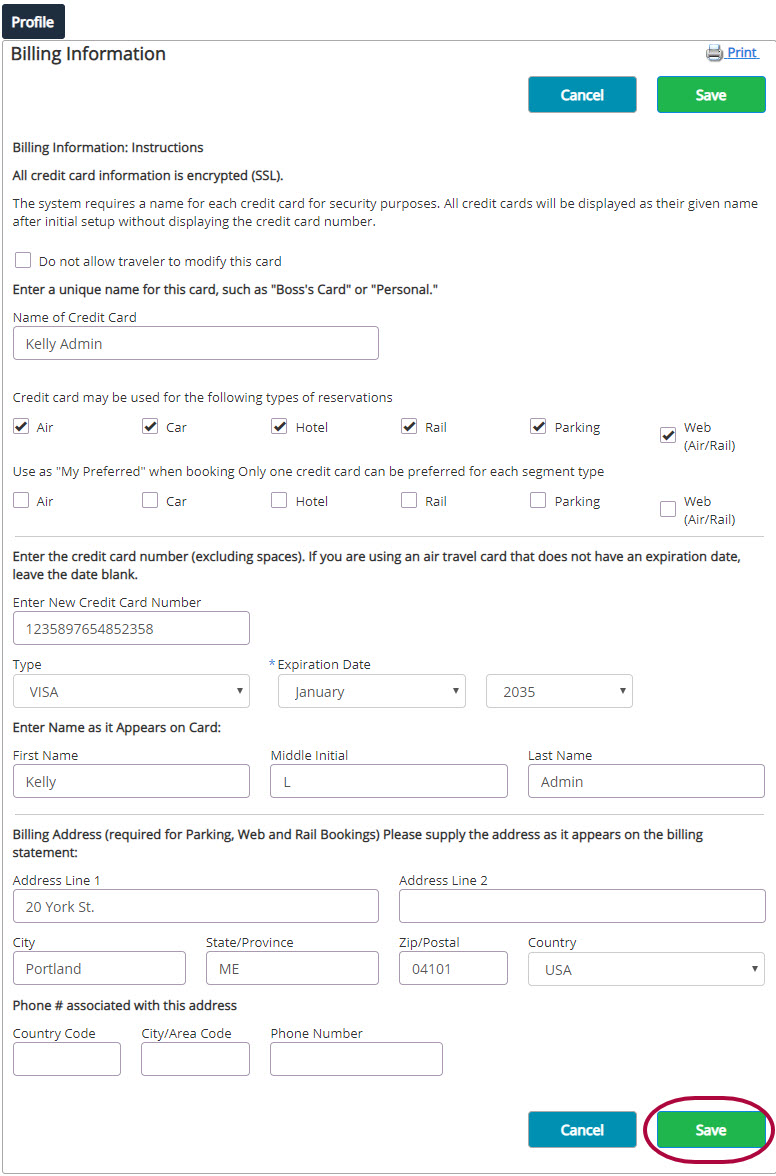
Nexonia Travel offers you the option to save your own loyalty program numbers (such as frequent flyer numbers) to your account. When you book a trip, Nexonia Travel will send the loyalty program number to the travel vendor to continue the reward accrual process. This article will show you how to add loyalty program information to your Nexonia account.
Step 1: From the Nexonia homepage, select the Travel menu to be sent to the Nexonia Travel homepage.

Step 2: Click the Profile menu. Then, select Membership Numbers.
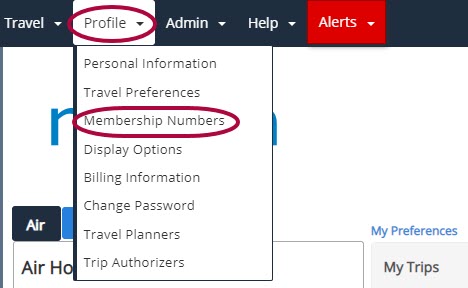
Step 3: Here, you can enter membership numbers for Airline, Car, Hotel, or Rail In each section there is a link for “Add New … Membership Number”. Scroll down to the Loyalty Program Association section to associate your air membership numbers to car and hotel vendors.
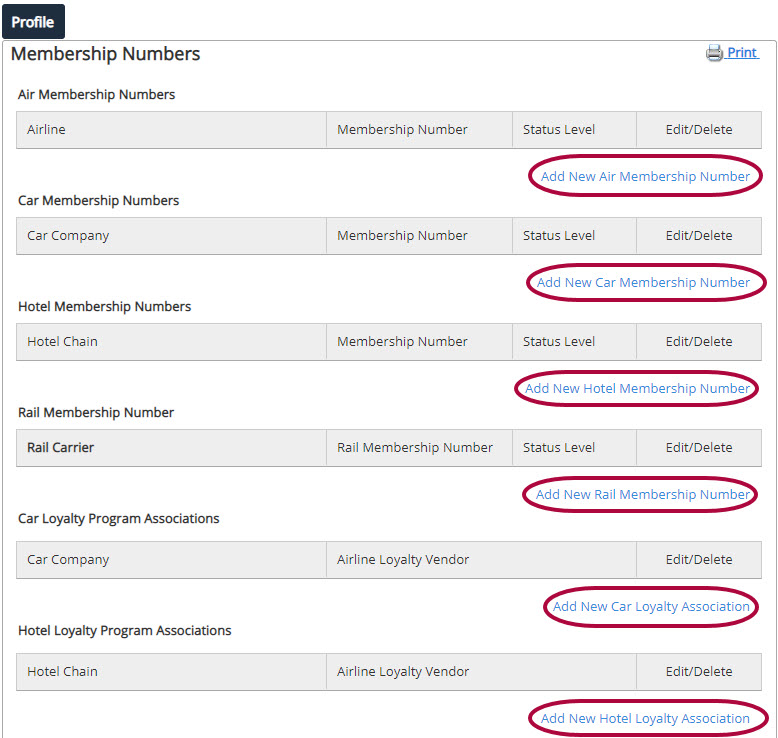
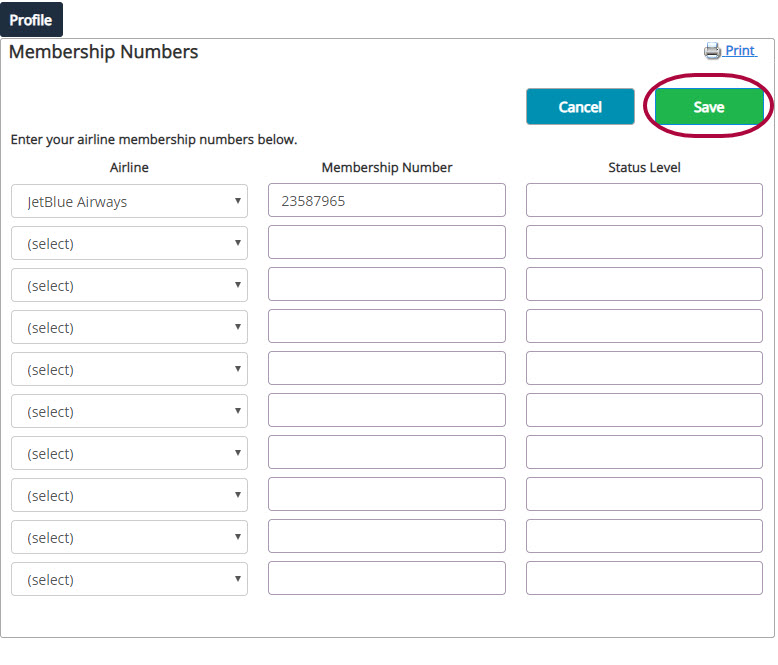
Step 4: Add the membership number or loyalty program association and click Save.
Nexonia Travel allows you to store your passport information in your account for future travel. This article will show you how to add your passport information to your profile.
Step 1: From the Nexonia homepage, select the Travel menu to be sent to the Nexonia Travel homepage.
 Step 2: Select Personal Information in the Profile menu.

Step 3: In the Passport Information section, enter your passport details for up to three passports. Click Save.

In addition to the regular notifications which are sent when a trip is booked, Nexonia Travel offers the option to have additional notifications sent to email addresses other than the default address on file. This article will show you how to add additional email notifications.
Step 1: From the Nexonia homepage, select the Travel menu to be sent to the Nexonia Travel homepage.
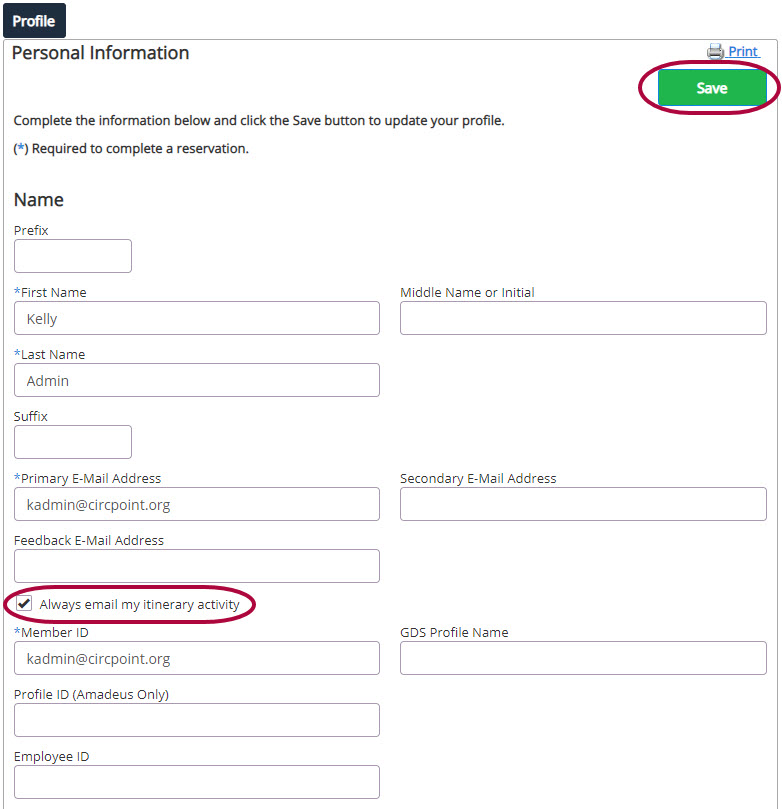
 Step 2: Select the Profile menu followed by Personal Information.

Step 3: Below the Primary and Secondary E-Mail Addresses, select the option for Always email my itinerary activity.
Please Note: Your itineraries will be emailed to the primary and secondary email addresses when the itinerary is created, modified, or cancelled.
Nexonia Travel works with several Global Distribution Systems (GDS) to provide robust travel services for users.
However, some travel vendors, like Allegiant Air and Volaris, sell their travel services outside of the GDS search. To include travel vendors in search results, Nexonia Travel provides a feature called the SuperSwitch to connect with these outside travel shopping sources. The SuperSwitch then connects to Travelfusion.
This article shows you, a TMC Administrator, how to activate the SuperSwitch required for air and add it to your Policy Tree.
Step 1: From the Nexonia homepage, select the Travel menu to be sent to the Nexonia Travel homepage.
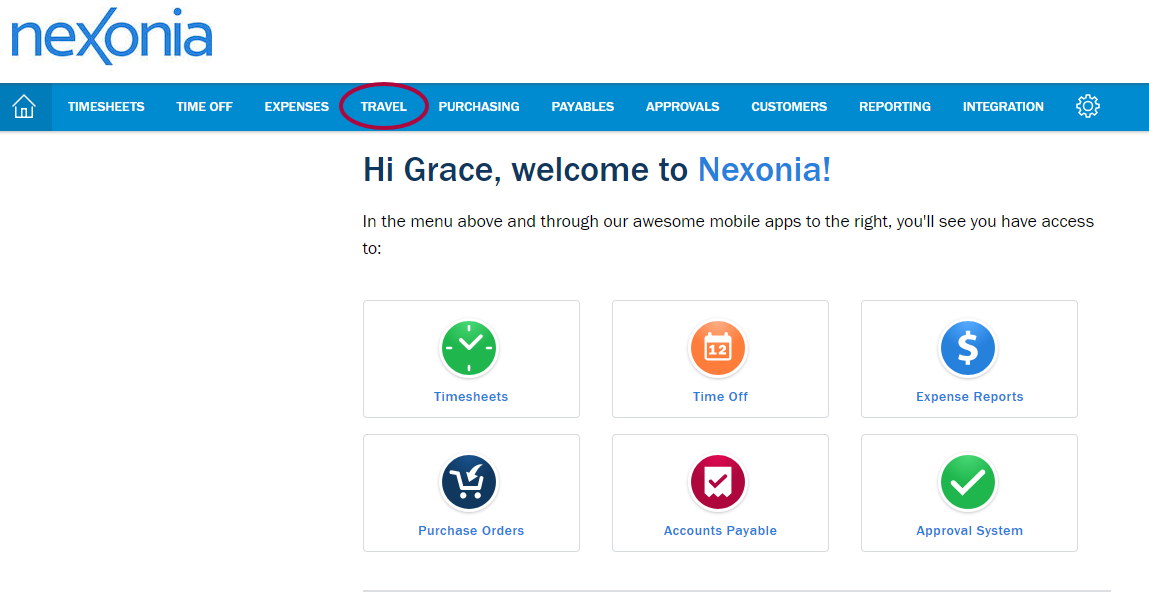
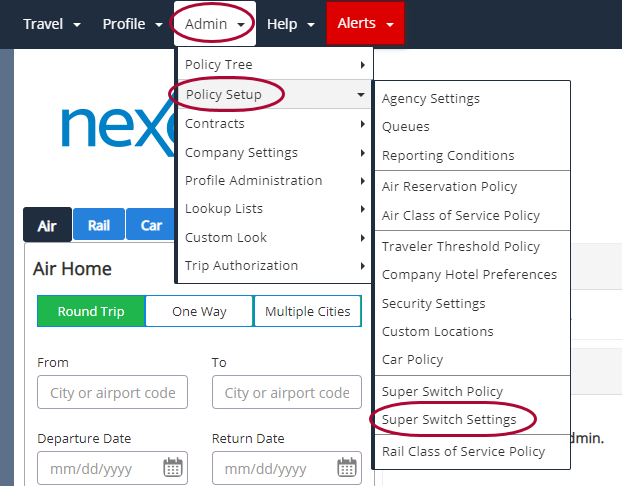
Step 2: On your Nexonia Travel homepage, click Admin. Then, click Policy Setup, followed by Super Switch Settings.
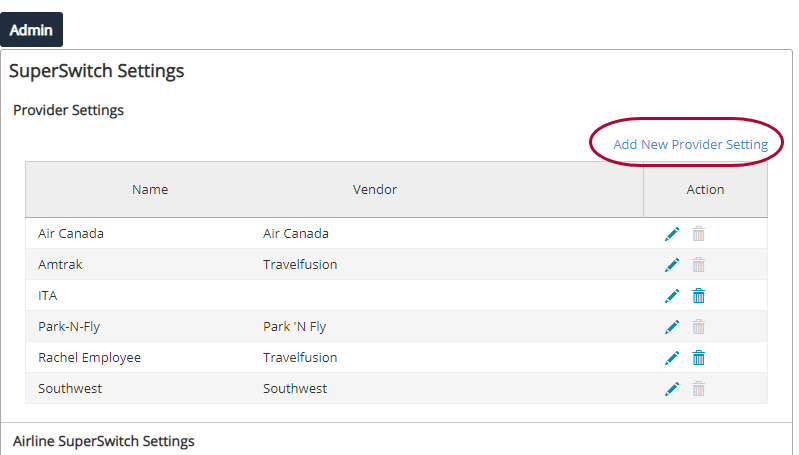
Step 3: Next, click Add New Provider Setting under the Provider Settings menu.
Step 4: Enter the Super Provider Name and choose Travelfusion in the Vendor drop-down menu. When complete, click Save.
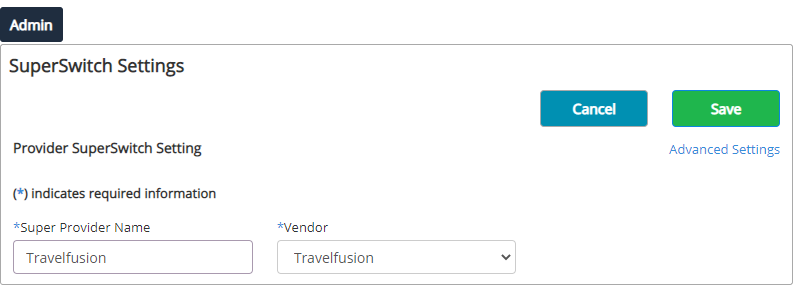
Please Note: Advance Settings are used for testing only. Please contact support prior to using this feature.
Step 5: Return to the Super Switch Settings page. From here, click Add New Air SuperSwitch Setting.

Step 6: Enter an Air SuperSwitch Setting Name and choose your air provider under the Provider drop-down menu. Enter an Agency Email Address to be notified of any booking errors that require action. Check the Air Supplier(s) you need and enter any credentials you have that are accepted for a Supplier.
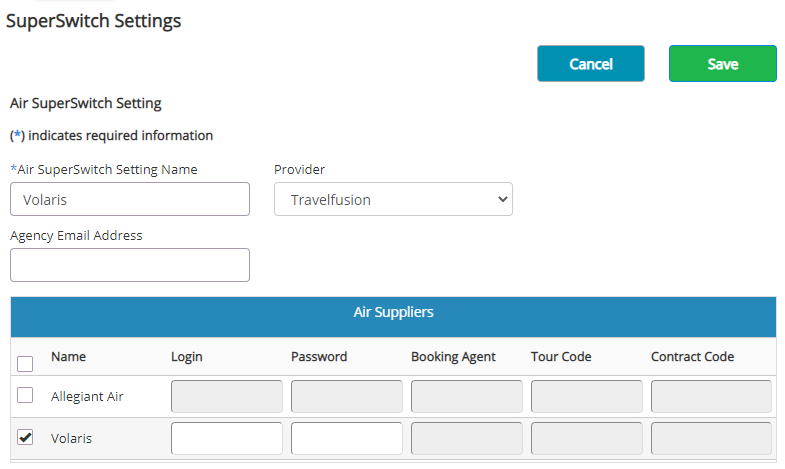
Select if you would like to Add Passive Rail Segments in GDS by checking the checkbox. This will create a PNR in your GDS with passive segments for the air segments (See the tooltip on the Air Passive Segment Type for available formats). Review the default documentation that will be added to the Passive booking. You can select Custom Documentation to adjust any entries. There are also options to add the form of payment and a OTH/TUR line.
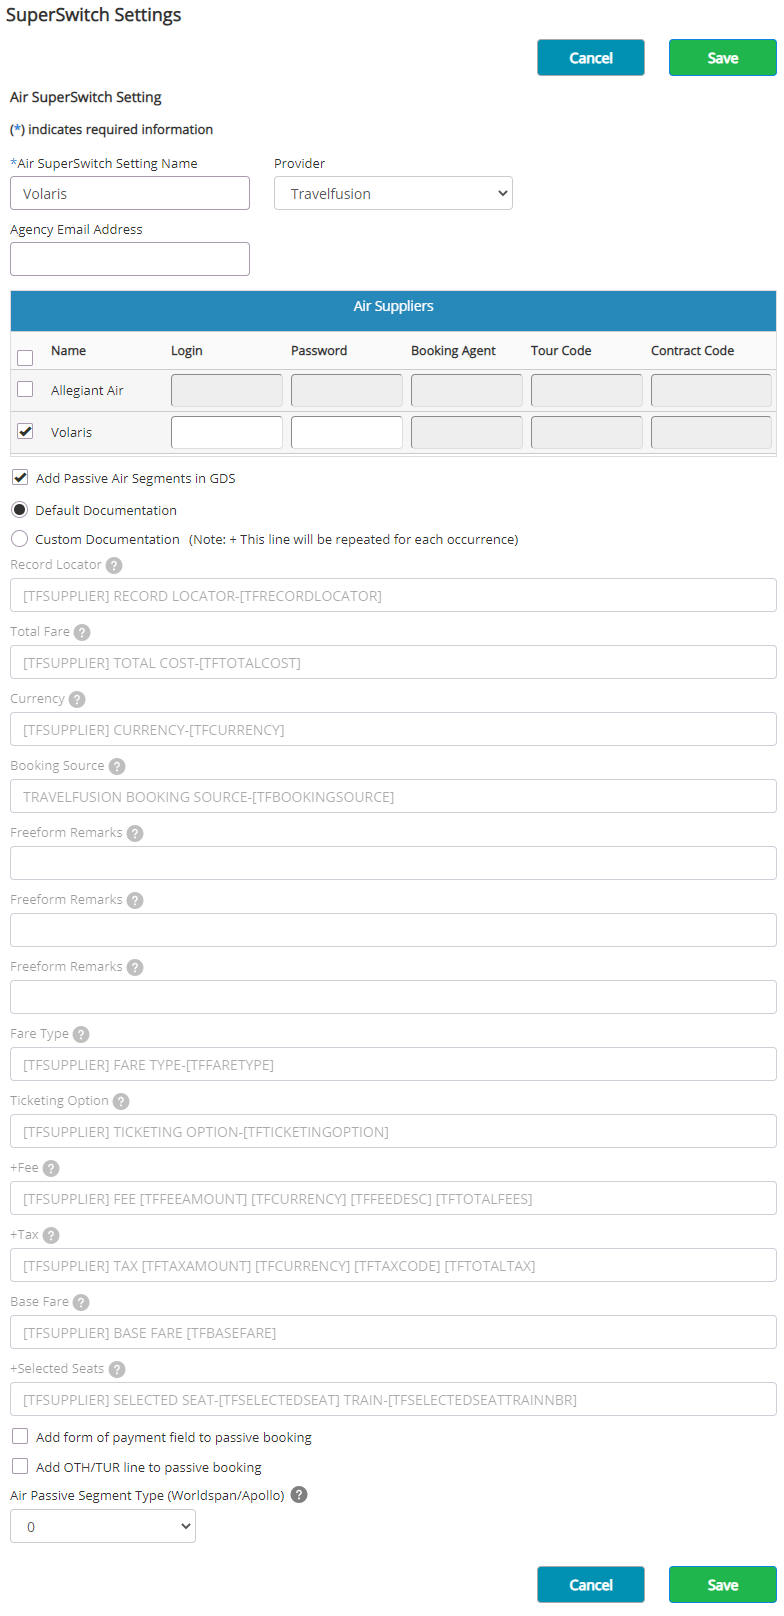
When complete, click Save.
Step 1: On the Nexonia Travel homepage, click the Admin menu. Then, click Policy Setup followed by SuperSwitch Policy.
Please Note: Only one SuperSwitch Policy is allowed per branch.
Please Note: The name Prefix is a required field. This field must be populated in order to book. if the traveler does not have a Prefix in their profile, the user will be prompted at the time of booking to add the information.

Step 2: Click Add New SuperSwitch Policy.
Please Note: You can also add the Air SuperSwitch Setting to an existing SuperSwitch Policy.

Step 3: Under Available Air SuperSwitch Setting(s) move the Air SuperSwitch Setting to Selected Air SuperSwitch Setting(s) and click Save.
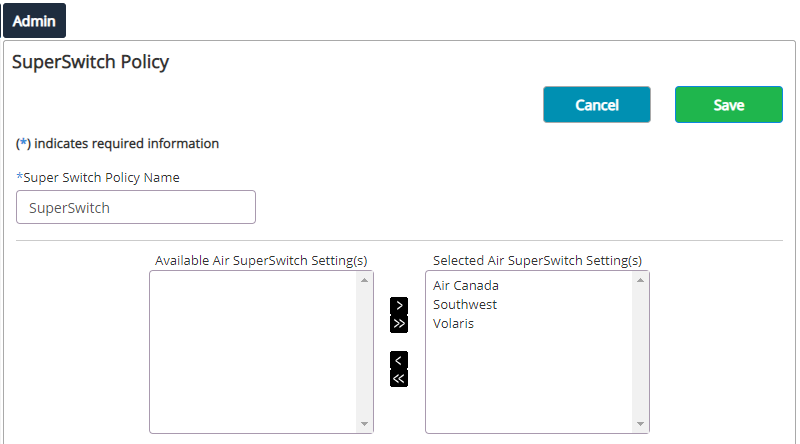
Please Note: If you are creating a new SuperSwitch Policy, you must include the new policy on the Policy Tree.
If you're looking for information and additional help on AmTrav, visit their Knowledge Base. There, find information about making and cancelling itineraries, creating travel reservations, and more.
Trip Templates are used to save frequent trip information to use on a later trip. For example, if you have users looking to book the same flight multiple times a year.
This article shows you, a Nexonia Travel User, how to create and use Trip Templates.
Step 1: Start by searching for a trip. When you're ready to book, click Purchase.
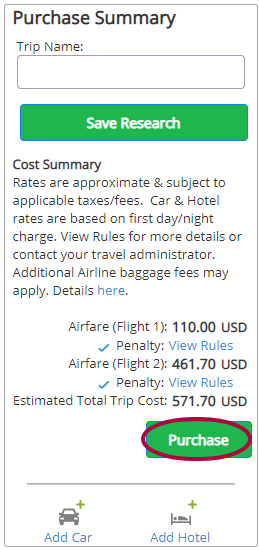
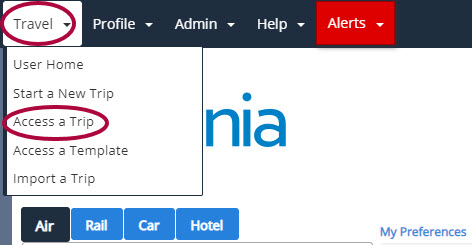
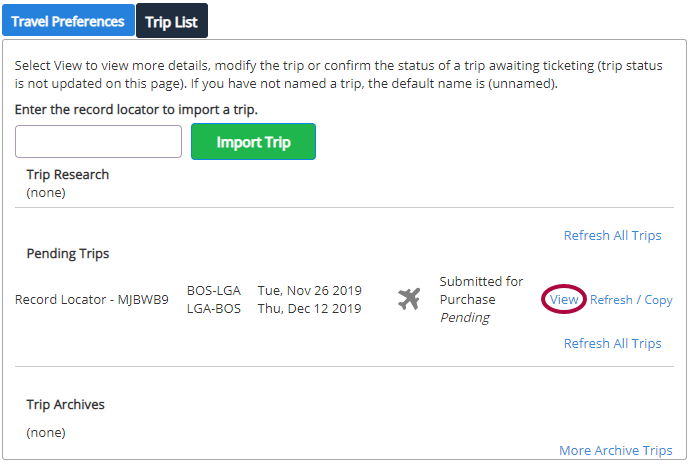
Step 2: Click Travel, then click Access a Trip.
Step 3: Click View next to the trip you'd like to add as a template.
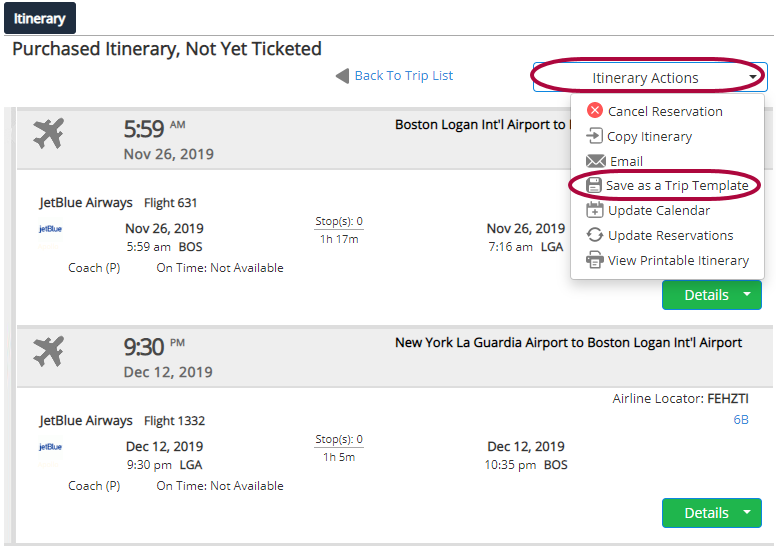
Step 4: Click Itinerary Actions followed by Save as Trip Template.
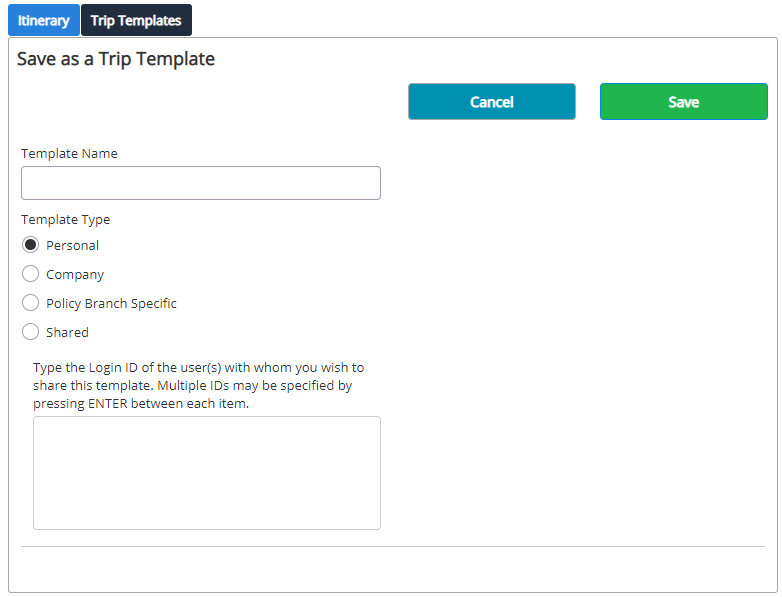
Step 5: Name the Trip Template. Best practice is to use a name that is easily identifiable. Then, choose if it should be for your Personal use, Company use, Policy Branch Specific, or Shared. If you're sharing the template with others, enter the Login IDs of the users you wish to share it with.
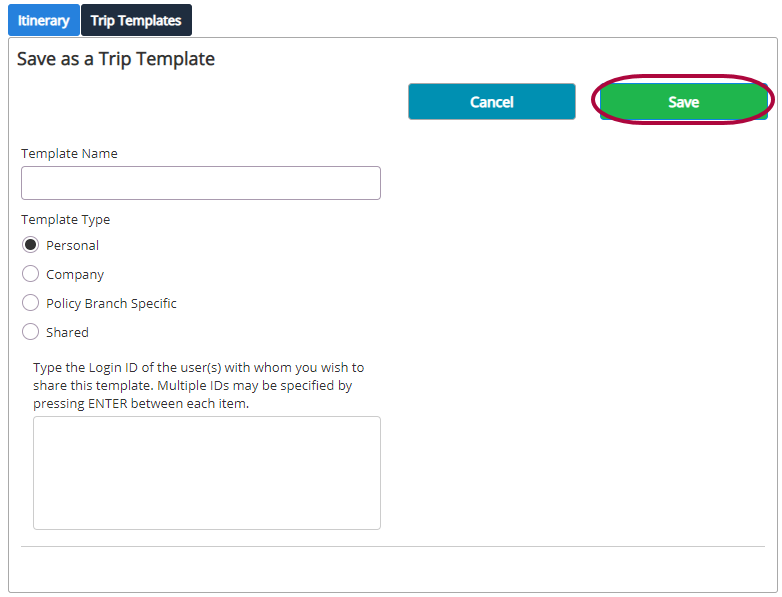
Step 6: Click Save to complete.
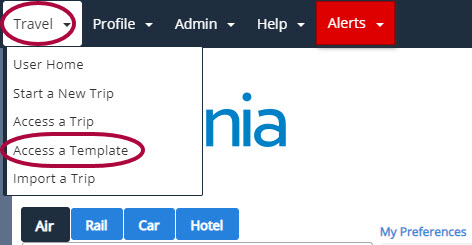
Step 1: To use the Trip Template on a trip, click Travel followed by Access a Template.
Step 2: Click Create Itinerary next to the template you'd like to use.

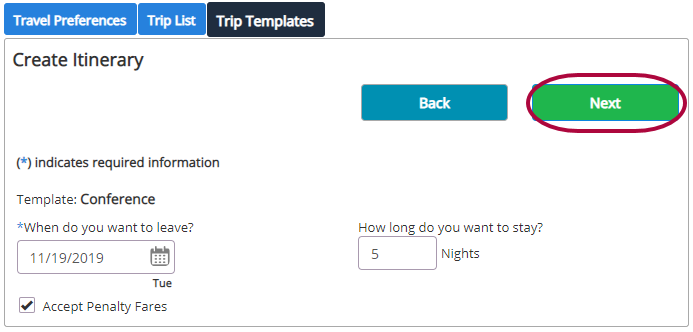
Step 3: Enter your Departure Date and how long you'd like to stay. Then, click Next.
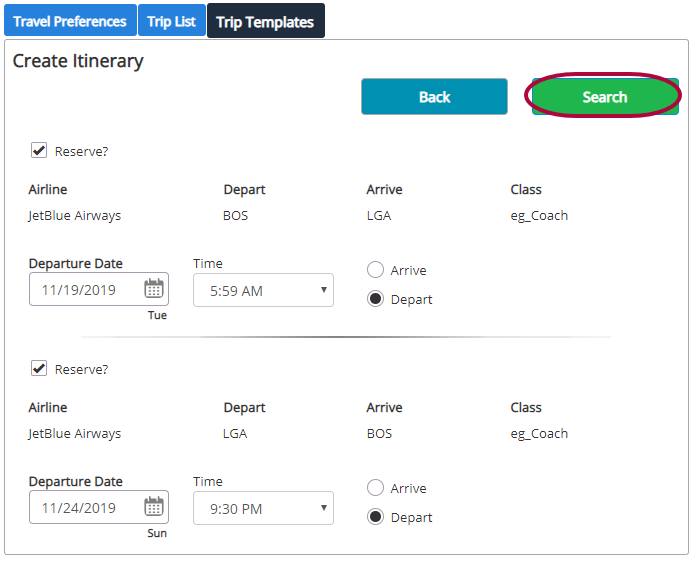
Step 4: Click Search.
Complete your booking process as usual.
As a TMC Administrator, you can allow users to be a Travel Planner and book trips on behalf of another user.
This article shows you, a TMC Administrator, how to create Guest Profile Access.
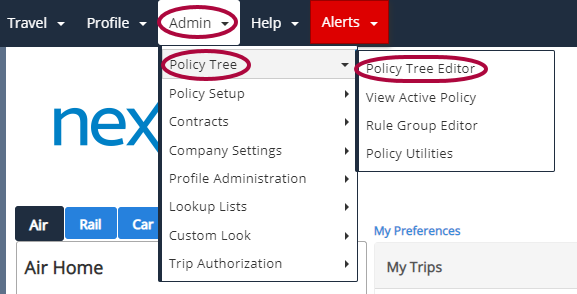
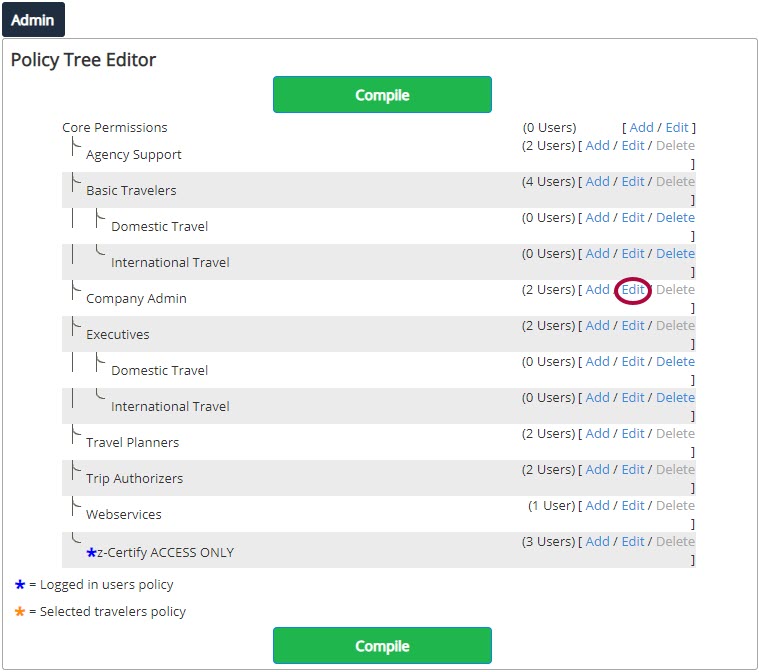
Step 1: On your Nexonia Travel homepage, click Admin. Then, click Policy Tree followed by Policy Tree Editor.
Step 2: Click Edit for the policy you want to have access to the Guest Traveler profile.
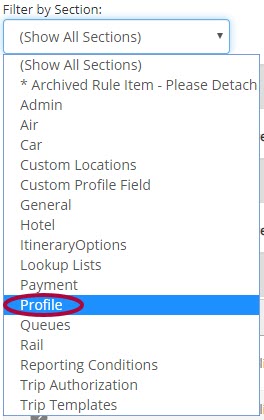
Step 3: Change the Filter by Section to Profile.
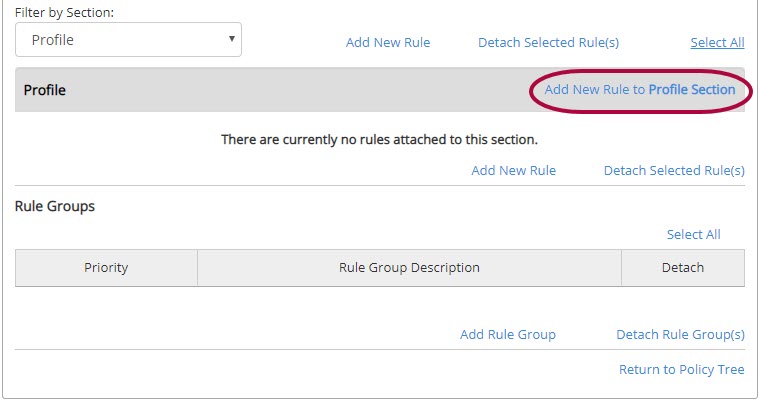
Step 4: Click Add New Rule to Profile Section.
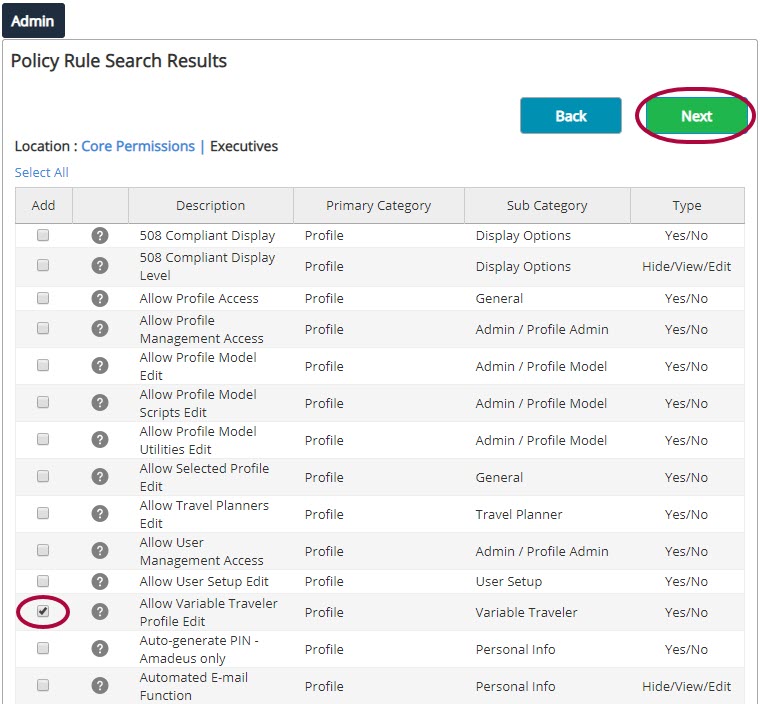
Step 5: Click the box next to Allow Variable Traveler Profile Edit and click Next.
Step 6: Set the Value to Yes. Click Save.

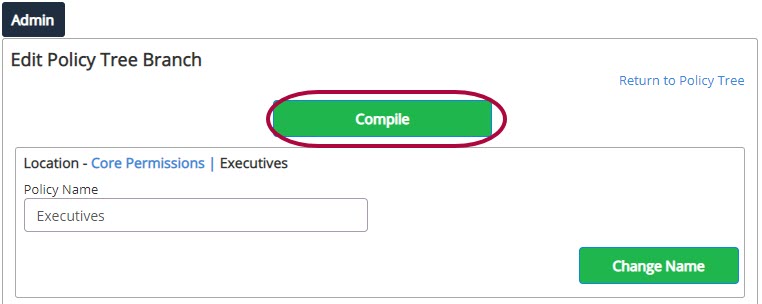
Step 7: Click Compile.
For next steps, view our article on Booking Guest Travel.
Nexonia Travel provides a Travel Planner option so designated users can book travel on another user's behalf. This is handy, for example, if a manager often has their administrative assistant book travel for them.
This article shows you, a Nexonia Travel User, how to establish a Travel Planner to book trips on your behalf.
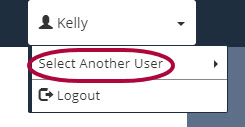
Step 1: On your Nexonia Travel homepage, hover over your traveler name and click Select Another User.
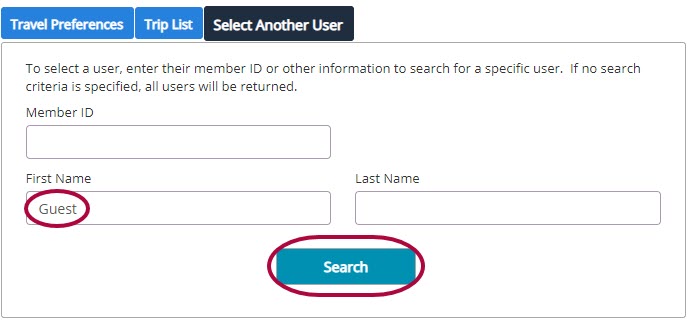
Step 2: Enter Guest in the First Name field and click Search.
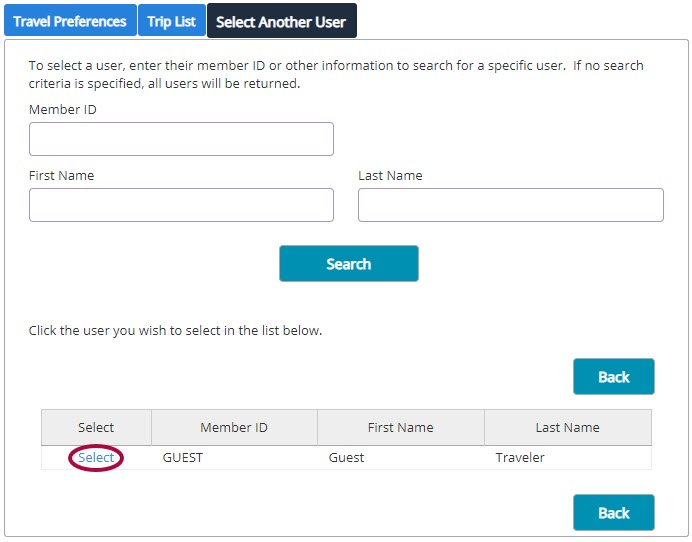
Step 3: Click Guest Traveler.
You are now in the Guest Traveler profile.

Step 4: Add a new Travel Planner to the Guest Profile by clicking Profile, then Travel Planners.
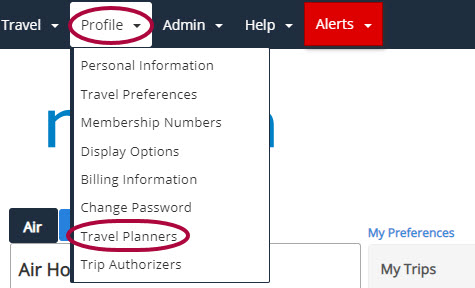
Step 5: Click Add New Travel Planner.

Step 6: Add the company email address for the employee who will be booking travel on your behalf to the Member ID section and Save.
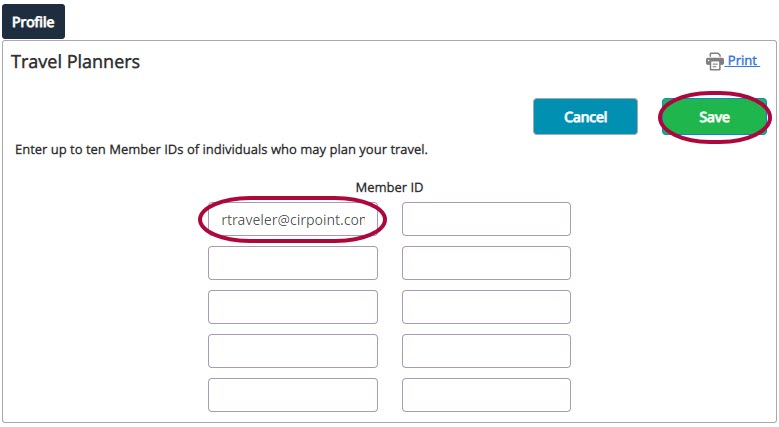
Step 7: Now, this employee can select your name from the Traveler profile and book travel on your behalf.
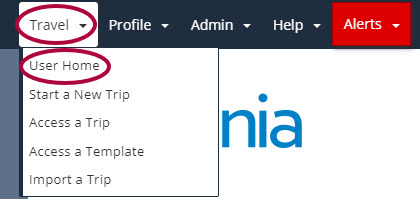
You can now begin the booking profess for Guest Traveler.
Nexonia Travel allows users to book flights, hotels, and car reservations quickly and effortlessly online. This article will show you how to book a flight.
Step 1: From the Nexonia homepage, select the Travel menu to be sent to the Nexonia Travel homepage.

Step 2: On the left panel, select Round Trip, One-Way, or Multi-City at the top. Enter your From and To locations, along with the departure and return dates and times. Use additional filtering on the in My Preferences if necessary. Click Search.
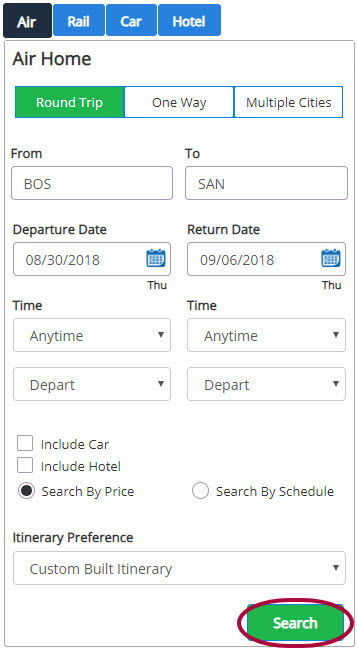
Please Note: If Search by Schedule is selected, Leg 1 and Leg 2 will be selected individually.
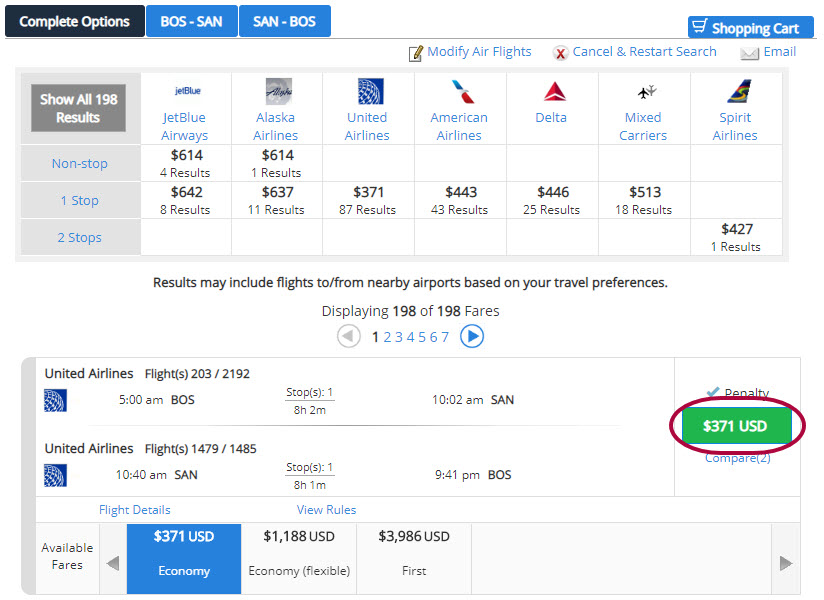
Step 3: Fares reflected are categorized by fare family and ticket class and will note trip totals based on the lowest available fare. If more than one fare is available for an option, the fares will be listed for selection.
Please Note: Click Warnings to view potential company policy violations.
Step 4: You will be presented with any lower-fare options if they are available. Otherwise, you are taken to the Shopping Cart.
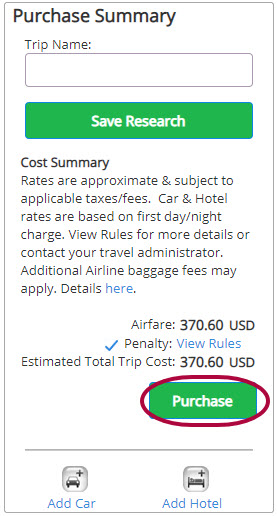
Step 5: Click Purchase to complete the reservation. Enter in any additional information for the trip required by your company. Be sure to acknowledge the DOT hazardous materials notification.
Please Note: If you have any unused tickets available from previous bookings, they will be added to this booking.
Step 6: From the Purchased Itinerary page, Itinerary Actions will allow you to email or cancel your reservation. 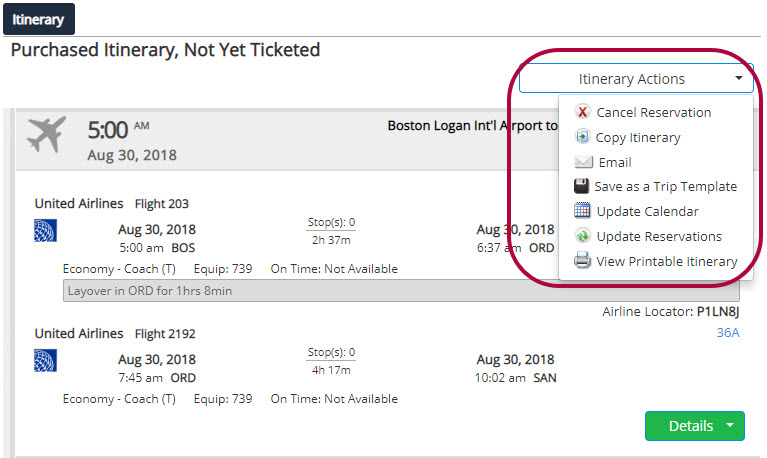
Step 7: You will receive a confirmation email when the reservation has been approved. Your emailed itinerary will automatically forward as an expense line item on a report.
The Nexonia Travel app is a great way to book your travel on-the-go. This article will show you how to download and register for the Nexonia Travel app.
Before you begin, check your Nexonia Travel Profile to make sure that your corporate email address is in the email address field in the Profile Personal Information section. Personal email addresses cannot appear in this field.
Step 1: Download the Nexonia Travel App from the Android or Apple Stores.
Step 2: After the download is complete, select the Register Button. Complete the information in the Sign-up area and be sure to use the same email address connected to your Nexonia Travel profile. Also, be sure to enter your full Company name as given by your travel manager.
Please Note: If you don't have your Company name, contact your Travel Administrator. If you don't enter this information, you won't be able to book travel.
Step 3: When the registration is complete, you'll receive a confirmation email that contains an authorization link. Click the link to approve your account and begin booking travel from your mobile app.
Please Note: If you don't receive the confirmation email, check your spam folder. If you do not click the authorization link from the email, you cannot access the mobile app.
The Nexonia Travel mobile app allows you to book trips while on the go.
This article will show you how to book a trip, including flight, car rental, and hotel all from you Nexonia Travel mobile app.
To begin, make sure you've downloaded and are registered for the Nexonia Travel Mobile App.
Step 1: Start by logging into the Nexonia Travel Mobile App with your regular login credentials. Once logged in, tap the Book square to begin booking a trip.
Step 2: You'll be brought to the Nexonia Travel homepage, where you can begin booking a flight, a rail reservation, a rental car reseravation, or a hotel reservation.
If beginning with flight, first select if you're looking for a round-trip or one-way flight. Enter in which airport you'll be flying out of and into, your departure date, and your return date.
Step 3: Check Include Car and Include Hotel if you'd like to include them when booking your trip. If including hotel in your search, enter in the Hotel Name where you'd like to stay as well as your check-in and check-out date.
Step 4: Tap Search when complete.
Step 5: Flight information based on the criteria you entered will appear. To choose a flight, tap the price next to the flight.
Step 6: If you included a car in your search, you'll now have the option to select a rental car. Tap Add to Cart to select.
Step 7: If you included a hotel in your search, you'll now have the option to select a hotel. To learn more about the populated options, tap Show Rates.
Step 8: To choose a room, tap the price underneath the description of the room.
Step 9: Tap Purchase to finish booking your trip.
Step 10: Depending on your company settings, you may need to enter in Additional Information, such as the purpose of your trip. Tap Continue.
Step 11: You'll now be prompted to enter in your credit card information to purchase your trip. Click Continue when complete.
Step 12: Your trip is now purchased. You can review your trip itinerary any time on the Mobile App or Online.
Companies are able to store their company credit cards for payment in Nexonia Travel.
This article will show you, a local Nexonia Travel Administrator, how to add a company credit card for multiple user profiles.
Step 1: On your Nexonia Travel homepage, select the Admin menu. Then, select Company Settings followed by Reports.

Step 2: Click View Reports.

Step 3: Click Add for the Administrative | Group Profile Updates Report.
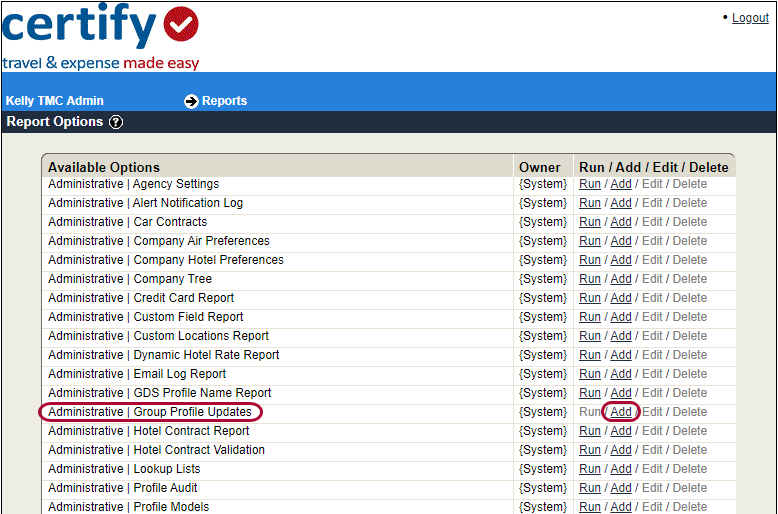
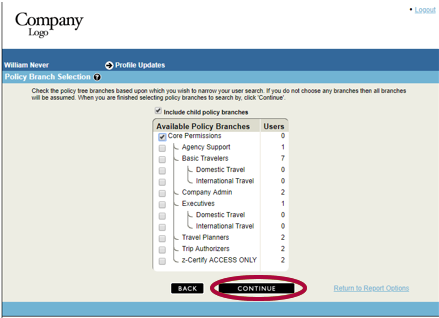
Step 4: Check the box for the Core Permissions policy branch and the checkbox for Include child policy branches. When Finished, click Continue.
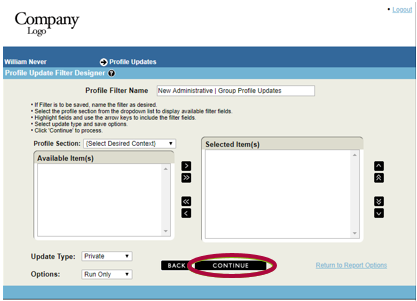
Step 5: The Profile Updates Filter Designer page will display. Selections can be made if you want to only add the credit card to certain profiles. The selected filters will be available on the Update Filters page. If you are updating for all profiles, no selection is required to Add a Credit Card. Click Continue.
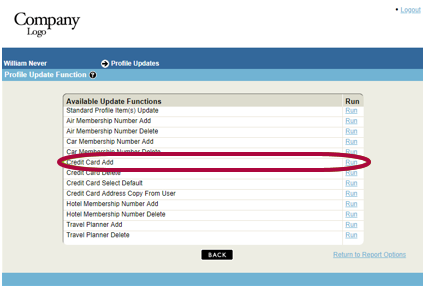
Step 6: Select Run for the Credit Card Add function.
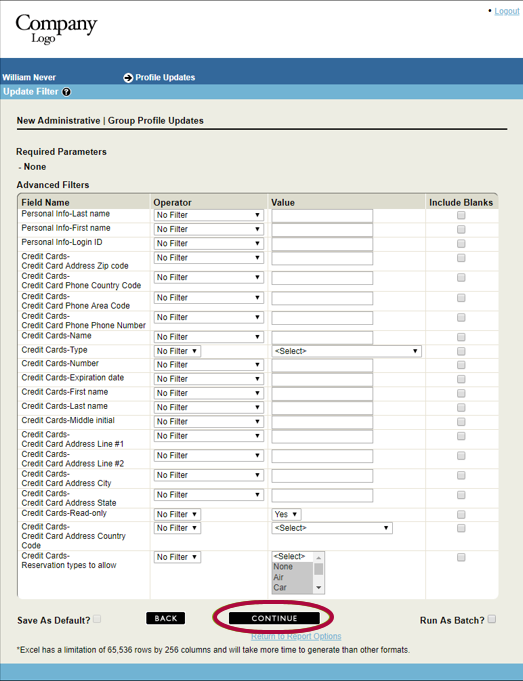
Step 7: The Update Filter page displays next. Selections can be made from the default filters, if you want to only add the credit card to certain profiles. If you are updating for all profiles, no selection is required to Add a Credit Card. Click Continue.
Step 8: Next the New Value page displays. Add the new credit card information. Click Continue.
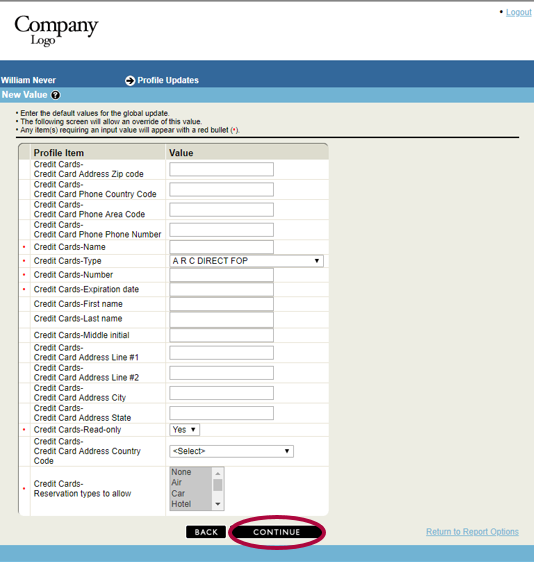
Please Note: The address fields should be completed. The address is required by certain vendors, so it is always best practice to complete the address fields. The first, middle, and last name must reflect the name on the card. If the company name is on the card, use available fields to populate the company name.
Credit Card fields
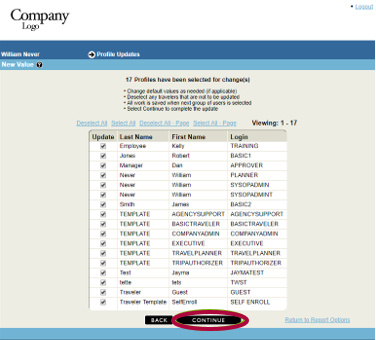
Step 9: A list of profiles that the credit card will be added to is displayed for you to review. In the Update column, uncheck any profile you do not wish to update. Click Continue.
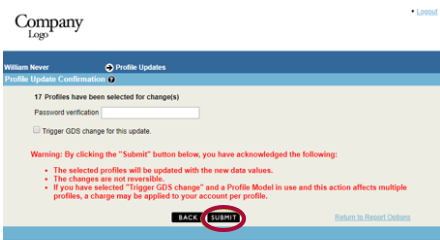
Step 10: Add your password. Click Submit.
Step 11: You will receive the confirmation that the update is complete. Click Continue to return to the main Reports page.
It is common for an organization to utilize company-paid credit cards for business travel. You may choose to have one specific card available as the preferred car for travel, amongst other available payment methods.
This article will show you, a local Nexonia Travel Administrator, how to set a preferred acompany credit card for multiple user profiles.
Step 1: On the Nexonia Travel homepage, select the Admin menu. Then, select Company Settings followed by Reports.

Step 2: Click View Reports.

Step 3: Click Run for the Administrative | Group Profile Updates report.
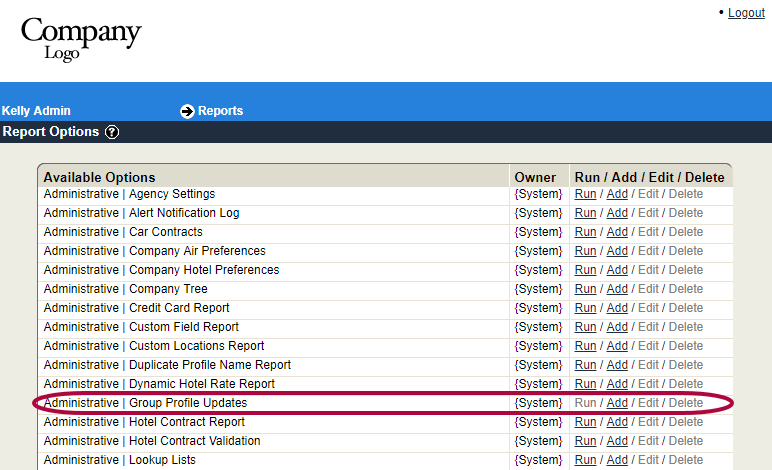
Step 4: Check the box for the Core Permissions policy branch and the checkbox for Include child policy branches. When finished, click Continue.
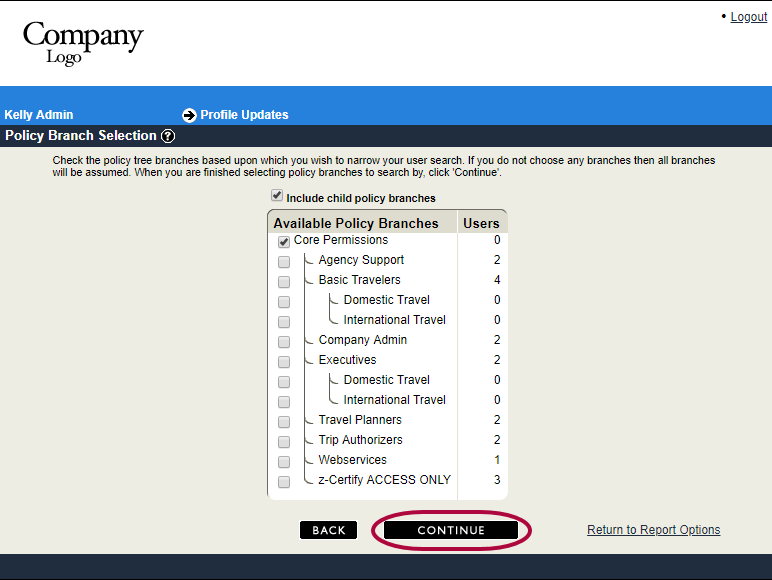
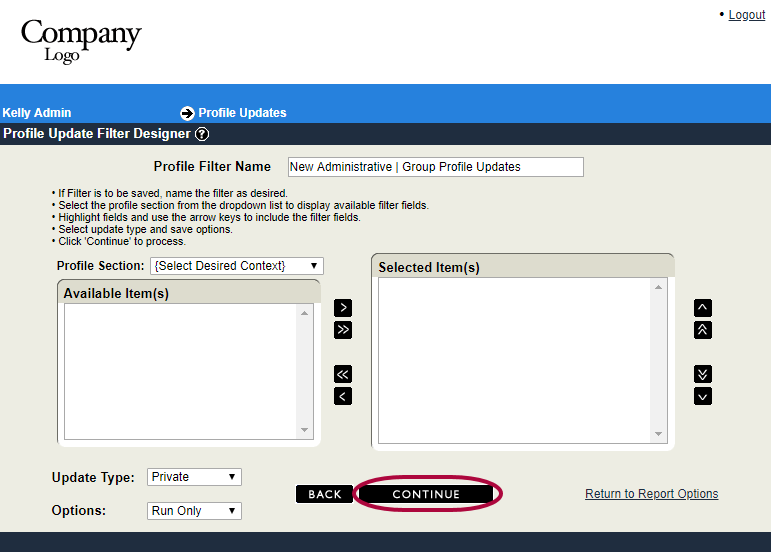
Step 5: The Profile Updates Filter Designer page will display. No selections are required to set a preferred credit card. Click Continue.
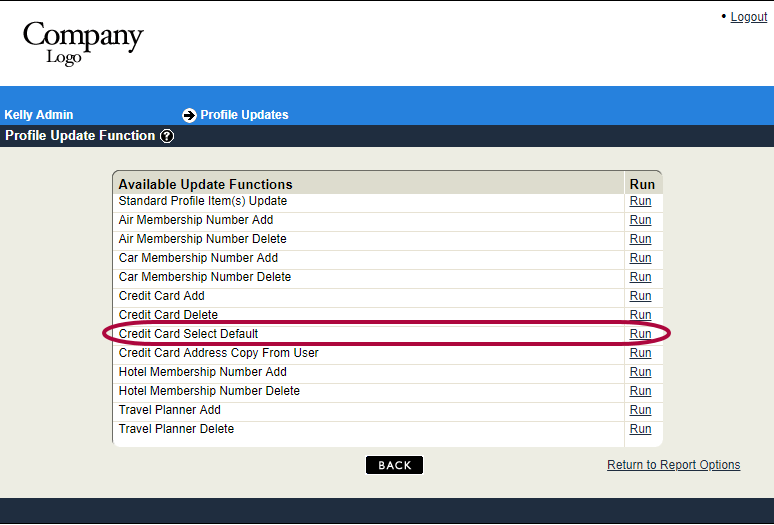
Step 6: Select Run for the Credit Card Select Default function.
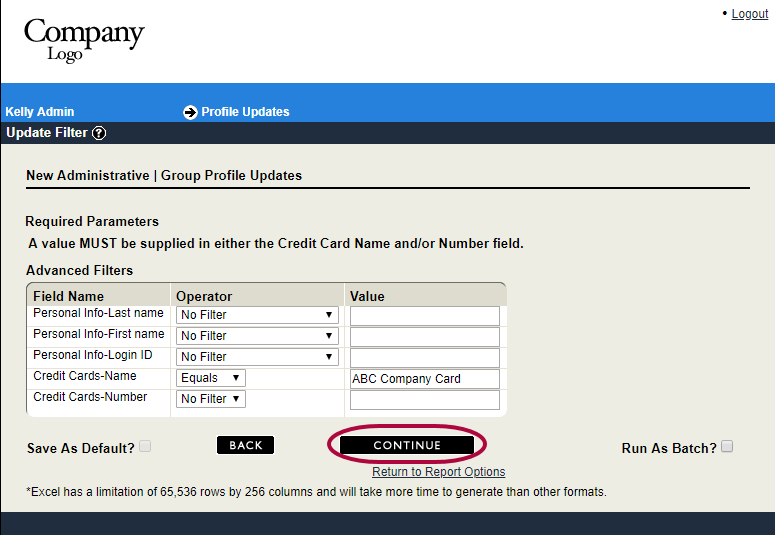
Step 7: Update the Filter for the Credit Card-Name to Equals and add the name of the credit card that is shown in the profiles. Click Continue.
Step 8: A list of available reservation types are shown. Check the types you want the credit card set as the preferred/default for. Click Continue.
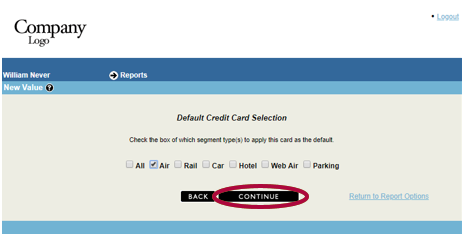
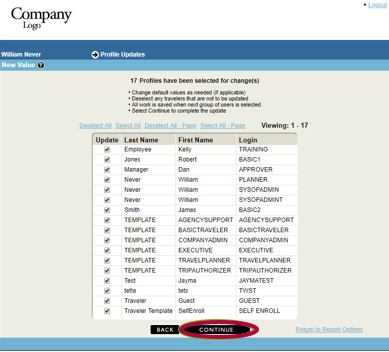
Step 9: A list of profiles containing the credit card is displayed for you to review. In the Update column, uncheck any profile you do not wish to update. Click Continue.
Step 10: Add your password. Click Submit.
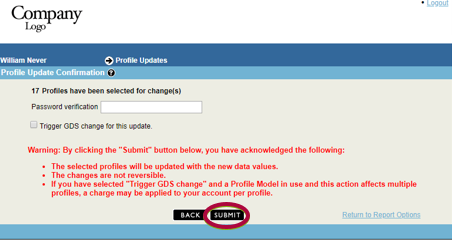
Step 11: You will receive the confirmation that the update is complete. Click Continue to return to the main Reports page.
It is common for an organization to utilize company-paid credit cards for business travel. Often, certain cards are available for specific groups of employees. You may need to delete an old company card assigned to an employee group.
This article will show you, a local Nexonia Travel Administrator, how to delete a company credit card for multiple user profiles.
Step 1: On the Nexonia Travel homepage, select the Admin menu. Then, select Company Settings followed by Reports.

Step 2: Click View Reports.

Step 3: Click Run for the Administrative | Group Profile Updates report.

Step 4: Check the box for the Core Permissions policy branch and the checkbox for Include child policy branches. When finished, click Continue.

Step 5: The Profile Updates Filter Designer page will display. No selections are required to delete a credit card. Click Continue.

Step 6: Select Run for the Credit Card Delete function.
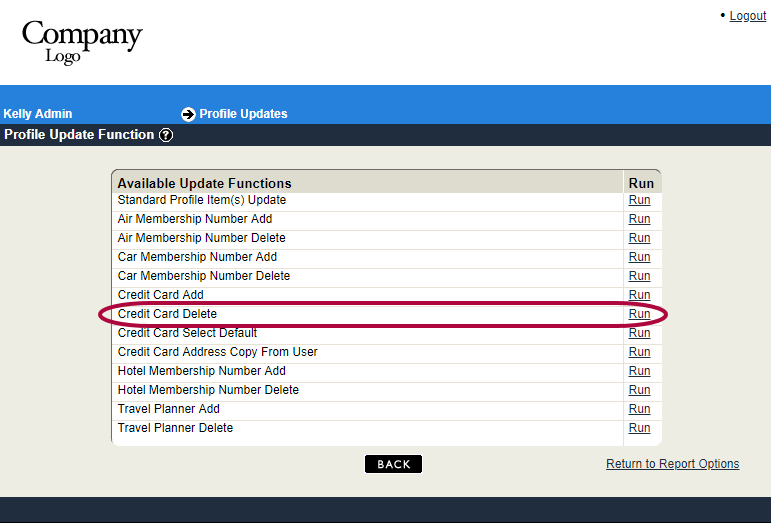
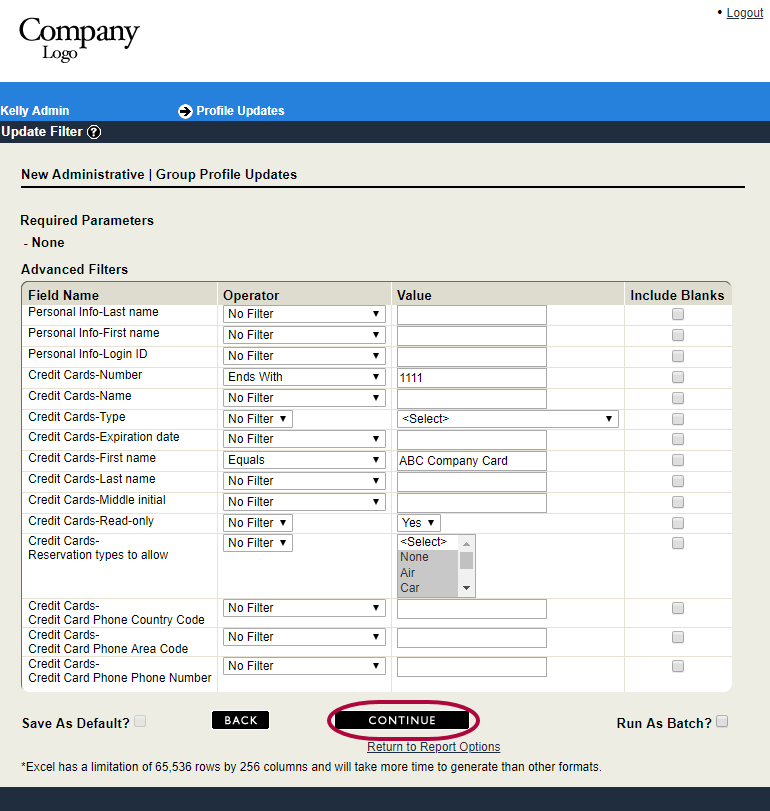
Step 7: Update the Filters for the Credit Cards - Number to Ends With and add the last four digits of the card number. Then set the filter for Credit Cards - Name to Equals and add the name of the credit card that is shown in the profiles. This will ensure you are deleting a specific credit card from the profiles. Click Continue.
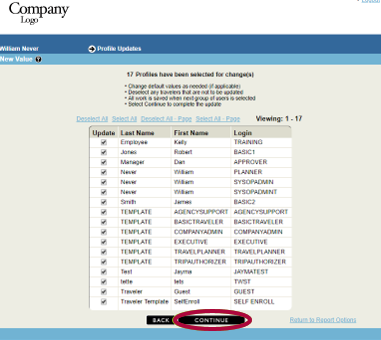
Step 8: A list of profiles containing the credit card is displayed for you to review. In the Update column, uncheck any profile you do not wish to update. Click Continue.
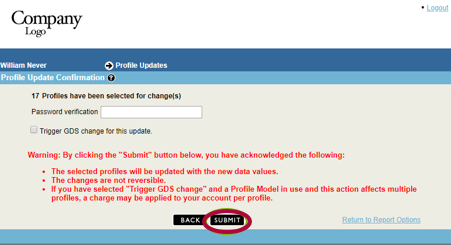
Step 9: Add your password. Click Submit.
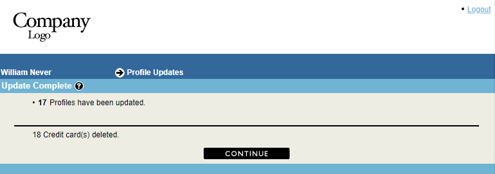
Step 10: You will receive the confirmation that the update is complete. Click Continue to reutnr to the main Reports page.
Nexonia Travel now integrates with Prime Analytics. Shared customers can now access Prime Analytics from within Nexonia Travel. Additionally, if your agency has a demo site set up for sales engineers, you can enable their accounts so that they may demo our new fully integrated solution.
This article shows you, a TMC Administrator, how to enable and use the Prime Analytics integration.
Step 1: Log into to Nexonia Travel. From your homepage, click Admin. Then, click Policy Setup followed by Agency Settings.
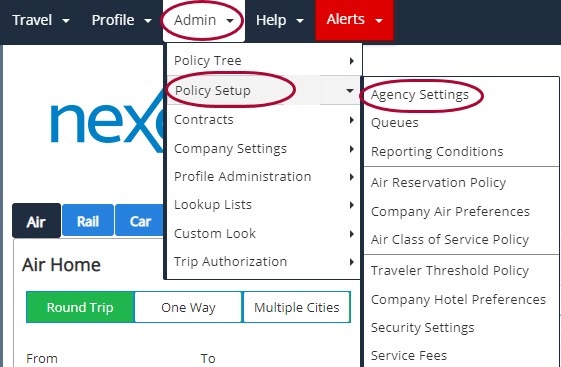
Step 2: Click the pencil icon.

Step 3: Once in Agency Settings, click the Reports tab.
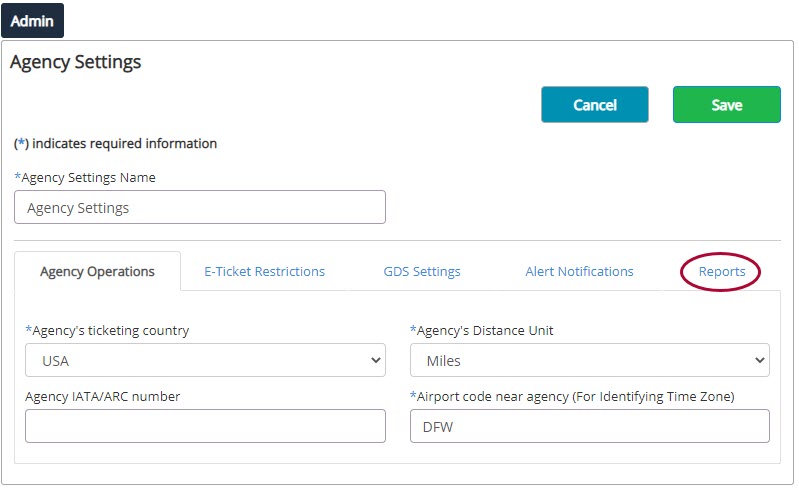
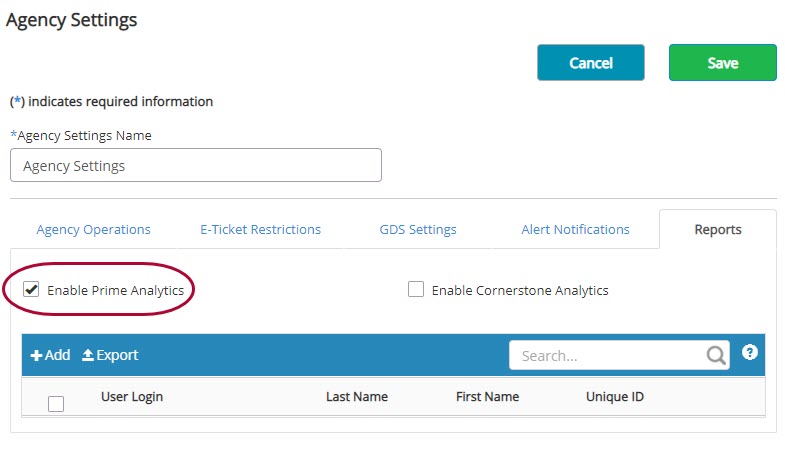
Step 4: Click the checkbox next to Enable Prime Analytics.
Step 5: Now, add users to the access list by clicking the Add button. You will then be prompted to search for users to add.
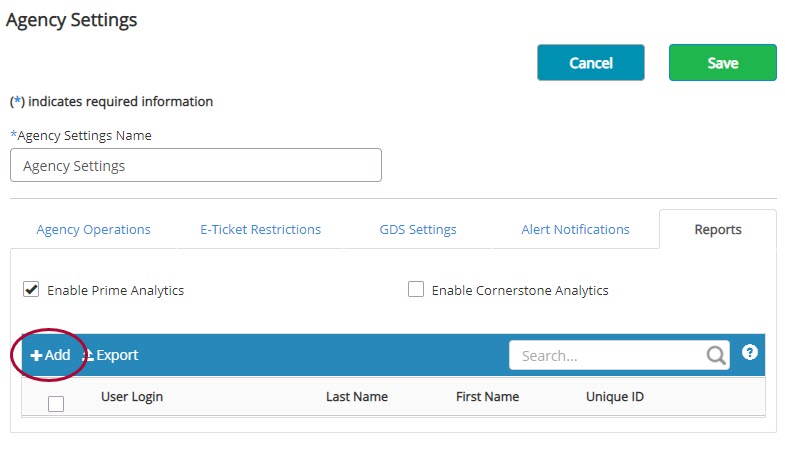
Please Note: This assumes the user exists in both Nexonia Travel and Prime Analytics. If they do not exist in Prime Analytics, you will need to add them. The users email in the OBT must match the user login in Prime Analytics or the access bridge may not work.
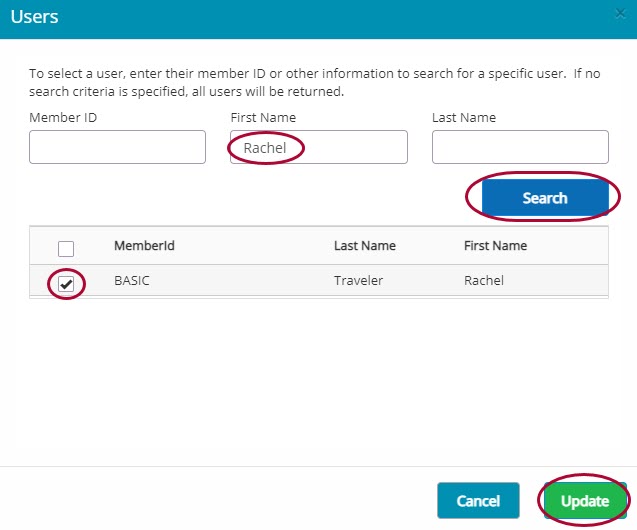
Step 6: When prompted, type in either their login, first name, or last name into the fields as shown, then click the Search button. A list of matching accounts appears. Click the checkbox next to the name(s) you wish to add and click the Update button. You will then be returned to the Agency Settings/Report tab to complete the configuration.
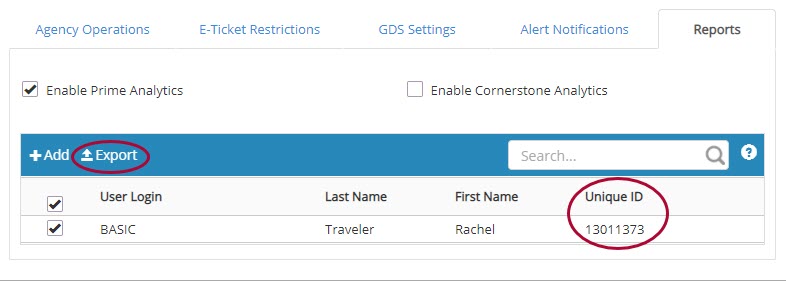
Step 7: Note the Unique ID for each user. You will need this ID for each user configured for Prime Analytics access. Write each down or export the list by clicking Export.
Step 8: Click Save to complete.
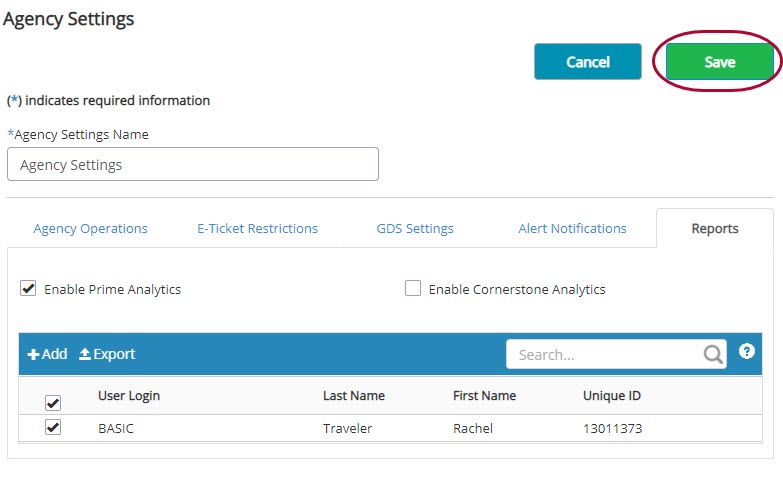
Please Note: To remove a user's access, uncheck the box to the left of the name and click Save.
Step 1: Log into Prime Analytics. You may either use Browse Users to search for a user or Browse Accounts to see a list of users for a given account.

Step 2: To activate the selected user, check the Allow Emburse SSO checkbox. Type in the Unique ID for the user that you wrote down earlier. Finally, click Save.

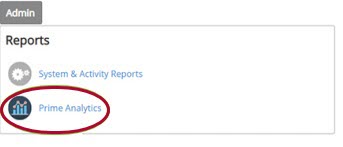
Step 1: Authorized accounts may access Prime Analytics from within Nexonia Travel. Start by logging in and clicking Admin. Then, click Company Settings followed by Reports.
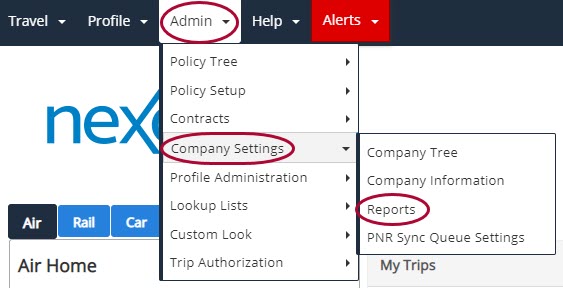
Step 2: Click Prime Analytics. You will then be transferred directly into your Prime Analytics account.
Nexonia Travel allows you to send Itinerary Emails via HTML.
This article shows you how to add the rule Email Itinerary using HTML and Compile your policy.
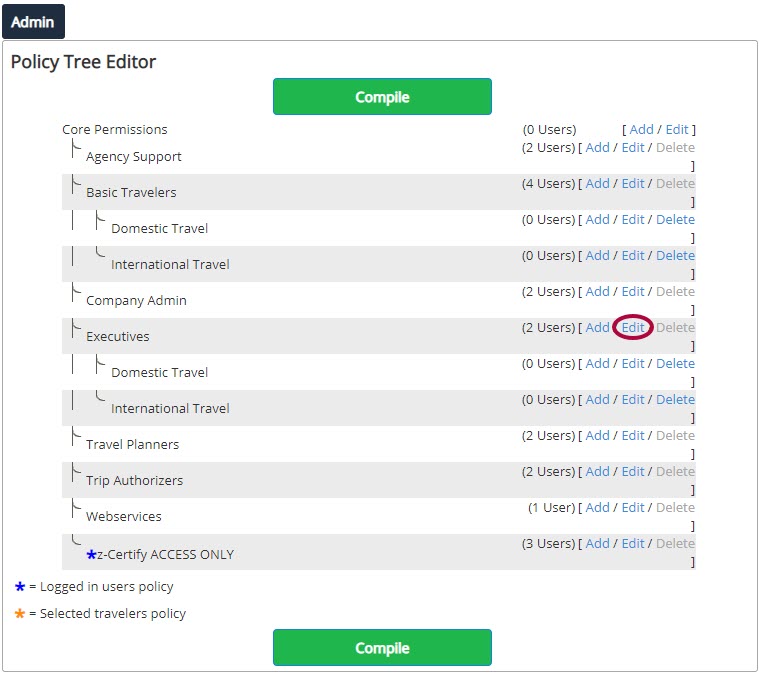
Step 1: On your Nexonia Travel homepage, click Admin. Then, click Policy Tree followed by Policy Tree Editor.

Step 2: Click Edit next to the branch you would like to update.
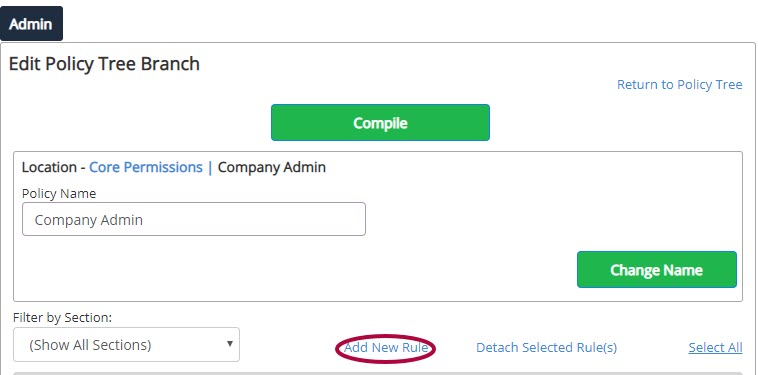
Step 3: Click Add New Rule.
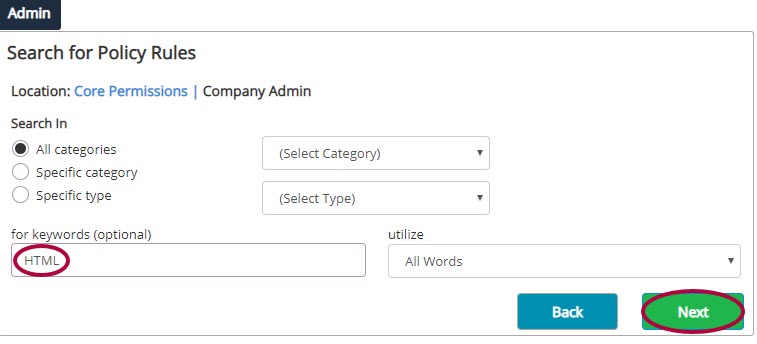
Step 4: Search for Policy Rules using HTML as a keyword. Click Next.
Step 5: Click the box for the rule, then click Next.
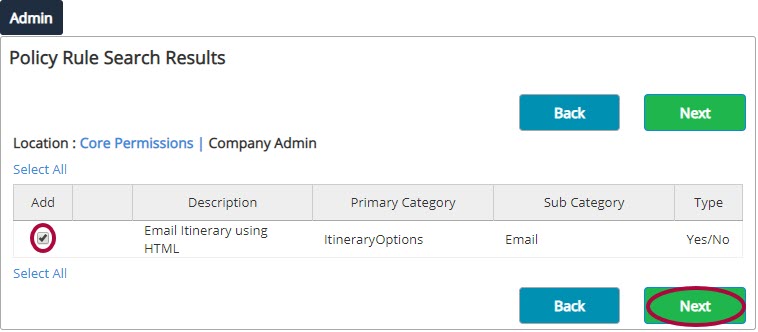
Step 6: Select Yes as your Value and click Save.

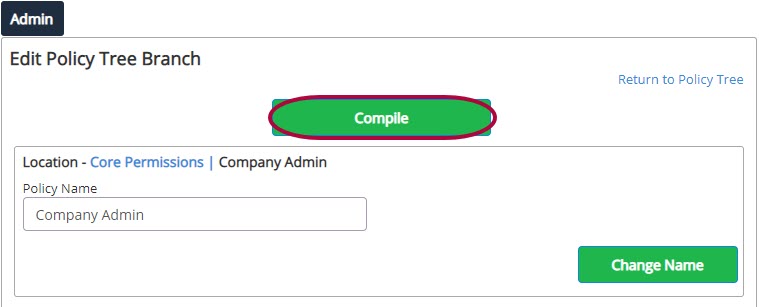
Step 7: Click Compile.
When booking travel, users have the ability to search for hotels using different search criteria such as Address, or Airport/Custom Location. As a Nexonia Travel TMC Admin, you can set a default for hotel searches to make it easier for users to book a hotel in a convenient location.
This article shows you, a Nexonia Travel TMC Admin, how to set the hotel search to a default.
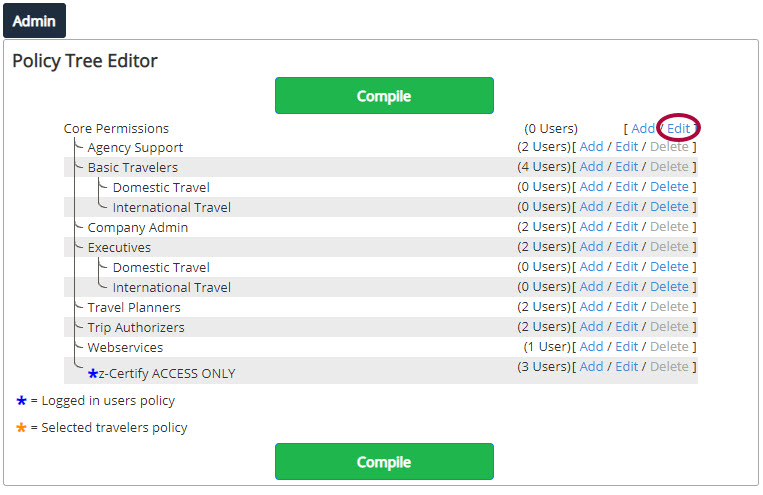
Step 1: On your Nexonia Travel homepage, click the Admin tab. Then, click Policy Treefollowed by Policy Tree Editor.

Step 2: Click Edit next to one of your policies.
Step 3: Click Add New Rule.
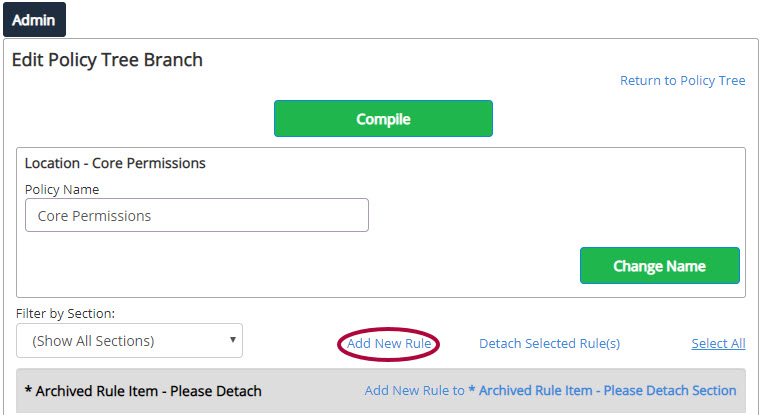
Step 4: Enter Default Hotel Search By in the for keywords (optional) box and click Next.
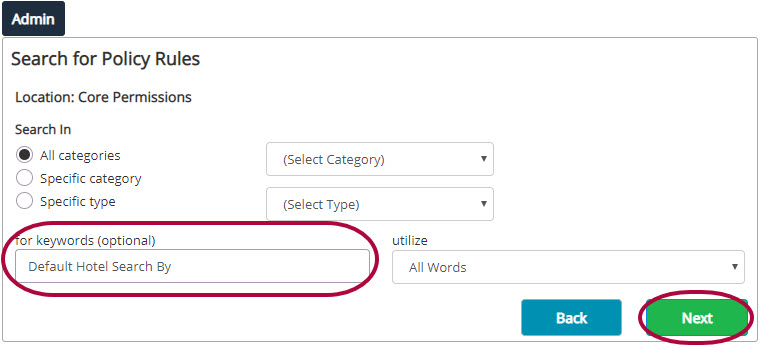
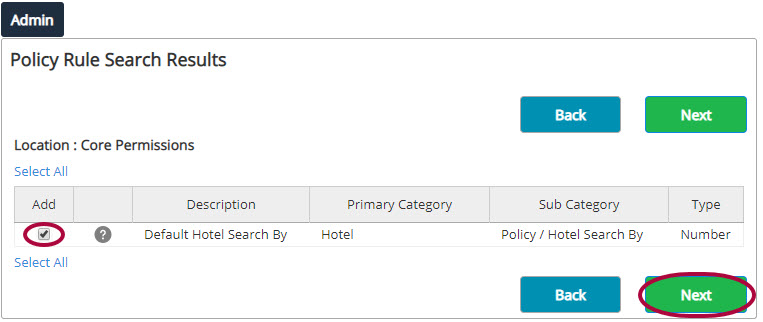
Step 5: Click the checkbox next to the policy rule, then click Next.
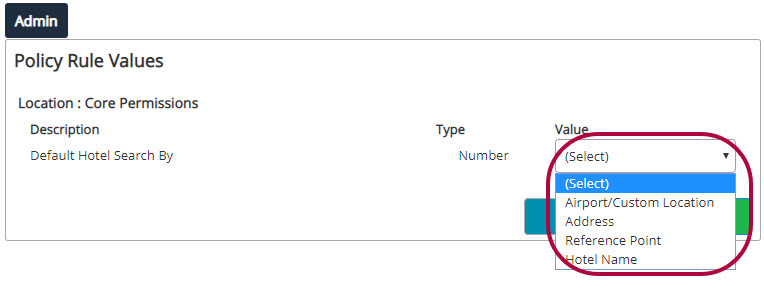
Step 6: Select the Value to default the Hotel Search to.
Step 7: Click Save.

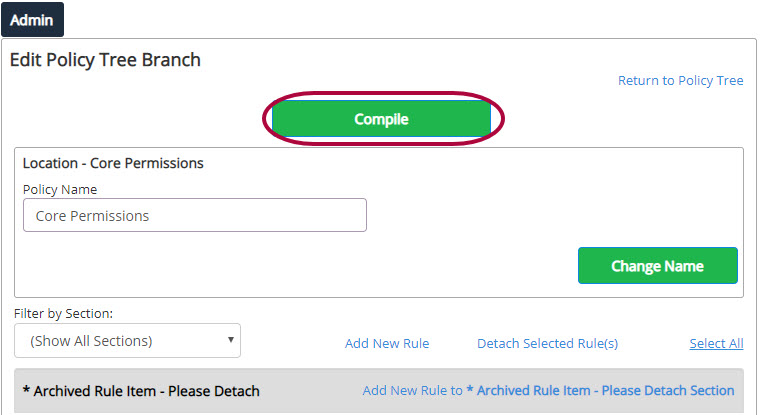
Step 8: Click Compile to complete.
An unused ticket is generated from a booked airline ticket that was paid for, then cancelled. The unused ticket then serves as a credit towards a new flight. Though unused tickets booked in Nexonia Travel will store automatically, it is possible to load them manually if needed.
This article shows you, a TMC Administrator, how to manually add unused tickets.
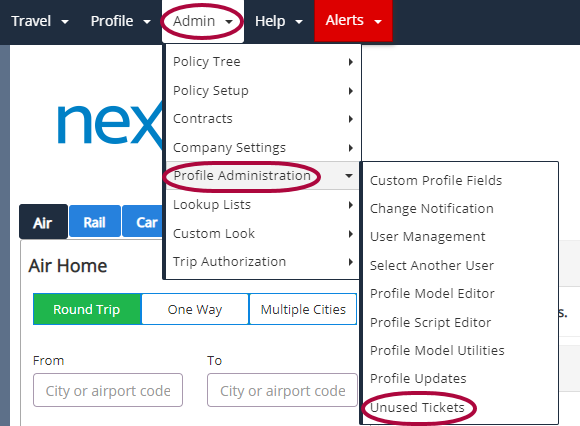
Step 1: On your Nexonia Travel homepage, click the Admin menu. Then, click Profile Administration followed by Unused Tickets.
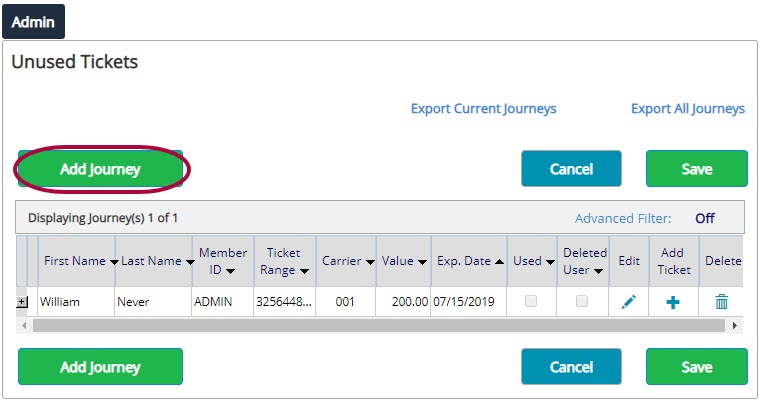
Step 2: Click Add Journey.
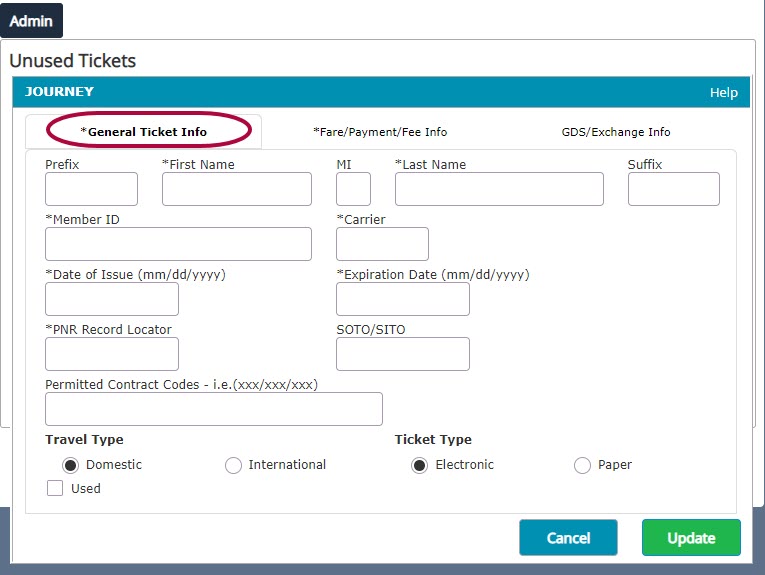
Step 3: In the General Ticket Info tab, fill out all of the required fields (indicated by an *).
Please Note: Do not click Update or Cancel when complete.
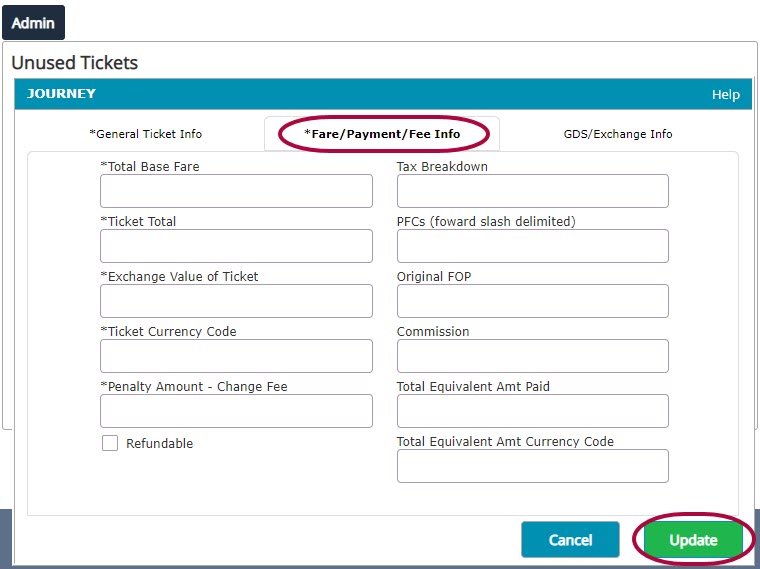
Step 4: Click the Fare/Payment/Fee Info tab and fill out all of the required fields. When complete, click Update.
Step 5: Click the plus icon under Add Ticket next to the Journey you just entered.
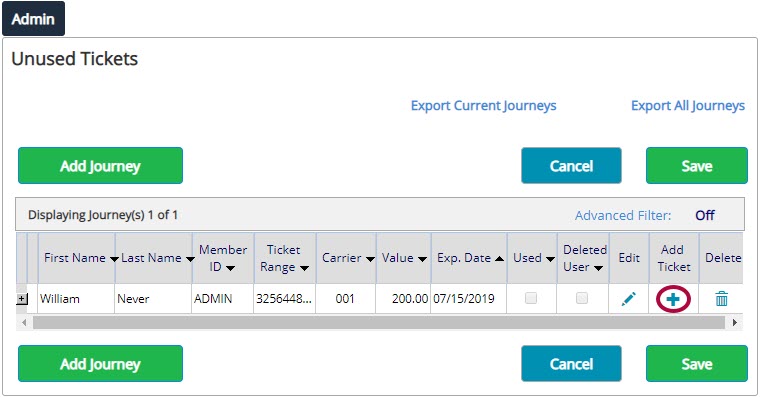
Step 6: Enter the 10-digit ticket number and enter the check digit. If the check digit is unknown, you may enter any number. Then, click Update.
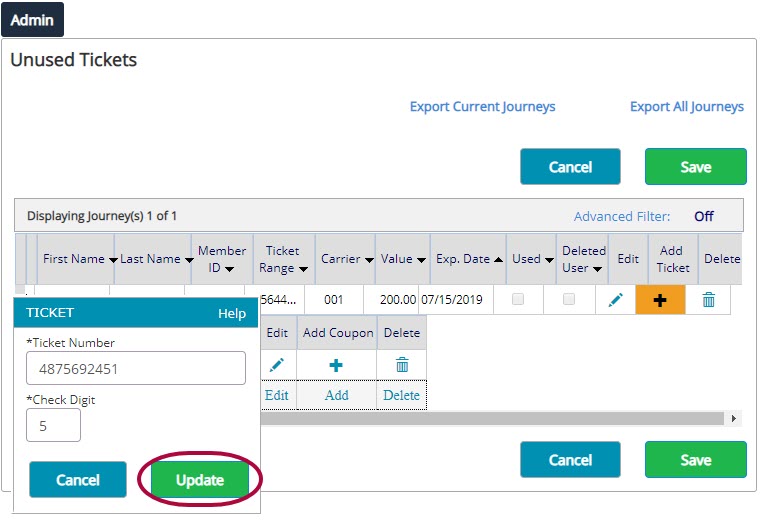
Step 7: Click Save.
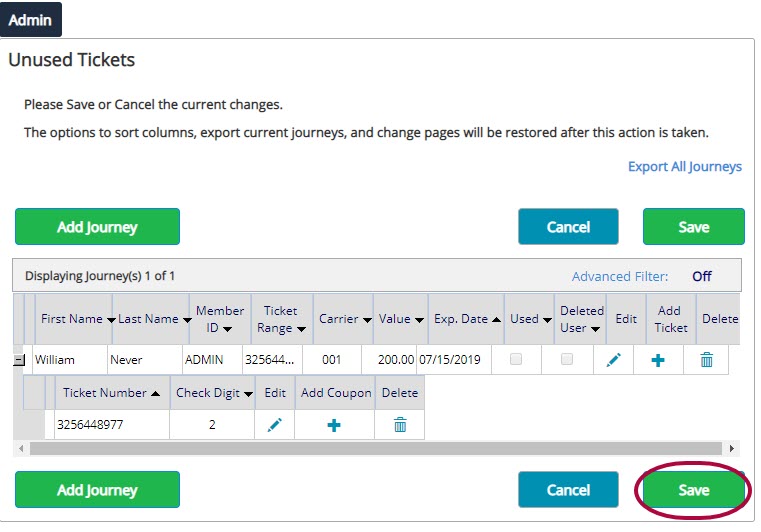
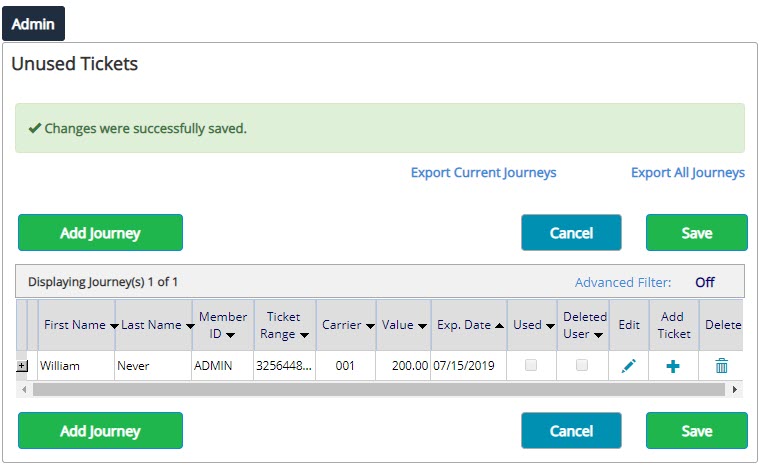
The new unused ticket has been saved to the user profile.
Park N Fly is an off-airport parking operator where travelers can prepay to leave their cars in a secure airport location, travel, and return to their car upon arrive. Before enabling Park N Fly:
This article shows you, a TMC Administrator, how to enable Park N Fly.
Step 1: On your Nexonia Travel homepage, click the Admin tab. Then, click Policy Tree followed by Policy Tree Editor.

Step 2: Click Edit next to Core Permissions.
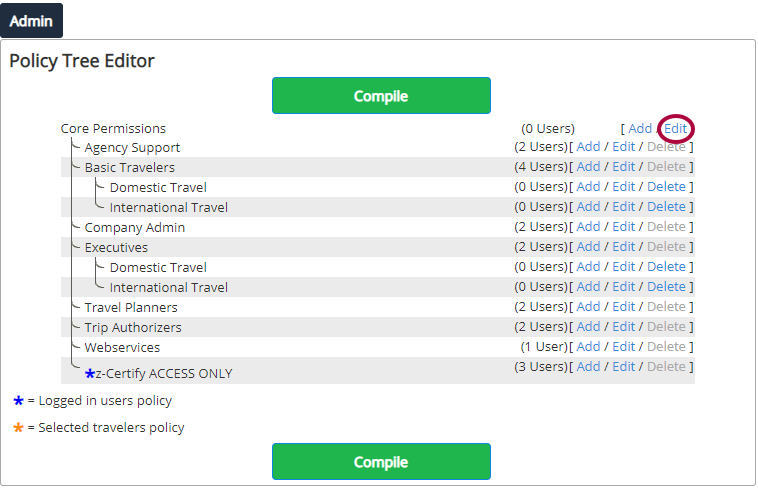
Step 3: Click Add New Rule.
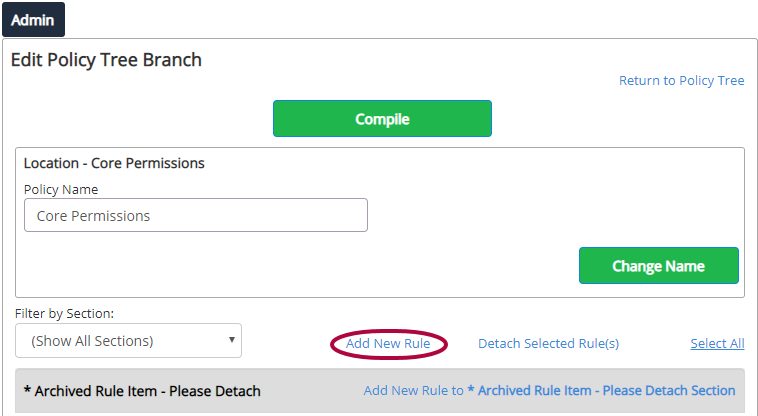
Step 4: Enter "Park" in the search function and click Next.
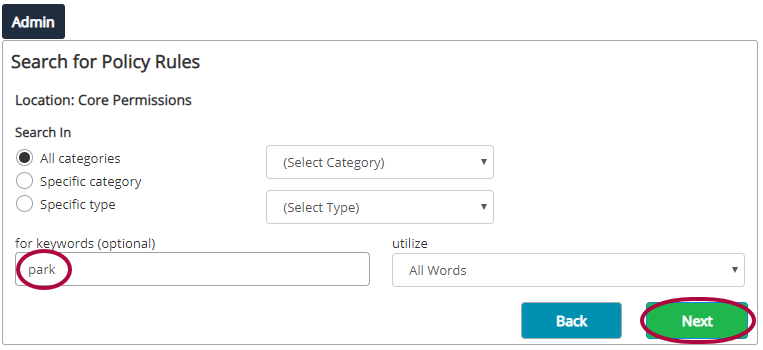
Step 5: Four rules will appear. Click the checkboxes next to Allow Airport Parking and Preferred Parking Credit Card Level. Then, click Next.
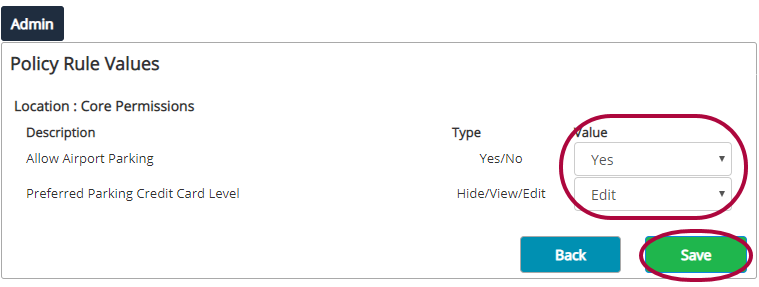
Step 6: In the Value drop-down menu, set Allow Airport Parking to Yes, and Preferred Parking Credit Card Level to Edit. Then, click Save.
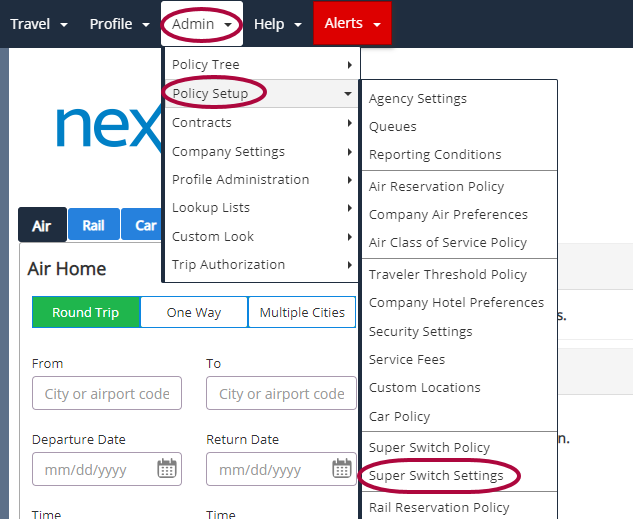
Step 7: Next, click Admin. Then, click Policy Setup followed by SuperSwitch Settings.
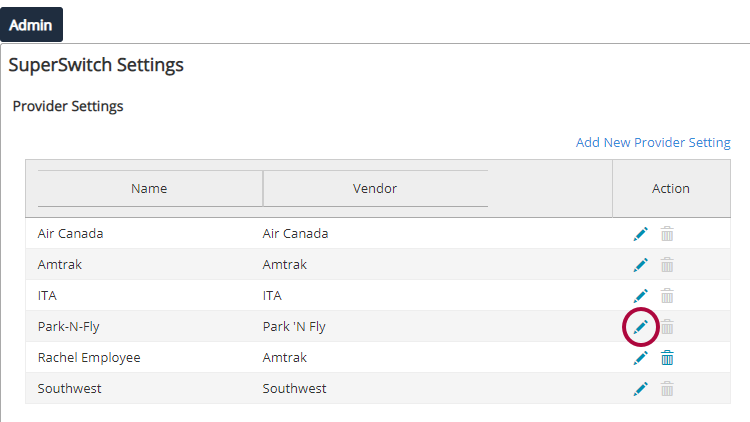
Step 8: Under Provider Settings, click the pencil icon next to Park N Fly to edit.
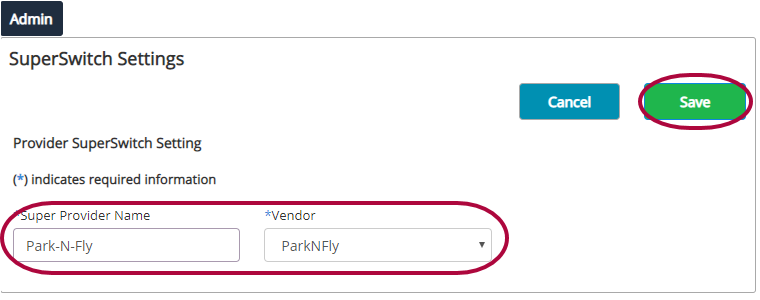
Step 9: Enter Park N Fly in the text box, and select the operator from the drop-down menu. Then, click Save.
Step 10: Back on the SuperSwitch Settings page, scroll to Parking SuperSwitch Settings and click the pencil icon next to Park N Fly to edit.
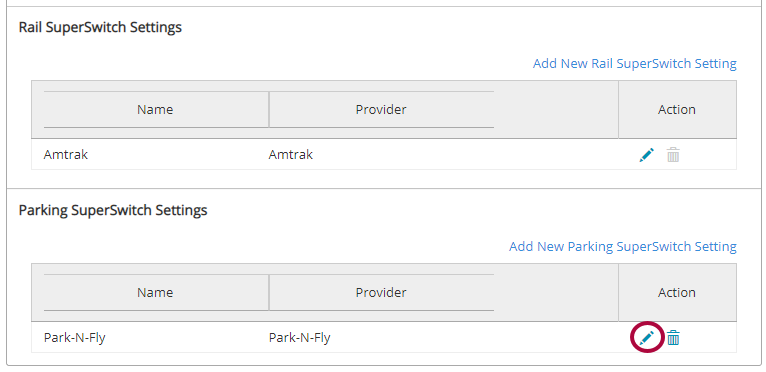
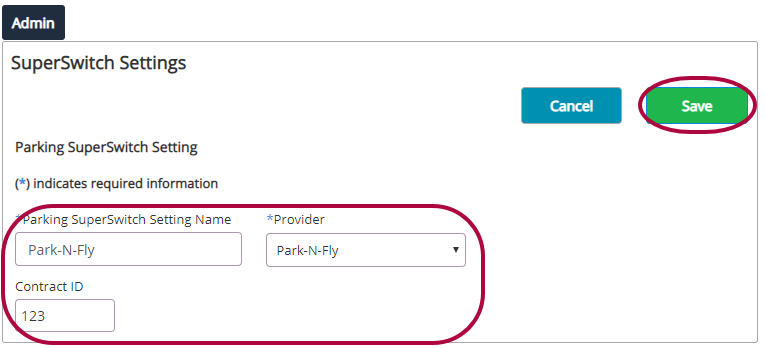
Step 11: In Parking SuperSwitch Setting Name enter Park N Fly and select the Provider from the drop-down menu. Enter a Contract ID or Discount Code in the third box if applicable. Click Save when complete.
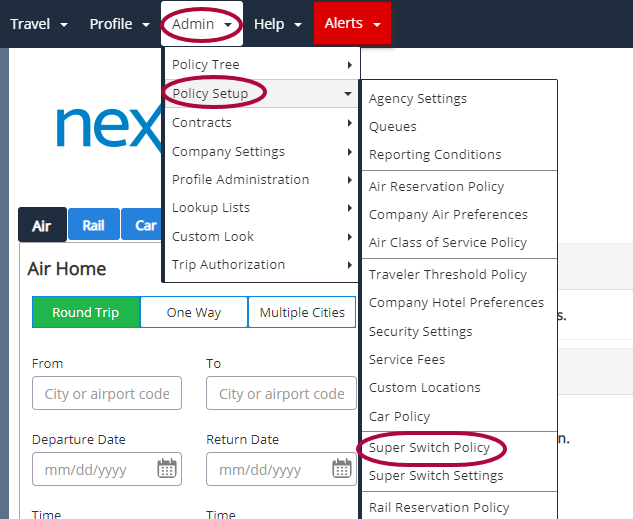
Step 12: Next, click Admin. Then, click Policy Setup followed by SuperSwitch Policy.
Step 13: Click the pencil icon.

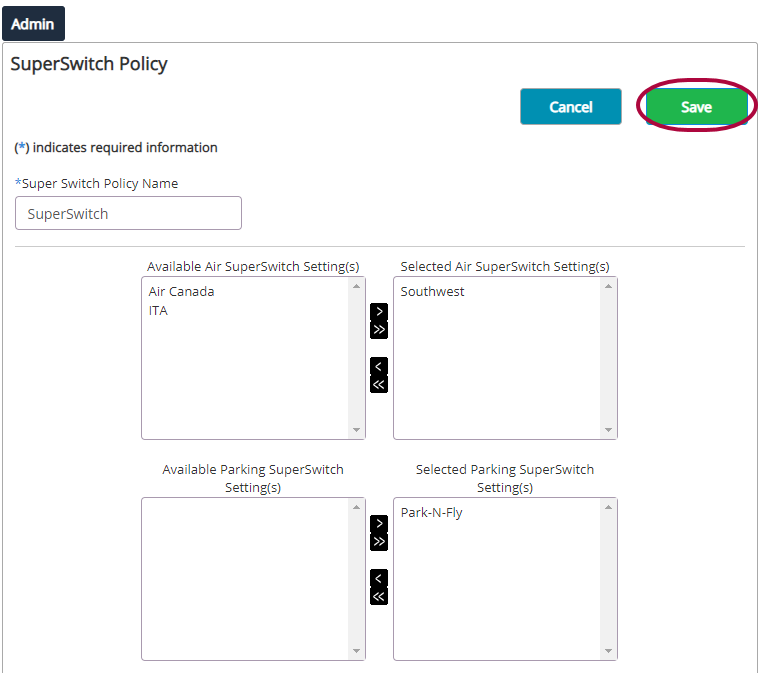
Step 14: Move Park N Fly from the left Available column, to the right Selected column using the arrow.
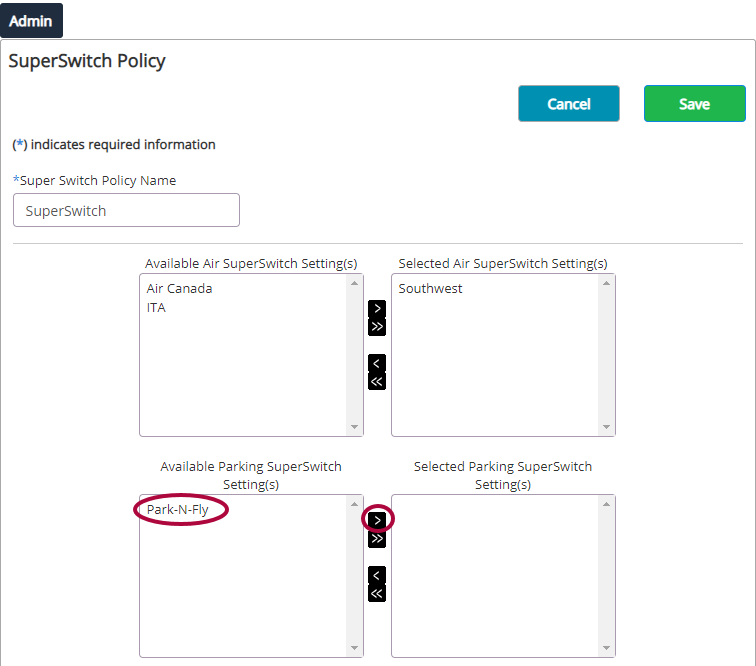
Step 15: Click Save when complete.
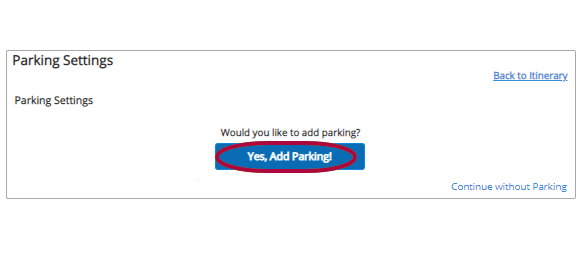
Step 16: Return to the homepage and search for a new travel booking. If parking is available at the outbound airport, you'll be prompted to add or decline parking.
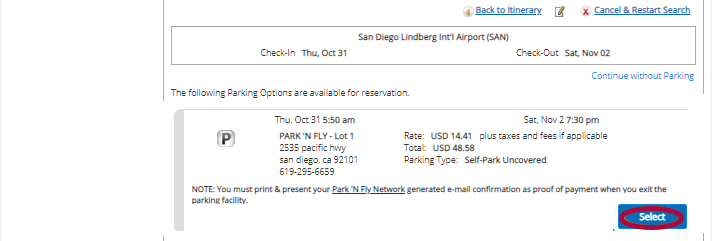
Step 17: When you add parking to your itinerary, a list of parking options will appear for selection. Click Select to add it to your itinerary.
Custom Profile Fields log user data in traveler profiles for a company. Using them helps with tracking and budgeting. The data from a custom profile field can be added to a GDS PNR or GDS Profiles. Once you have created a new Custom Profile Field, you have to attach it to a branch of the Policy Tree and Compile it.
This article shows you, a Nexonia Travel Administrator, how to attach a new Custom Profile Field to the Policy Tree.
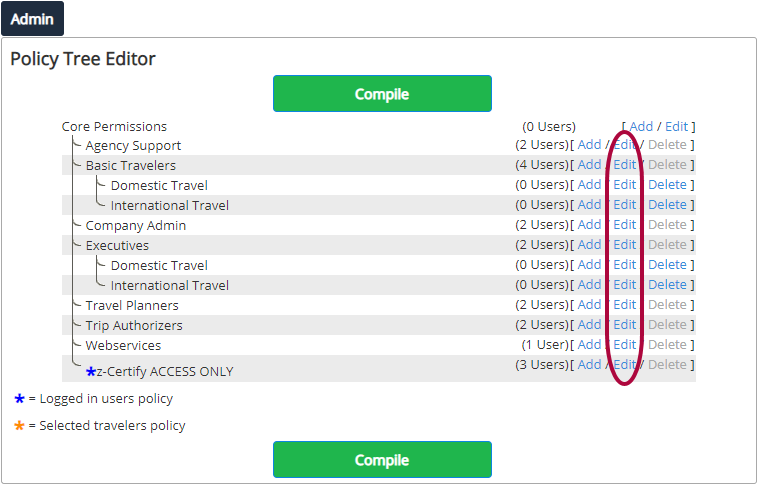
Step 1: On your Nexonia Travel homepage, click the Admin tab. Then, click Policy Tree followed by Policy Tree Editor.

Step 2: Click Edit next to the Branch to which to attach the Custom Profile Field.
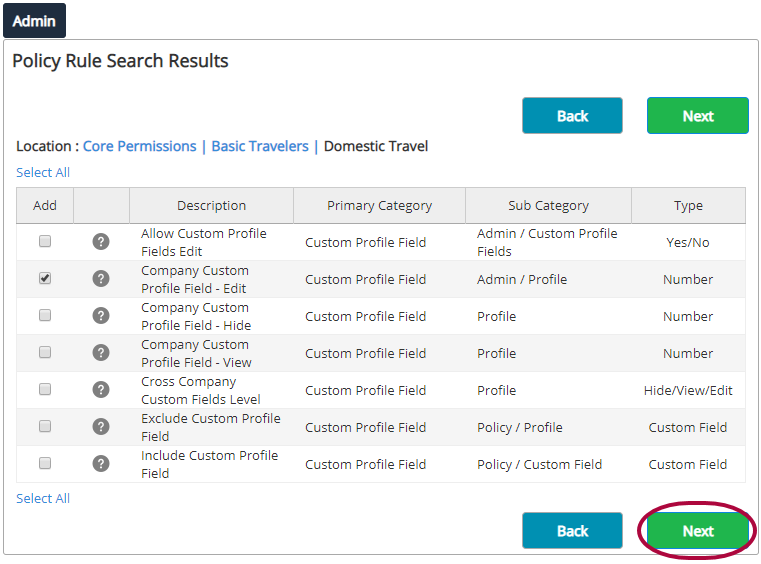
Step 3: Find the Custom Profile Field section and click Add New Rule to Custom Profile Field Section.

Step 4: Mark the checkboxes for Include Custom Profile Field, Level of the Custom Profile Field, Company Custom Profile Field - Hide, Company Custom Profile Field - View, or Company Custom Profile Field - Edit. Then, click Next.
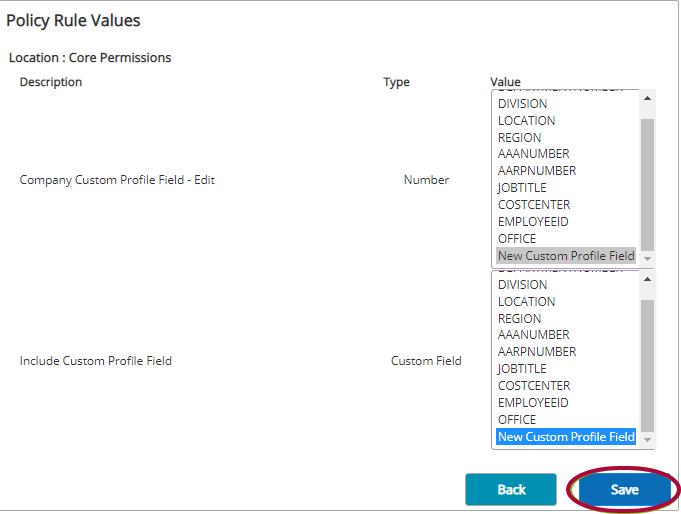
Step 5: Select the Custom Profile Field you created earlier, then click Save.
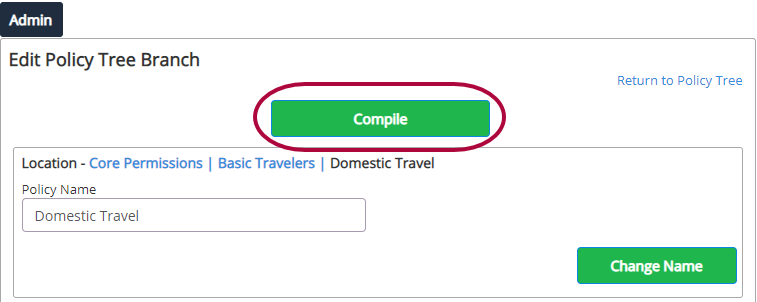
Step 6: Click Compile.
Step 7: Once complete, the String Replacement Tag from the custom profile field can be used in a Reporting Condition to enter data into the GDS PNRs that are booked.
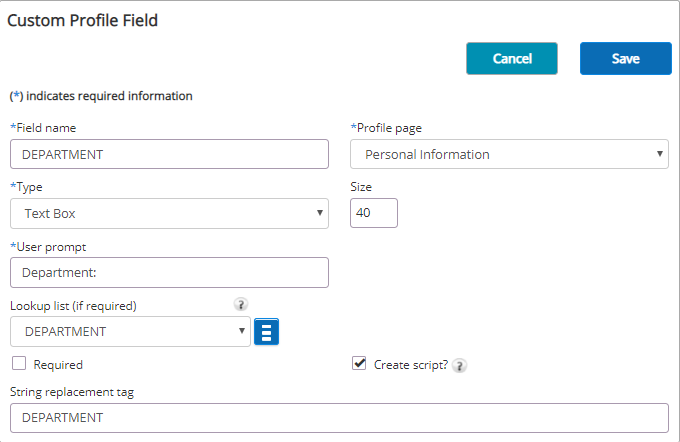
The String Replacement Tag from the custom profile field is placed in the GDS Command(s). The GDS format and how the data is placed within that format will be determined by the TMC Administrator.
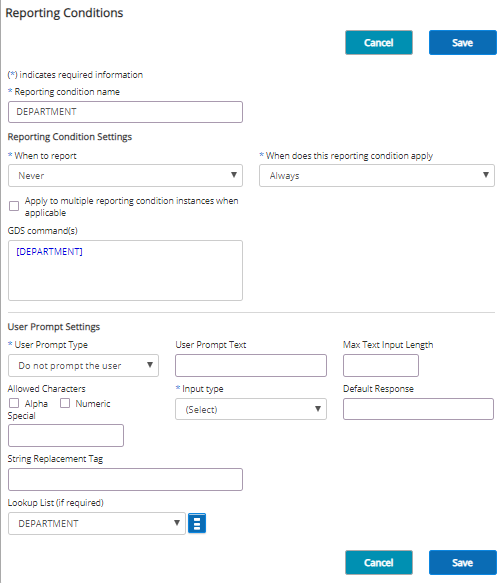
Please Note: Refer to these articles to add or edit reporting conditions.
The String Replacement Tag from a custom profile field can be used in a profile model to enter into GDS Profiles or utilized through web services.
Nexonia Travel offers various travel reports available to the administrator. These reports contain both information regarding site configuration, such as your company's hotel and air preferences, in addition to utilization data, such as travelers' itinerary details and trip approval status.
This article will show you, a local Nexonia Travel Administrator, how to access and run reports.
Step 1: Select Company Settings in the Admin menu. Then, Reports.

Step 2: Click View Reports.

Step 3: Select which report you need, and click Run.
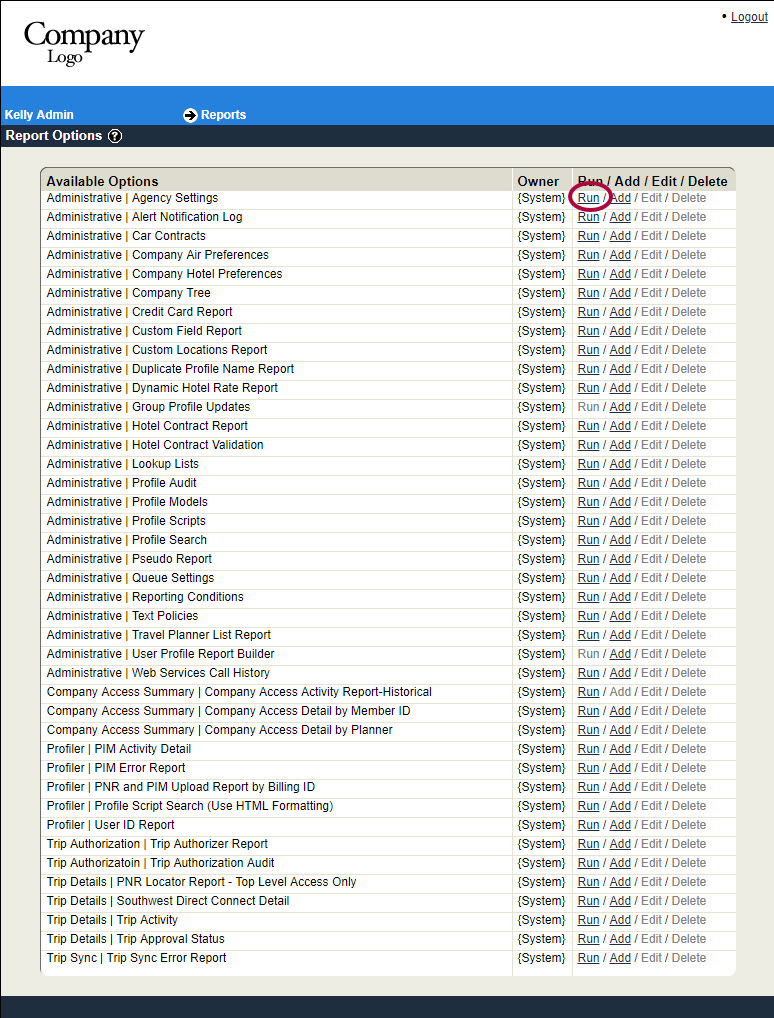
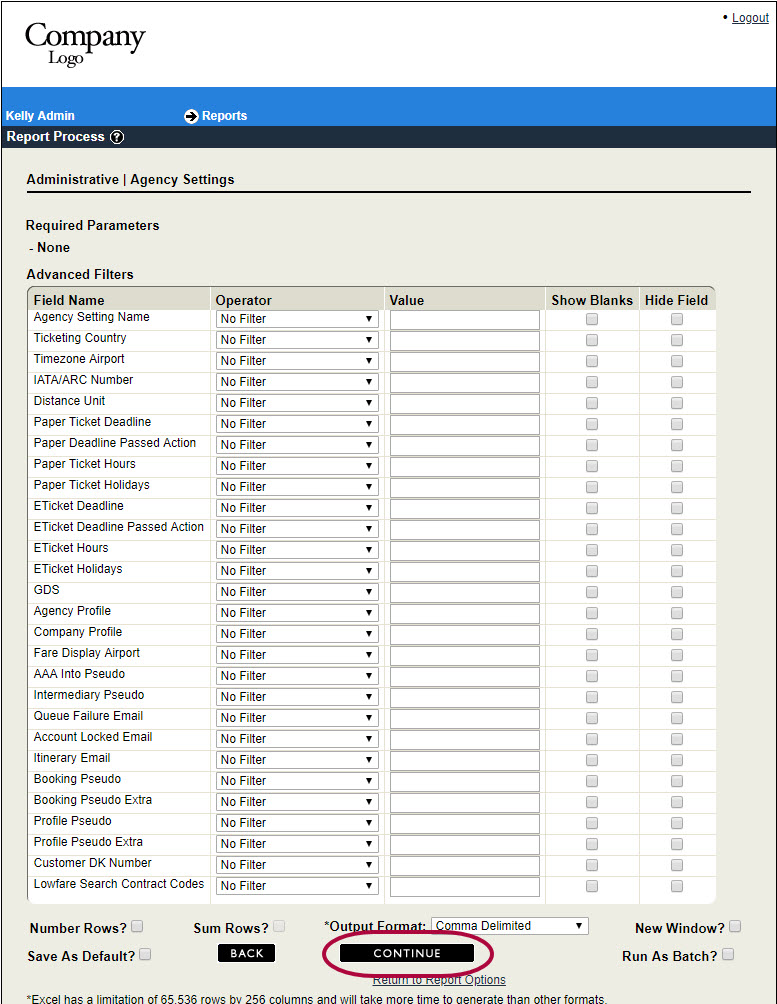
Step 4: Utilize the filtering options to limit your results if applicable. You also have many other options regarding the type of output format, limitations on rows, and the report should appear in a new window. When finished, click Continue.
Step 5: The report will be available to access dependent on your selection on the previous screen. You will receive a downloaded file, or, the report will be accessible in a new browser window.

Frequently-Used Reports:
Nexonia Travel will keep track of unused tickets from any prior cancelled itineraries for your company travelers. Most times, these tickets will act as a credit towards a future flight, subject to any cost difference and cancellation fees. Keeping track of unused air tickets is essential to identify cost savings opportunities.
This article will show you, an local Nexonia Travel Administrator, how to view unused tickets within your organization.
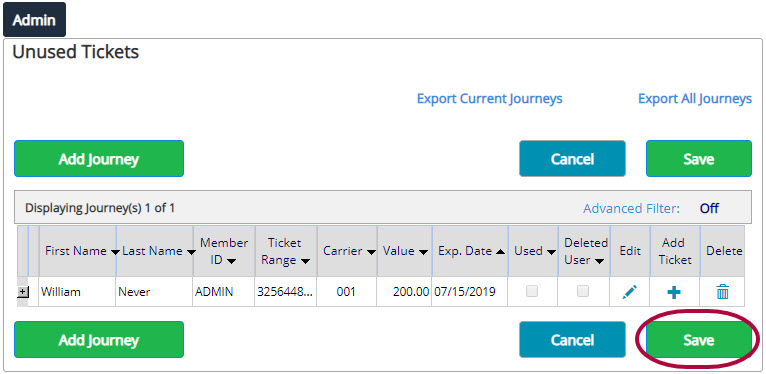
Step 1: From the Admin menu, select Profile Administration. Then, Unused Tickets.

Step 2: The Unused Tickets screen will display. Your Travel Management Company will handle unused ticket exchanges on new itineraries. Included details are:
Reporting Conditions can be set to log user actions during the booking process. This process helps to identify travel policy compliance, and the information captured can be documented within the PNR (Trip) in remark fields, UDIDs, sort fields, etc.
This article will show you, the TMC Administrator, how to create and edit Reporting Conditions.
Step 1: On the Nexonia Travel homepage, click the Admin menu, followed by Policy Setup, then Reporting Conditions.
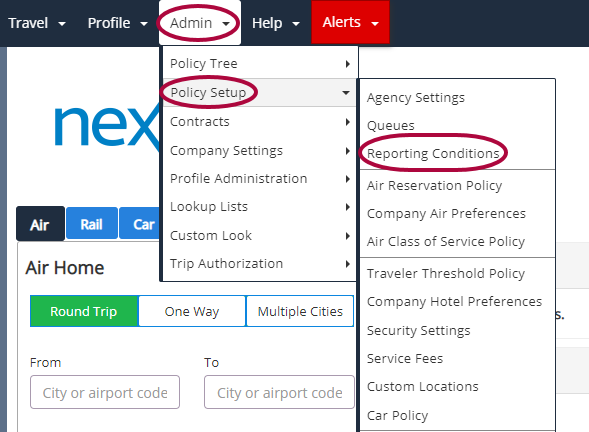
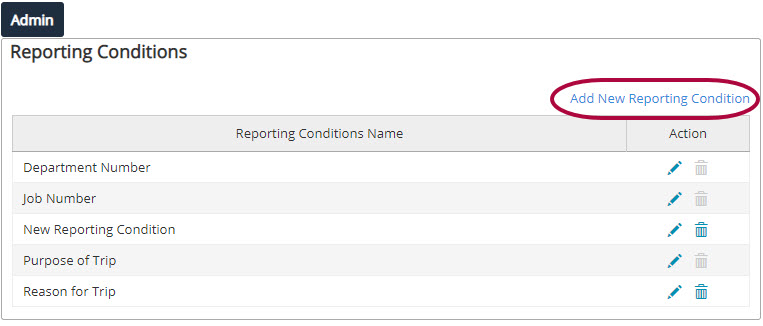
Step 2: From the Reporting Conditions list section, select the Add New Reporting Condition link.
Step 3: Fill in the fields on the Reporting Conditions screen.
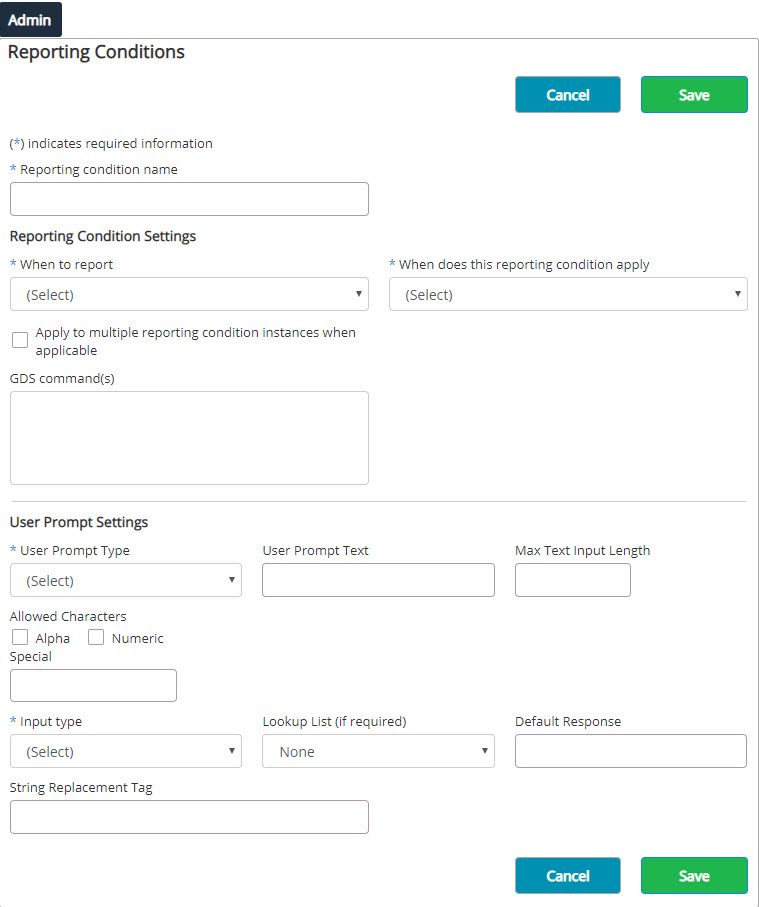
Reporting Condition Name - The name of this specific reporting condition.
When to Report - The selection in this field will tell Nexonia Travel when to report on an employee action.
When does this reporting condition apply - Select when the system should report on an employee action.
GDS command(s) - The GDS command to insert the information into the PNR.
User Prompt Type - The effect of the prompt on the user.
User Type - The type of users to whom the reporting condition applies:
User Prompt Text - (For use with the User Prompt Type field). Enter instructional text for when the user is prompted to respond to the reporting condition.
Max Text Input Length - Enter the maximum number of characters the user can use to respond. This helps ensure the GDS entry does not fail when there is a character limitation to the entry.
Allowed Characters - Enter the type of characters with which the user can respond:
Input Type - The type of field used to collect the user's response:
Lookup List (if required) - Select the Lookup List that contains the choices for the questions presented to the user. If you are not referencing a Lookup List select "(none):.
Note: The lookup list must be attached to the same Policy Tree Branch as the reporting condition unless it is a custom lookup list.
Default Response - Text displayed in a text box or verified text box by default. This text is attached to the GDS command unless the user replaces it with a response.
String Replacement Tag - The unique tag that allows the reporting condition to be used in another area.
Step 4: Click Save to complete.
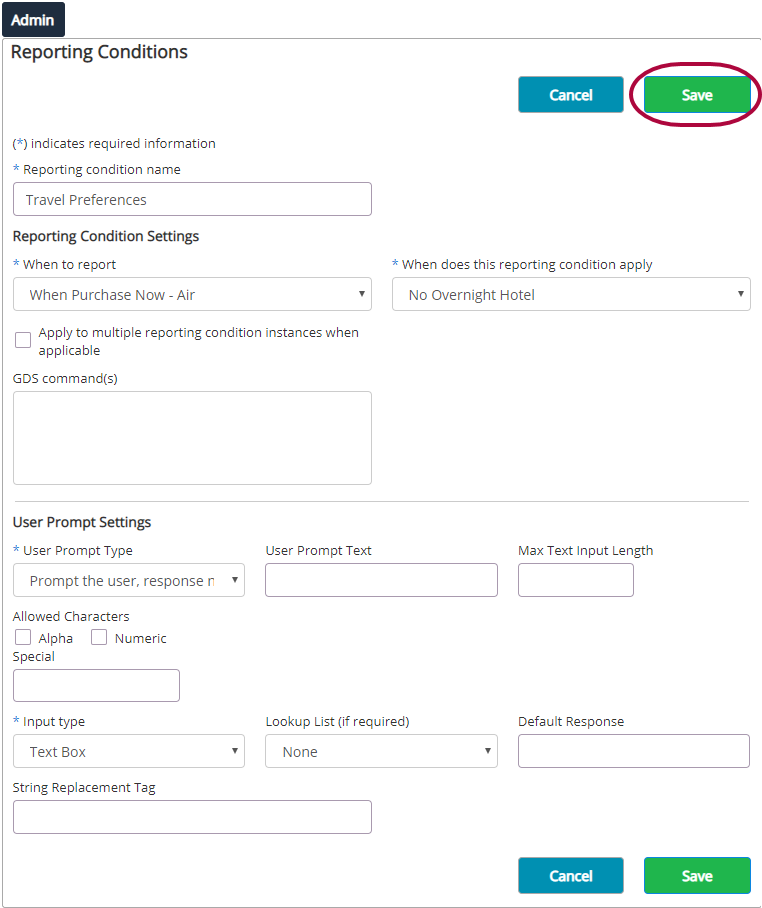
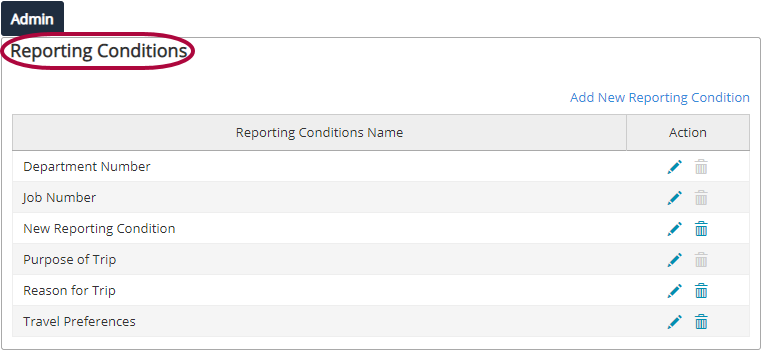
Step 5: Once you've saved the reporting condition, you are returned to the Reporting Conditions page where the new condition has been added to the list.
A company can collect data from several Reporting Conditions and have the Nexonia Travel system store the information temporarily (without sending it straight to the GDS). The information can then be combined and sent to the GDS by one Reporting Condition. The stored reporting condition data is kept only during the current session or request, whichever is shorter.
Step 1: Create the Reporting Conditions to collect data (as shown in Creating Reporting Conditions), but paying attention to the following fields:
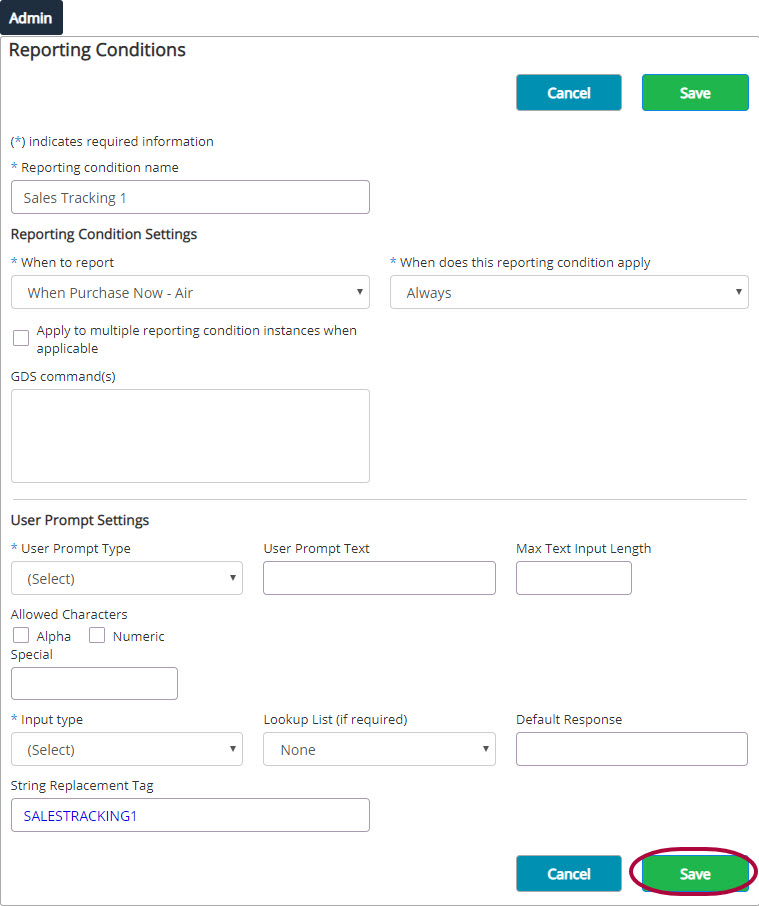
Step 2: Create the Reporting Condition to submit the data to the GDS as usual, but paying attention to the following fields:
You can set Reporting Conditions to log user actions during the booking process for a company. This process helps to identify travel policy compliance, and the information captured can be documented within the PNR (Trip) in remark fields, UDIDs, sort fields, etc.
This document shows you, a TMC Administrator, how to update existing Reporting Conditions.
Step 1: Select Policy Setup in the Admin menu. Then, Reporting Conditions.
Step 2: The Reporting Conditions section opens with a list of all existing Reporting Conditions. Click the pencil icon from the Action column to next to the condition to edit.

Step 3: The Reporting Conditions page opens to the one you selected. Make changes to the Reporting Condition using the fields provided, and then click Save.
Reporting Conditions attached to a Policy Tree Branch with the Include Reporting Condition rule item cannot be deleted. To delete an attached Reporting Condition, it must first be detached from the Policy Tree Branch.
With Nexonia and Egencia, employees can book travel on Egencia and have that data flow smoothly overnight to Nexonia. The integration will transfer approved Egencia trip itineraries into Nexonia automatically. The itinerary items then auto-populate expense items in Nexonia for the traveller.
This article will include an overview of the integration as well as cover information you will require for the set-up.
Overview
Nexonia's integration with Egencia will integrate approved trip itineraries into Nexonia to populate expense reports with booking data. Expense items will be created based on configured defaults, such as the category and whether it's employee or company paid. Itinerary details will be mapped into the item memo, but values can be mapped into custom fields if preferred.
Note: no receipt or itinerary attachment is provided via the integration. Attachments can be imported by the user to their expense report once it's been created via the integration - the most convenient method is to forward any itinerary documentation via email to receipts@nexonia.com.
Trip expenses can be linked to receipt attachments, and merged with credit card transactions if they're also integrated into Nexonia.
The trips are matched from the Egencia traveller's email to the Nexonia user's email - this is how the integration knows whose trip belongs in which user account.
The typical workflow would be that the booked travel will be drafted into the Nexonia expense report and once travel is completed, the traveller can complete the report - attach receipts, add additional out of pocket or company paid expenses - and then submit for expense approval.
Click here to learn more about How to Use Nexonia's Travel Integration with Egencia
Demonstration of Nexonia's Egencia Integration
Implementation Requirements for an Egencia Feed Integration
An administrator will be able to set up an Egencia integration themselves on your Nexonia account. You will require your Egencia Company ID - you'll want to engage your Egencia Implementation Consultant for this value.
Once you have that, contact sales@nexonia.com to initiate the Egencia integration process.
Nexonia Configuration for the Egencia Integration
As part of the implementation, you'll need to plan which of your Nexonia expense categories should be associated with particular types of Egencia trip expenses.
Egencia Expense Types
The integration can set all of the integrated expenses as Company Paid or Employee Paid, or this can be set based on the category's setting. For example, if only Airfare is Company Paid, it could be linked to a specific expense category with that default.
There are additional integration values that can be configured, but note that these settings apply to all items integrated from Egencia.
Expense Report Date - defaults to the date the itinerary was imported into Nexonia, but options include:
Expense Item Date - defaults to the date the itinerary item was imported into Nexonia, but options include:
Custom Fields - custom fields can be create in Nexonia, and integrated itinerary values can be mapped to these fields.
How Can I Get Started?
Contact sales@nexonia.com - your account executive can give you details on the pricing for an Egencia integration and begin the process.
Once the Payment Settings rule has been enabled in your Nexonia Travel account, and you have added either credit cards or virtual cards, you may encounter some of these scenarios.
The option to Edit or Delete a Payment Setting is available, however, any Payment Setting attached through an Include Rule cannot be deleted.
The Payment Type of a Payment Setting cannot be changed.
The following rules are available for Payment Settings:
Virtual Cards:
Only one Hotel Virtual Card will be valid per policy branch. If a parent policy contains the rule item Include Payment - Hotel Virtual Card and the Admin adds the rule to a child policy, the Hotel Virtual Card from the parent policy will be overridden.
Credit Cards:
Cards added through Payment Settings are not available in the traveler profiles.
Multiple Credit Cards can be added to a policy branch. If a parent policy contains the rule item Include Payment - Credit Card and the Admin adds the rule to a child policy, the Credit Card from both rules will be available to the users. Any Hotel Virtual Card included will also be shown.
Only one Virtual Card is allowed per policy branch.
When a user is prompted to select a card, all available credit cards will be listed. The List includes virtual cards, all company credit cards, and all traveler profile cards for the travel type.
Users will be prompted when there are multiple Payment Settings credit card/virtual cards included on the policy branch for the travel type being booked.
If a traveler's policy branch has multiple Payment Settings credit cards for air travel, the user is not prompted when there is a card designated for a specific airline. Instead, the specific airline card is applied as the default payment. Non-specific cards are not considered when a specific airline card is available.
If the traveler's policy branch has a Payment Settings Virtual Card or Credit Card for the travel type included, the Payment Settings card will always be applied. If there is a preferred credit card for the travel type in the traveler's profile, it will not be used. The rule Always Prompt for Credit Card must be attached to the traveler policy branch and set to Yes for the user to have the option to select a card from the profile.
If the traveler's policy branch does not have a Payment Settings Virtual Card or Credit Card for the travel type included and there is a preferred credit card for the travel type in the traveler's profile, the preferred credit card from the traveler profile is always applied to bookings for the travel type.
If the traveler's policy branch does not have a Payment Settings Virtual Card or Credit Card for the travel type included and there is an available credit card(s) for the travel type in the traveler's profile but no preferred credit card for the travel type is selected in the traveler's profile, the user will be prompted to select from the list of available credit cards when booking the travel type.
If the rule item Always Prompt for Credit Card is attached to the traveler policy branch and set to Yes, the user will always be prompted to select a card when booking.
If the user is viewing the traveler's profile, the access to the Billing Information Page and the ability to add a credit card for a travel type is based on the logged-in user's policy.
During the booking process, the user will be prompted to add a credit card to the travel type if the traveler does not have available credit in their profile or policy.
If the user is adding a credit card during the booking process, that card will be available during the session for the traveler. The ability to save the card to the traveler's profile is based on the traveler's policy. Each type of travel has a Level Rule to determine if the traveler can set a preferred credit card. If the user is adding a credit card during the booking process and wants to save the credit card to the traveler's profile, the Level Rule on the traveler's policy b ranch for the type of travel must be set to Edit.
If a user attempts to book a hotel but we are not able to obtain a virtual card from Conferma, the user will be presented with an error:
Unable to process hotel payment. Please remove the hotel(s) from your itinerary to continue. To correct his problem, go to the top menu bar, select "Help" then "Online Help" and then "Contact Support". If you need immediate assistance, please contact your travel agency.
If a user attempts to book a hotel but the total cost exceeds the maximum amount set by the company for a virtual card, the user will be presented with an error:
Unable to process hotel payment. Requested amount exceeds maximum amount allowed. Please choose another option.
If a user books a hotel with a virtual card but we are unable to complete the card processing with Conferma, the user will be presented with an error:
Unable to complete hotel payment process. Please contact your travel agency for assistance.
Please Note: An email will be sent to the TMC's Failure Email when a failure occurs and the TMC needs to take action.
A new virtual card is requested for each hotel booking for a trip. If the hotel is changed and the hotel remains the same, the existing virtual card will be updated. If the hotel is changed and a different hotel is selected, the original virtual card is canceled and a new card is requested for the new hotel.
To ensure that a Hotel Virtual Card is always used for your company's hotel bookings, the Hotel Virtual Card must be included on the policy branch for the traveler(s) and the Preferred Hotel Credit Card Level rule item should be set to Hide. The rule item Always Prompt for Credit Card should not be used.
Payment Settings can be used to add virtual cards and credit cards that can be used for hotels. First, Payment Settings must be enabled in your Nexonia Travel account. In order to add a virtual card, you must first set one up through Conferma.
This article shows you, a Nexonia Travel Administrator, how to add a virtual card using payment settings.
Step 1: On your Nexonia Travel homepage, click Admin. Then, click Policy Setup followed by Payment Settings.
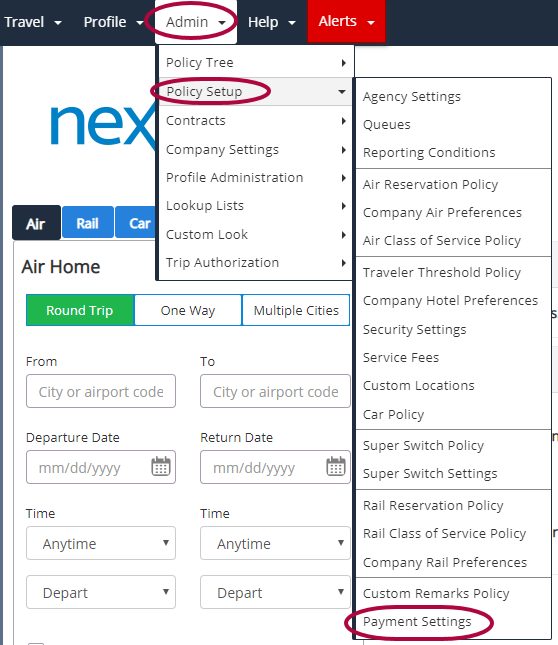
Step 2: Click Add New.

Step 3: Select Virtual Card from the Payment Type drop-down menu.
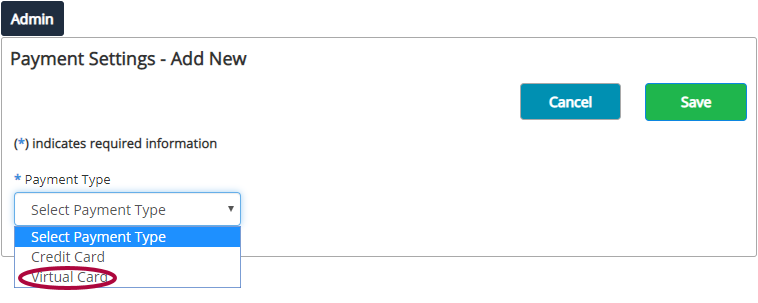
Step 4: Complete the fields for the new virtual card. Fields marked with a * are required. Some include:
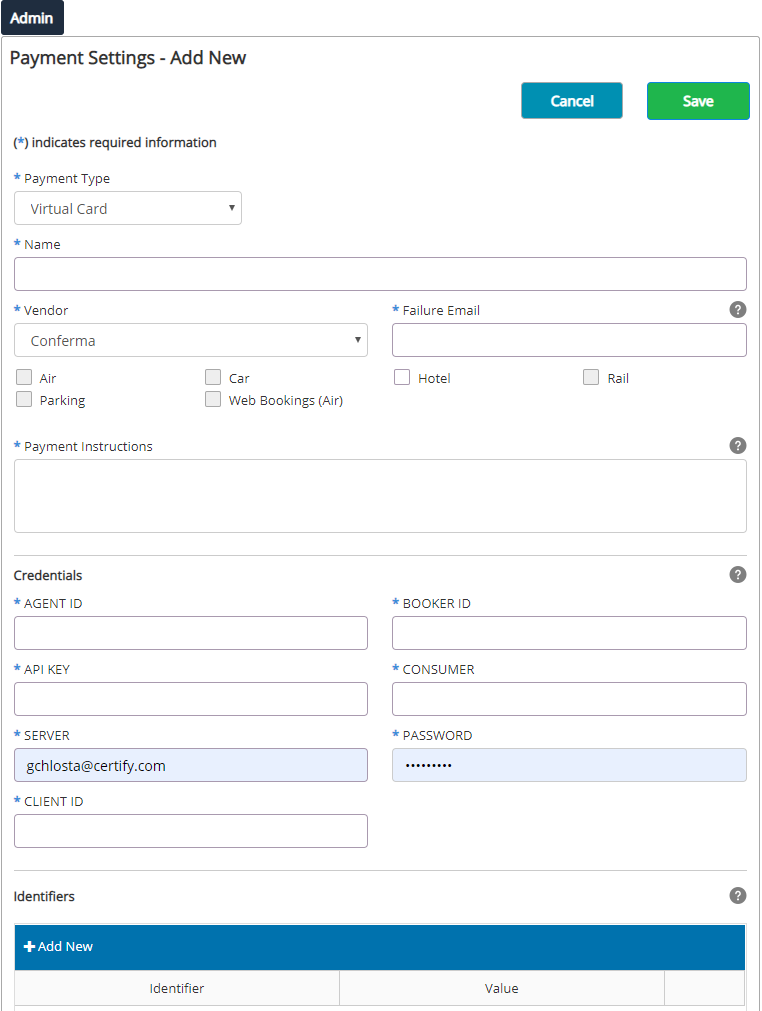
Step 5: Identifiers are used to send Conferma data you wish to include with your card requests. These items can then be included on reports provided by Conferma. Click Add New in the Identifiers section.

Step 6: Add the Identifier and Value for the new Identifier:
Both the Identifier and Value are required for an identifier to be valid. The string replacement tags from custom profile fields and reporting conditions can be used in the Value field.

Step 7: Click Save to add the virtual card to your Payment Settings.
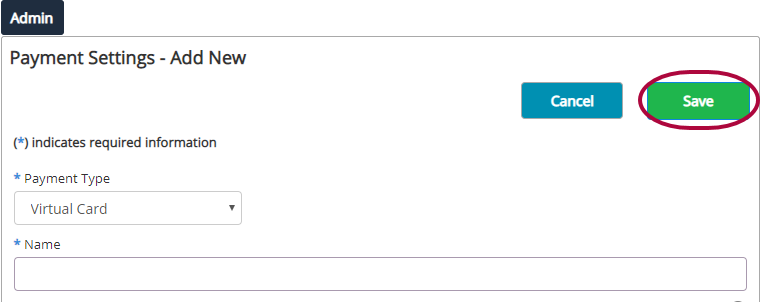
The following rules are available for Payment Settings.
Virtual Cards:
Please Note: Only one Hotel Virtual Card will be valid per policy branch. If a parent policy contains the rule item Include Payment - Hotel Virtual Card and the Admin adds the rule to a child policy, the Hotel Virtual Card from the parent policy will be overridden.
Payment Settings can be used to add credit cards and virtual cards that can be used for all travel types. First, Payment Settings must be enabled in your Nexonia Travel account.
This article shows you, a Nexonia Travel Administrator, how to add a credit card using payment settings.
Step 1: On your Nexonia Travel homepage, click Admin. Then, click Policy Setup followed by Payment Settings.

Step 2: Click Add New.

Step 3: Select Credit Card in the Payment Type drop-down menu.
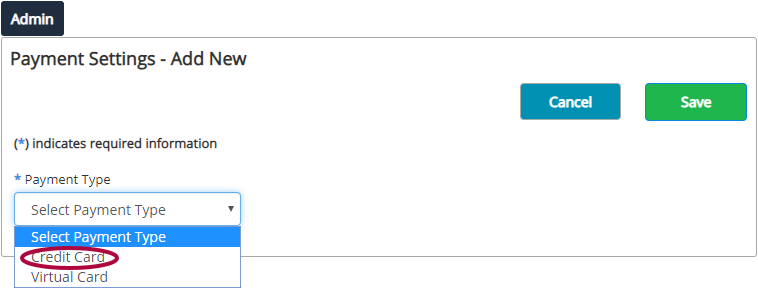
Step 4: Complete the fields for the new credit card. Fields marked with an * are required. Name refers to your own internal reference to this card. This name will be shown to the users when selecting a card. Under Name, select the types of booking this card should be used for.
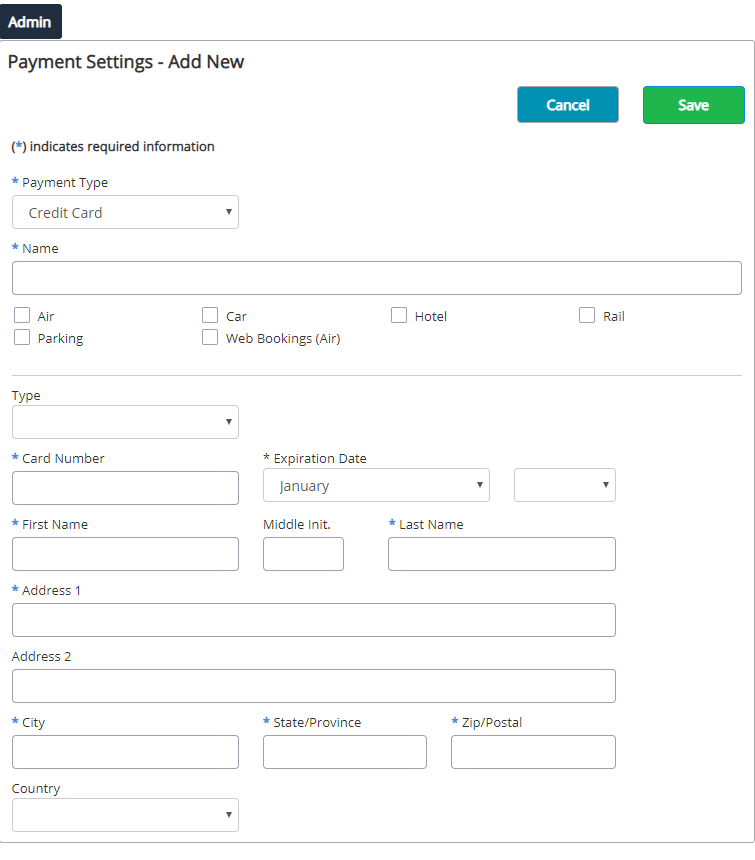
Please Note: When a Credit Card is made available for Air, an airline can be designated. When an airline is included, the itinerary can only contain the airlines listed for the card to be applied. Up to ten airlines can be included and must be separated by a comma.

Step 5: Click Save to add the credit card to your Payment Settings.

Please Note: Cards added through Payment Settings are not available in the traveler profiles.
Multiple Credit Cards can be added to a policy branch. If a parent policy contains the rule item Include Payment - Credit Card and the Admin adds the rule to a child policy, the Credit Card from both rules will be available to the users. Any Hotel virtual Card included will also be shown.
The Payment Settings Rule allows you to manage payment options from a company level for your travel site.
This article shows you, a Nexonia Travel Administrator, how to enable the Payment Settings Rule.
Step 1: On your Nexonia Travel homepage, click Admin. Then, click Policy Tree followed by Policy Tree Editor.

Step 2: Click edit next to Administrator's policy branch.
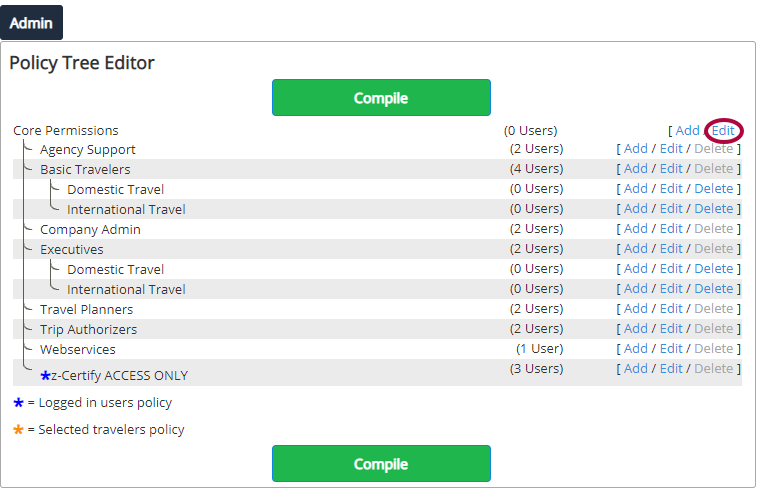
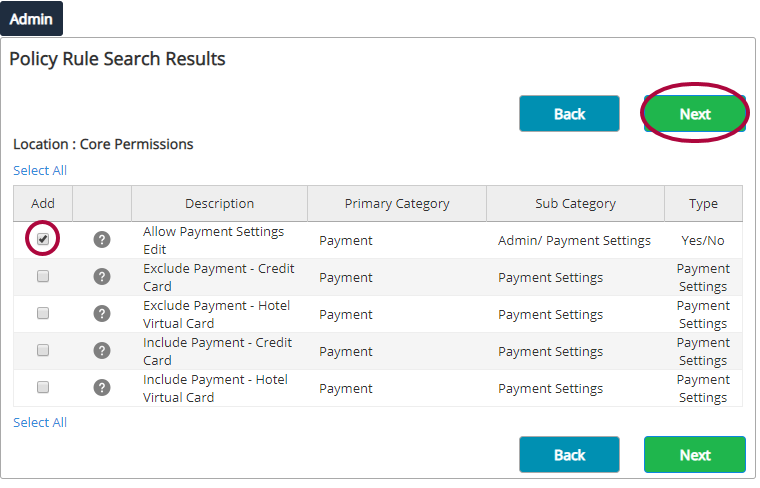
Step 3: Click Add New Rule to Payment Section to view all available rules.

Step 4: Click the checkbox next to Allow Payment Settings Edit and click Next.
Step 5: Select Yes from the drop-down menu, then click Save.

The Payment Settings Rule has now been added to your account. You must have this rule on your policy branch in order to access the Payment Settings page. Next, add credit cards and virtual cards to your account using Payment Settings.
Offline Trip Approval is available to approve trips for offline bookings. It works through a PNR Sync. A new queue is added to a company and designated as an Offline Trip Authorization Queue. PNRs on this queue are imported as a normal PNR Sync would import.
In addition to the import, trips imported from the designated queue are sent through the trip approval process with help from a TMC Admin. TMCs enter two remarks into the PNR that the Trip Approval Process will use in communicating with the approver. The first is the ability to customize the subject line of the email, and the second is to indicate the reason(s) for the trip approval requests.
Once the emails are sent, the offline trip approval process will be the same as the online trip approval process.
For the setup to be valid, travelers must have the following settings:
Please Note: If there isn't a trip authorizer assigned in the traveler profile, the trip authorization process will not work.
Please Note: If there isn't a trip authorizer included on the policy branch of the traveler, the trip authorization process will not work.
This article will show you, a TMC Administrator, how to enable the Offline Trip Approval Process.
Step 1: On your Nexonia Travel homepage, click the Admin menu. Then, click Company Settings followed by PNR Sync Queue Settings.
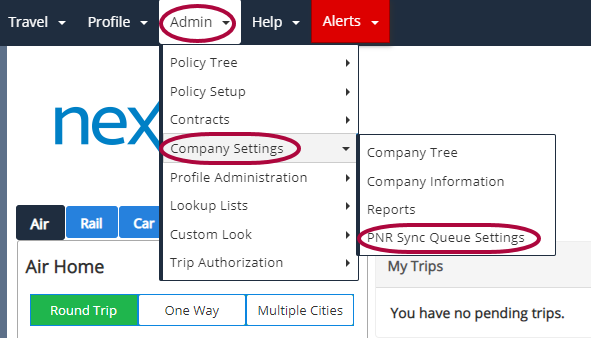
Step 2: Click Add New Queue Setting.

Step 3: Fill out the fields on the PNR Sync Queue Settings page:
Please Note: Default User ID is not used for the majority of standard configuration for Trip Syn Usage. This field is specific to custom useage by clients using a sync process of PNR's housed in a third-party database other than GDS.
Also, there isn't a policy rule item in order to activate this policy. This is unique to the online tool as most policies require a rule item to be applied. This functionality does not.

Step 4: Click Save when complete.

You'll be returned to the PNR Sync Queue Settings list screen and the new setting has been added. The queue setting will be active after for as long as the settings exists in the list.
When a PNR is read from the queue, the PNR will be checked for remarks that begin as follows:
The text following OTAR- will be copied and sent as a failed test. Multiple remarks will each be processed and sent in the trip approval email(s).
These remarks will go into the [FAILEDTESTS] SRT in trip authorization emails that are sent.
Alpha qualifiers can be used but will not be captured as part of the test.
These remarks will go into the subject line in trip authorization emails that are sent.
If the PNR does not contain any remarks with OTAR-, the failed tests will be populated with custom text ID 11066. The default text is "CONTACT AGENCY FOR APPROVAL INFORMATION".
A new option has been added to the Agency Email Alter Notifications section of the Agency Settings. The new field 
If the traveler does not have a trip authorizer available to their profile, the trip will simply be imported, and an email will be sent to the email address in the Offline Trip Authorization Failure Notification Email Address.
The Trip Authorization Page is where company travel policy details are entered for trips requiring approval and/or policy control at availability:
This article shows you, a TMC Administrator, how to establish trip approval.
Step 1: On the Nexonia Travel homepage, select Trip Authorization in the Admin menu. Then, Trip Authorization Policy.
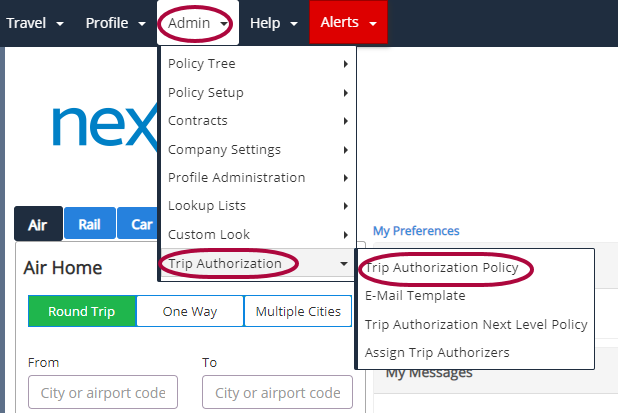
Step 2: The Trip Authorization page opens. Click the pencil icon to edit to open the section where you can establish trip policy for the company you are working with.

The Trip Authorization page appears. These fields apply to all Global Distribution Systems (GDS).
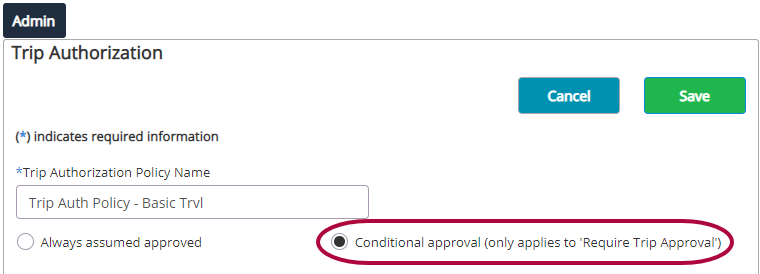
Please Note: Changing between Always assumed approved and Conditional approval must go through Nexonia Travel Support.
Trip Authorization Policy Name: The travel policy name for the company. Then choose whether the company Authorizer must always approve all trips OR conditionally approve only certain trips.
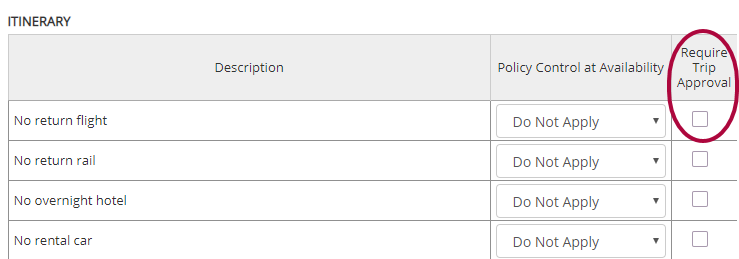
 Trip conditions which can be configured with conditional approval are:
On the Trip Authorization page, there are sections for itinerary, air, car, hotel and rail. Each section covers approval policy for that topic.
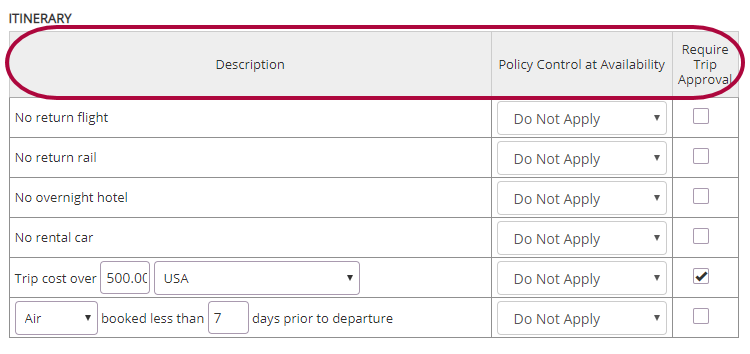
Setting ITINERARY, AIR, CAR, HOTEL and RAIL policy:
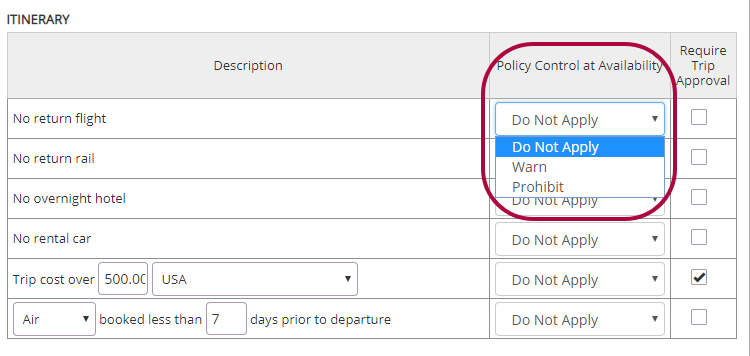

Use notifications to set up which emails are sent when a traveler books a trip requiring approval.
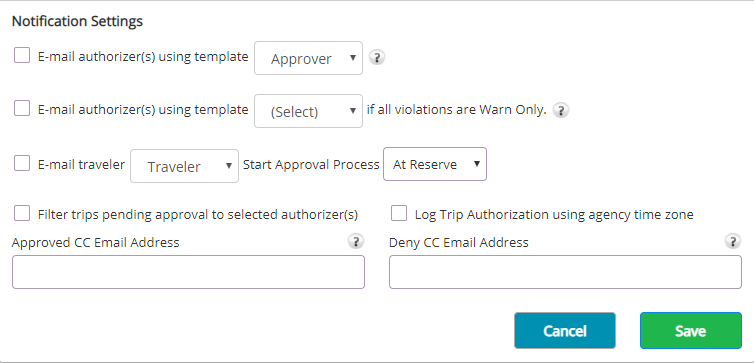
Notification Settings fields include:
E-mail authorizer(s) using template: Markthis box to select the email template that will be sent to Authorizers. Choose the email template that should be used.Template options vary depending company configurations. In this example, the company has loaded two templates – one for an Approver and one for a Traveler. Templates are established in the Trip Authorization section of Admin.
E-mail authorizer(s) using template (Select) if all violations are Warn Only: Checkmark this box to select the email template that will be sent to Authorizers. Choose the email template that should be used if all violations are Warn only.
E-mail traveler: A check indicates the selected traveler is notified when authorization is required. Choose the email template that should be used.
Start Approval Process: If the E-mail traveler checkbox is marked, the trip Authorizationcan be triggered at Reserve or Purchase.
Approved CC Email Address: Enter an additional email address. When an address is entered here, the trip approval email goes to the traveler and this email. If nothing is entered here, the trip approval email goes just to the traveler.
Deny CC Email Address: Enter an additional email address. When an address is entered here, the trip-denied email goes to the traveler and this email. If nothing is entered here, the trip-denied email goes just to the traveler.
Single Sign On (SSO) is where a single action of user authentication and authorization permits a user access to all computers and systems (with established access permission), without the need to enter multiple passwords.

This section is handled by Nexonia Travel Support.
Trip Authorizers saved in the policy will override any authorizers from the traveler profile or policy branch. To select a user, the user must be assigned as a trip authorizer.


Trip Authorizers can authorize trips for travelers. They can have multiple travelers underneath them, and these travelers can be added or removed at any time. Trip Authorizers are added and assigned in the traveler profiles. Next-Level Trip Authorizers have Trip Authorizers assigned to them, and authorize trips for travelers on the next level.
This article will show you, a TMC Administrator, how to manage Next-Level Trip Authorizers.
Trip Authorizers can be managed in profiles or by policy:
Profile - Trip Authorizers
For Trip Authorizers to be managed in the traveler profile, the following rule is required on the traveler policy branch:
If the travelers should select from the list of available trip authorizers:
If the trip authorizers will be assigned by the administration:
If the available trip authorizer(s) are different between policy branches:
Policy - Trip Authorizers
This is required when the Trip Authorizer(s) of a traveler can change between bookings, and the user should be prompted to select their Trip Authorizer each time they book. For Trip Authorizers to be managed on the policy branch, the following rule is required on the traveler policy branch:
If the travelers should select from the list of available Trip Authorizers:
If the travelers do not need to select from the list of available trip authorizers but the administrator wants the approval emails to go all trip authorizers included on the traveler's policy branch:
Trip authorizer(s) must be included on the traveler's policy branch:
Step 1: On the Nexonia Travel homepage, select Trip Authorization in the Admin menu. Then, Assign Trip Authorizers.
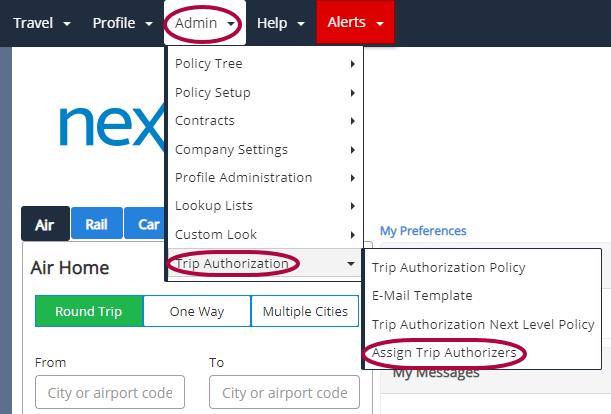
Please Note: The Administrator must have the rule item Allow Assign Trip Authorizers Edit on their policy branch with the value set to Yes in order to access the Assign Trip Authorizers page. And the rule item Allow Access to Assign Next Level Trip on their policy branch with the value set to Yes in order to access the Assign Trip Authorizers Next Level Assign section of the Trip Authorizers page.
Step 2: Check the box for a profile(s) to enable the user to authorize travel as a Next Level Trip Authorizer. First Level Trip Authorizers should be in place prior to assigning Next Level Trip Authorizers. Template, Self-Registration, and Guest Traveler profiles will not be added to the list of Next Level Trip Authorizers. These are not normal users and would not be able to authorize travel.
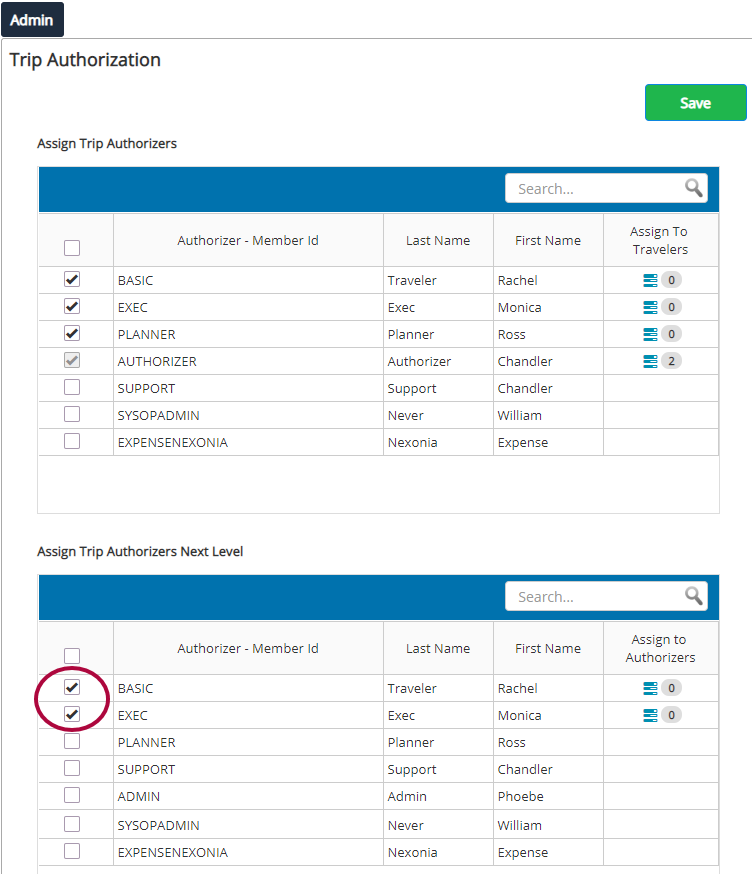
Step 3: Click Save to complete.
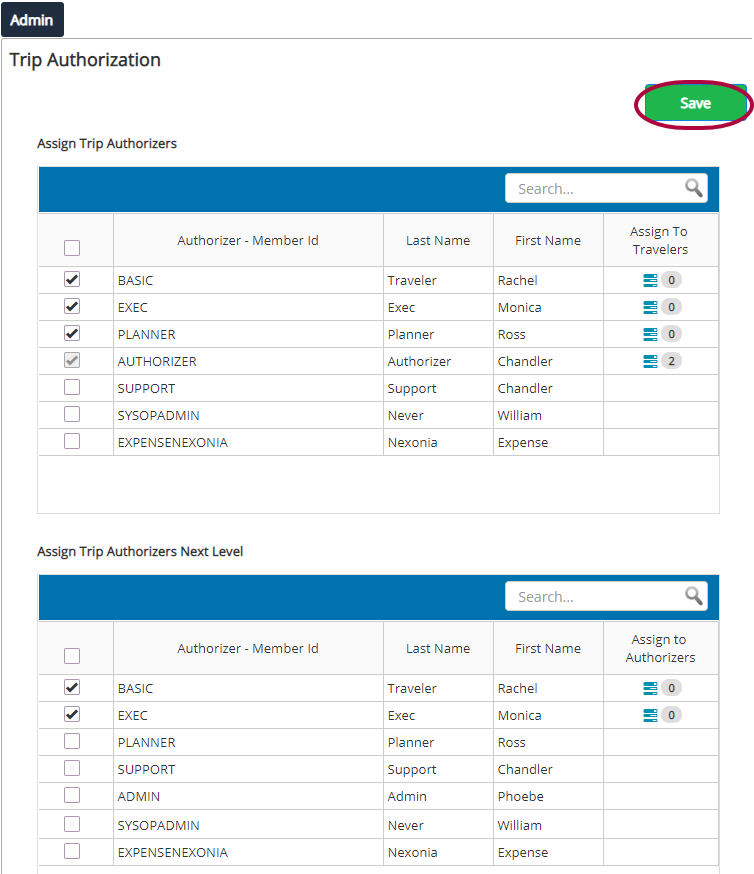
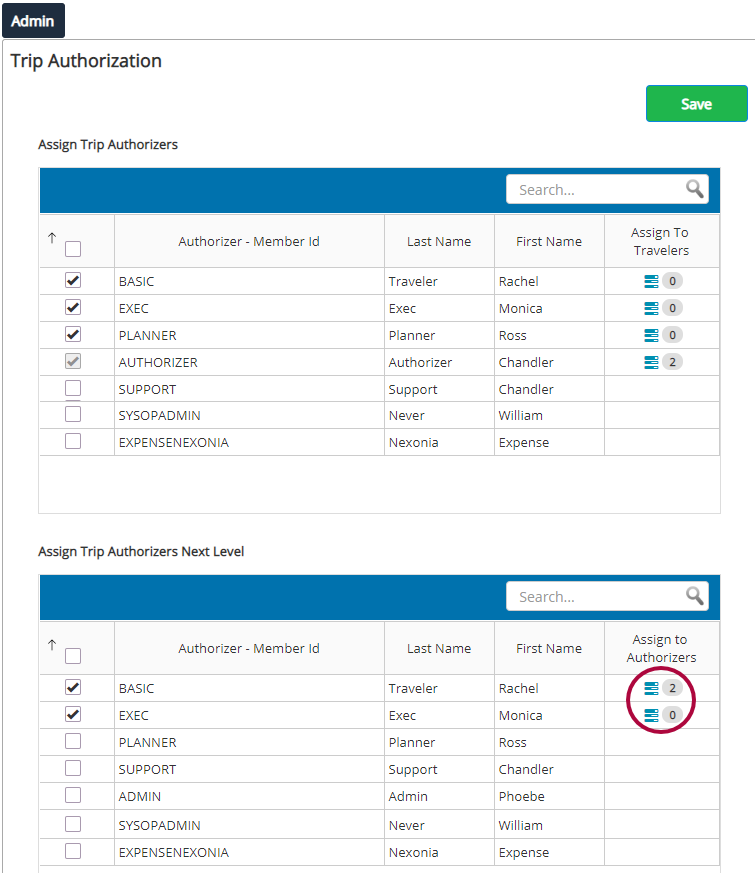
Step 4: The page will re-display and the users that have been enabled will be moved to the top of the list. The option to Assign Authorizers will now be available for any user designated as a Next Level Trip Authorizer. Click the icon in the Assign Authorizers column to assign Trip Authorizers to the Next Level Trip Authorizer.
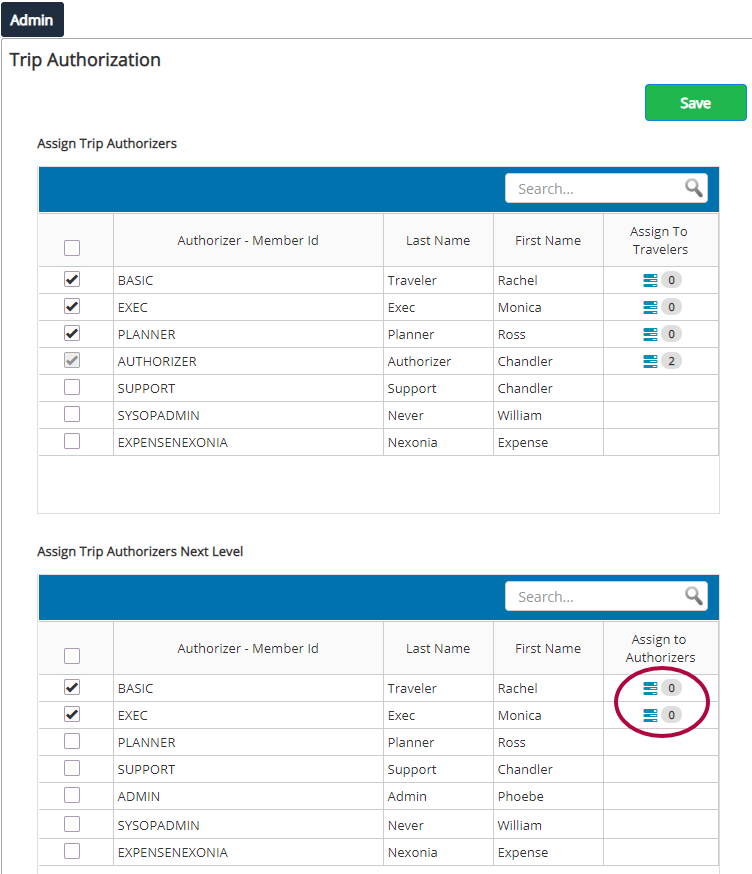
Please Note: A profile must be enabled as a Next Level Trip Authorizer before the member ID can be used in the Include Trip Authorizer Next Level rule item. The Administrator must have the rule item Allow Trip Authorizer at Profile on their policy branch with the value set to Yes in order to assign travelers to a Trip Authorizer. In order for any assignments to be valid for a traveler, the traveler's policy branch must also have the rule item Allow Trip Authorizer at Profile on their policy branch with the value set to Yes.
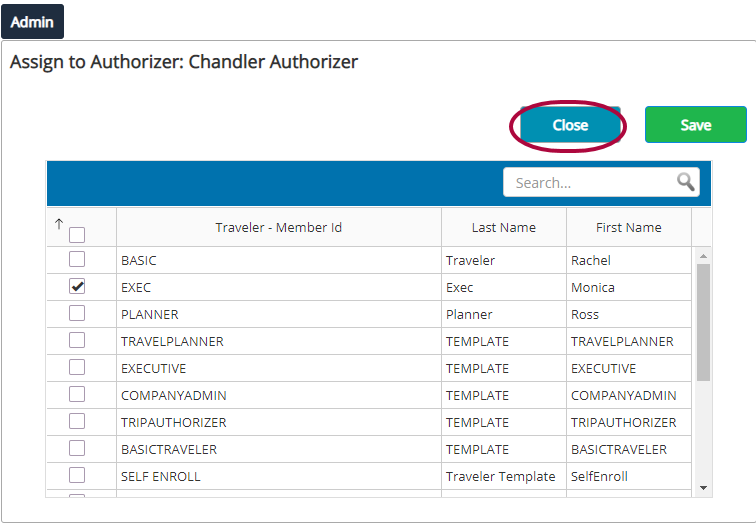
Step 5: This is the Assign to Authorizer page. The available list will contain all Trip Authorizers in the company. Check the box for a Trip Authorizer(s) to assign them to the Next Level Trip Authorizer.
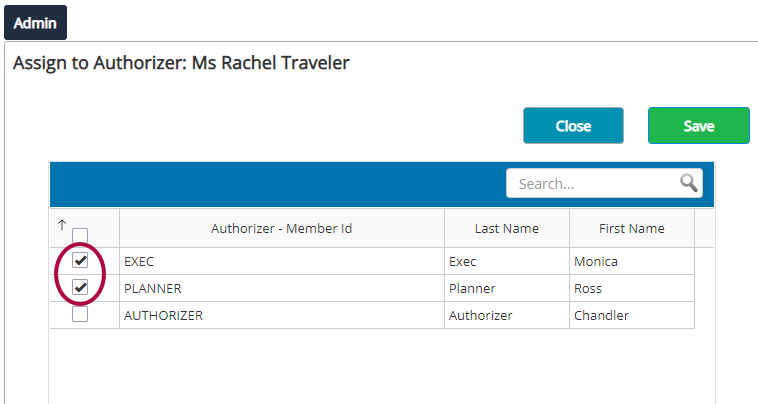
Please Note: The profile of the Next Level Trip Authorizer and any profile that has a Next Level Trip Authorizer included on their policy branch that is not the selected Next Level Trip Authorizer will be excluded from the list.
Step 6: Click Save to complete.
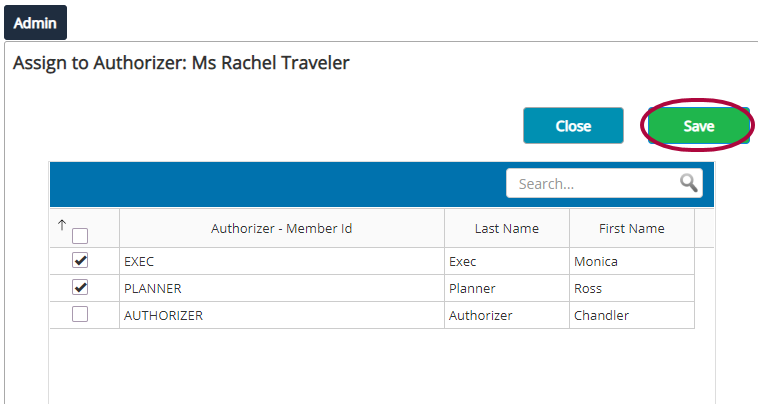
Please Note: If the rule item Include Trip Authorizer Next Level is active on a policy branch, Trip Authorizers on that policy branch(es) can only be assigned to Next Level Trip Authorizers that have been included.
Step 7: Click Close to return to the list of Next Level Trip Authorizers.
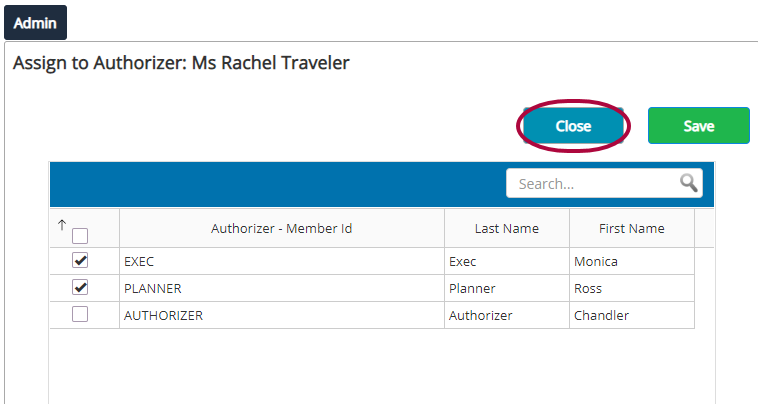
Step 8: The number of Trip Authorizers you assigned will be shown for each Next Level Trip Authorizer.
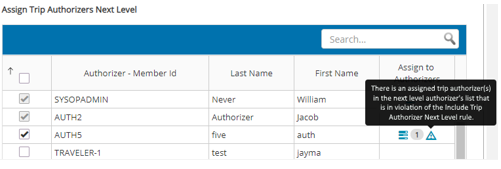
Please Note: If there is a Trip Authorizer assignment that is in violation of the Include Trip Authorizer Next Level rule, there will be a warning icon. This can occur when you are in the process of changing policy settings or if the assignment was done through a databridge feed.
When you return to the Assign Trip Authorizers page, the number of Trip Authorizers you assigned will be shown for each Next Level Trip Authorizer.
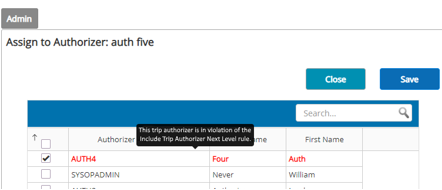
Once a Next Level Trip Authorizer has an assigned Trip Authorizer, all trip approval emails will go to the Trip Authorizer's assigned Next Level Trip Authorizer.
If a Next Level Trip Authorizer is added to a databridge feed, the Next Level Trip Authorizer will be automatically enabled in Administration with the Trip Authorizer assigned to the Next Level Trip Authorizer.
To remove or change a Next-Level Trip Authorizer, please see Removing a Next-Level Trip Authorizer.
To remove a Trip Authorizer assigned to a Next-Level Trip Authorizer, please see Removing a Traveler assigned to a Next-Level Trip Authorizer.
An organization may need to change or delete a Next-Level Trip Authorizer assigned to a Trip Authorizer.
This article will show you, a TMC Administrator, how to remove a Next-Level Trip Authorizer already assigned to a Trip-Authorizer.
Step 1: On the Certify Travel homepage, select Trip Authorization in the Admin menu. Then, select Assign Trip Authorizers.

Step 2: To remove a Trip Authorizer, un-check the profile.
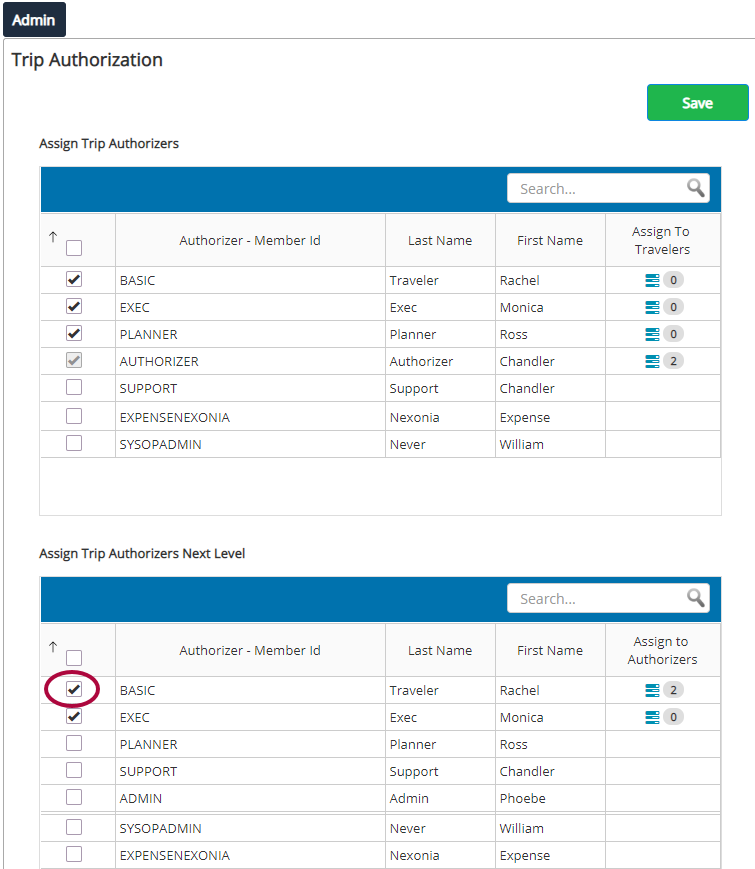
Step 3: Click OK to confirm.
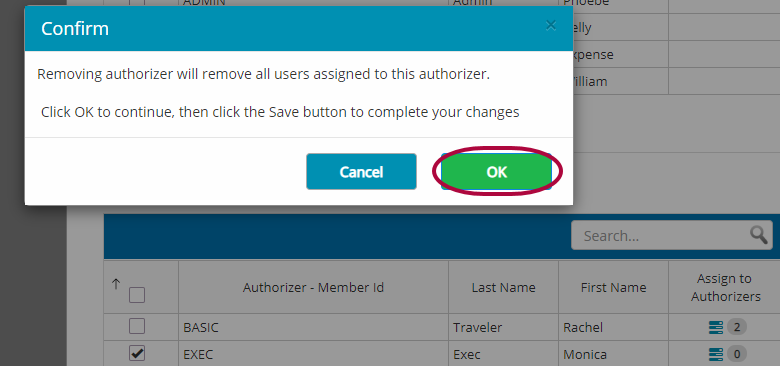
Please Note: If a Next Level Trip Authorizer is included on a policy branch, you will not be able to remove them as a Trip Authorizer. You must first detach all instances of the rule item Include Trip Authorizer that contain the member ID of the Trip Authorizer and Compile in order to remove them as a Trip Authorizer.
Step 4: Click Save to complete.
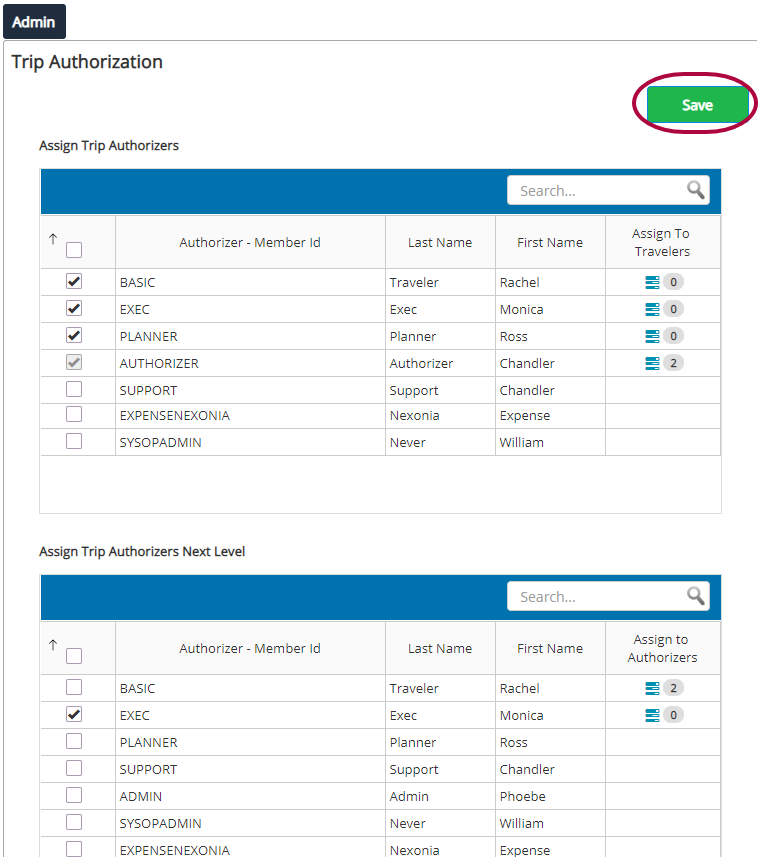
Please Note: If you exit the page without saving, your changes will be lost.
At any time, an organization may need to change a Next-Level Trip Authorizer, when the Trip Authorizer is already assigned to multiple Next-Level Trip Authorizers. In this case, it may be easier just to remove the single Trip Authorizer from the Next-Level Trip Authorizer's list.
This article will show you, a TMC Administrator, how to remove a Trip Authorizer assigned to a Next-Level Trip Authorizer.
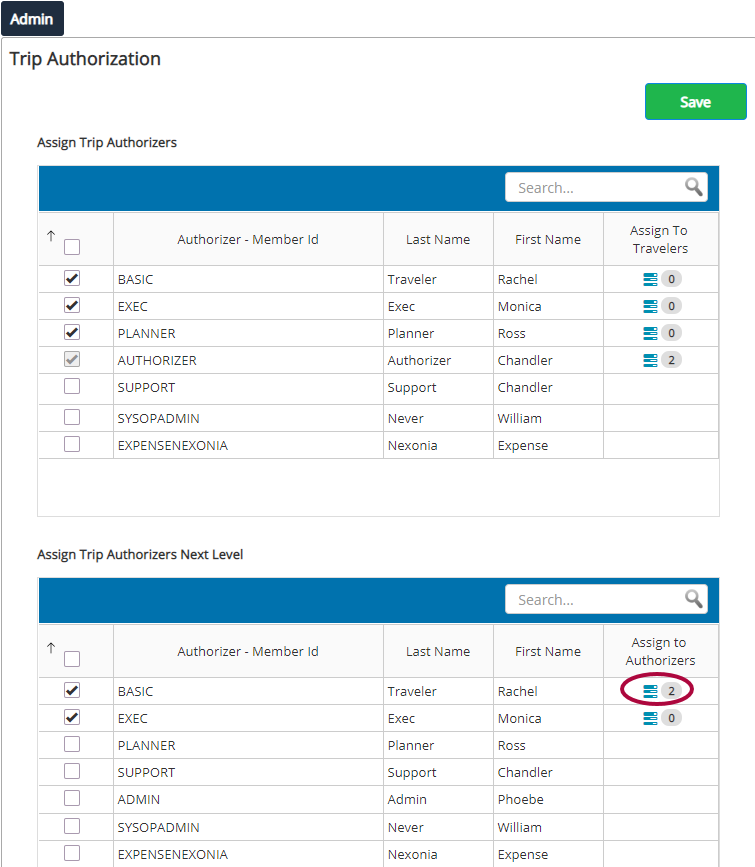
Step 1: On the Certify Travel homepage, select Trip Authorization in the Admin menu. Then, select Assign Trip Authorizers.

Step 2: Click the icon in the Assign to Authorizers column.
Step 3: Un-check the trip authorizer(s) you wish to unassign.
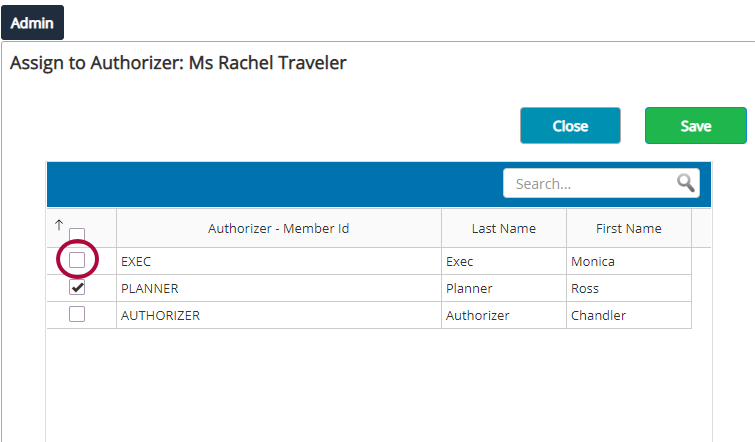
Step 4: Click Save to complete.
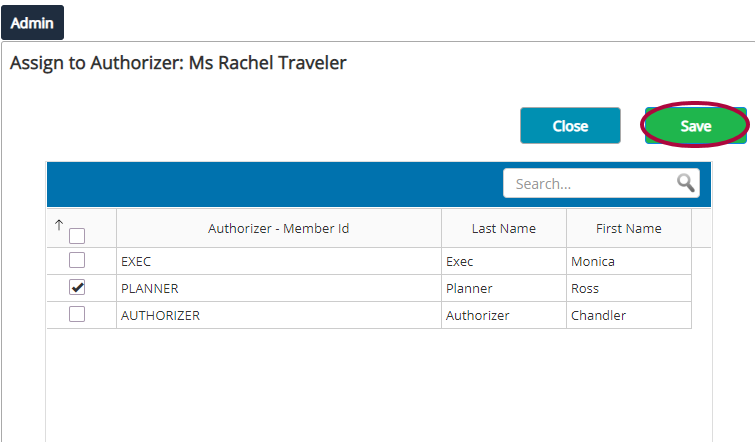
Step 5: Click Close to return to the list of Next-Level Trip Authorizers.
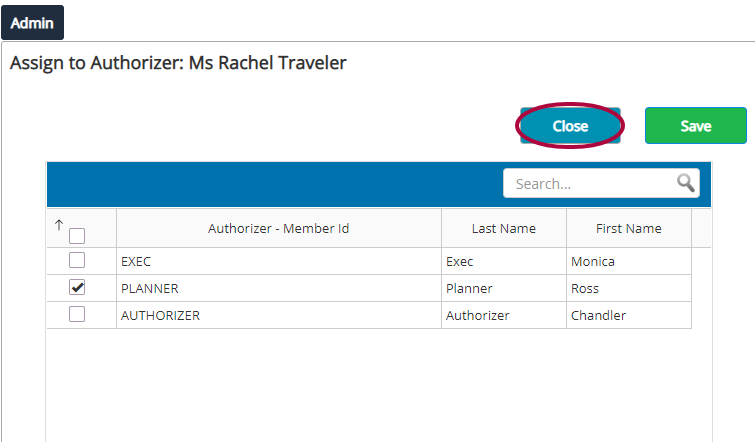
The number of assigned trip authorizers will be updated.
Step 1: To access the Trip Authorizers page in the traveler profile, go to Profile and then Trip Authorizers.

Please Note: To access this page, the user's policy branch must have the rule item Trip Authorizer Selection Level Next Level attached with the value as Edit. If the Administrator does not want users to change their Next Level Trip Authorizers, the value should be set to View or Hide.
Step 2: The Trip Authorizers page of the traveler profile will show the available next-level authorizers.
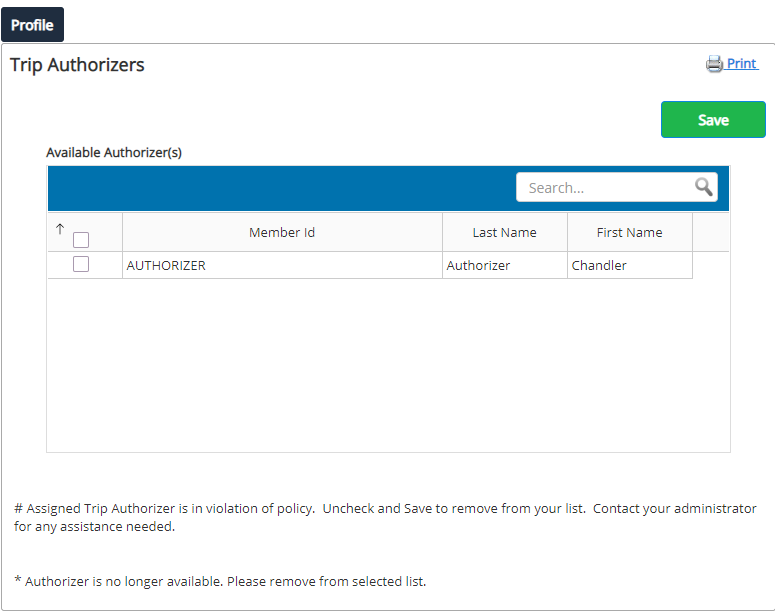
Any Next Level Trip Authorizer assigned by the Administrator will be flagged. Advising the trip authorizer to not remove the Next-Level Trip Authorizer from the list.
If the policy branch for the profile has the rule item Include Trip Authorizer Next Level included, only those Next Level Trip Authorizers included by the rule item will be available to choose.
If the policy branch for the profile does not have the rule item Include Trip Authorizer Next Level included but the rule item is on another policy branch(es), only those Next Level Trip Authorizers not included by the rule item will be available for selection.
Trip Authorizers can authorize trips for travelers. They can have multiple travelers underneath them, and these travelers can be added or removed at any time. Trip Authorizers are added and assigned in the traveler profiles.
This article will show you, a TMC Administrator, how to manage Trip Authorizers.
Step 1: On the Nexonia Travel homepage, select Trip Authorization in the Admin menu. Then, select Assign Trip Authorizers.

Step 2: Check the box for a profile(s) to enable the user to authorize travel.
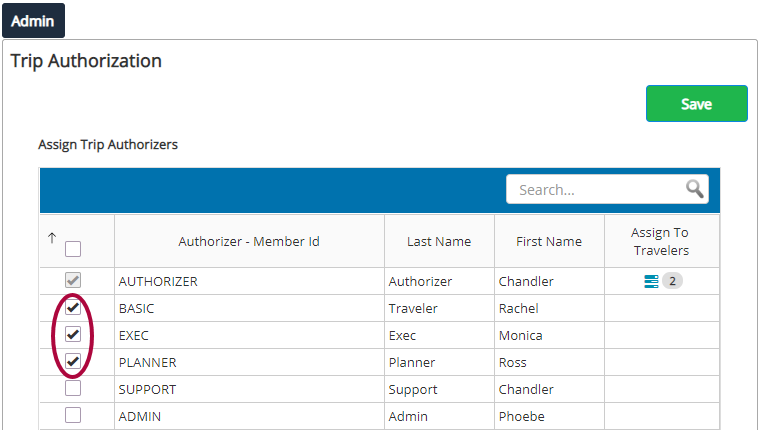
Please Note: The available list will contain all profiles in the company. Template, Self-Registration, and Guest Traveler profiles will not be added to the list. These are not normal users and would not be able to authorize travel.
Step 3: Click Save to complete.
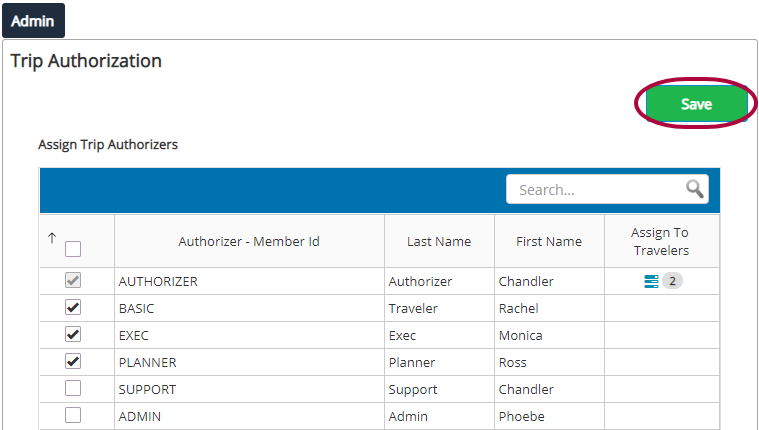
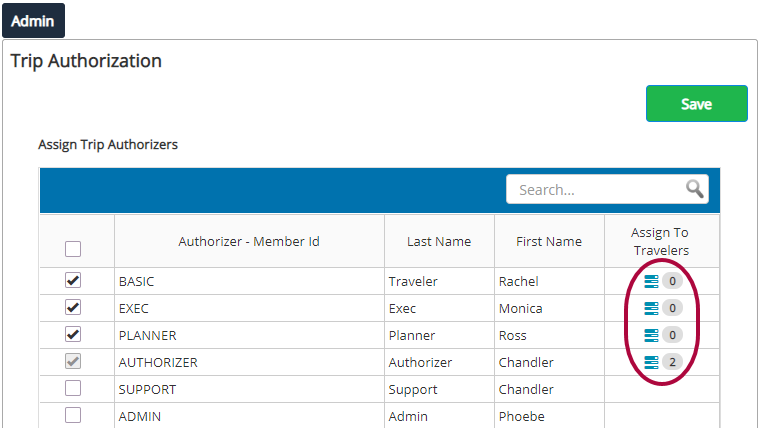
Step 4: The page will re-display and the users that have been enabled will be moved to the top of the list. The option to Assign Travelers will now be available for any user designated as a Trip Authorizer. Click the icon in the Assign Travelers column to assign travelers to the Trip Authorizer.
Step 5: This is the Assign to Authorizer page. Check the box for a profile(s) to assign them to the Trip Authorizer.
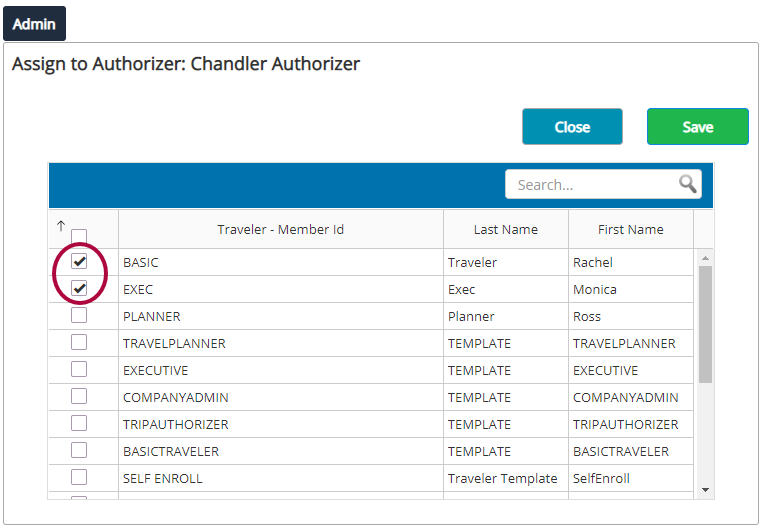
Please Note: The available list will contain all profiles in the company, including Template, Self-Registration, and Guest Traveler profiles. The only profile excluded from the list is the Trip Authorizer.
Step 6: Click Save to complete.
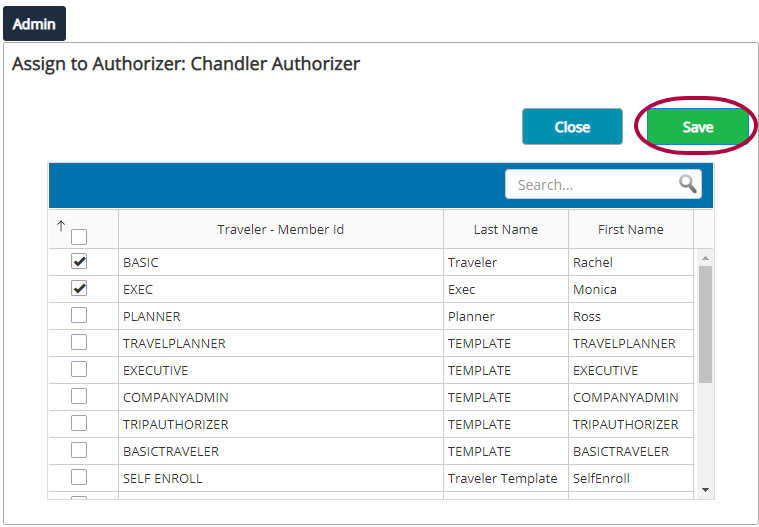
Step 7: Click Close to return to the list of Trip Authorizers.
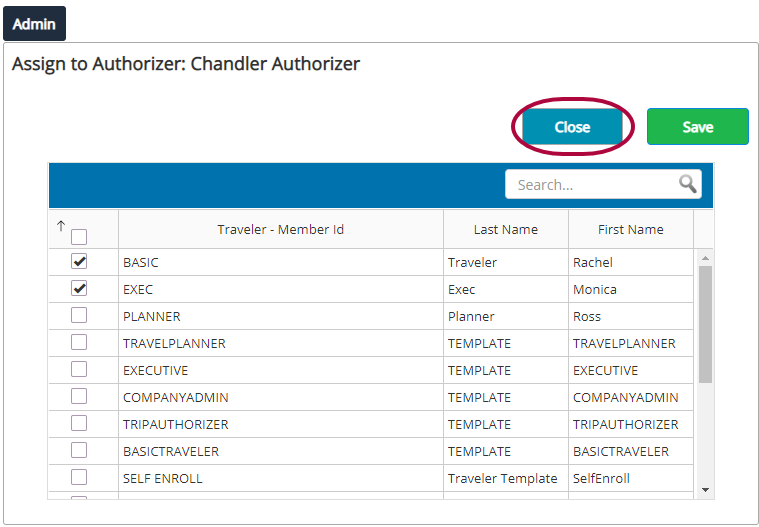
Step 8: When you return to the Assign Trip Authorizers page, the number of travelers you assigned will be shown for each Trip Authorizer.
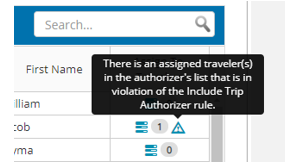

Once a traveler has an assigned Trip Authorizer, all trip approval emails will go to the travelers assigned Trip Authorizer.
If a Trip Authorizer is added to the databridge feed, the Trip Authorizer will be automatically enabled in Administration with the traveler assigned to the Trip Authorizer.
If the traveler is making a booking that requires approval and they have assigned trip authorizers in their profile, the approval requests will automatically be sent to the assigned trip authorizers.
If the traveler is making a booking that requires approval and they do not have assigned trip authorizers in their profile, they will be prompted during the booking process to select a trip authorizer from their available list.
To remove or change a Trip Authorizer, please see Removing a Trip Authorizer - Professional.
To remove a Traveler assigned to a Trip Authorizer, please see Removing a Traveler Assigned to a Trip Authorizer - Professional.
An organization may need to change or delete a Trip Authorizer assigned to a Traveler.
This article will show you, a TMC Administrator, how to remove a Trip Authorizer already assigned to a Traveler.
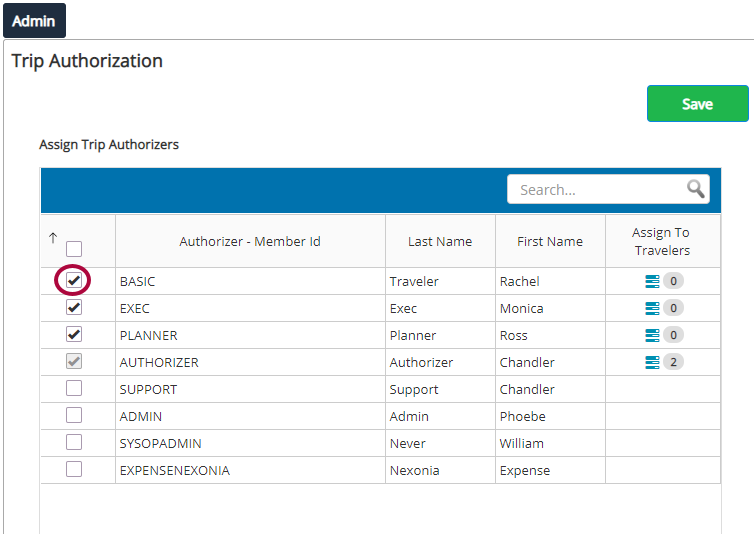
Step 1: On the Nexonia Travel homepage, select Trip Authorization in the Admin menu. Then, select Assign Trip Authorizers.

Step 2: To remove a Trip Authorizer, click the checkbox next to the Trip Authorizer.
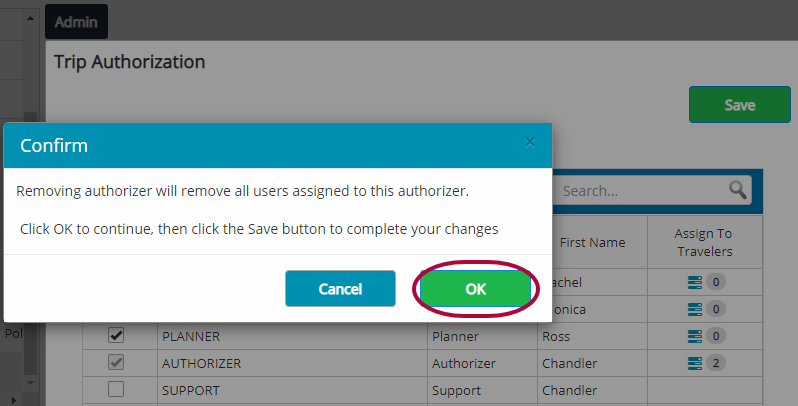
Step 3: Click OK to confirm.
Step 4: Click Save to complete.
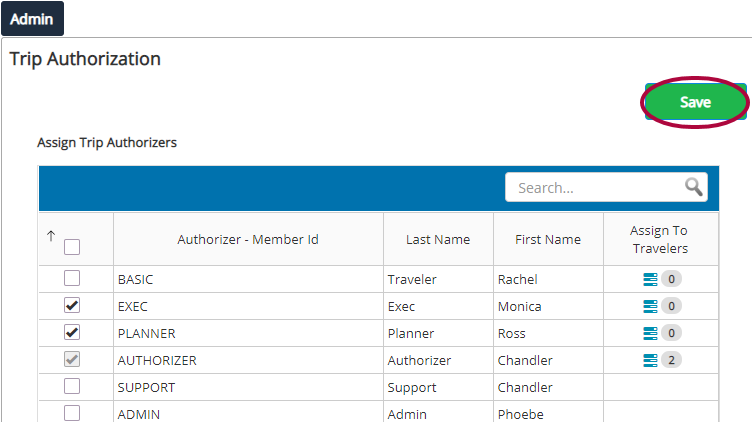
Please Note: If you exit the page without saving, your changes will be lost.
At any time, an organization may need to change a Traveler's Authorizer, when the Authorizer is already assigned to multiple Travelers. In this case, it may be easier just to remove the single Traveler from the Authorizer's list.
This article will show you, a TMC Administrator, how to remove a Traveler assigned to a Trip Authorizer.
Step 1: On the Nexonia Travel homepage, select Trip Authorization in the Admin menu. Then, select Assign Trip Authorizers.

Step 2: Click the icon in the Assign Travelers column.
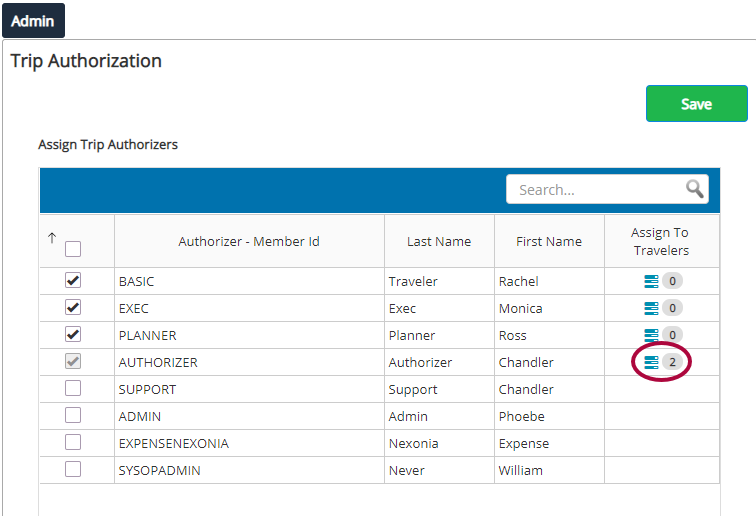
Step 3: Click the checkbox next to the traveler(s) you wish to unassign.
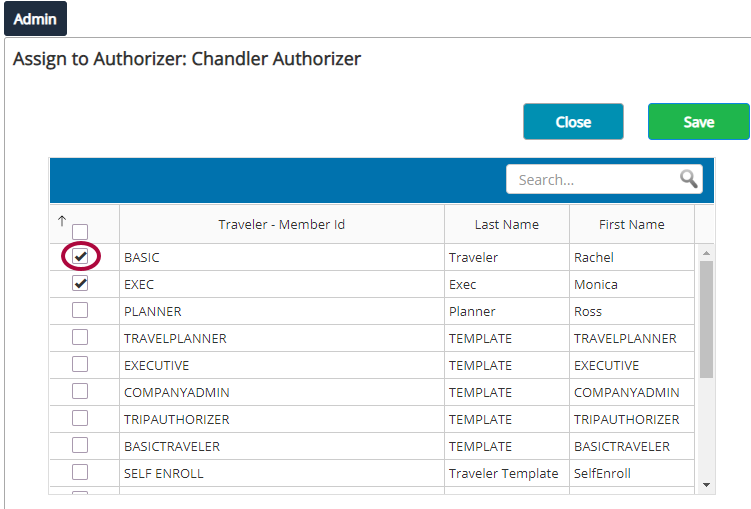
Step 4: Click Save to complete.
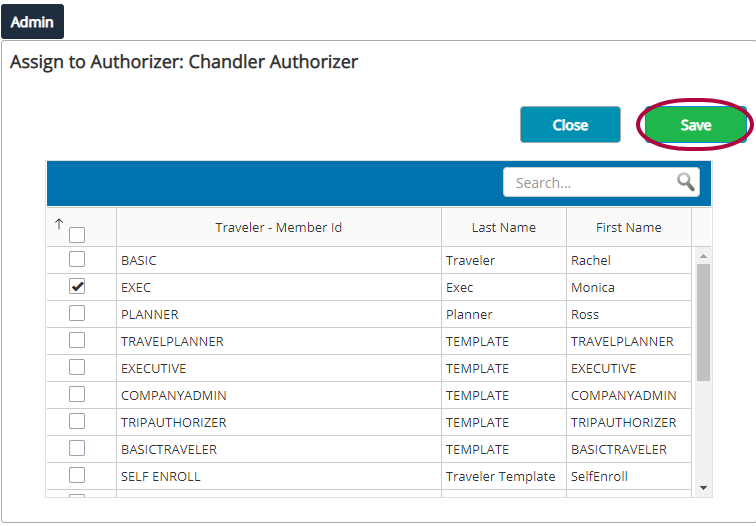 Step 5: Click Close.
Step 1: To access the Trip Authorizers page in the traveler profile, go to Profile and then Trip Authorizers.
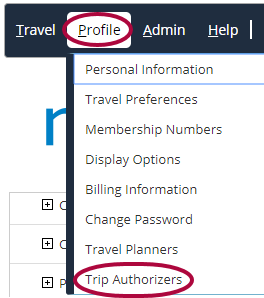
Step 2: The Trip Authorizers page of the Traveler Profile will show the available authorizers. Any Trip Authorizer assigned by the Administrator will be flagged. This advises the traveler to not remove the Trip Authorizer from the list.
