Timesheets
Using Nexonia Mobile for Timesheets
- Updating your Password on the Timesheets Mobile App
- How to Configure PIN & Fingerprint Authentication for Your Nexonia Timesheets App
- Based on system configuration, you're not able to add time entries
- How to use Timers on the Mobile Application
- PDF: Getting Started: A User Guide to Nexonia Timesheets on the Mobile Application
- How To Download the Timesheets Mobile App, Log In and Sync
Entering & Approving Timesheets
Managing Timesheets
- How to Enable Email Notifications for Timesheets
- Setting Quotas for Timesheets
- Filtering Task Category by Role
- DCAA Compliance
- Uploading a Time Policy Document
- Deleting Timesheets
Running Reports
Training Calendar
Submitting & Approving Expenses
Alternating schedule
How to login, upload your receipts, create and expense reports for approval, and approve expenses.
Submitting & Approving Time Off and Timesheets
Alternating schedule
A walkthrough of how to create, submit, and approve Timesheets and Time Off requests.
Reporting Module Overview
Alternating schedule
An overview on how to create and generate reports.
Configuring Expense Settings for Admins
Alternating schedule
How to manage your company's data and settings.
Configuring Timesheets & Time Off Settings for Admins
Alternating schedule
How to manage timesheets and time off settings and policies for your company.
Managing Nexonia with Intacct
Alternating schedule
An overview of how Nexonia is integrated with Intacct. Learn how to import and export data between Nexonia and Intacct, manage users, expense categories and Intacct dimensions.
Managing Nexonia with QuickBooks
Alternating schedule
An overview of how Nexonia is integrated with QuickBooks Desktop or QuickBooks Online. Learn how to import and export data between Nexonia and QuickBooks, manage users, expense categories and QuickBooks dimensions.
Managing Nexonia with NetSuite
Alternating schedule
An overview of how Nexonia is integrated with NetSuite. Learn how to import and export data between Nexonia and NetSuite, manage users, expense categories and NetSuite segments.
Travel Booking & Analytics
Alternating schedule
Review how to book travel, run reports, & view unused tickets.
Watch Nexonia's easy-to-follow brief tutorial videos here.
Training Videos
Updating your Password on the Timesheets Mobile App How to Configure PIN & Fingerprint Authentication for Your Nexonia Timesheets App Based on system configuration, you're not able to add time entries How to use Timers on the Mobile Application PDF: Getting Started: A User Guide to Nexonia Timesheets on the Mobile Application How To Download the Timesheets Mobile App, Log In and Sync
-
When you change your password on the web you will need to update the password on your Timesheets mobile app as well by following these steps:
Step 1: From the homescreen of the mobile app, tap your name near the top.
Step 2: Tap the Gear icon next to your name.
Step 3: Tap Login Parameters.
Step 4: Update your password, then tap Login.
That's all you need to know to use the Timesheets Mobile App!
-
Nexonia Timesheets allows users to unlock their app using a PIN or fingerprint authentication (Touch ID). If your mobile device is capable and configured to have fingerprint authentication, you can unlock Nexonia Timesheets with your fingerprint. You can continue using your PIN as a backup.
How to Configure Fingerprint Authentication for Nexonia Timesheets
Log in to your Nexonia account on the mobile app.
Navigate to Settings > SECURITY.
If you are using an iOS mobile device you will have 3 options:
- PIN - upon launching the app, you will be prompted to enter a PIN.
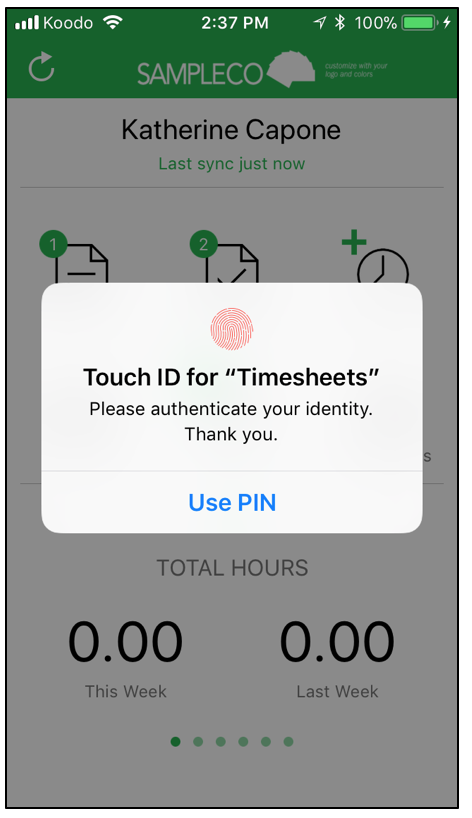
- Touch ID - upon launching the app, you will be prompted to enter a PIN or verify your identity using fingerprint authentication.
- None -upon launching the app, neither a PIN nor fingerprint will be required.
Touch ID > Done > Enter new PIN > Reenter PIN > Save.

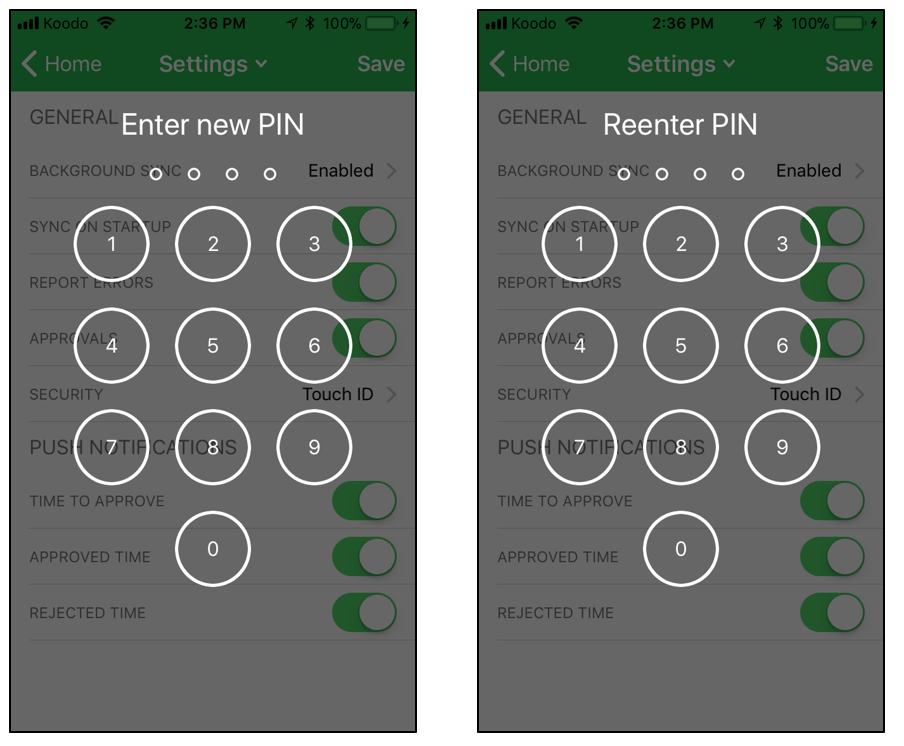
Congratulations! You have configured PIN & Fingerprint authentication for your Nexonia Timesheets app. You will now be asked to authenticate your identity via fingerprint or PIN after 5 seconds of exiting the app or upon re-launching the Nexonia Timesheets app.
IMPORTANT NOTES:
Nexonia Administrators can set the Mobile PIN & Fingerprint Lock feature to Always or When acting for other users. To learn more: How to Configure Mobile PIN & Fingerprint Lock.
If your account Administrators have set this feature to Always, the PIN/Fingerprint feature will be automatically enabled for all users, and therefore users will not need to follow the instructions above.
If your account Administrators have set the Mobile PIN & Fingerprint Lock feature to When acting for other users (default setting), the PIN/Fingerprint feature is enabled only for users who proxy or "Act For" other users on the app. Users can follow the instructions above to enable the PIN/Fingerprint feature on their individual mobile app.
Device capability
The mobile device must be capable and configured to detect fingerprints (fingerprint sensor present and fingerprints registered in the system). Otherwise a PIN is activated instead.
Feature deactivation
Users can disable the PIN/Fingerprint feature from their mobile app Settings, if their account Administrators have set the Mobile PIN & Fingerprint Lock feature to When acting for other users and the user did not proxy or "Act For" another user on the app. When disabling the feature, the user will be prompted to authenticate their identity using their fingerprint. Upon completion, the feature will be disabled.
-
When you're adding time in either the mobile or web app, you may receive an error message stating Based on system configuration, you're not able to add time entries. This error is caused by one or more of the required timesheet fields being filtered without access given to yourself. The following fields are commonly filtered: Customers, Projects, Tasks.

To resolve this error, contact your company administrator. Administrators can grant access to the different fields.
After the access is granted by your administrator, you can run a Sync if using the mobile app in order to reflect the changes.
If you are an administrator, you can determine if Customers/Projects/tasks are filtered by going to Settings > Company > Features > Edit.
Timesheets has the following two filtering options:
- Filter task categories by Region: Go to Settings > Company > Timesheets > Task Categories > click into a task > towards the bottom of the page, you'll see a section for each region in the Region column > check mark the applicable region(s) > click Apply to save
- Filter task categories by Project type: Project list is most likely filtered in combination with this setting. Go to Settings > Company > Timesheets > Task Categories > click into any task category > go to the Project Types table > check mark the applicable project type > Apply to save. Also perform steps in note for Internal Contacts: Sub-selected at Project level.
Internal Contacts has the following filtering options:
- Sub-selected at Customer level: Go to Customers > click into a Customer > Internal contacts > Edit > check mark the applicable user(s) > Apply to save
- Sub-selected at Project level: Go to Customers > Projects > click into a Project > Internal Team > Edit > check mark the applicable user(s) > Apply to save.
Task has the following filtering options:
- Sub-selected At Customer level: Go to Customers > click into a Customer > Task Categories > Edit > check mark all the task categories that should apply as well as all regions that the task(s) should be enabled for > Apply to save
- Sub-selected At Project level: Go to Customers > Projects > click into a Project > Task Categories > Edit > check mark all the task categories that should apply > Apply to save
- Sub-selected At User level (Within a Project): Go to Customers > Projects > click into a Project > Task Categories > click Edit in the far right corner under Project Rate > check mark all the users that should apply for that task category > Apply to save
- Filtered by User (for all Projects): Go to Settings > Users > Users > click into a user profile > Task Categories > Edit > check mark all applicable task categories > Apply to save.
If any of the listed filters within Timesheets, Internal Contacts and Task are check marked, that is most likely why users are receiving the error message. Enable the applicable access as outlined in the notes for the filters. If the user keeps receiving the same error message, reach out to the Nexonia support team for further assistance.
Please Note: The project and customer fields may be labeled differently or hidden depending on your configuration.
-
When creating a time entry in Nexonia Timesheets, instead of manually entering the total duration, users may have the option to start a timer at the beginning of their activity and stop it at the end. Upon stopping the timer, Nexonia will automatically create a time entry with the duration auto-populated. Users can pause the timer as needed and/or code it against a Customer, Project, Task Category and any other fields.
HOW TO USE THE TIMERS FEATURE ON THE MOBILE APPLICATION:
1. Tap on the Timers icon from the Nexonia Timesheets homescreen.
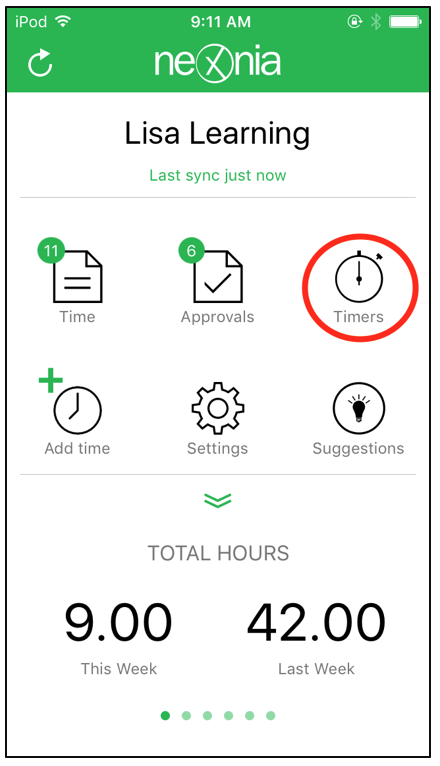
2. Here you will see a list of all of your timers (if applicable). There are two ways to add a timer: + ADD and
 START NEW.
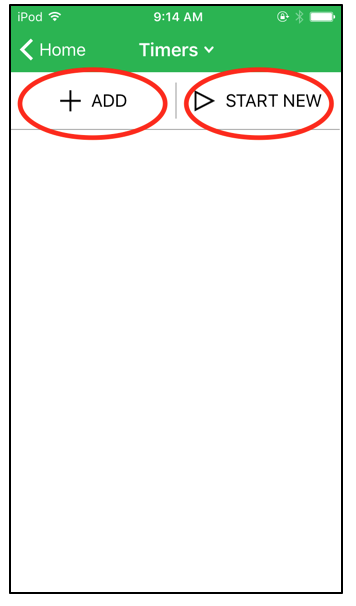
3. Tap + ADD to add a new timer which you can code, start, pause or stop at anytime.
Note: + ADD will not automatically start the timer. You will need to tap the
 Play icon to start the timer and choose one to code the timer against a Customer, Project, Task Category and any other fields. Tap Save once you've entered the details.
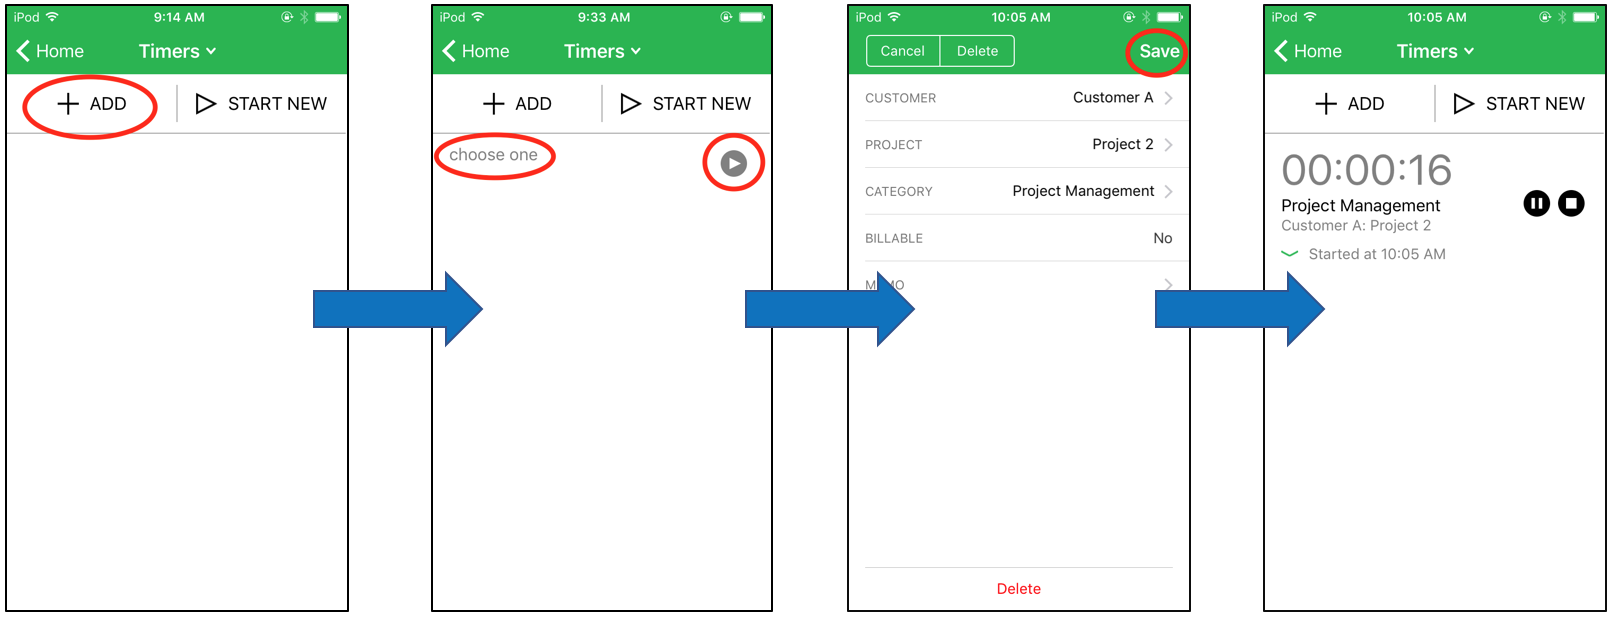
4. Tap
 START NEW to immediately start a new timer.
Note: any timer that is currently running will stop automatically, as only one timer can be running at a time. The started timer can then be coded, paused or stopped at anytime. To code the timer, simply tap on the running time enter the details. Then tap Save.

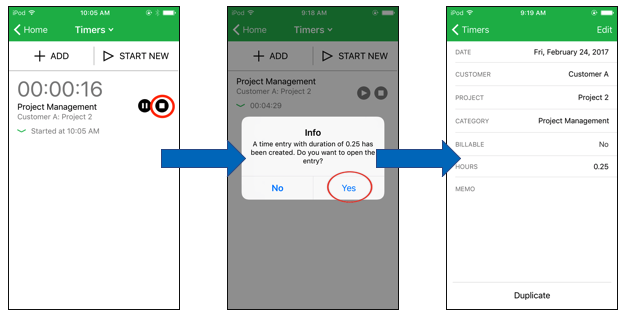
5. A running timer can be stopped at any time. To stop a timer from the Timers homescreen, simply tap the
 Stop icon to the right of the timer. Upon stopping the timer, Nexonia will automatically create a time entry for the duration that the timer was running. A popup window will ask if you want to open the entry. At this point, the time entry can be edited by the user as it's in draft status.
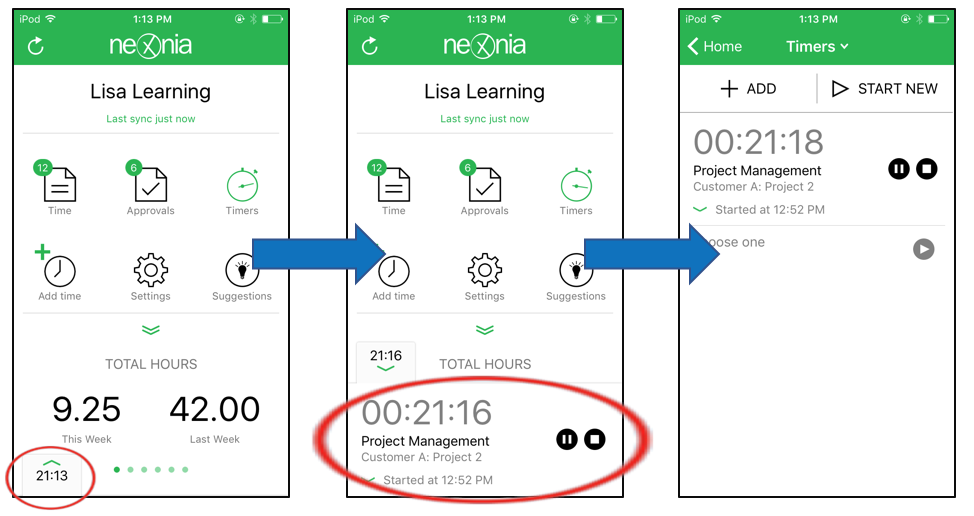
Any timer that is actively running will be visible from the Nexonia Timesheets homescreen in the bottom left corner. Tapping on the running time will display the time that the timer started at and will also allow you to pause or stop the timer as needed. You can also tap on the running time to be brought to the Timers homescreen.
 Timer Tips:
 - You can add multiple timers; however, you can only have one timer running at a time.
- Deleting a stopped timer will delete it from the Timers homescreen, but will not delete the corresponding time entry.
- A running timer will continue to run in the background, even upon closing the Timesheets application; this will allow you to exit the application as needed while keeping the timer running.
-
A downloadable PDF guide to simple Timesheets on the mobile application:
- Downloading the Mobile Application
- Logging in
- Nexonia Timesheets Homescreen
- Nexonia App Settings
- Creating Timesheets
- Submitting Timesheets
- Timesheets Approval Status
-
DOWNLOADING THE MOBILE APP
The Nexonia Timesheets mobile application is available for free on iOS, Android™ and BlackBerry® 10. The application will require you to login with your Nexonia credentials. Once you’ve done so, you’ll be able to create, submit and approve timesheets directly from your mobile device, such as a smartphone or tablet.
To download the Nexonia Timesheets mobile app, visit the corresponding app store:
Link: Apple App Store for iOS devices
Link: Google Play for Android devices
Link: Blackberry App World for Blackberry devices with the Blackberry 10 operating system and up
Search for “nexonia timesheets” and install the “Nexonia Timesheets” application. The app icon should look similar to one of the icons below:
LOGGING IN TO THE MOBILE APP
Once you’ve installed the application, you’ll need to open the app and log in with your Nexonia credentials. You only need to enter your login credentials once, the first time you open the application, or if your Nexonia password changes. The application will allow you to remain logged in.
Logging in to Nexonia:
Once you’ve downloaded the application, tap the Timesheets icon to open the app.

The first time you open the Nexonia Timesheets App, the application will ask if you’d like to give the following permissions (note: you can change these later if needed in your app or phone settings):
“Timesheets” Would Like to Send You Notifications. This allows Nexonia to send you notifications and alerts on your mobile device, such as notifying you when timesheets are submitted, approved or rejected.
Allow “Timesheets” to access your location while you use the app? Your location is retrieved when your company requires it to be associated with time entries.
You’ll then see a screen thanking you for downloading Nexonia Timesheets! Once you hit “Continue...” you’ll be taken to the Login screen.
Enter the e-mail address associated with your Nexonia profile and your password.

Tap “Login” and the application will log you in. Provided you are connected to the internet on your mobile device, the application will do an initial synchronization to ensure the information from your web profile is copied to the mobile app, and back again.
SYNCING THE MOBILE APP
Nexonia’s mobile application syncs your Timesheets mobile app data to the Nexonia server. This transfers any new information, such as recently added time entries, between your web profile on the server and your mobile application. For example, if you added a time entry on the web, but aren’t seeing it on the mobile app, it may not have synced yet.
By default, the application will sync when you start the app.
The sync is triggered in one of two ways:
Background Sync (default setting) - the application will sync when you first open the app and every 5 minutes in the background thereafter, as long as you have an internet connection to your device.
Manual Sync - you always have a manual sync option located on the homescreen. Tapping on the arrow in the top right corner will sync any new data immediately, as well as update any setup changes your administrator made to the company profile. You can also trigger a manual sync by pulling down from the homescreen.
You can see the last time the app synced under your name on the homescreen.
You can limit when the app syncs, depending on the internet connection:
From the mobile app homescreen go to "Settings" > "Background Sync"
Your options for "Background Sync" are:
- Enable: Sync automatically whenever you’re connected to the internet;
- Wifi only: Only sync automatically when you’re connected to wifi;
- Disable: Turns off automatic sync. You can still sync manually.

How to Use Week Filtering for Timesheet Approvals Recalling or Reassigning Timesheets How to Approve Timesheets on the Web Submitting Timesheets on the Web Timesheets Display: Viewing Past or Future Timesheet Entries How to use Timers on the Web
-
Filters can be used to limit the number of timesheets that are visible in the Approvals module, making it easier to view the most current timesheets pending approval.
When logged into Nexonia on the web, from the home screen, either click on Approvals along the navigation bar or click on the Approval System icon on the welcome page.
Note: If you are using multiple Nexonia products, ensure you have clicked on Timesheets just below the navigation bar after accessing Approvals.
You will now be able to review any timesheets that have been submitted to you. By default, the filters will display the last 8 weeks of timesheets based on the current day. You are able to configure the filters to view between 1 and 15 weeks. You can change this by clicking on "Last 8 weeks(s)" and selecting a different number from the dropdown menu.
You can also change the period of time that is displayed, to review older timesheets that are pending approval. You can do this by clicking on "Change" and selecting the date you want the period to end on.
-
Unlike Expenses, Timesheets can not be recalled or reassigned to a different Approver. If a Timesheet should go to a different approver, the approval workflow has to be modified. After it's modified, the Timesheet has to be reset to draft and re-submitted.
If you as a Nexonia User need to adjust a Timesheet, please reach out to an Administrator so that they can reset it to draft. There isn't an option to recall the Timesheet on your own without Administrator intervention.
If you are looking for instructions on reassigning expense approvals, you will find that in this article.
-
Approving a timesheet entry advances it to the next step in the approval workflow. If the timesheet is approved at the final step in the workflow, the status changes from Submitted to Approved, and it will be ready for export to your ERP (if applicable).
When logged into Nexonia on the web, from the home screen, either click on Approvals along the navigation bar or click on the Approval System icon on the welcome page.
 Note: If you are using multiple Nexonia products, ensure you have clicked on Timesheets just below the navigation bar after accessing Approvals.
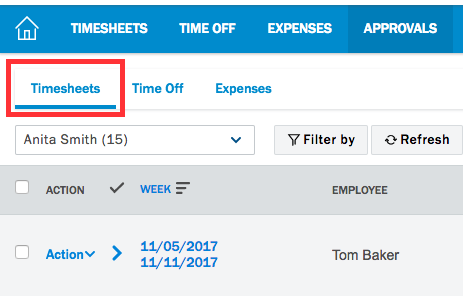
You will now be able to review any timesheets that have been submitted to you. Click on the timesheet to open up for review.
Based on your permissions, you may be able to make edits and changes to the content. Otherwise, the information will be presented in read only.
You can Approve or Reject entries in a couple different ways.
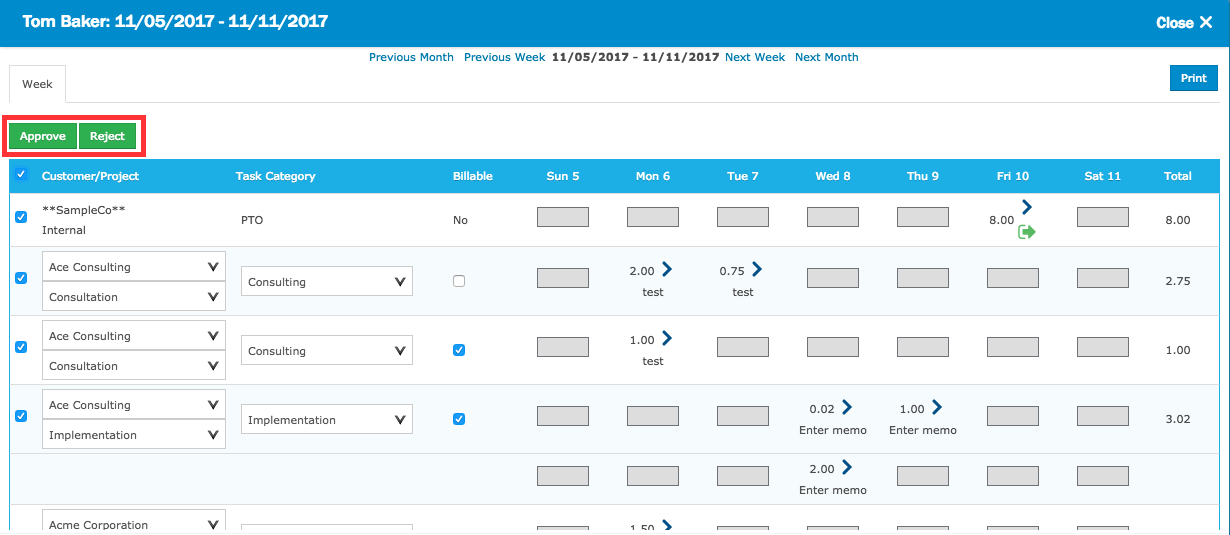
- Use the checkboxes to individually select timesheet entries, or use the select all checkbox at the top and on the left hand side at both top and bottom will be Approve and Reject buttons to click on.
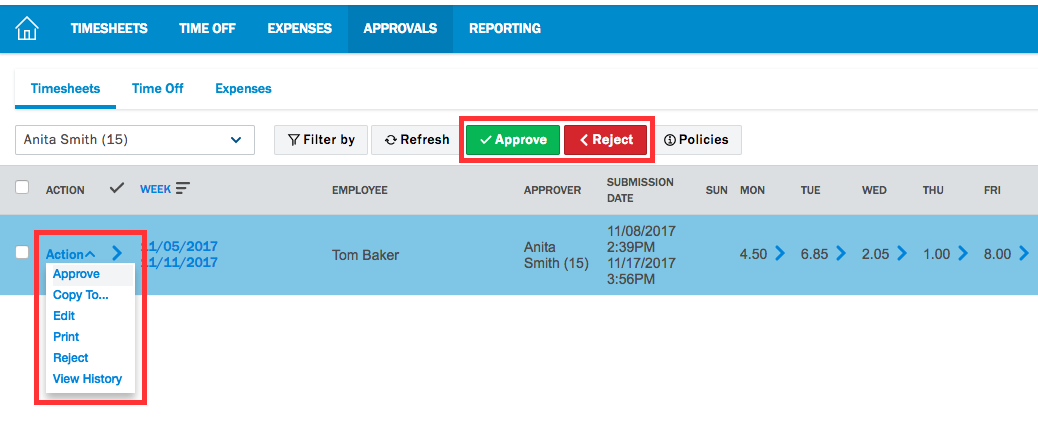
- From the Approvals page, click the checkbox for the timesheet you would like to action on, and along the top of the page, select Approve or Reject.
- Also from the Approvals page, click the Action dropdown for the timesheet and select Approve or Reject from here.
If you are rejecting a timesheet, you will likely be prompted to fill in a comment. This is information that will be communicated to the original submitter.
Otherwise, approving the timesheet will remove it from your approval queue and progress it in the approval workflow to the next step.
- Use the checkboxes to individually select timesheet entries, or use the select all checkbox at the top and on the left hand side at both top and bottom will be Approve and Reject buttons to click on.
-
Timesheets that have the Draft (or Rejected) approval status can be submitted for approval.This action sends the timesheets through the approval workflow. If the timesheets qualify for an active approval step, the status will change to Submitted. If no approval process is active, or the user's role does not have an approval process assigned, or the timesheets do not qualify for any approval steps within the approval process, the status will change to Approved.Users can always submit their own Draft or Rejected timesheets. Some users may have a role with access levels that enable them to submit timesheets that belong to their subordinates, members of a project they manage, or users in their same home region. Administrators can always submit Draft or Rejected timesheets that belong to any user.Timesheets can only be submitted from the Timesheets page - either from the weekly view or from the timesheet view.Submitting from the weekly view
- To submit all of the draft or rejected items in a single weekly timesheet:
Locate the timesheet > click Action (on the weekly timesheet line) > Submit > OK.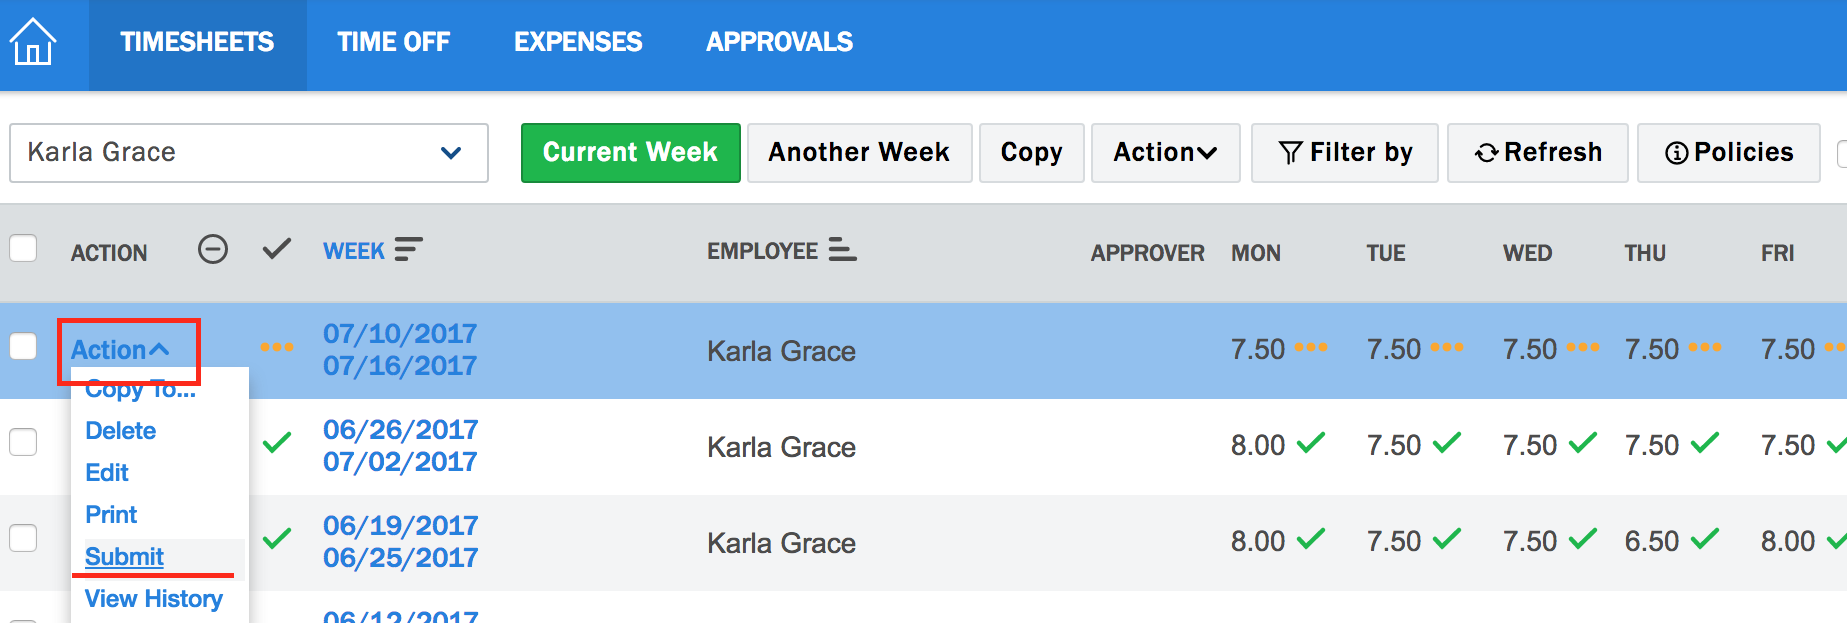
- To submit all of the draft or rejected items in multiple timesheets:
Use the checkboxes on the left to select multiple timesheets > Action (button along the top of the page) > Submit > OK.Submitting from the timesheet viewIf you've completed the timesheet and you'd like to submit it, click the Submit button in the top right corner of the timesheet.- To submit all of the draft or rejected items in a single weekly timesheet
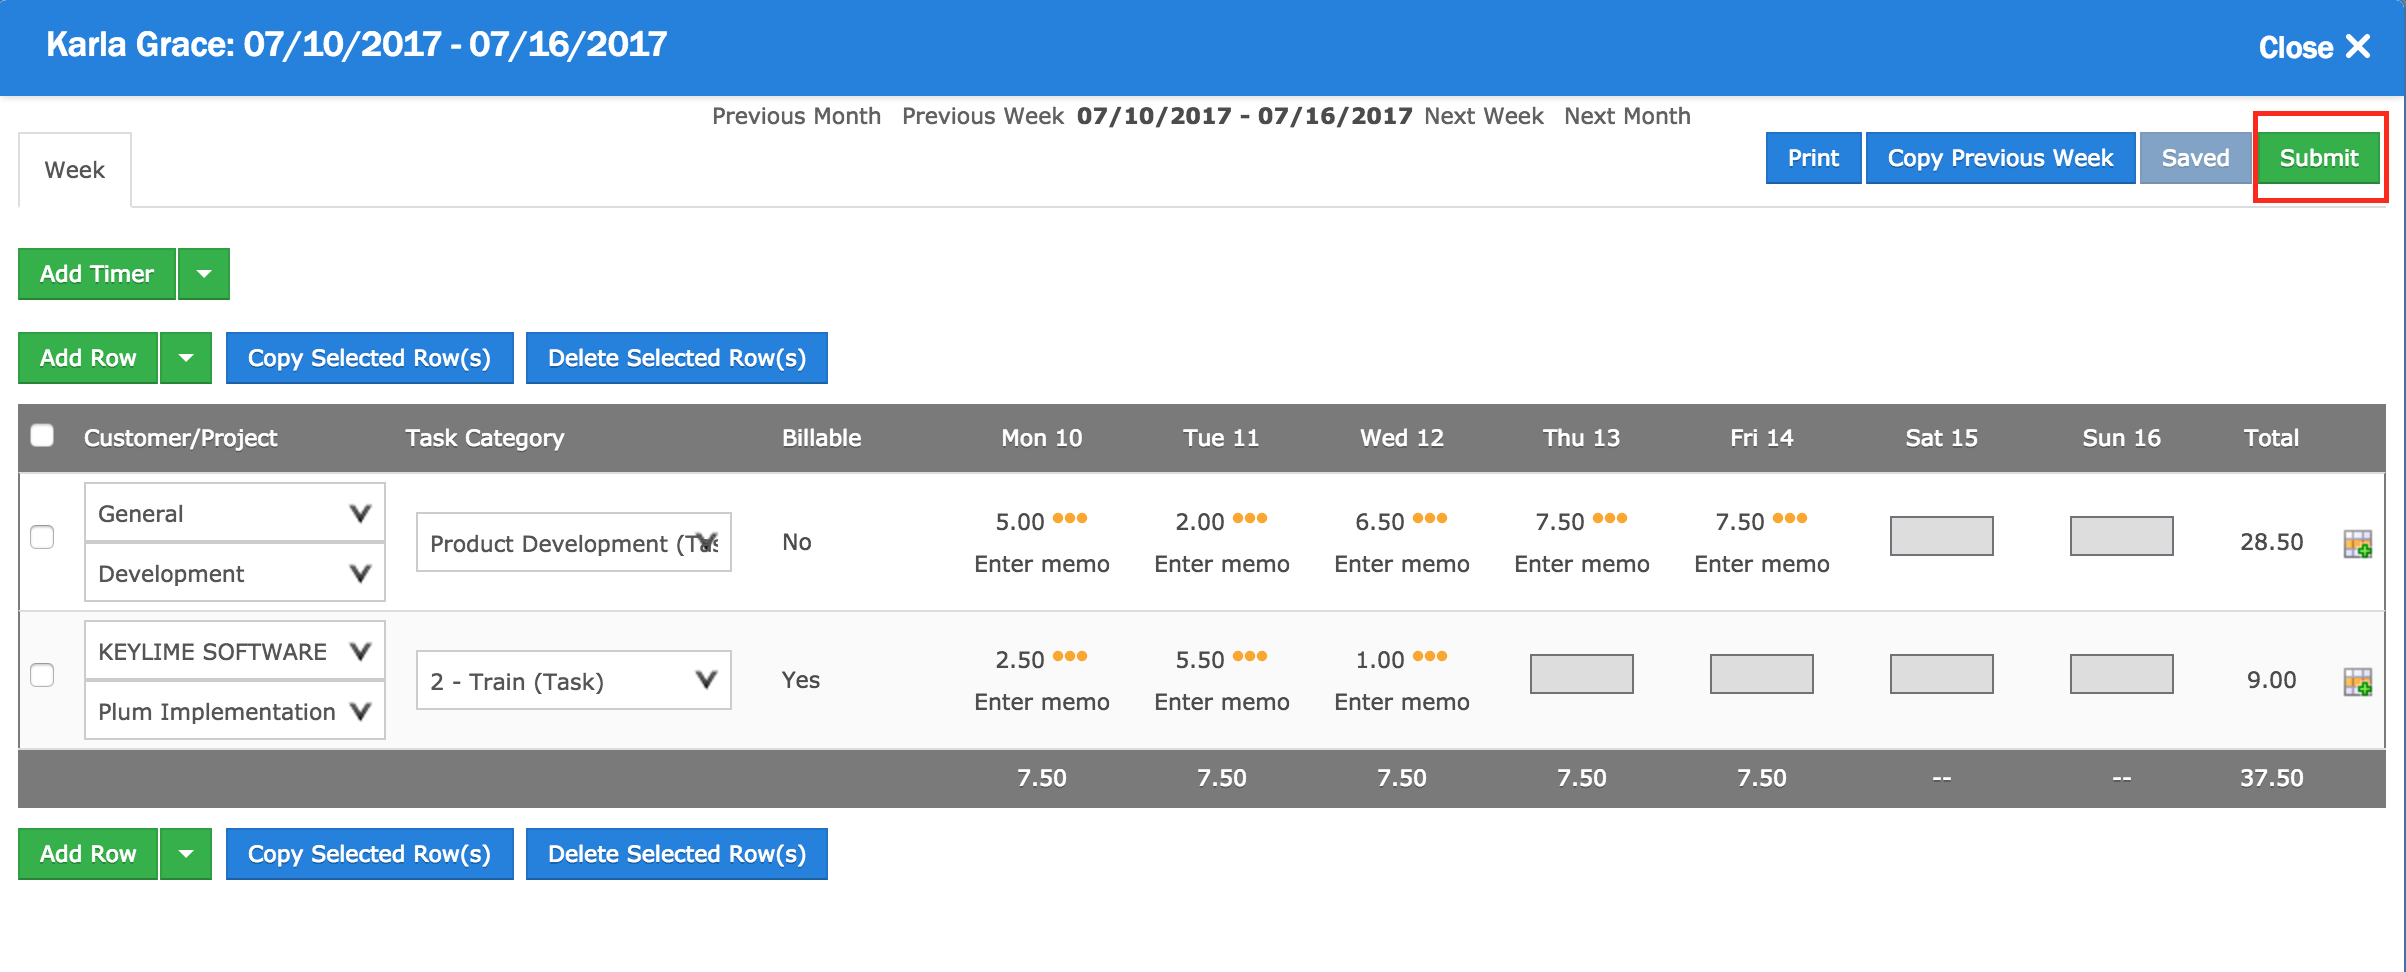 Once timesheet entries are Submitted, they can no longer be edited by the user. For the user to edit the timesheet entries again, the approver may Reject the timesheet, or an Administrator may reset the timesheet to Draft.
 -
In the Timesheet weekly view on the web, users can view past timesheets. By default, the user can see any timesheet from the past up to a maximum of 15 weeks. The system counts backwards from the current week, so if the user wants to see anything older than 15 weeks they'll need to roll back the display calendar date.
Similarly, if you want to see a timesheet entry you made in the future, you'll need to roll the display calendar forward. This is commonly done if you think you made a time entry in error and possibly entered the wrong month or year.
Note: even though the system will only display a maximum of 15 weeks of timesheets, every timesheet entry made on Nexonia is archived on the web. Users with the appropriate permissions can use the reporting module to extract historical timesheet data.
To adjust your timesheet display calendar:
Log in to Nexonia on the web and navigate to the Timesheet module, where you'll see a week by week view of any timesheets available.
The section highlighted below in red controls the timesheet display calendar.

To see past timesheets:
Click the Change link, which will open up a calendar option. Select the date you wish to roll back the calendar date to and then click the OK button. This will update your display. To reset the display back to the current week, click the Reset link that appears next to the Change link.
Example: if you're looking for a timesheet more than 3 months old, roll back the calendar to 3 months earlier than the current date.
To see future timesheets:
Click the Change link, which will open up a calendar option. Select the date you wish to roll back the calendar date to and then click the OK button. This will update your display. To reset the display back to the current week, click the Reset link that appears next to the Change link.
Example: if you're looking for a timesheet in the future, roll the calendar forward.
Tip: if you're looking for a future timesheet, the quickest way is to roll the calendar forward a year (the double arrows on the right).
To include weeks with no time entries in the view:
Check off the Empty Weeks box to include any blank timesheets in the view.
To limit the calendar display to less than 15 weeks
Click the Last 15 week(s) link and you'll have an option to lower the number of weeks being displayed in the weekly view.
-
When creating a time entry in Nexonia Timesheets, instead of manually entering the total duration, users may have the option to start a timer at the beginning of their activity and stop it at the end. Upon stopping the timer, Nexonia will automatically create a time entry with the duration auto-populated. Users can pause the timer as needed and/or code it against a Customer, Project, Task Category and any other fields.
HOW TO USE THE TIMERS FEATURE ON THE WEB:
1. From within your weekly timesheet, click Add Timer.
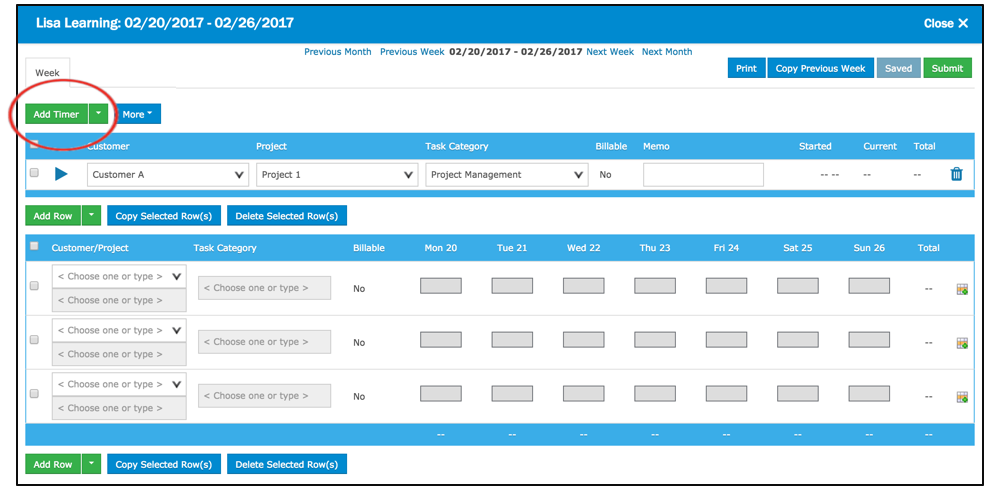
2. Then click the
 Play button to start the timer. You'll notice that once you click
  Play, Nexonia will display the date and time that the timer was Started, the Current running time, and the Total time that the timer has run.
Note: The Total time will be greater than the Current time if you have ever paused and re-started the timer. Here you can also code the timer against a Customer, Project, Task Category and any other fields listed by your organization.

3. A running timer can be paused at any time, by clicking the
 Pause button to the left of the timer. Once paused, the timer will stop running but can be restarted by clicking the
  Play button.
Note: A timer can be paused and restarted as many times as needed. Timers can also be easily deleted by clicking on the trash can icon to the far right of the timer.
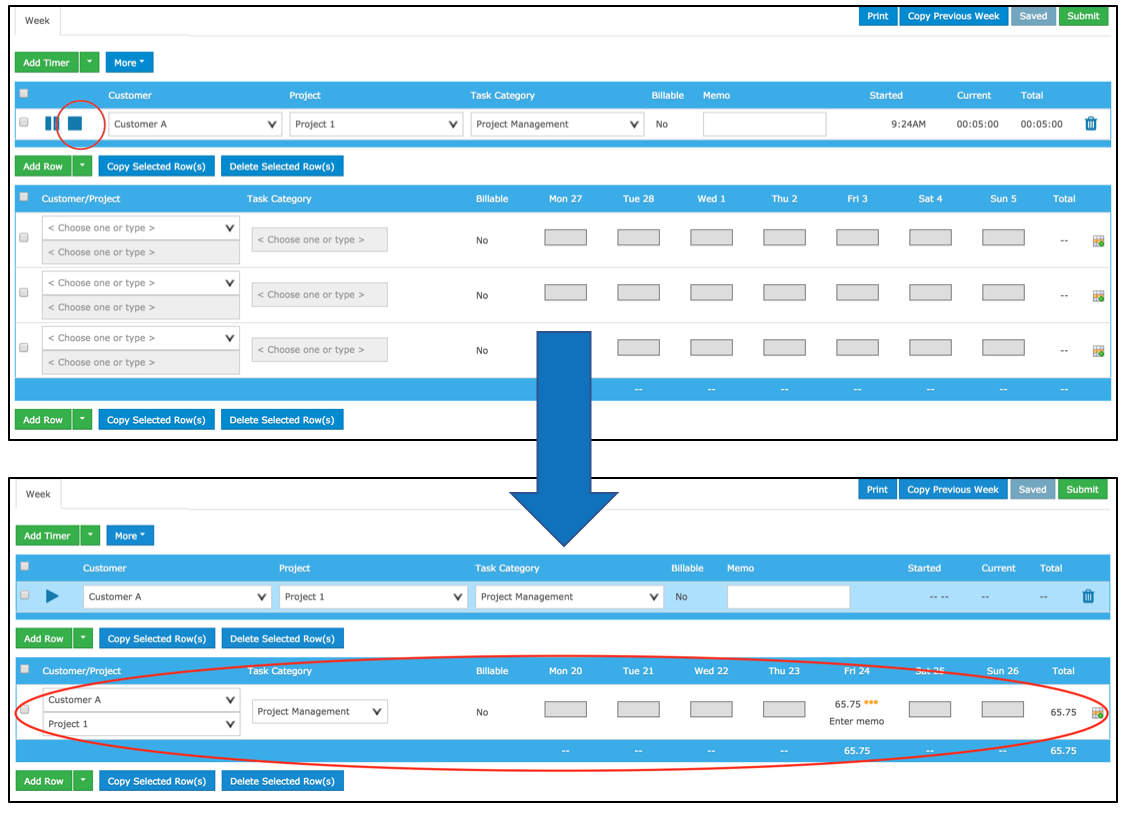
4. A time entry will only be created in your weekly timesheet once you stop the timer by clicking the
 Stop button to the left of the timer.
Note: a timer can only be stopped once. Upon stopping the timer, the timer will disappear and Nexonia will automatically create a time entry below for the duration that the timer was running. Any coding will also be copied to the entry. At this point, the time entry can be edited by the user as it's in draft status.
 Timer Tips:
- You can add multiple timers; however, you can only have one timer running at a time.
- A running timer will continue to run in the background, even upon exiting your internet browser; this will allow you to exit the screen as needed while keeping the timer running.
How to Enable Email Notifications for Timesheets Setting Quotas for Timesheets Filtering Task Category by Role DCAA Compliance Uploading a Time Policy Document Deleting Timesheets
-
Nexonia can send email notifications to your users. Notifications are typically sent to alert approvers when time entries are submitted to them, and notifying submitters when time entries are approved or rejected.
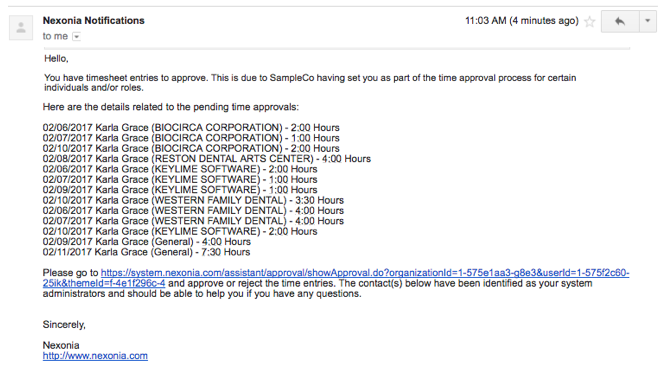
You can enable notifications in Nexonia by navigating to Setup > Company > Notifications > Edit.
Scroll to the row Time Approval Workflow. These are the settings to send reminders and notifications related to the submission and approval of expense reports.
Check the Active box to enable this notification workflow.
Below would be a standard notification configuration. Check off the appropriate boxes, scroll to the bottom and click the Apply button to save your settings. This will now enable the email notifications.

Common Notifications
Assignee, Unapproved = reminder emails if an approver hasn’t review the submitted time entries after a day. Frequency can be adjusted here.
Author, Rejected = notifies the submitter if a time entry was rejected. You can choose to copy any Prior Approvers as well.
Author, Approved = notifies submitter when time entries are approved.
Assignee, Assigned = notifies approver when time entries are submitted to them.
Additional Notifications
Other, Approved = used to email a copy of the notification of approval to another email address.
Note: Assignee, Recalled is not a feature currently available for Timesheets.
Notification Terms and Values
- Recipients
- Author/User: user who submitted expenses for approval
- Assignee/Manager: supervisor responsible for approving time entries
- Manager’s Manager
- Cc Prior Approver: the approver(s) before the current approver
- Regional Administrator: administrator set in the system for submitters region
- Other: email can be specified to include others in distribution list
- When
- Unapproved: time entries have not been approved
- Rejected: a line charge/time has been rejected and needs their attention
- Approved: time entries have been approved
- Assigned: submitted to approver for approval
- Frequency
-
- Specified number of days
- Immediate/Once
- Recipients
-
Time quotas can be used to notify users if a minimum number of hours has not been submitted or approved in a given time period. Time quotas are set at the Role level, so you can have different quotas for different user groups. Quotas can also be used with policy blockers to prevent timesheets that are under quota from being submitted for approval.
Setting up time quotas has two steps:
- Defining the quota in the Role.
- Enabling notifications for users who are under quotas at the end of the period.
Defining the Quota in the Role
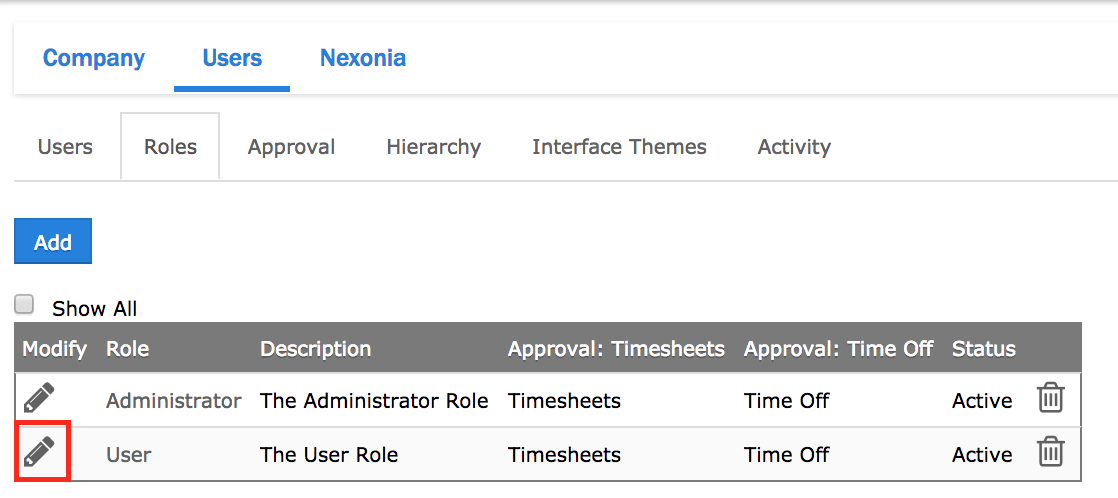
Navigate to Settings (gear icon) > Users > Roles
Navigate to the role you wish to modify and click the Edit (pencil) icon next to the role.
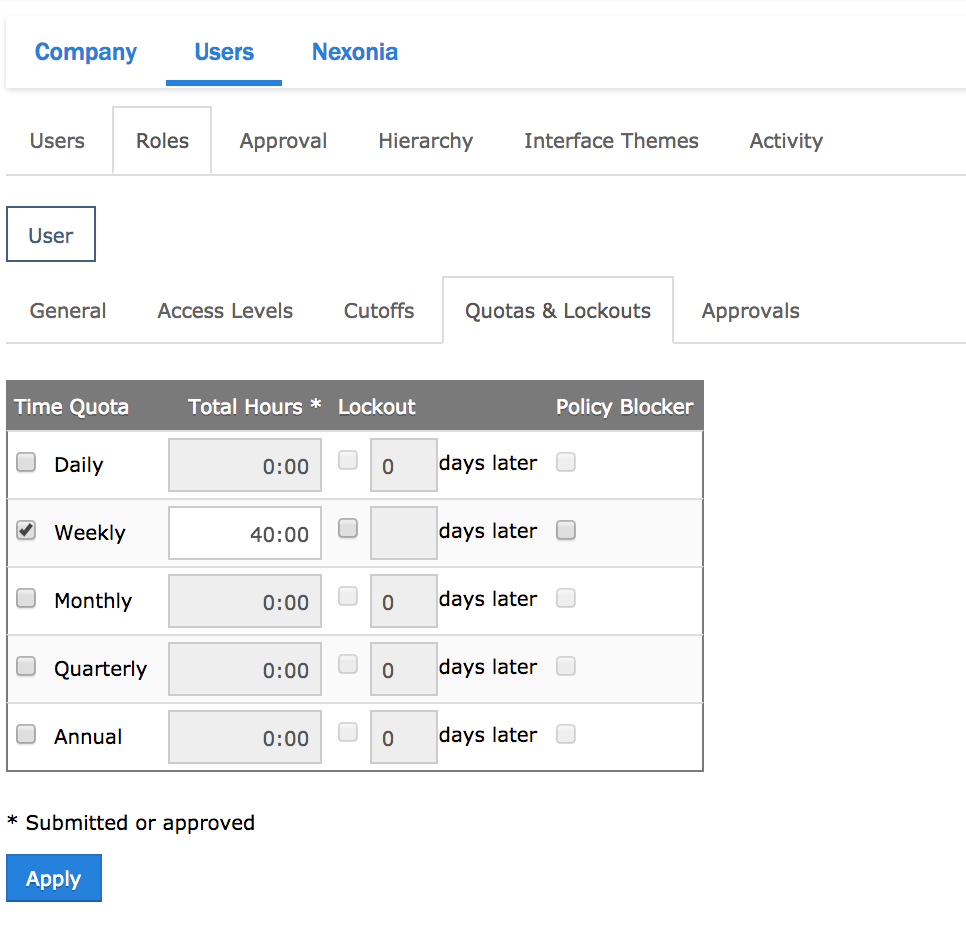
Once in the role, you should see a tab for Quotas & Lockouts. There you can define a quota, as well as a lockout for submitting late time if that is also required. The quota will represent the minimum amount of hours expected for the given period.
- Check off the period for the time quota - Daily, Weekly, Monthly, Quarterly, Annual - and enter the number of hours and minutes for the quota.
- Click the Apply button to save and apply this setting.
Tip: to ensure users are submitting a timesheet every period, you could set a quota of 1 minute, which would send a reminder to anyone who has not submitted time at the end of the period.
Policy Blocker
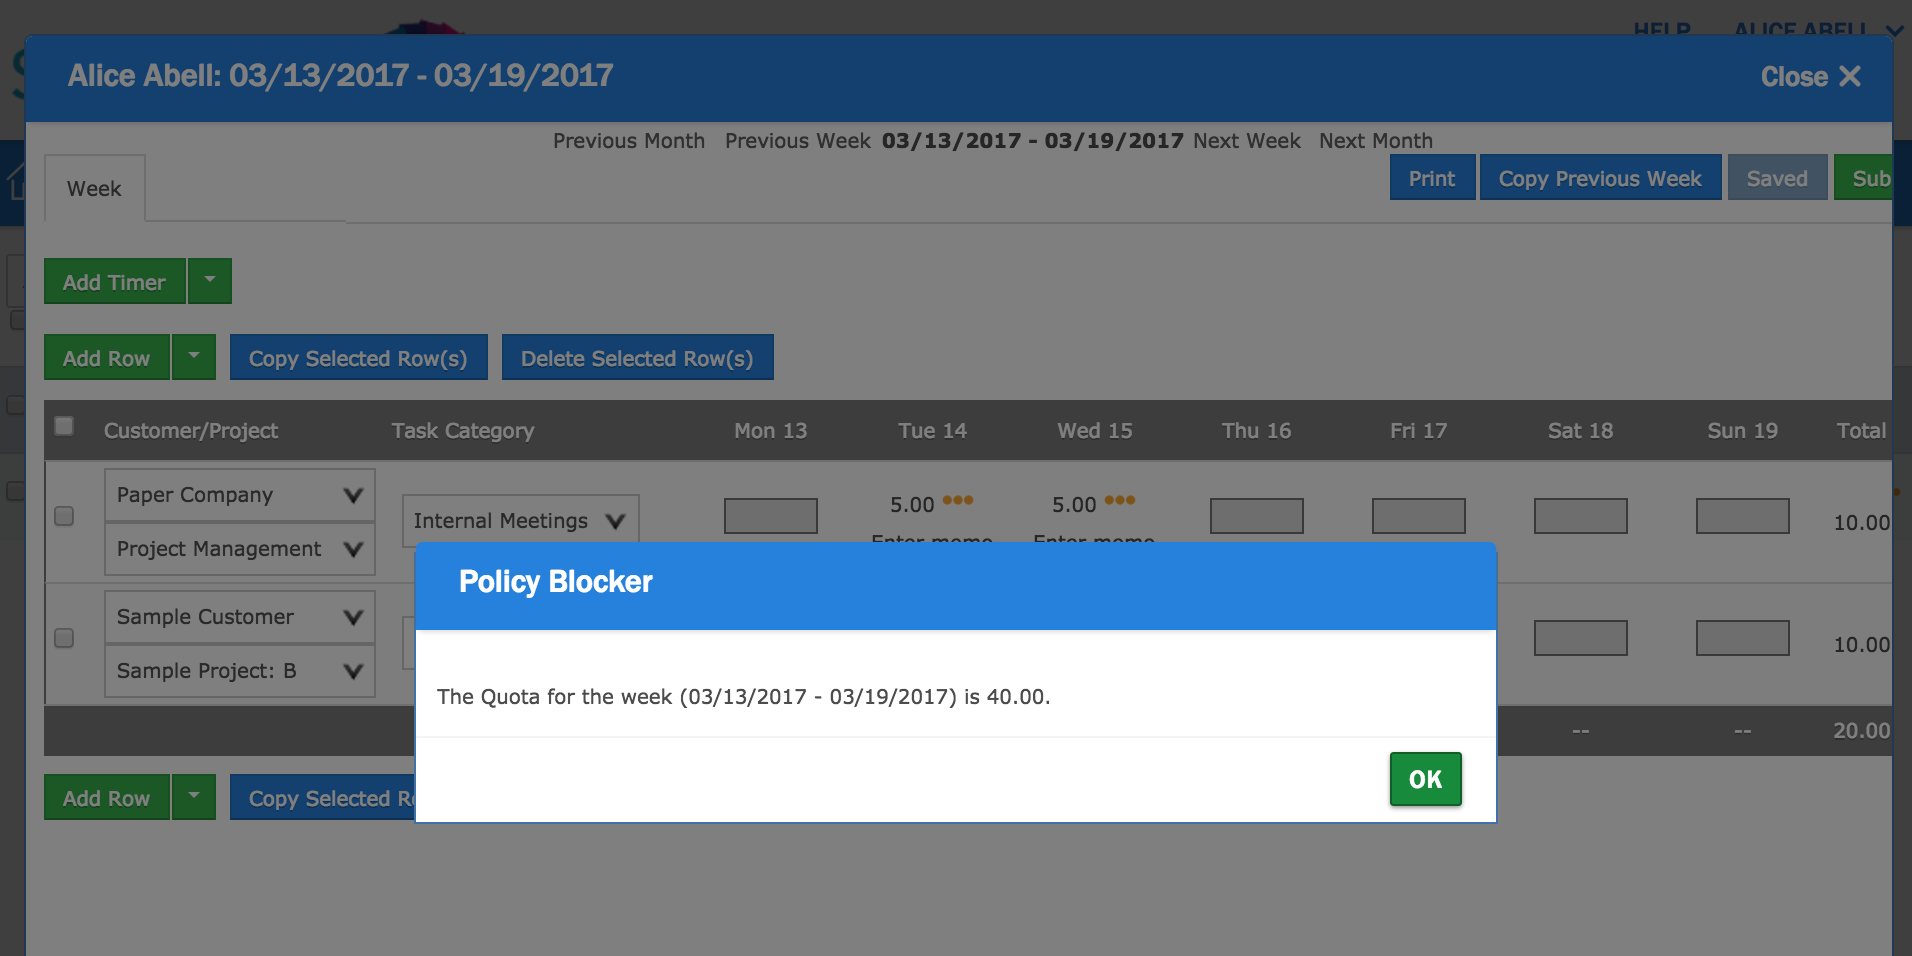
The policy blocked can be enabled by clicking it in the quota settings and marking it with a checkmark. If the submitter tries to submit a timesheet that is under quota, they will see a policy blocker appear which will prevent submission of the timesheet.
Quota Notifications
Once a time quota has been set at the Role level, you can enable notifications so that users are sent a notification if they are under quota at the end of the time period. Notifications are sent via email as well as an in-app notification on the mobile application.
To send a notification for missing quota:
Navigate to Setup > Company > Notifications
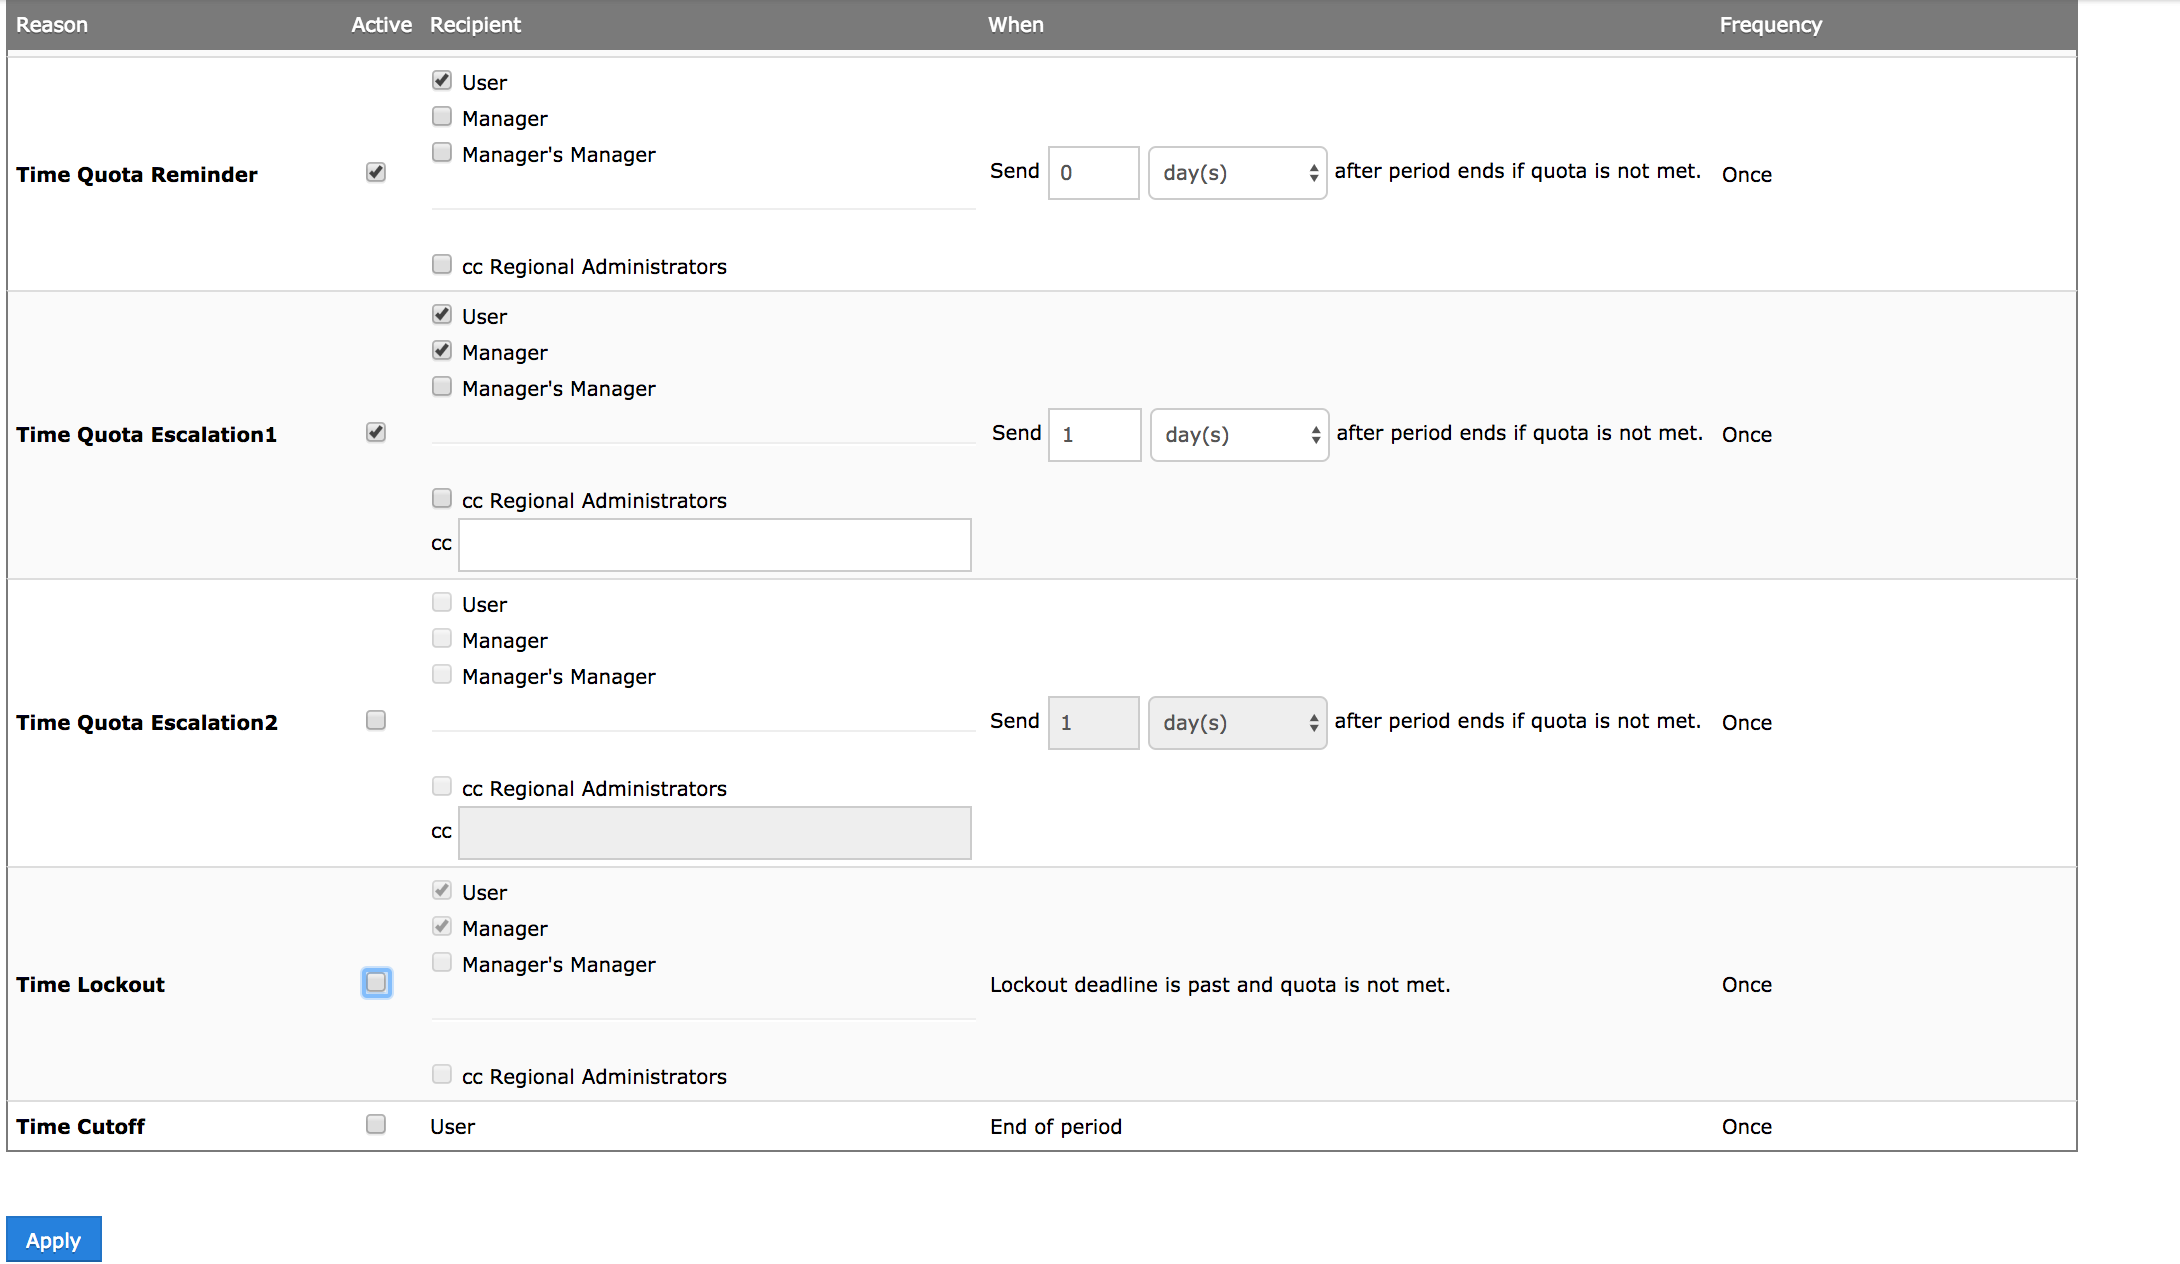
Edit the Notifications. Scroll down and you'll see the Time Quota Reminders. You can set the notifications to send an initial warning to the user, as well as subsequent escalations. Notifications can be sent to the user, as well as copied to managers or manager's manager according to the hierarchy in Nexonia, or copied to the regional administrator according to the Nexonia Region of the user.
In our example, we see a notification will be sent to the user at the end of the period, and an escalation notification will be sent to the user's manager the next day if quota is not met.
Q: What time of day does Nexonia send out Time Quota notifications?
A: Time Quota notifications are sent out at 4pm based on the client's time zone. -
Administrators can filter task categories by user role in Nexonia. This setting limits which timesheet tasks are available to users based on their role when they create their timesheets.
Example: if you wanted only the "Marketing User" role to have access to the "Webinar" task category.
By default, when a task category is created, it's available for all roles. The role filtering is available within each task category's settings.
Link: Configuration Guide to Roles and User Permissions
 Note: for customers integrating with Intacct or NetSuite, tasks are integrated directly from the ERP, as well as any task resource filtering. This feature would not apply in those scenarios.
To apply filtering task categories by role:
Navigate to Settings > Company > Timesheets > Task Categories, where you'll see a list of your task categories.
Navigate to the task category you wish to edit.
Click the Edit (pencil) icon next to the task category - this takes you into the settings for this task category.

If you scroll down the settings for this category, you'll see a box for "Roles".

All Roles is enabled by default. If you uncheck that box, you'll see a list of available roles in your account.
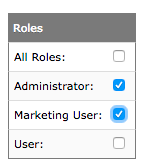
Check off the roles you want to have access to this task.
Scroll to the bottom of the page and click the Apply to save your changes.Now, only those users in those roles can access this category.
-
Nexonia supports DCAA Compliance for both Timesheets and Expenses.
To enable the DCAA Compliance feature, log in to your Nexonia account on the web as an Administrator.
Timesheets
Navigate to Settings > Features > Edit > Timesheets > Check DCAA compliance.
Checking DCAA compliance will automatically select the following required features:-
No entry creation for future days
-
Provide a reason when editing approved entries
-
Don't allow to add entry where one or more entries has already been approved or submitted (Note: this feature prevents users from adding new time entries to a week that contains a submitted or approved time entry).
-
Don't allow to delete approved or submitted entry
Click Apply.
Expense Reports
Navigate to Settings > Features > Edit > Expense Reports > Check DCAA Compliance.
Checking DCAA Compliance will automatically select the following required features:-
Submit and Approve Expenses by Report - "Yes, no Add/Delete"
-
Provide a reason when editing approved entries
-
Prevent submission of an item with transaction date later than the submission - "No"
Click Apply.
-
-
Administrators can upload an time policy document into Nexonia at the Region level, which will then be available to users in that region to access and download from their Timesheets homepage on the web.
- Supported file types: *.txt, *.pdf, *.docx, *.pptx, *.xlsx
- Maximum file size: 5 MB
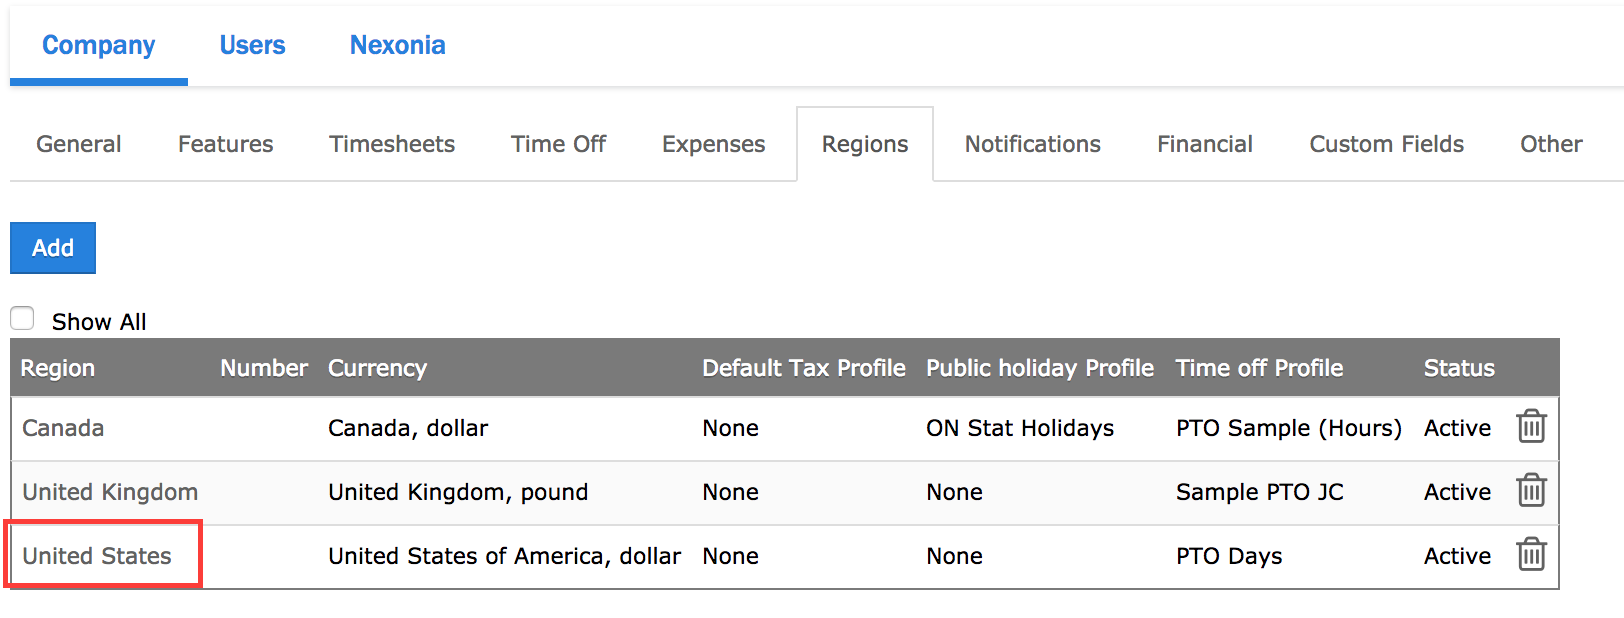
To upload a time policy document, navigate to: Settings > Company > Regions
You'll see a list of your organization's regions. Click the name of the region to view the settings and preferences for that region.
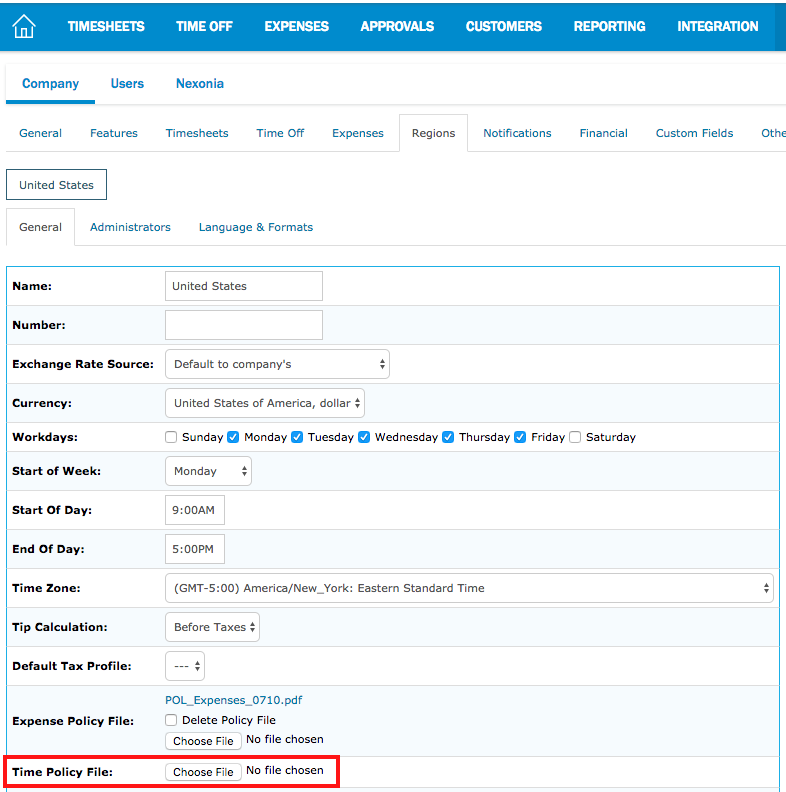
In the region, you should see a tab for General settings. Click that tab to view it, and scroll down to the setting for Time Policy File.
Click the button, select the file you want to upload from your computer.
After you've selected the file, you should be returned to Nexonia and see the file name next to Time Policy File.
Scroll down and click the Apply button to save the uploaded document.
User Access
Users can access the policy document on their Timesheets homepage under the Info button.

-
Non-Administrator users in Nexonia can only delete timesheets if they have the Draft (or Rejected) approval status.Users with Administrator role access have the ability to delete timesheets regardless of their approval status.
 The deletion of timesheets cannot be undone; please consider if editing, rejecting or resetting the timesheet to draft status is the appropriate course of action instead. Timesheets can be deleted by an Administrator from the Timesheet page or the Approvals page.
- To delete an entire timesheet:
Locate the timesheet > click Action (on the timesheet line) > Delete > OK.
- To delete multiple timesheets:
Use the checkboxes on the left to select multiple timesheets > Action (button along the top of the page) > Delete > OK.- To delete an individual row within a timesheet:
Open a timesheet > locate the entry row > use the checkboxes on the left to select row> click the "Delete Selected Row(s) button > Yes.- To delete multiple rows within a timesheet:
Open a timesheet > use the checkboxes on the left to select multiple rows > click the "Delete Selected Row(s) button > Yes.
Total Hours By User For A Project Reporting Template: Draft and Unapproved Time Entries, Summary Reporting Template: Timesheet Users with Zero Hours, Summary Reporting Template: Total Hours By User
-
These instructions will assist with building a summary report to capture the amount of hours that users have entered for a project.
The ability to build and run reports is linked to your Role permission. Administrators typically have this permission built in to their role, and can grant it to other roles if needed.
Link: Configuration Guide to Roles and User Permissions
Designing Your Report: Creating the Report Template
Login to Nexonia on the web and navigate to the Reporting module.
Click the Create Report button to start the report configuration.
You'll see the General tab appear. Enter the following:
- Name and Description
- Type - select Time
- Summary - select Yes
Click the Add button.
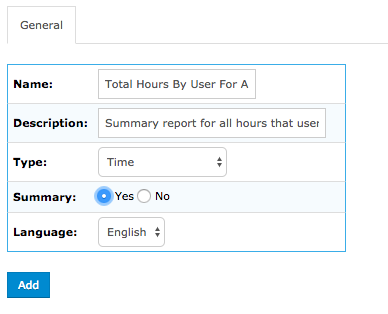
You should now see the five tabs for configuring the report:
- General - general information and sharing permissions
- Selection Criteria - report template filters and defaults
- Columns - data columns for the report
- Categories - data categorization for the report
- Order - order of the report results
Important: as you update the settings in each tab, it's important to hit Apply at the bottom of each tab to save your changes before moving to the next tab.
General
Most of the information will have been provided on your initial General screen. Here you can also configure:
- Shared - allows the report template to be private, shared with all other users or specific roles
- Header & Footer - you can enter information you'd like to see in the report header and footer
Selection Criteria
This tab allows you filtering of the report data to be included. A number of fields can be set as hidden or visible to users running the report, set with defaults, or locked in with a predefined selection.
For this report, the key values are:
- Date Range - establishes the date range range of entries being pulled when this report is run.
- Date Range - Interval - this will be the default date range when a user runs this report.
- People - this will be the list of users whose data will be included in the report. By default it will include everyone visible to you based on your role permission. You can limit this to specific subsets of users or predefine which users will be included.
- Customers & Projects - this could be left as is (Selected when the report is run), but if you desire to lock in specific or all projects, change to 'Predefined', toggle the Choices to Fixed and change the list to Select all the projects you'd like to be included in the report when it is run.
- Approval - Check off all the values that should be included based on what hours you'd like to include in the report.
- Billable - Configure this how needed;
- Disabled will include all entries regardless of billable status
- Selected when the report is run allows you to set the default behavior, but allows anyone running the report to update the value at the time of running the report.
- Predefined allows you to set the report behavior.
Categories
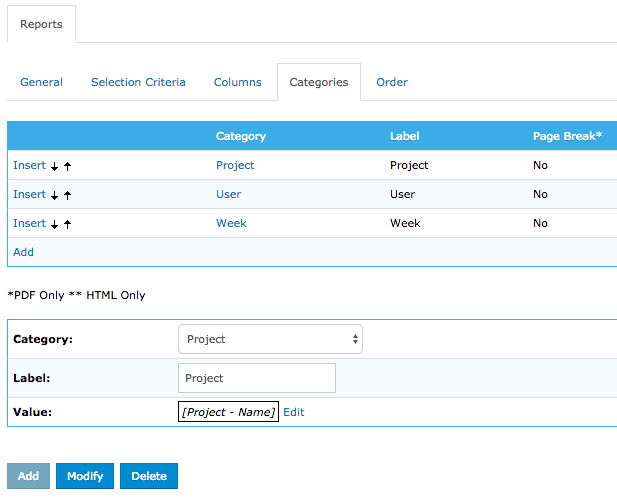
For summary reports, you'll want to move to the Categories tab next. Categories controls which data values are available in the Columns tab for summary reports.
Click the Add link on the left and select the Category of data to include from the dropdown menu. Include the following:
- Project & set the Indented value to Yes
- User
- Week or other relevant period
Columns (Data)
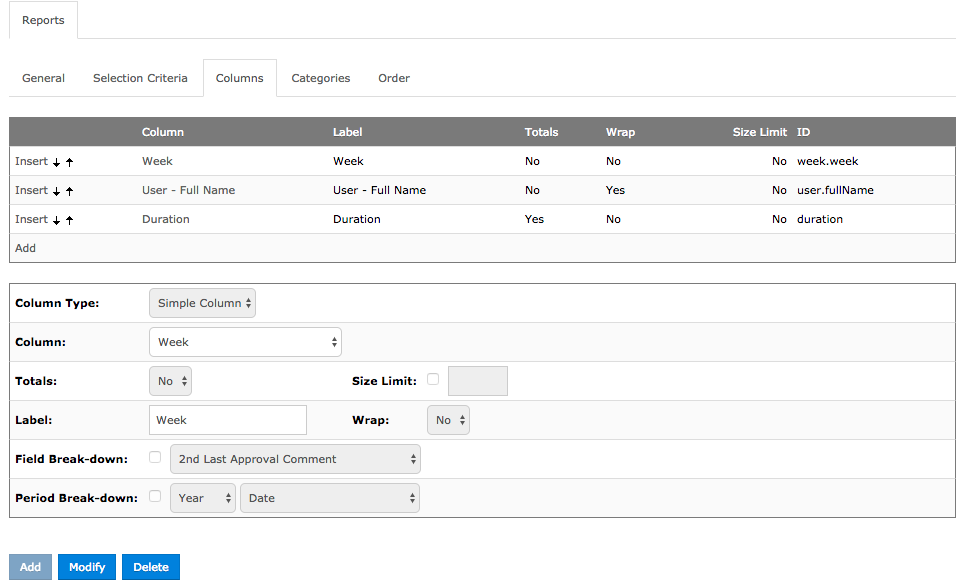
The Column tab is where you define what information you want to include in the report. We’ve included some columns of data that can be useful, but you can choose to add others, remove columns or sort them in a different order. Click Add and select the column value below.
For this report, include these three values:
- Week or relevant period
- User - Full Name
- Duration
Note - do not include Status. The Status column will result in two entries for each user - time with a status and time without a status.
Order
Order is what order are the results being outputted in. For example, you could sort the results by Date, then by User.
You have now completed building your reporting template.
Running Your Report
Under the Reporting module, you should see the reporting template you have just built. If you’re not seeing it, double check you don’t have a filter enabled.
Click the Action link to the left of the reporting template and you should see a dropdown menu with your Run option.
You’ll now see your Selection Criteria for the report. Make any selections if needed, and then click “Run”.Tip: for the report format, use HTML if you want a pop-up with the results, PDF if you want a copy of the report to print, save or email, and .CSV if you want to open the report in a spreadsheet program in Excel -this can be useful for filtering the values to only view users with zero hours reported.
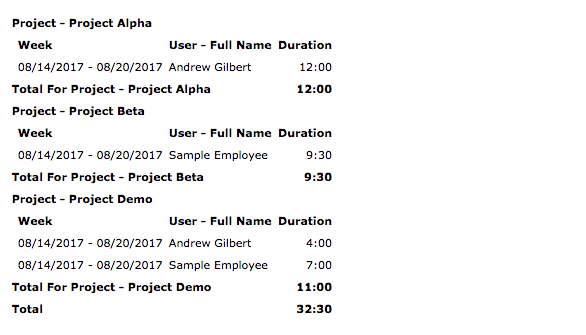
Here is a sample of the results:
-
These instructions will assist with building a summary report to capture any timesheet entries that have not been approved in a given date range.
A separate report can be created to capture any timesheet users who have zero time created in a given date range.
Link: Reporting Template: Timesheet Users with Zero Hours, Summary
The ability to build reports is linked to your Role permission. Administrators typically have this permission built in to their role, and can grant it to other roles if needed.
Designing Your Report: Creating the Report Template
Login to Nexonia on the web and navigate to the Reporting module.
Click the Create Report button to start the report configuration.
You'll see the General tab appear. Enter the following:
- Name and Description
- Type - select Time
- Summary - select Yes
Click the Add button.
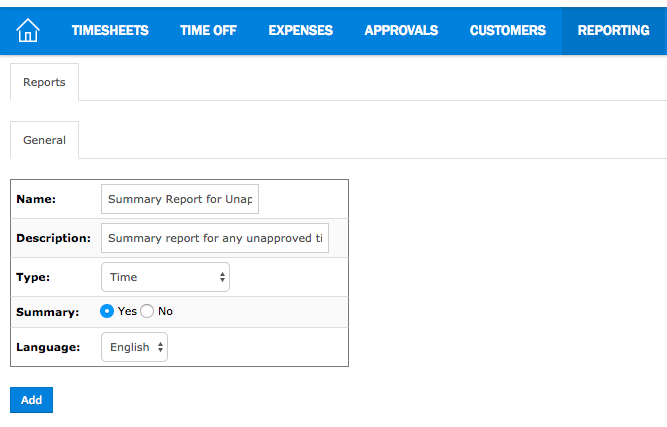
You should now see the five tabs for configuring the report:
- General - general information and sharing permissions
- Selection Criteria - report template filters and defaults
- Columns - data columns for the report
- Categories - data categorization for the report
- Order - order of the report results
Important: as you update the settings in each tab, it's important to hit Apply to save your changes before moving to the next tab.
General
Most of the information will have been provided on your initial General screen. Here you can also configure:
- Shared - allows the report template to be private, shared with all other users or specific roles
- Header & Footer - you can enter information you'd like to see in the report header and footer, such as the title
Selection Criteria
This tab allows you filtering of the report data to be included. A number of fields can be set as hidden or visible to users running the report, set with defaults, or locked in with a predefined selection.
For this report, the key values are:
- Date Range - establishes the date range range of entries being pulled when this report is run.
- Date Range - Interval - this will be the default date range when a user runs this report.
- People - this will be the list of users whose data will be included in the report. By default it will include everyone visible to you based on your role permission. You can limit this to specific subsets of users or predefine which users will be included.
- Status = Check off the values you'd want to include in this report. For this report you'd want to check off the following:
- Draft - time entries that have been created but not submitted for approval
- Submitted - time entries submitted and currently pending approval
- Rejected - time entries that have been rejected and have not been deleted or resubmitted
Categories
For summary reports, you'll want to move to the Categories tab next. Categories controls which data values are available in the Columns tab for summary reports.
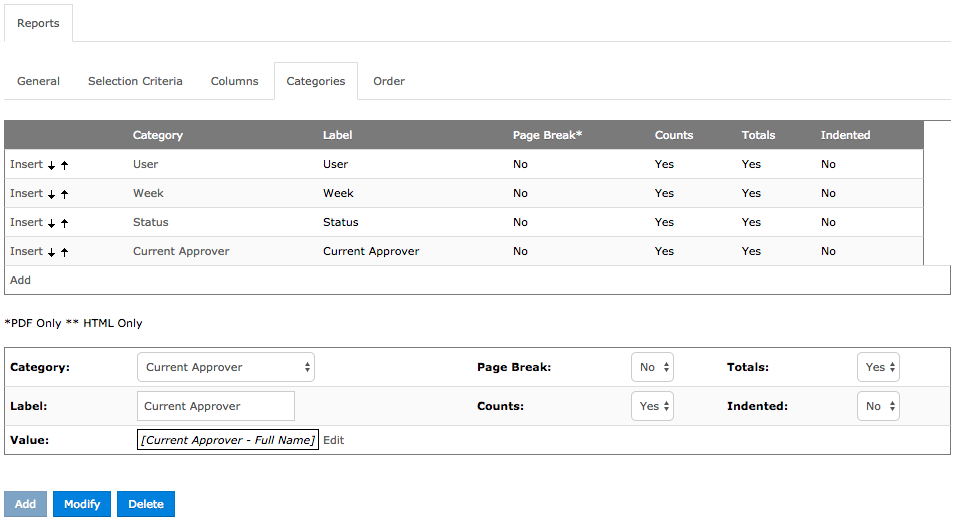
Click the Add link on the left and select the Category of data to include from the dropdown menu. Include the following:
- User
- Week or other relevant period
- Status
- Current Approver - optional, but useful if you want to identify which approver a submitted entry is currently assigned to.
Columns (Data)
The Column tab is where you define what information you want to include in the report. We’ve included some columns of data that can be useful, but you can choose to add others, remove columns or sort them in a different order. Click Add and select the column value below.
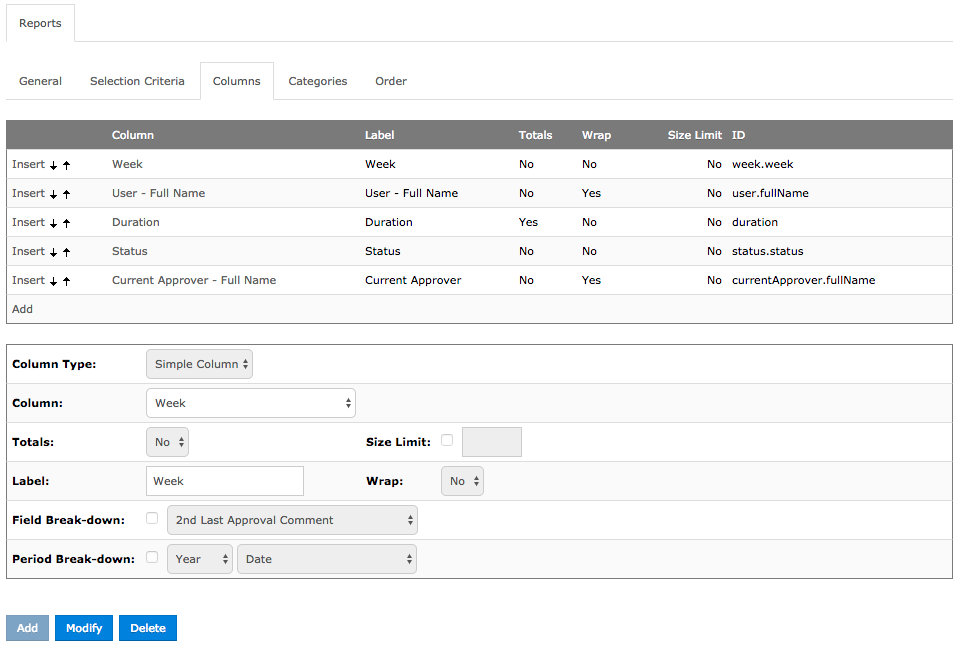
For this report, include these five values:
- Week or relevant period
- User - Full Name
- Duration
- Status
- Current Approver - Full Name
Order
Order is what order are the results being presented. For example, you could sort the results by Date, then by User and Status.
You have now completed building your reporting template.
Running Your Report
Under the Reporting module, you should see the reporting template you just built. If you’re not seeing it, double check you don’t have a filter enabled.
Click the Action link to the left of the reporting template and you should see a dropdown menu with your Run option.
You’ll now see your Selection Criteria for the report. Make any selections if needed, and then click “Run”.Tip: for the report format, use HTML if you want a pop-up with the results, PDF if you want a copy of the report to print, save or email, and .CSV if you want to open the report in a spreadsheet program in Excel -this can be useful for filtering the values to only view users with zero hours reported.
Here is a sample of the results:

-
These instructions will assist with building a summary report to capture any timesheet users who have not created any time entries in a given date range.
A separate report can be created to capture any timesheet users who have created a time entry but not yet submitted the entry or if it's unapproved.
Link: Reporting Template: Draft and Unapproved Time Entries, Summary
The ability to build and run reports is linked to your Role permission. Administrators typically have this permission built in to their role, and can grant it to other roles if needed.
Link: Configuration Guide to Roles and User Permissions
Designing Your Report: Creating the Report Template
Login to Nexonia on the web and navigate to the Reporting module.
Click the Create Report button to start the report configuration.
You'll see the General tab appear. Enter the following:
- Name and Description
- Type - select Time
- Summary - select Yes
Click the Add button.
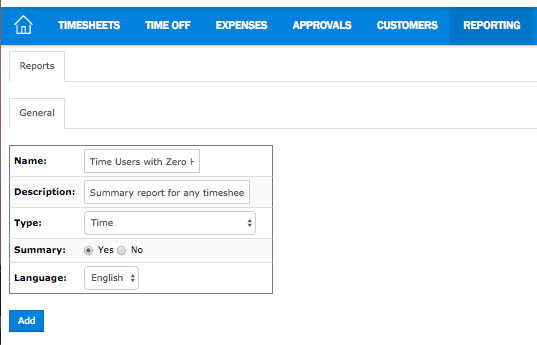
You should now see the five tabs for configuring the report:
- General - general information and sharing permissions
- Selection Criteria - report template filters and defaults
- Columns - data columns for the report
- Categories - data categorization for the report
- Order - order of the report results
Important: as you update the settings in each tab, it's important to hit Apply at the bottom of each tab to save your changes before moving to the next tab.
General
Most of the information will have been provided on your initial General screen. Here you can also configure:
- Shared - allows the report template to be private, shared with all other users or specific roles
- Header & Footer - you can enter information you'd like to see in the report header and footer
Selection Criteria
This tab allows you filtering of the report data to be included. A number of fields can be set as hidden or visible to users running the report, set with defaults, or locked in with a predefined selection.
For this report, the key values are:
- Date Range - establishes the date range range of entries being pulled when this report is run.
- Date Range - Interval - this will be the default date range when a user runs this report.
- People - this will be the list of users whose data will be included in the report. By default it will include everyone visible to you based on your role permission. You can limit this to specific subsets of users or predefine which users will be included.
- Status = Check off all the values in order for the report to properly pull all the time entries and zero values.
- Data for All Users - required, this setting will include all users including any who have no time entries created for the given date range.
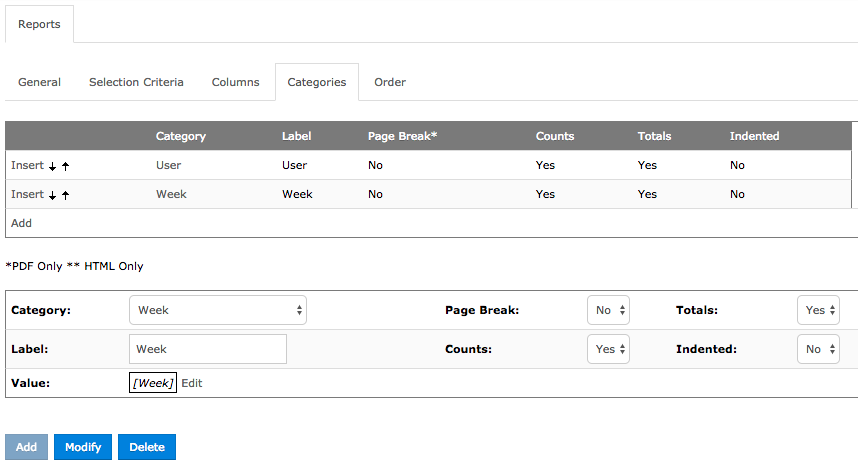
Categories
For summary reports, you'll want to move to the Categories tab next. Categories controls which data values are available in the Columns tab for summary reports.
Click the Add link on the left and select the Category of data to include from the dropdown menu. Include the following:
- User
- Week or other relevant period
Columns (Data)
The Column tab is where you define what information you want to include in the report. We’ve included some columns of data that can be useful, but you can choose to add others, remove columns or sort them in a different order. Click Add and select the column value below.
For this report, include these three values:
- Week or relevant period
- User - Full Name
- Duration
Note - do not include Status. The Status column will result in two entries for each user - time with a status and time without a status.

Order
Order is what order are the results being outputted in. For example, you could sort the results by Date, then by User.
You have now completed building your reporting template.
Running Your Report
Under the Reporting module, you should see the reporting template you have just built. If you’re not seeing it, double check you don’t have a filter enabled.
Click the Action link to the left of the reporting template and you should see a dropdown menu with your Run option.
You’ll now see your Selection Criteria for the report. Make any selections if needed, and then click “Run”.Tip: for the report format, use HTML if you want a pop-up with the results, PDF if you want a copy of the report to print, save or email, and .CSV if you want to open the report in a spreadsheet program in Excel -this can be useful for filtering the values to only view users with zero hours reported.
Here is a sample of the results:

-
These instructions will assist with building a basic Timesheets report that will show all hours by user over the specified time period.
Separate reports can be created to capture any timesheet users who have zero time created in a given date range or who have created a time entry but not yet submitted the entry or if it's unapproved.
Link: Reporting Template: Timesheet Users with Zero Hours, Summary
Link: Reporting Template: Draft and Unapproved Time Entries, Summary
The ability to build reports is linked to your Role permission. Administrators typically have this permission built in to their role, and can grant it to other roles if needed.
Designing Your Report: Creating the Report Template
Login to Nexonia on the web and navigate to the Reporting module.
Click the Create Report button to start the report configuration.
You'll see the General tab appear. Enter the following:
- Name and Description
- Type - select Time
- Summary - select Yes
Click the Add button.

You should now see the five tabs for configuring the report:
- General - general information and sharing permissions
- Selection Criteria - report template filters and defaults
- Columns - data columns for the report
- Categories - data categorization for the report
- Order - order of the report results
Important: as you update the settings in each tab, it's important to hit Apply to save your changes before moving to the next tab.
General
Most of the information will have been provided on your initial General screen. Here you can also configure:
- Shared - allows the report template to be private, shared with all other users or specific roles
- Header & Footer - you can enter information you'd like to see in the report header and footer, such as the title
Selection Criteria
This tab allows you filtering of the report data to be included. A number of fields can be set as hidden or visible to users running the report, set with defaults, or locked in with a predefined selection.
For this report, the key values are:
- Date Range - establishes the date range range of entries being pulled when this report is run.
- Date Range - Interval - this will be the default date range when a user runs this report.
- People - this will be the list of users whose data will be included in the report. By default it will include everyone visible to you based on your role permission. You can limit this to specific subsets of users or predefine which users will be included.
- Approval - Check off all values. That way all time entries will be reported on regardless of approval status.
- Data for All Users - if set to No, Nexonia can only report on entries that have been created. By setting to Yes, this allows the system to populate a value for each user even if that is 0.
Categories
For summary reports, you'll want to move to the Categories tab next. Categories controls which data values are available in the Columns tab for summary reports.
Click the Add link on the left and select the Category of data to include from the dropdown menu. Include the following:
- User
- Week

Columns (Data)
The Column tab is where you define what information you want to include in the report. We’ve included some columns of data that can be useful, but you can choose to add others, remove columns or sort them in a different order. Click Add, select the column value below and you can rename the column header for verbiage that makes sense for you (see the Label column in the screenshot below).
For this report, include these three values:
- Week
- User - Full Name
- Duration

Order
Order is what order are the results being presented. For example, you could sort the results by Duration, then by User and Status.
You have now completed building your reporting template.
Running Your Report
Under the Reporting module, you should see the reporting template you just built. If you’re not seeing it, double check you don’t have a filter enabled.
Click the Action link to the left of the reporting template and you should see a dropdown menu with the Run option.
You’ll now see your Selection Criteria for the report. Make any selections if needed, and then click “Run”. Tip: for the report format, use HTML if you want a pop-up with the results, PDF if you want a copy of the report to print, save or email, and .CSV if you want to open the report in a spreadsheet program such as Excel -this can be useful for filtering the values to only view users with zero hours reported.
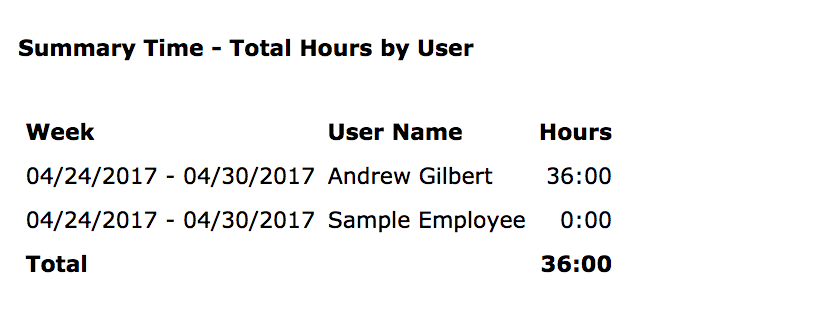
Here is a sample of the results:
