Time Off
Entering & Approving Time Off
Managing Time Off
- How to Add Time to Banks - Opening Balances and Adjustments
- Populating Public Holidays when using Planned Projects
- How to Configure Time Off Accruals - Mono-Tier
- How to Enable Email Notifications for Time-Off
- How to Manage Time Off Bank Balances for Users
- Public Holidays Integrated with Timesheets
Running Reports
Training Calendar
Submitting & Approving Expenses
Alternating schedule
How to login, upload your receipts, create and expense reports for approval, and approve expenses.
Submitting & Approving Time Off and Timesheets
Alternating schedule
A walkthrough of how to create, submit, and approve Timesheets and Time Off requests.
Reporting Module Overview
Alternating schedule
An overview on how to create and generate reports.
Configuring Expense Settings for Admins
Alternating schedule
How to manage your company's data and settings.
Configuring Timesheets & Time Off Settings for Admins
Alternating schedule
How to manage timesheets and time off settings and policies for your company.
Managing Nexonia with Intacct
Alternating schedule
An overview of how Nexonia is integrated with Intacct. Learn how to import and export data between Nexonia and Intacct, manage users, expense categories and Intacct dimensions.
Managing Nexonia with QuickBooks
Alternating schedule
An overview of how Nexonia is integrated with QuickBooks Desktop or QuickBooks Online. Learn how to import and export data between Nexonia and QuickBooks, manage users, expense categories and QuickBooks dimensions.
Managing Nexonia with NetSuite
Alternating schedule
An overview of how Nexonia is integrated with NetSuite. Learn how to import and export data between Nexonia and NetSuite, manage users, expense categories and NetSuite segments.
Travel Booking & Analytics
Alternating schedule
Review how to book travel, run reports, & view unused tickets.
Watch Nexonia's easy-to-follow brief tutorial videos here.
Training Videos
Submitting Time Off How to Approve Time Off How to Recall Submitted Time Off
-
The Time Off module in Nexonia allows you to request time off for Vacation, Sick Time, Jury Duty, and other reasons defined by your company.
This article shows you how to submit Time Off.
Step 1: On your Nexonia homepage, click the Time Off tab.

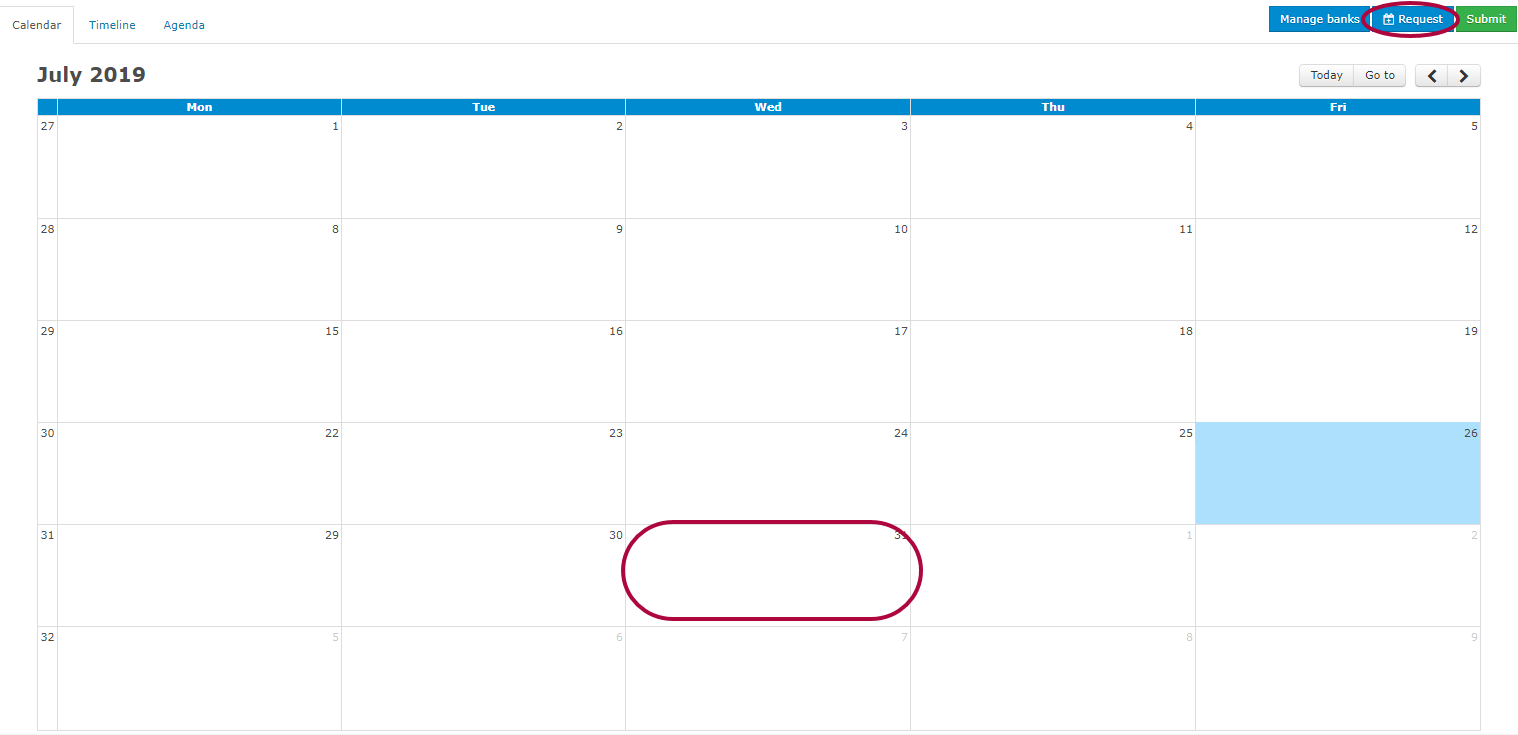
Step 2: To make a Time Off request, click a date on the calendar, or click the Request button.
Step 3: Enter details about your Time Off request:
- Type: Select the type of time off, such as Vacation or Sick Time
- Period: Choose whether it's a single day or multiple days of time off
- Date: Enter the date(s) you're requesting off
- Duration: Depending on your organization's setup, you may be able to choose a full day, a half day, or less
- Memo: Optional. Enter further details about the time off request
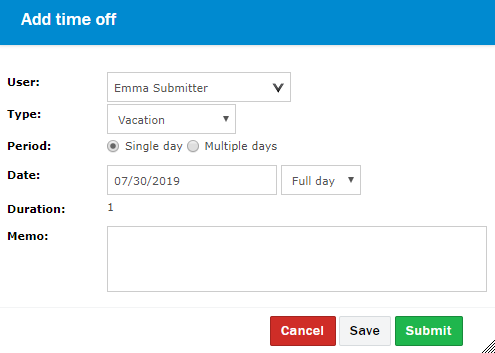
Step 4: Click Submit to send the request to your Approver.
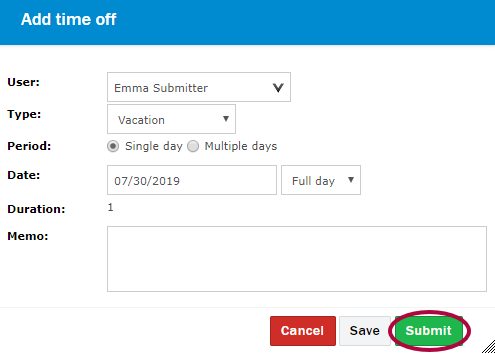
Step 5: Click OK to confirm.

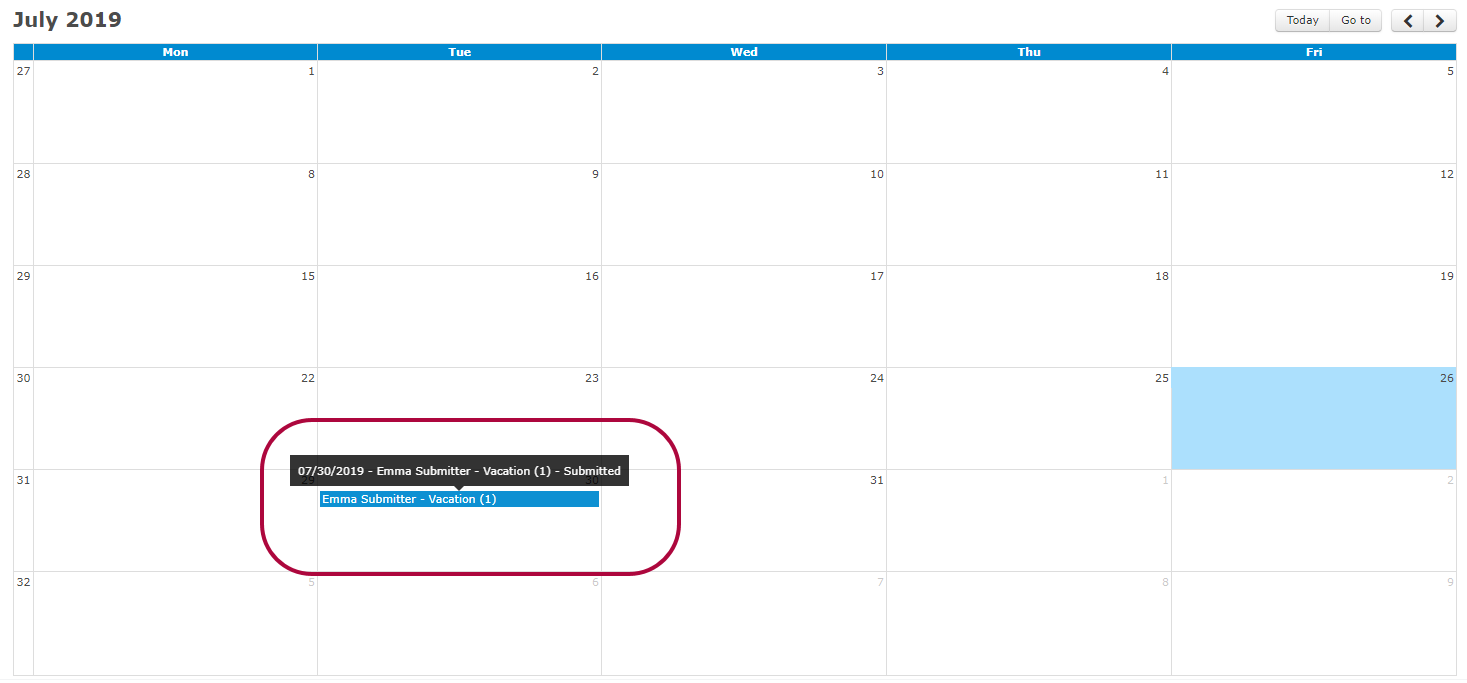
Step 6: Depending on your organization's setup, you may be able to Recall submitted time off requests that have not yet been approved. To do so, click the request.
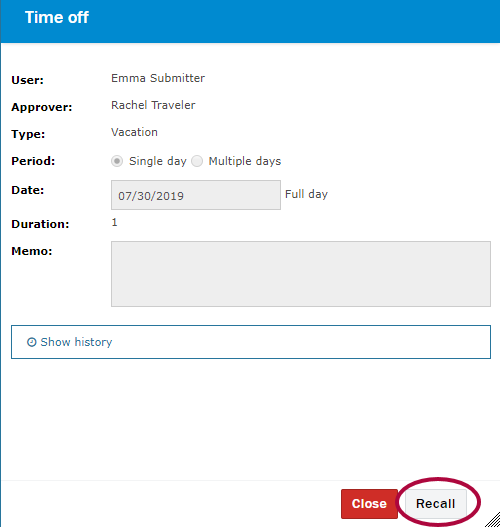
Step 7: Click Recall. This sends the request back to Draft status so you can edit or delete it.
-
Approving a time off request advances it to the next step in the approval workflow. If the request is approved at the final step in the workflow, the status changes from Submitted to Approved.
When logged into Nexonia on the web, from the home screen, either click on Approvals along the navigation bar or click on the Approval System icon on the welcome page.
 Note: If you are using multiple Nexonia products, ensure you have clicked on Time Off just below the navigation bar after accessing Approvals.
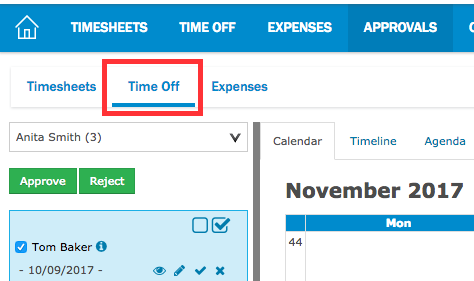
You will now be able to review any requests that have been submitted to you. Click on a request to open it for review.
Based on your permissions, you may be able to make edits and changes to the content. Otherwise, the information will be presented in read only.
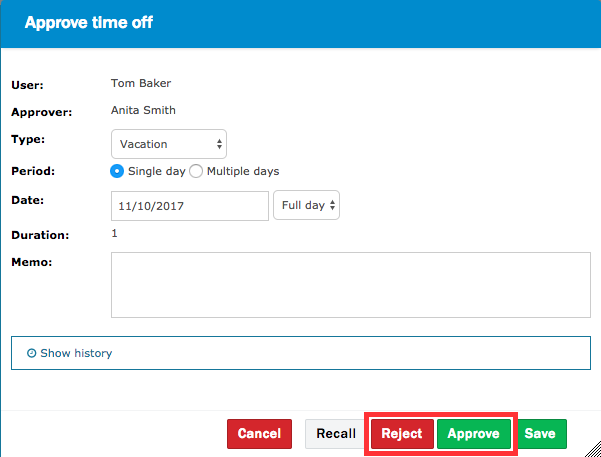
You can Approve or Reject requests in a couple different ways.
- From the Calendar, Timeline or Agenda view, click on the request to open it. At the bottom of the request are the options to approve and reject.
- On the left hand side of the screen will be a summary of requests from people who have submitted to you. Use the checkbox to the left of their name if you want to hide their requests from your review calendar. Click the information icon to the right of their name to review the current bank usage for that user.
- For all submitters whose checkboxes are checked, you can approve or reject all of their requests by clicking the respective buttons at the top.
- Use the individual request approval check or rejection x to action (the eye icon will show their request in the calendar, the pencil allows you to open the request).
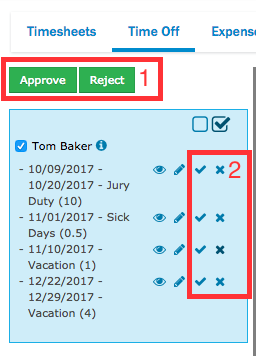
If you are rejecting a request, you will likely be prompted to fill in a comment. This is information that will be communicated to the original submitter.
Otherwise, approving the request will remove it from your approval queue and progress it in the approval workflow to the next step.
- From the Calendar, Timeline or Agenda view, click on the request to open it. At the bottom of the request are the options to approve and reject.
-
When you submit a time off request it is pending approval from a specific user, commonly your manager or supervisor. Once submitted, you no longer have the ability to edit or delete the time off.If your time off has been submitted in error or you need to make changes, and your organization has enabled the Recall feature on your Nexonia account, you will be able to recall your time off which will change the status from Submitted to Draft. This will allow you to delete the time off or make changes immediately, without having to contact an administrator or wait for the time off to be Rejected.To recall a submitted time off request, navigate to:Time Off > Click on the time off request to open it > Click "Recall".
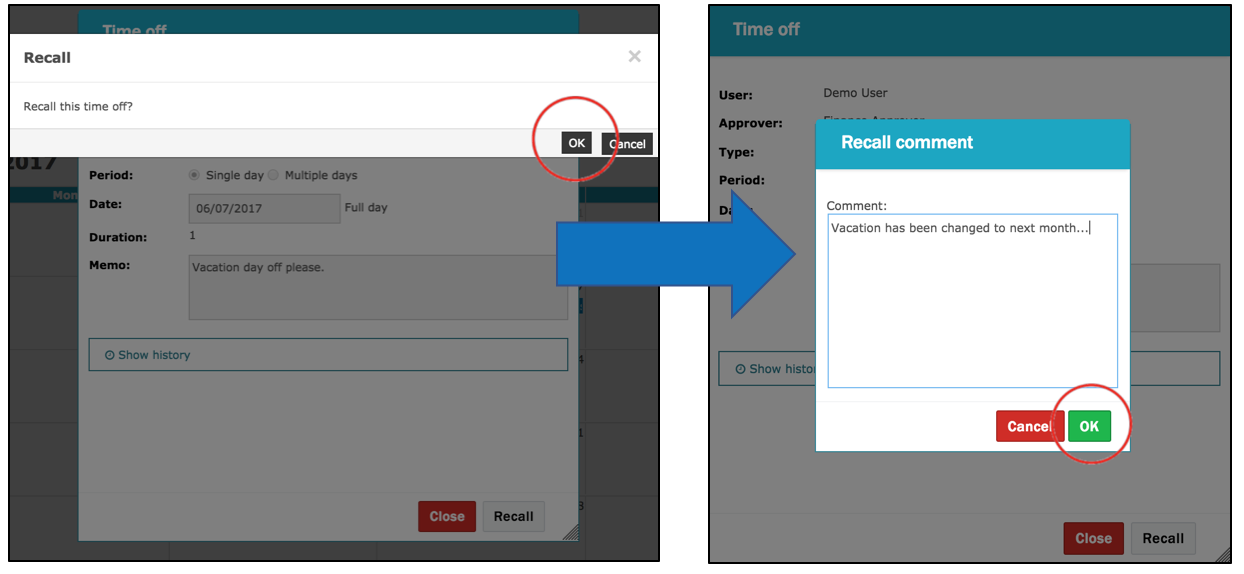
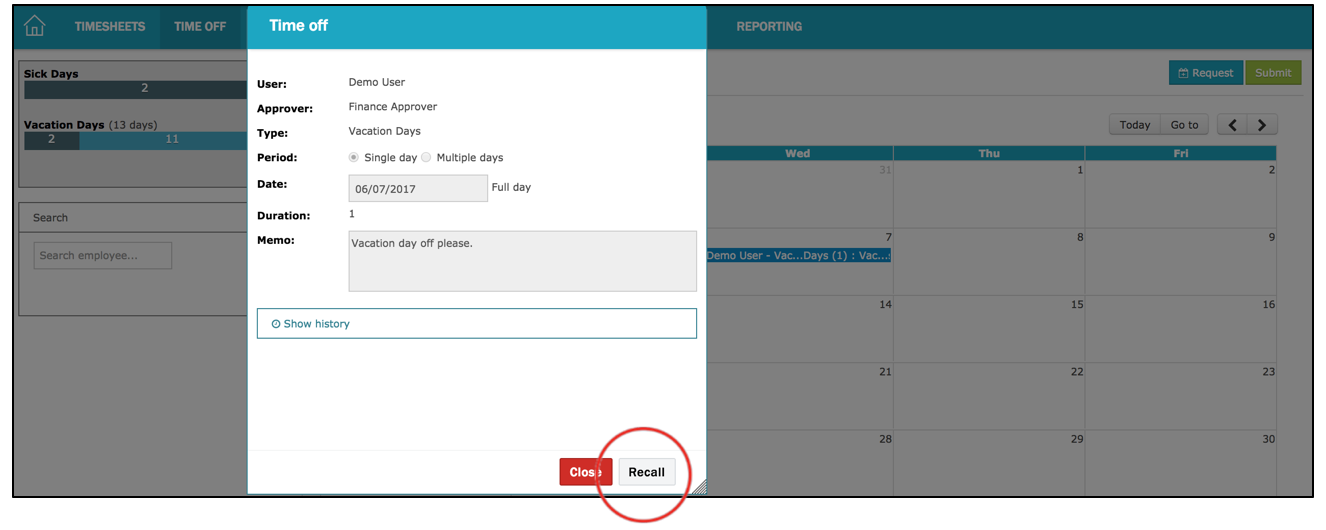 Click OK to confirm that you'd like to recall this time off. Provide a Recall comment and then click OK.
 Your time off has been successfully recalled and your approver has been notified via email! The time off is now in Draft status where you can edit or delete it immediately.
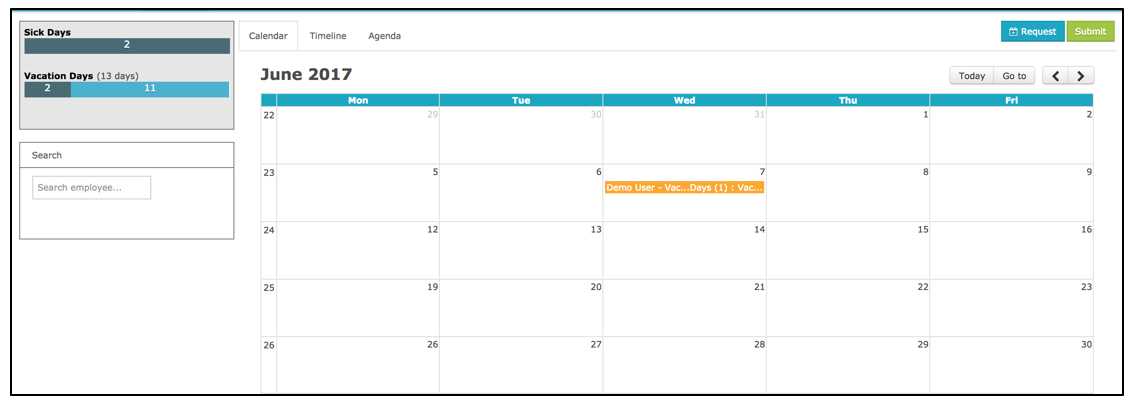
 Fully approved time off requests cannot be recalled; this can only be reset/cancelled by an Administrator.
How to Add Time to Banks - Opening Balances and Adjustments Populating Public Holidays when using Planned Projects How to Configure Time Off Accruals - Mono-Tier How to Enable Email Notifications for Time-Off How to Manage Time Off Bank Balances for Users Public Holidays Integrated with Timesheets
-
Administrators can manage Time Off accrual bank balances manually in Nexonia. This is used typically to initialize the time off bank with an opening balance, or to adjust the balance of time a user has.
Note: Administrators will need to do this step when Adding New Users or implementing Time Off for the first time.
To manage the bank balances:
Log in to Nexonia as an Administrator and navigate to the Time Off module.
Click the button Manage Banks - only administrators have this button available.

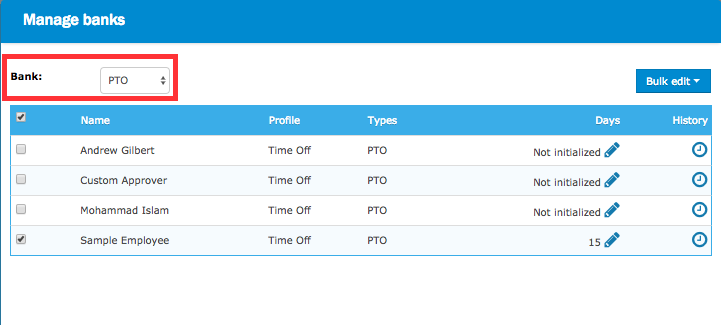
You'll now see the Manage Banks window. The dropdown under Bank allows you to select which bank of time you're viewing. Once you select the bank, you'll see a list of only the users linked to this bank via their time off profile.
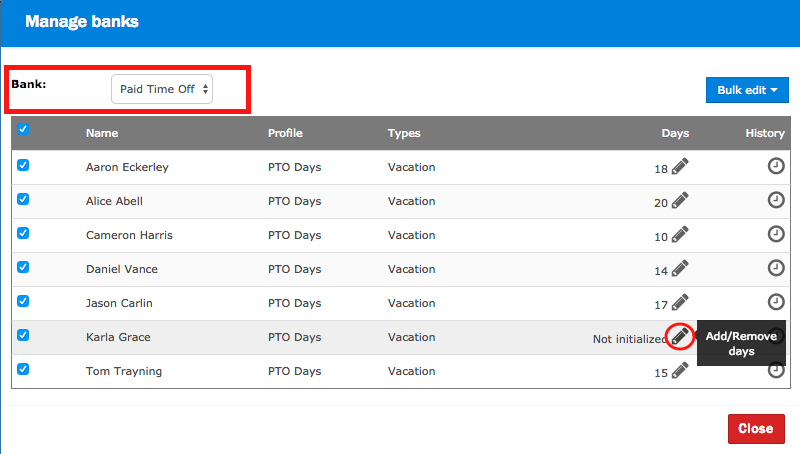
The columns you'll see are:
- Employee Name
- Time Off Profile the user is linked to
- Time Off Type linked to this bank
- Current Balance of this Bank
- History - click the clock icon to view the audit history for any adjustments to this bank.
Click the Modify icon (the pencil) in an employee's row will open the Manual Edit window where you can adjust the bank balance up or down.
To Adjust a Bank Balance
- Enter the amount you wish to adjust.
- Click the + to add the time or - to subtract the time from the balance.
- Add the required memo - the memo is required for the audit history, so you'll always need to make a note regarding the balance adjustment.
- Click the OK button and the balance will be updated.
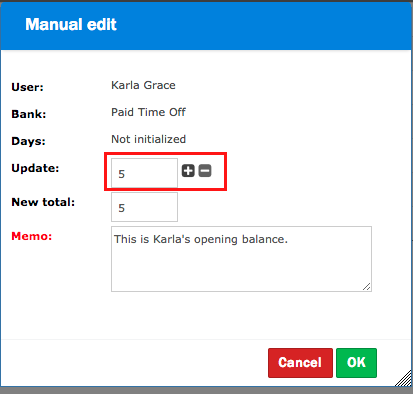
To Set an Opening Balance:
- Navigate to the employee whose bank you want to adjust, and click the modify icon (pencil).
- Enter the opening balance, or use the +- clicks as needed.
- Add a memo
Click the OK button and the balance will be updated.
To Adjust Time for Multiple Users - Bulk Edit
1. Use the checkboxes on the left to select the employees you want to edit.
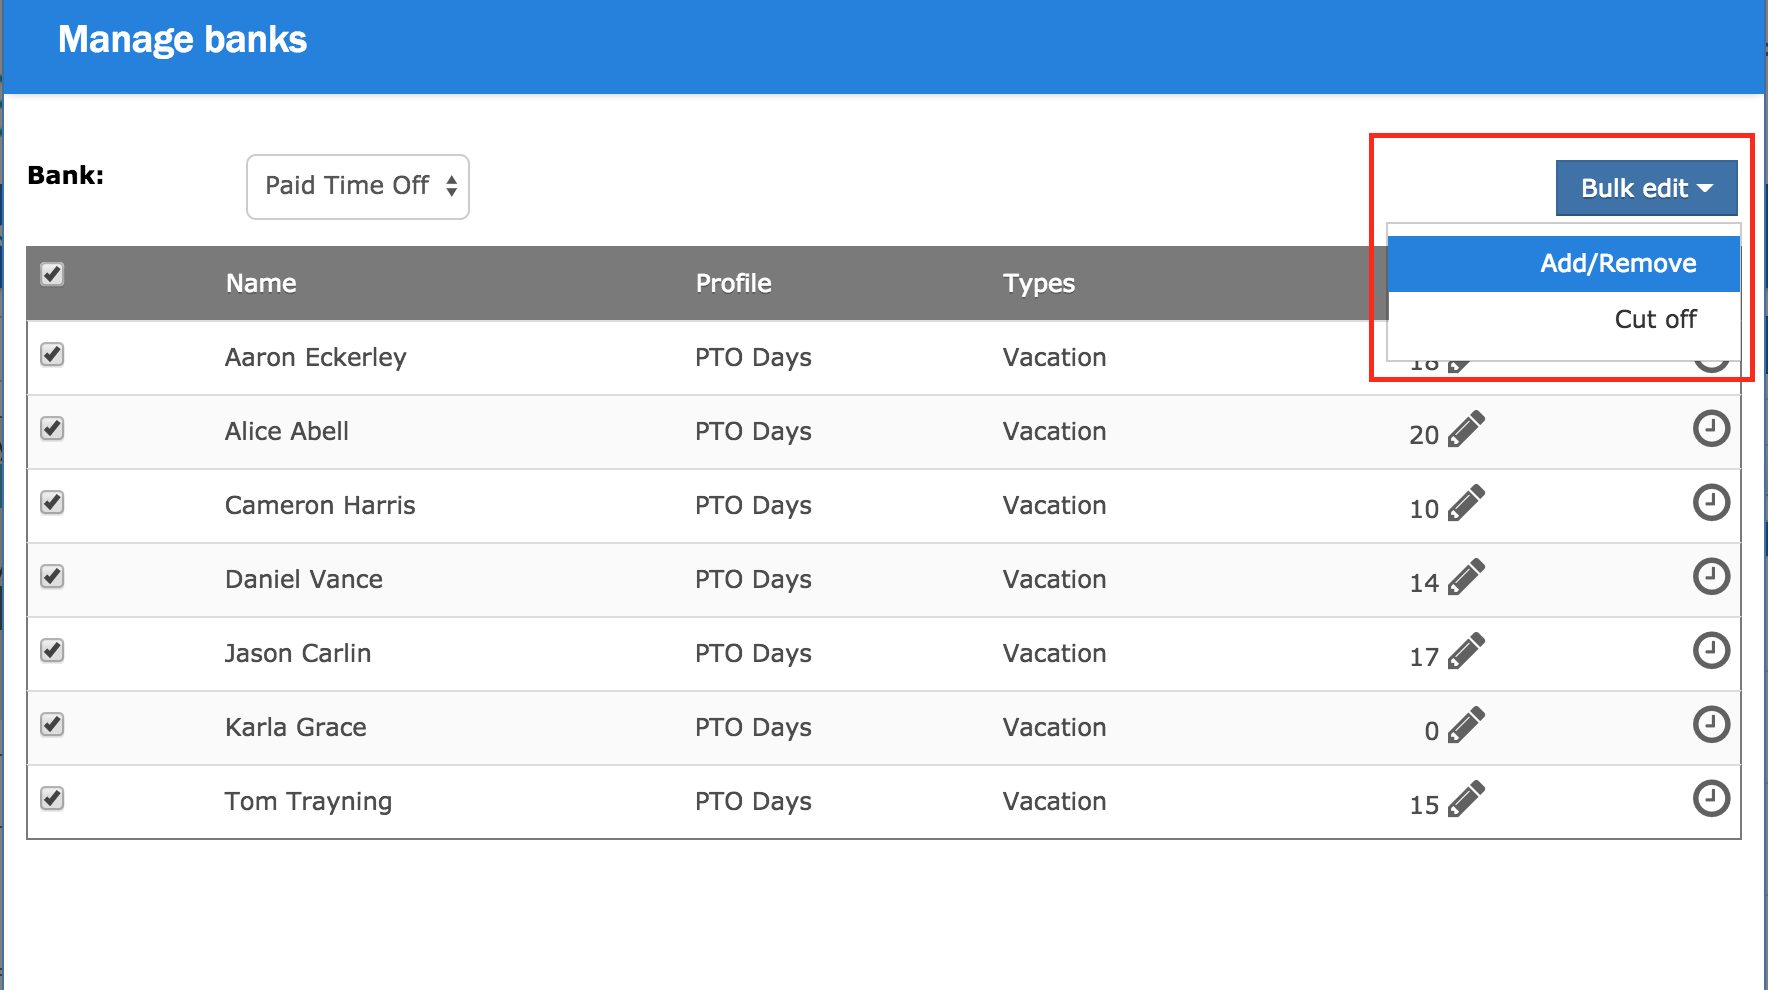
2. Click the Bulk Edit button in the top left, and select "Add/Remove".
3. You'll now see a Bulk Edit window - to apply an amount to all the users, use the Add/Remove box at above the list of users.
4. Enter the amount you wish to adjust - enter negatives for any deductions. You can also click on the plus and minus signs +/- to adjust the amount up or down.
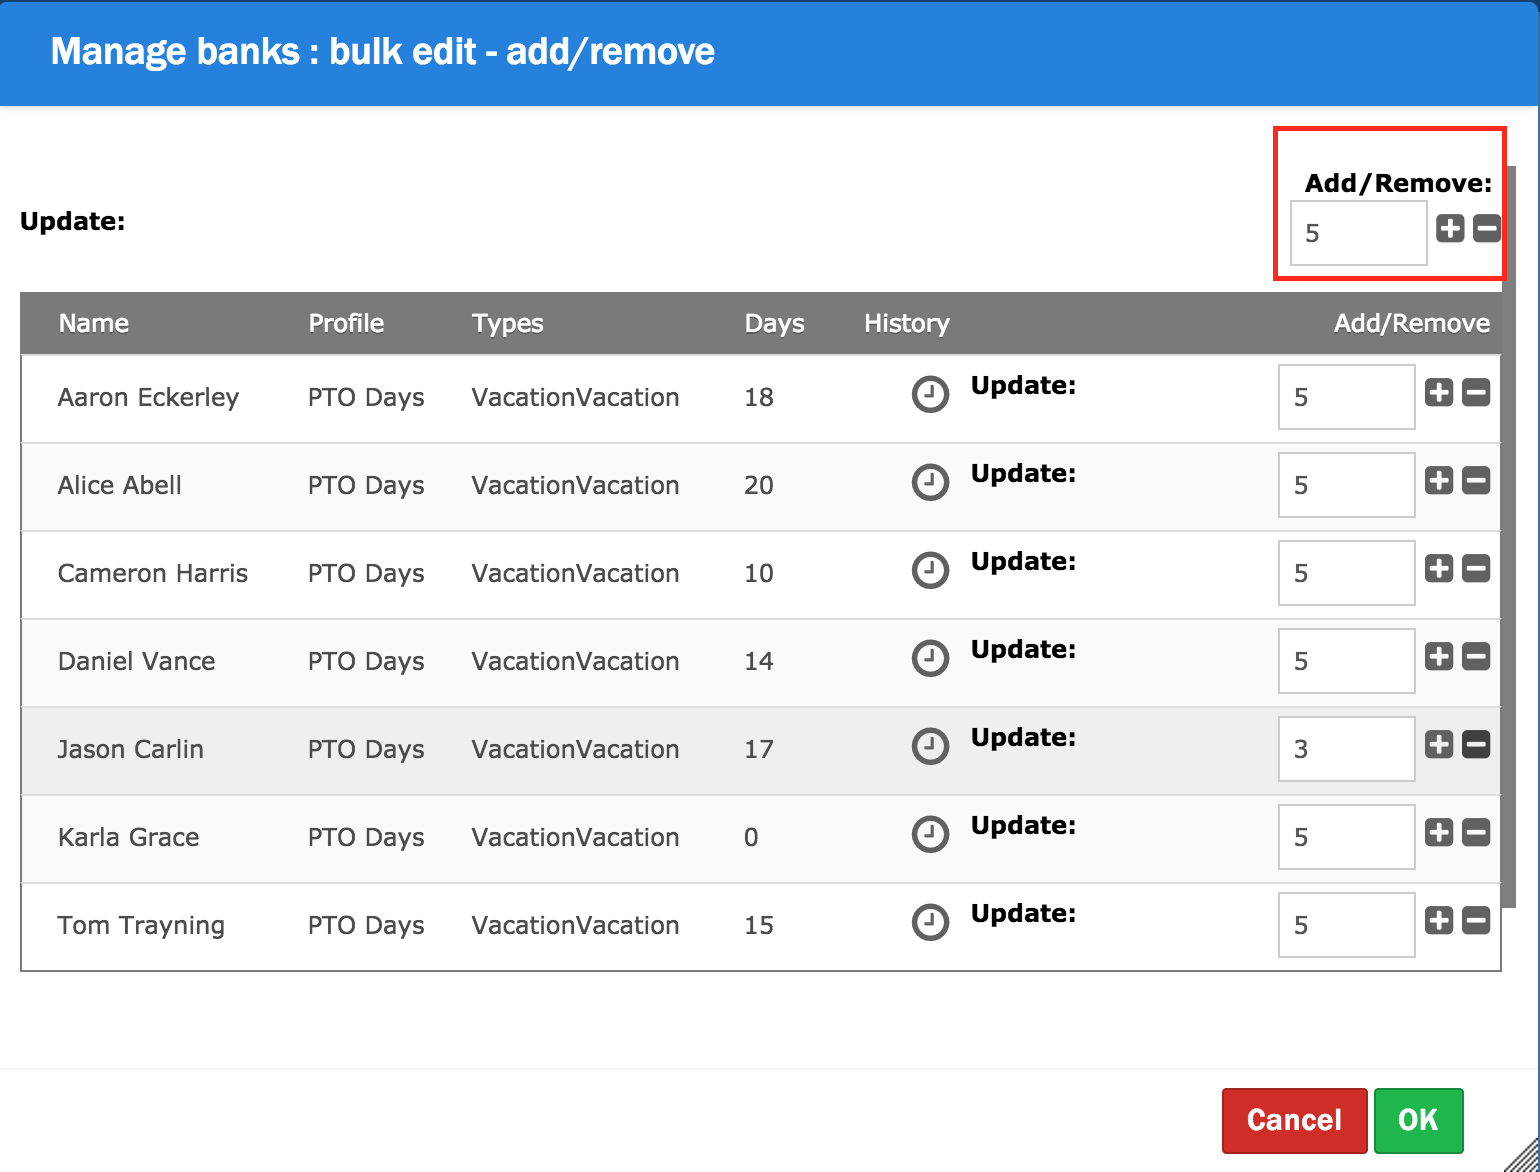
5. Any amount you enter in the top Add/Remove field will copy into the individual user lines - you can also adjust the individual users as needed.
6. Add the required memo - the memo is required for the audit history, so you'll always need to make a note regarding the balance adjustment.
7. Click the OK button and the balances will be updated.
-
If you use the Planning Module and all of your Projects have the Planning function set to Yes, you'll be prevented from entering a Project when configuring your Public Holiday Profiles.
Public Holidays are not compatible with planned projects. To enter a Project for a Public Holiday profile, Planning should be turned off temporarily for the Project you want to use with the Public Holiday profile.
This article will show you, a Nexonia Administrator, how to populate public holidays when using planned projects.
Step 1: From the Nexonia homepage, navigate to Customers tab>>Projects.

Step 2: Click on the project you wish to use for the Public Holiday profile.

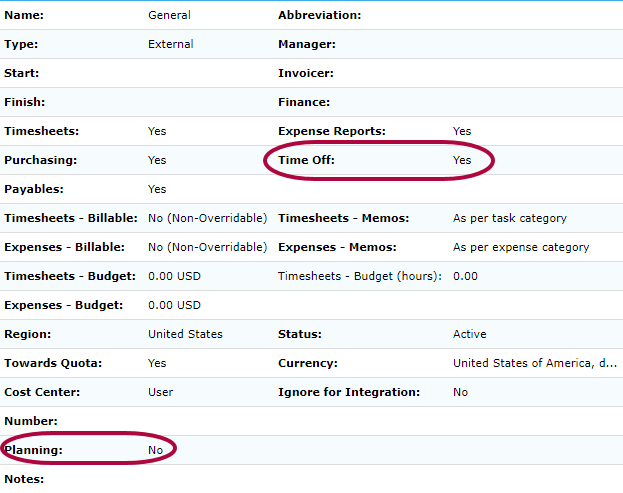
Step 3: Ensure that Time Off is set to Yes and that Planning is set to No.
Step 4: Click the Gear icon to navigate to Settings>>Company>>Time Off

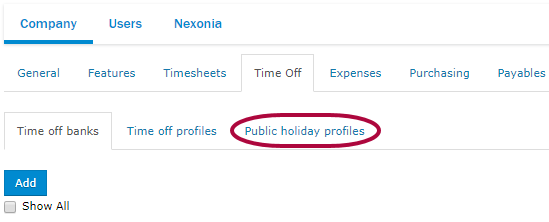
Step 5: Click Public Holiday Profiles.
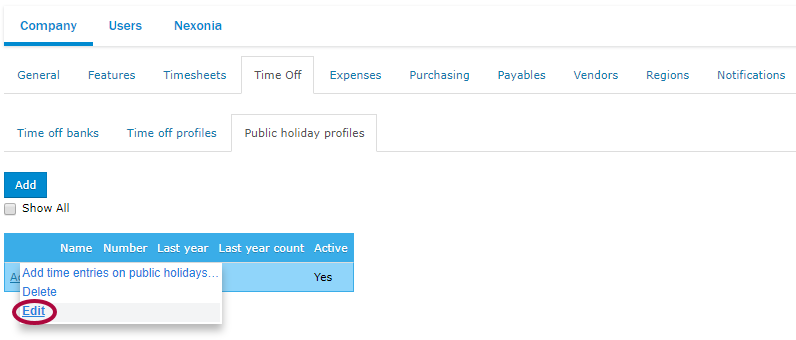
Step 6: Click Actions, followed by Edit next to the relevant profile.

Step 7: Ensure that the Customer tied to the Project you're using is picked in the Customer section. Then, choose the correct Project.
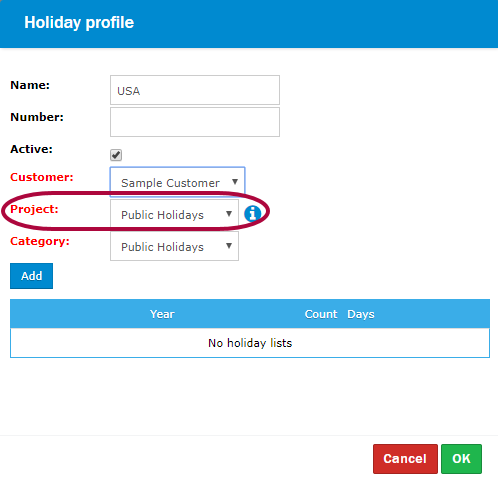
Step 8: Choose a Task Category and click OK to save.
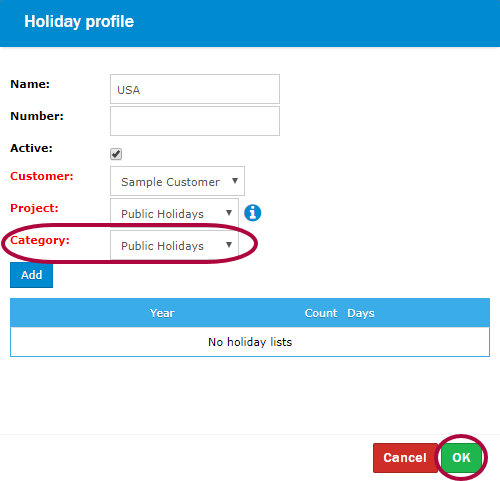
Step 9: Next, go back to the holiday profile and click Actions followed by Add time entries on public holiday.
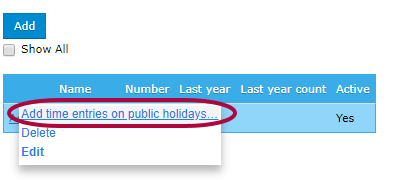
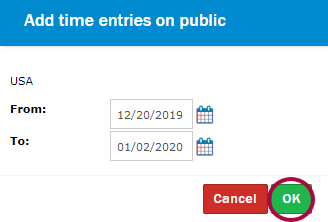
Step 10: Choose a Date Range covering all holidays that you want to populate. Then, click OK.
Step 11: Click Projects under the Customers tab. Then, click on the project that you're using for the Public Holiday profile.

Step 12: Click Edit.
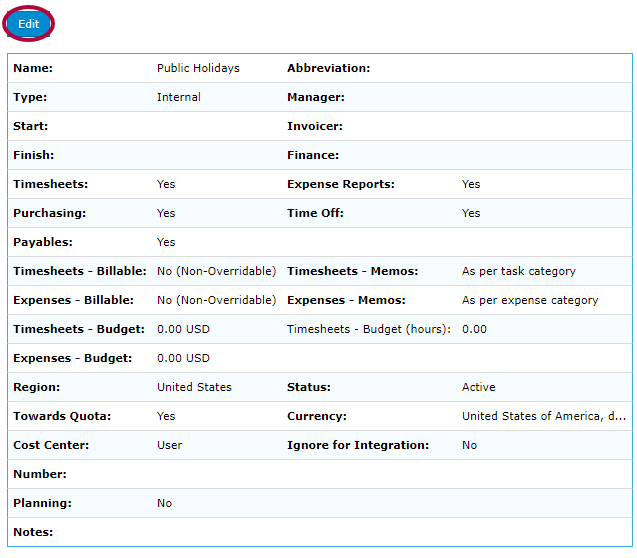
Step 13: Set Planning to Yes. Click Apply when complete.

This gets around the issue of Planned Projects not being available for a Public Holiday profile. Every time you're updating your holidays, this process should be followed. Ideally, this should be done once a year to populate all holidays for that year.
-
Mono-Tier accruals are supported in Nexonia if your organization grants an amount of time off based on a set period (ex. Weekly, Monthly, Yearly).
To create a mono-tier bank navigate to: Settings > Company > Time Off > Time off banks > Add.

Fill in the Name for this bank and check Accruals. Define the parameters the accruals will work based off of. Refer to the article Creating a Time Off Accrual Bank to review the configuration for the bank prior to the Accruals Method. We'll provide instructions below on how to create a mono-tier accrual calculation.
In the below example, we see employees accrue 15 days of vacation per year, and can only carry over 3 days into the next year (period).
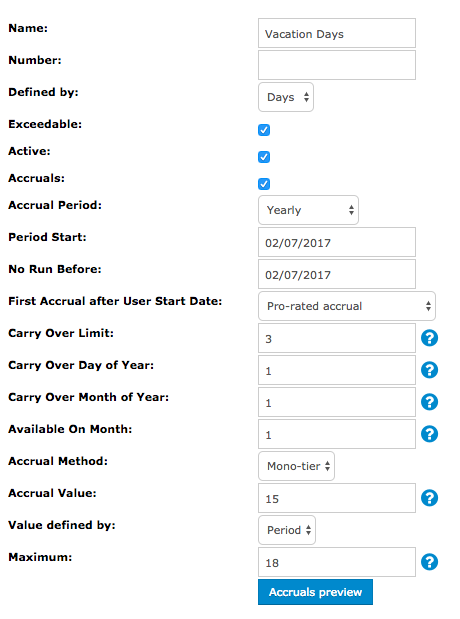
Accrual Method
Mono-tier: Accruals are based on a simple calculation. Only one accrual rate is calculated and the concept of seniority (employee's number of years with the company) is not taken into account in the calculations.
- Accrual Value:
- The Accrual Value field can be:
- a number entered directlly in the field
- a custom field at the user level
- a custom field at the region level
- an expression made up of the user or region custom field - When typing the dollar sign '$' in the field, a drop-down list of all valid custom fields will be available for selection.
Valid custom fields have been created in Setup > Company > Custom Fields > Other and are of Object Type 'User' or 'Region' and are of Type 'text' or 'float'. - When using a custom field of Object Type 'User', the value of the custom field is defined in Setup > Users > User > <name of the custom field>.
When using a custom field of Object Type 'Region', the value of the custom field is defined in Setup > Company > Region > <name of the custom field>.
Value defined by:
-
- Year : the value in the field 'Accrual Value' is the total of days/hours accrued for the year. If the accrual period is shorter than a year, the accrued amount in each period is a fraction of the Accrual Value defined for the year.
- Period : the value in the field 'Accrual Value' is the actual number of days/hours accrued for each period.
Maximum:
-
- The maximum amount of days/hours that a bank can ever have (It would make sense to have the maximum be greater than the carry over.)
- This field can be a number or an expression (both user type and region type custom field values are supported).
- No more accruals will be added (from the accruals batches) to the bank once this maximum has been reached .
-
- Empty field: no maximum is applied.
Accruals preview button:
- Gives you the number of hours/days that will be accrued per period (not per tier) in each different tier.
- Will let you know the seniority of each employee that is in the bank you are setting up.
-
Nexonia can send email notifications to your users. Notifications are typically sent to alert approvers when time-off requests are submitted to them, and notifying submitters when time-off requests are approved or rejected.
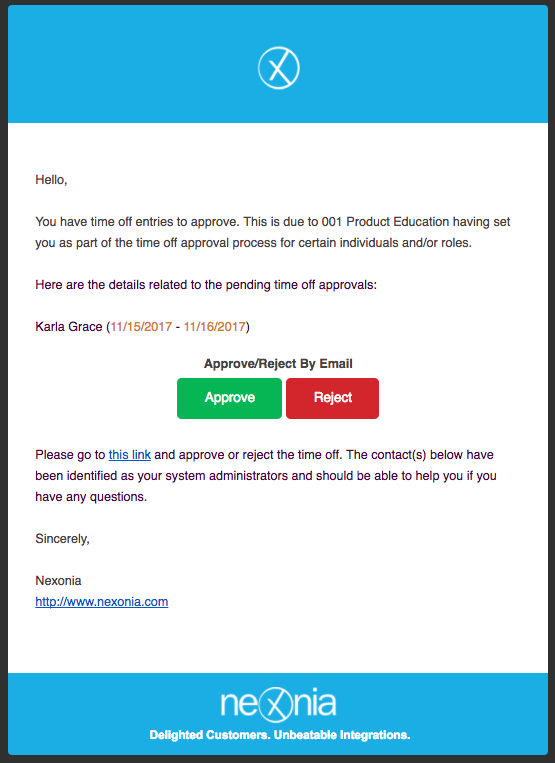
You can enable notifications in Nexonia by navigating to Setup > Company > Notifications > Edit.
Scroll to the row Time Off Approval Workflow. These are the settings to send reminders and notifications related to the submission and approval of expense reports.
Check the Active box to enable this notification workflow.
Below would be a standard notification configuration. Check off the appropriate boxes, scroll to the bottom and click the Apply button to save your settings. This will now enable the email notifications.

Common Notifications
Assignee, Unapproved = reminder emails if an approver hasn’t review the submitted time-off requests after a day. Frequency can be adjusted here.
Author, Rejected = notifies the submitter if a time-off requests was rejected. You can choose to copy any Prior Approvers as well.
Author, Approved = notifies submitter when time entries are approved.
Assignee, Assigned = notifies approver when time entries are submitted to them.
Additional Notifications
Assignee, Recalled = used to notify approvers if a time-off request in their approval queue is recalled by the user.
Other, Approved = used to email a copy of the notification of approval to another email address.
Notification Terms and Values
- Recipients
- Author/User: user who submitted expenses for approval
- Assignee/Manager: supervisor responsible for approving time entries
- Manager’s Manager
- Cc Prior Approver: the approver(s) before the current approver
- Regional Administrator: administrator set in the system for submitters region
- Other: email can be specified to include others in distribution list
- When
- Unapproved: time entries have not been approved
- Rejected: a line charge/time has been rejected and needs their attention
- Recalled: submitted time entries have been recalled by a user
- Approved: time entries have been approved
- Assigned: submitted to approver for approval
- Frequency
-
- Specified number of days
- Immediate/Once
- Recipients
-
In Nexonia, administrators will have the rights to manage the time off bank balances for all users. This is the ability to make manual adjustments to the amount of time any specific user has been allotted.
Navigate to: Time Off > Manage Banks > select the bank from dropdown list > click the edit pencil for the user that requires an edit.
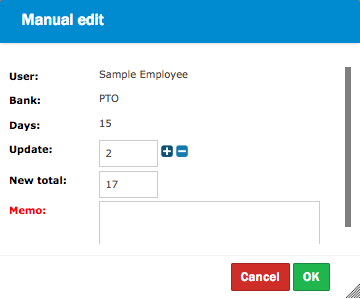
In the Update field, fill in the adjustment amount (can be a negative value). This will affect the New total field where you'll see what the new balance will be for the user. In the Memo field, enter in the reason for the change.
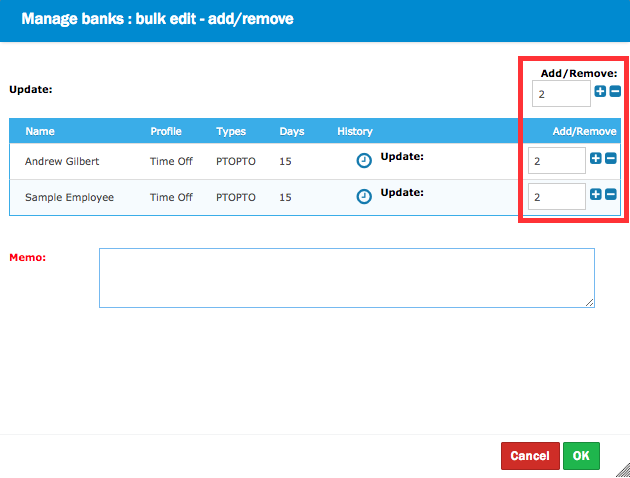
In the example below, our employee had 15 days allowed for PTO, but a manual adjustment of +2 days has been allotted.
Bulk Edits
The above example showed us how to adjust an individual's bank, but there is a bulk option available too. After selecting the bank, use the checkboxes on the left to select which users you'd like to make the same change to.

Next, click on Bulk edit > Add/Remove. Options exist to add/remove the same amount for all users or you could still make the individual adjustment on the user's line.
-
If your organization has enabled Time Off and Timesheets, public holidays can be automatically added as time entries in Timesheets.
By default, the public holiday time entry will automatically appear in Timesheets on the 14th day prior to the date of the holiday. However, if you'd like public holidays to appear in advance of 14 days, Administrators can select a From and To date, which will automatically add all public holidays during the specified date range to Timesheets.
To push holidays to generate in Timesheets, navigate to:
Settings > Company > Time Off > Public holiday profiles
Locate the public holiday profile and click Actions > Add time entries on public holidays...
Enter the date range and then click OK
Public Holidays will now be generated in Timesheets!

 User Note: The public holiday entry is still editable by the user, in case they need to modify the entry or delete it outright if they happened to have worked that day.
 Administrator Note: If the public holiday has been added to your account within 14 days of the date of the public holiday, or you've added a new user within 14 days of the date of the public holiday, the system will not automatically add a time entry in Timesheets. In these instances, if you'd like the public holiday to appear in Timesheets, an Administrator will need to follow the instructions above to push the holiday to generate in Timesheets.
  Administrator Note: The Public Holiday Feature is currently not compatible with Intacct's Task (e.g. Holiday task) if the task is restricted to resources.
Reporting Column Definitions - Time Off Reporting Template: Time Off Taken/History Reporting Template: Time Off Balance
-
Please refer to the attached PDF to see a list and definition guide of all the column values available when creating an Expenses type of report.
-
These instructions will assist with building a report to track the time off history which can be used by admins or shared with users so they can run a quick report on their time off history for a specific period.
The ability to build and run reports is linked to your Role permission. Administrators typically have this permission built in to their role, and can grant it to other roles if needed.
Link: Configuration Guide to Roles and User Permissions
Designing Your Report: Creating the Report Template
Login to Nexonia on the web and click on the Reporting module.
Click the Create Report button to start the report configuration.
You'll see the General tab appear. Enter the following:
- Name (e.g. "Time Off Taken/History")
- Description
- Type - select Time Off
- Summary - select No
Click the Add button.
You should now see the five tabs for configuring the report:
- General - general information and sharing permissions
- Selection Criteria - report template filters and defaults
- Columns - data columns for the report
- Categories - data categorization for the report
- Order - order of the report results
Important: as you update the settings in each tab, it's important to hit Apply at the bottom of each tab to save your changes before moving to the next tab.
General
Most of the information will have been provided on your initial General screen. Here you can also configure:
- Shared - allows the report template to be private, shared with all other users or specific roles
- Header & Footer - you can enter information you'd like to see in the report header and footer
Selection Criteria
This tab allows you filtering of the report data to be included. A number of fields can be set as hidden or visible to users running the report, set with defaults, or locked in with a predefined selection.
For this report, the key values are:
Date Range - establishes the date range range of entries being pulled when this report is run.
- Interval - you can default the period of time most commonly used when running the report: Current Year, Current Quarter, etc.
People - you can set whether the person running the report can select the people to be included in the report results, or lock down the values by using the "predefined" option.
Subset - default to which people will be included in the report. The most commonly used options:
- Default to user - select this if the report is intended so users can report on their own time off balance.
- Default to user and subordinates - select this if the report is intended so managers can report on time off balances for themselves and their subordinates.
- Default to all visible users - select to include all available users in the results. This would be useful if running department or company wide reporting.
Approval - default to "Approved", but if you need to see time off requests that are in the pipeline, you may want to turn on the "Submitted" status.
Format - if there's a preference, you can set the default output format for this report.
Columns (Data)
The Column tab is where you define what information you want to include in the report. We’ve included some columns of data that can be useful, but you can choose to add others, remove columns or sort them in a different order. Click Add and select the column value below.
Column Name Value
Purpose
User - Full Name Person Name of the employee Block - Dates Date Date range of requests Type - Name Type Type of request Time off Hours Hours
Amount of time booked
Status
Status
Approval status
Block - Memo Memo Memo details entered (if any) 
Categories:
Categories can be used to group the results and create subtotals for the distance and amount:
- User - group the results by user
Order
Order is what order are the report results being sorted. For example, you could sort the results by user.
You have now completed building your reporting template.
Running Your Report
Under the Reporting module, you should see the reporting template you have just built. If you’re not seeing it, double check you don’t have a filter enabled.
Click the Action link to the left of the reporting template and you should see a dropdown menu with the 'Run' option.
You’ll now see your options based on the Selection Criteria you set for the report. Make any adjustments if needed, and then click Run.
Reading Your Report
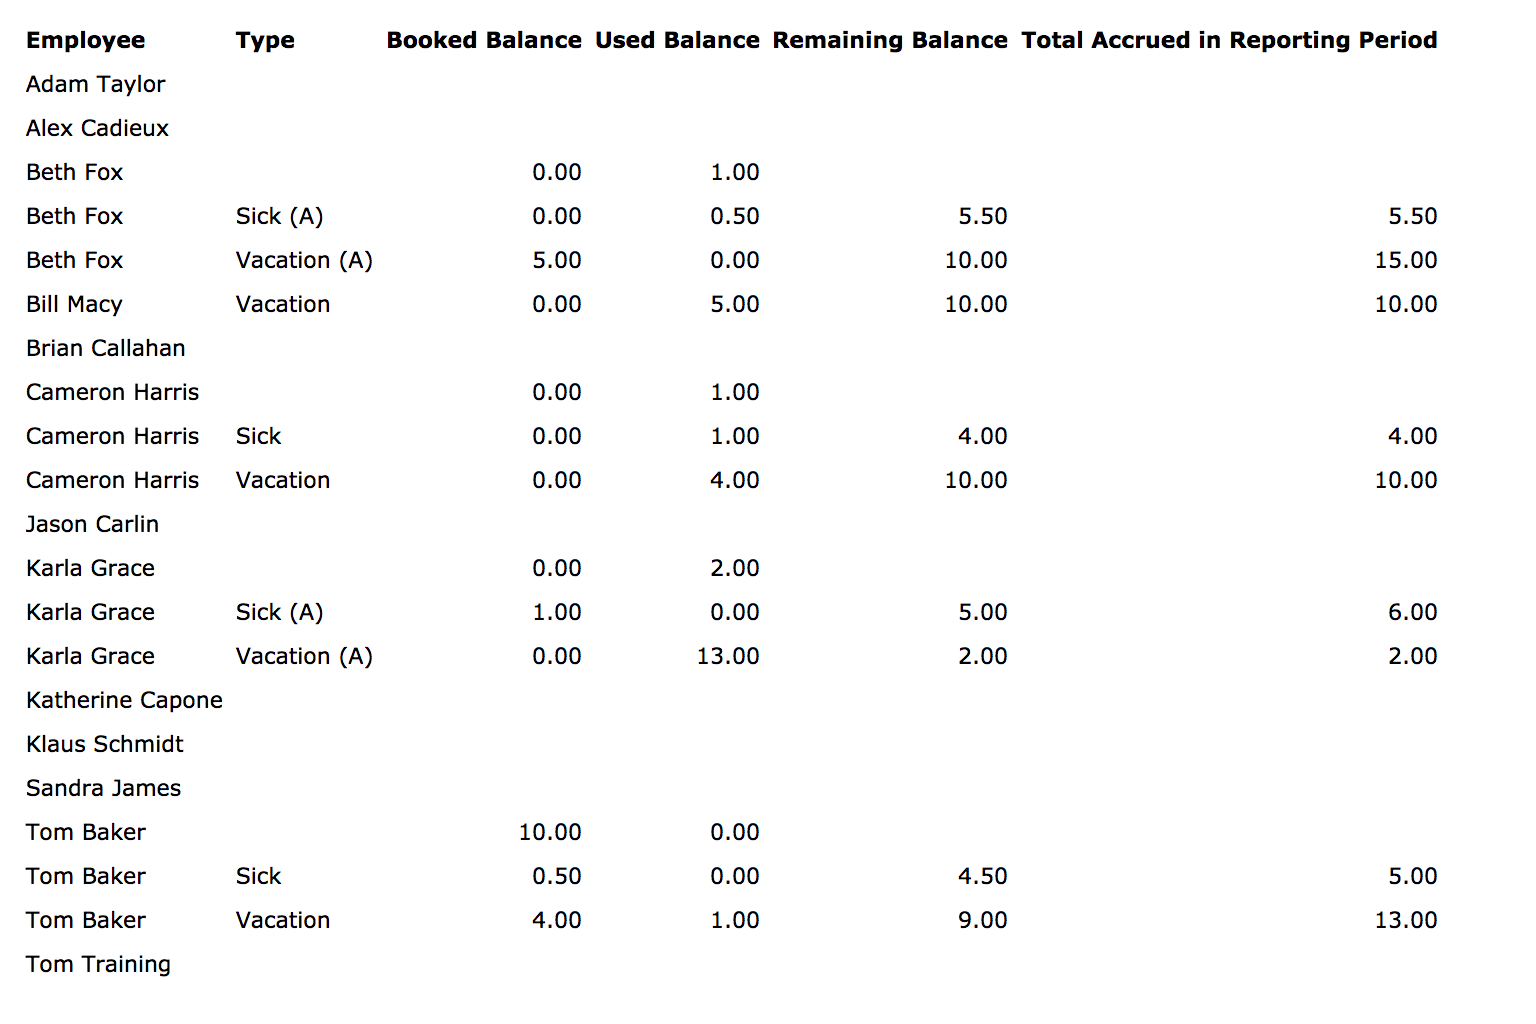
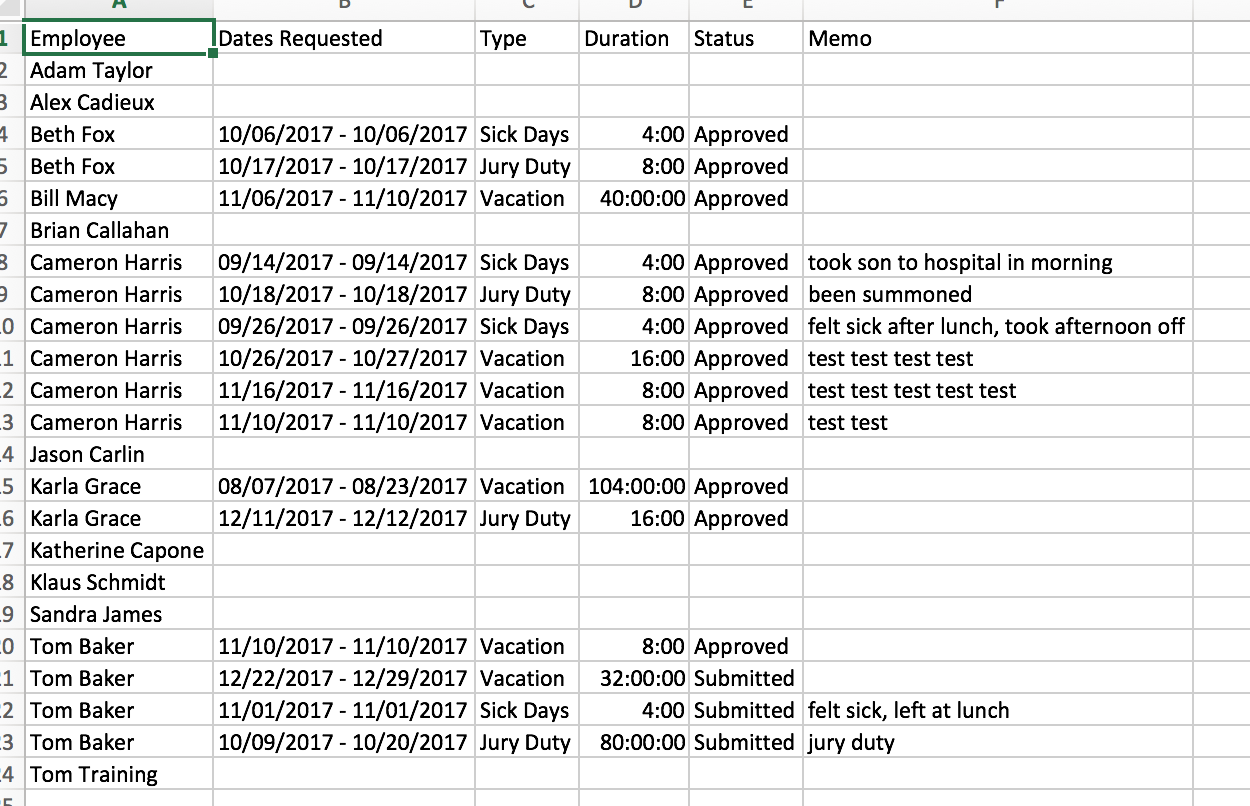
Here’s an example of our Time Off History, run as a .CSV and opened in Excel. You can now identify exactly how much time off has been booked, used and is remaining.
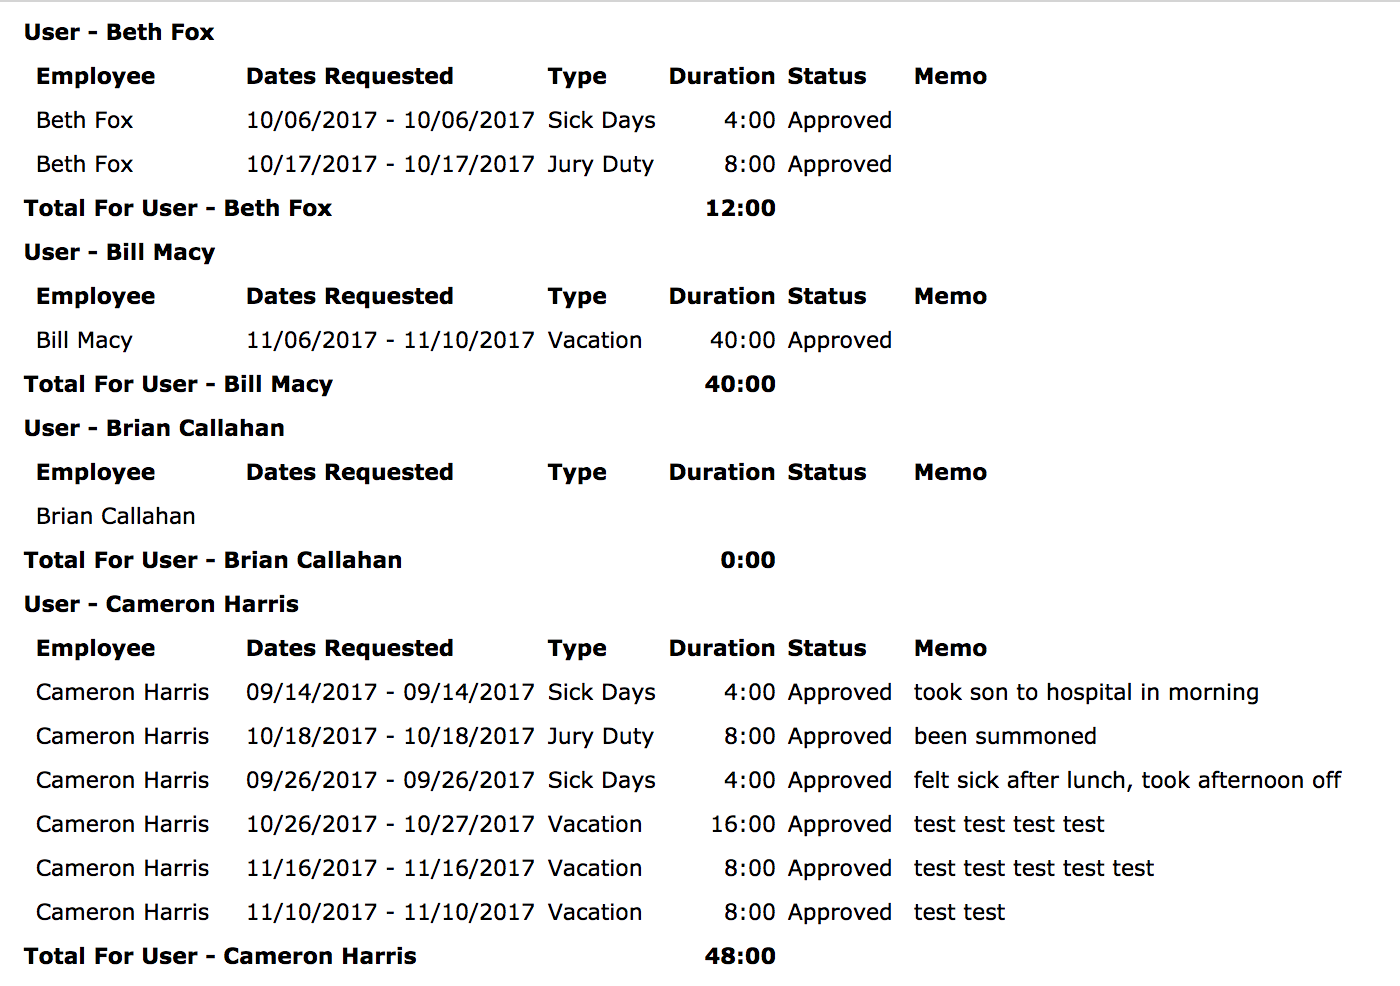
Here’s an example of our Time Off History, run as a HTML or PDF.
-
These instructions will assist with building a time off balance report which can be used by admins or shared with users so they can run a quick report on their time off balance for a specific period.
The ability to build and run reports is linked to your Role permission. Administrators typically have this permission built in to their role, and can grant it to other roles if needed.
Link: Configuration Guide to Roles and User Permissions
Designing Your Report: Creating the Report Template
Login to Nexonia on the web and click on the Reporting module.
Click the Create Report button to start the report configuration.
You'll see the General tab appear. Enter the following:
- Name (e.g. "Time Off Balance")
- Description
- Type - select Time Off
- Summary - select Yes
Click the Add button.
You should now see the five tabs for configuring the report:
- General - general information and sharing permissions
- Selection Criteria - report template filters and defaults
- Columns - data columns for the report
- Categories - data categorization for the report
- Order - order of the report results
Important: as you update the settings in each tab, it's important to hit Apply at the bottom of each tab to save your changes before moving to the next tab.
General
Most of the information will have been provided on your initial General screen. Here you can also configure:
- Shared - allows the report template to be private, shared with all other users or specific roles
- Header & Footer - you can enter information you'd like to see in the report header and footer
Selection Criteria
This tab allows you filtering of the report data to be included. A number of fields can be set as hidden or visible to users running the report, set with defaults, or locked in with a predefined selection.
For this report, the key values are:
Date Range - establishes the date range range of entries being pulled when this report is run.
- Interval - you can default the period of time most commonly used when running the report: Current Year, Current Quarter, etc.
People - you can set whether the person running the report can select the people to be included in the report results, or lock down the values by using the "predefined" option.
Subset - default to which people will be included in the report. The most commonly used options:
- Default to user - select this if the report is intended so users can report on their own time off balance.
- Default to user and subordinates - select this if the report is intended so managers can report on time off balances for themselves and their subordinates.
- Default to all visible users - select to include all available users in the results. This would be useful if running department or company wide reporting.
Approval - default to "Approved", but if you need to see time off requests that are in the pipeline, you may want to turn on some of the other statuses.
Format - if there's a preference, you can set the default output format for this report.
Categories
For summarized reports, it is imperative that you set categories first, then take a step back to columns after.
Categories can be used to group the results and create subtotals for the distance and amount:
- User - group the results by user
- Bank - group the results by the time off type
- User Bank - group the results by the user's time off type
Columns (Data)
The Column tab is where you define what information you want to include in the report. We’ve included some columns of data that can be useful, but you can choose to add others, remove columns or sort them in a different order. Click Add and select the column value below.
Column Name Value
Purpose
User - Full Name Person Name of the employee Bank - Name Type Name of the type of request User Bank - Booked Balance Booked Amount Booked amount for the type User Bank - Used Balance
Used Amount
Used amount for the type
User Bank - Remaining Balance (Current)
Remaining Balance
Remaining amount for the type
User Bank - Total Accrued in Reporting Period Accrued Amount Accrued amount for the period being reported on 
Order
Order is what order are the report results being sorted. For example, you could sort the results by user.
You have now completed building your reporting template.
Running Your Report
Under the Reporting module, you should see the reporting template you have just built. If you’re not seeing it, double check you don’t have a filter enabled.
Click the Action link to the left of the reporting template and you should see a dropdown menu with the 'Run' option.
You’ll now see your options based on the Selection Criteria you set for the report. Make any adjustments if needed, and then click Run.
Reading Your Report
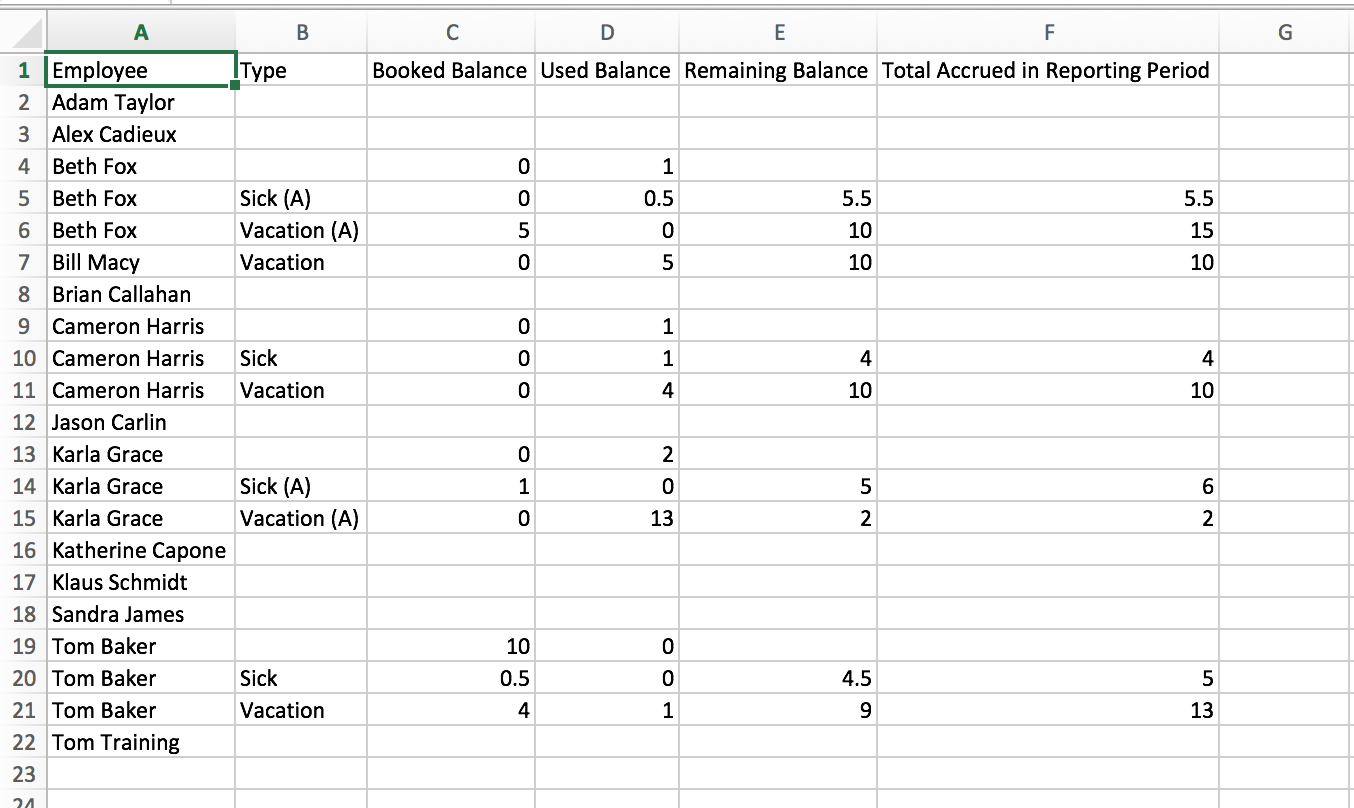
Here’s an example of our Time Off Balance, run as a .CSV and opened in Excel. You can now identify exactly how much time off has been booked, used and is remaining.
Whenever you see a blank type, but there have been values booked and used, that is representative of one of your Tracked types.
If you see blank rows for employees, that means they have not made any requests for 1 or more of their banks of time.
Here’s an example of our Time Off Balance, run as a HTML or PDF.
