
For customers managing their chart of accounts in Nexonia, Administrators can add or modify general ledger (GL) numbers as needed.
![]() Please note, these instructions apply to non-integrated Nexonia accounts. If your accounting software or ERP is integrated directly to Nexonia and used as the source of the configuration information, any chart of account changes will have to be made in the accounting software or ERP and pushed to Nexonia via the Configuration Sync. This applies to, but is not limited to: Intacct, NetSuite, QuickBooks, Dynamics GP, Xero or SFTP based integrations.
Please note, these instructions apply to non-integrated Nexonia accounts. If your accounting software or ERP is integrated directly to Nexonia and used as the source of the configuration information, any chart of account changes will have to be made in the accounting software or ERP and pushed to Nexonia via the Configuration Sync. This applies to, but is not limited to: Intacct, NetSuite, QuickBooks, Dynamics GP, Xero or SFTP based integrations.
If you want to add or modify an Expense Category (this is the user-facing value will be seeing in the expense item), please refer to Creating Expense Categories and Configuring Rules and Policies.
If deactivating or deleting GLs, keep in mind that you'll need to edit any expense categories previously associated with that GL and update it to an active GL. For this or rewriting an entire chart of accounts, please refer to Best Practices for Changing a Non-Integrated Chart of Accounts.
To Edit/Modify or Add a GL in Your Chart of Accounts:
To begin, log in to Nexonia as an Administrator.
Navigate to Settings > Company > Financial > Chart Of Accounts > Edit
You should now see the chart of accounts in Nexonia.
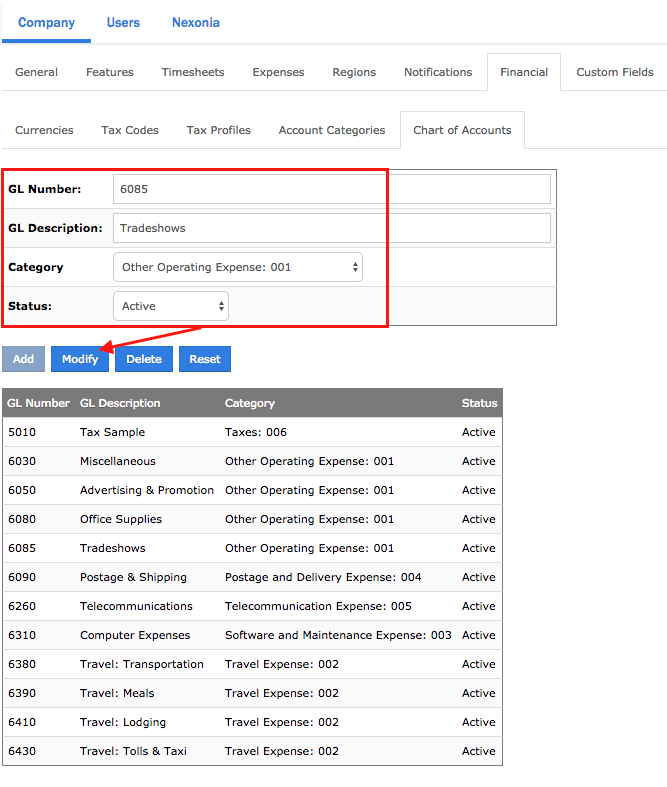
To Edit/Modify an Existing GL
Mouse over the GL number row and right click - you should see the details populated in the fields above and the "Modify" button light up. Edit the fields needed and then click the "Modify" button to apply this change.
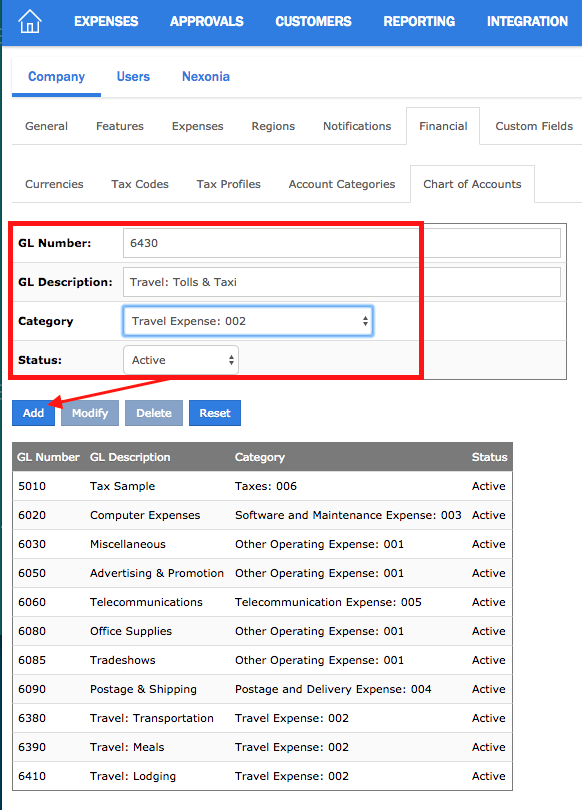
To Add a New GL
Type in the details in the fields and click the "Add" button.
You can use the same steps to modify Account Categories - these are just ways to categorize or group your GLs.
Navigate to Settings > Company > Financial > Account Categories > Edit
To Edit an Existing Account Category
Mouse over the GL number row and right-click - you should see the details populated in the fields above. Edit the fields needed and then click the "Modify" button.
To Add a New Account Category
Type in the details in the fields and click the "Add" button.
Comments
0 comments
Article is closed for comments.