AP/PO
Entering & Approving AP and Purchase Orders
Managing AP/PO
- Administrator Training for Purchasing & Payables
- Allowing Vendors to Create Bills by Email
- Approving Payables via Email Notification
- Enable Payables Approvals via Email Notification
- Enable Purchase Orders Approvals via Email Notification
- How to Add Payables/Purchasing Vendors
Training Calendar
Submitting & Approving Expenses
Alternating schedule
How to login, upload your receipts, create and expense reports for approval, and approve expenses.
Submitting & Approving Time Off and Timesheets
Alternating schedule
A walkthrough of how to create, submit, and approve Timesheets and Time Off requests.
Reporting Module Overview
Alternating schedule
An overview on how to create and generate reports.
Configuring Expense Settings for Admins
Alternating schedule
How to manage your company's data and settings.
Configuring Timesheets & Time Off Settings for Admins
Alternating schedule
How to manage timesheets and time off settings and policies for your company.
Managing Nexonia with Intacct
Alternating schedule
An overview of how Nexonia is integrated with Intacct. Learn how to import and export data between Nexonia and Intacct, manage users, expense categories and Intacct dimensions.
Managing Nexonia with QuickBooks
Alternating schedule
An overview of how Nexonia is integrated with QuickBooks Desktop or QuickBooks Online. Learn how to import and export data between Nexonia and QuickBooks, manage users, expense categories and QuickBooks dimensions.
Managing Nexonia with NetSuite
Alternating schedule
An overview of how Nexonia is integrated with NetSuite. Learn how to import and export data between Nexonia and NetSuite, manage users, expense categories and NetSuite segments.
Travel Booking & Analytics
Alternating schedule
Review how to book travel, run reports, & view unused tickets.
Watch Nexonia's easy-to-follow brief tutorial videos here.
Training Videos
Approving Purchase Orders via Email Notification How to Approve Purchase Orders How to Create Purchase Orders Purchasing & Payables Training
-
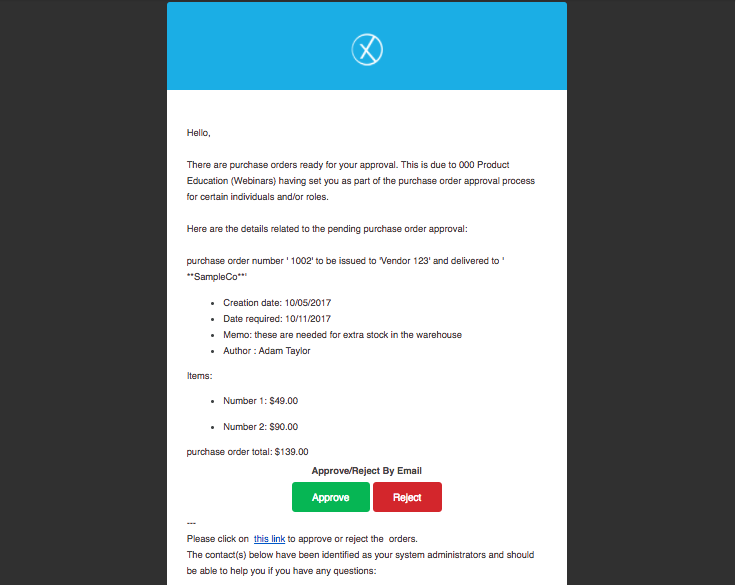
If your administrators have enabled the option to Approve or Reject by email (& the email notification to notify the Assignee when a PO has been Assigned), when a PO has been submitted to you, you will receive an email from Nexonia with the option to approve or reject in the email.
 Tip: If the email notification is also configured to include attachments, you can open any attached documents that were included in the PO.
Included in the email may be details such as:
- Requestor
- Required Date
- Memo details
- Total amount
Click on the Approve or Reject button to take action, or click on the link further below to open the PO in Nexonia for additional review.
-
Approving a purchase order advances it to the next step in the approval workflow. If the order is approved at the final step in the workflow, the status changes from Submitted to Approved, and it will be ready for export to your ERP (if applicable).
When logged into Nexonia on the web, from the home screen, either click on Approvals along the navigation bar or click on the Approval System icon on the welcome page.
 Note: If you are using multiple Nexonia products, ensure you have clicked on Purchasing just below the navigation bar after accessing Approvals.
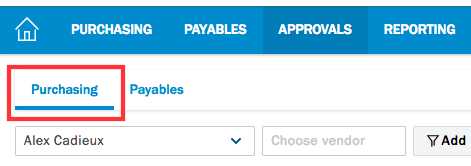
You will now be able to review any orders that have been submitted to you. Double click on the order to open up for review.
Based on your permissions, you may be able to make edits and changes to the content. Otherwise, the information will be presented in read only. Notably, at the bottom of the order could be any user uploaded attachments that you can review by clicking on the file name.
You can Approve or Reject purchase orders in a couple different ways.
- Within the order, on the right hand side at both top and bottom will be Approve and Reject buttons to click on.

- From the Approvals page, click the checkbox for the order you would like to action on, and along the top of the page, select Approve or Reject
- Also from the Approvals page, click the Action dropdown for the order and select Approve or Reject from here.
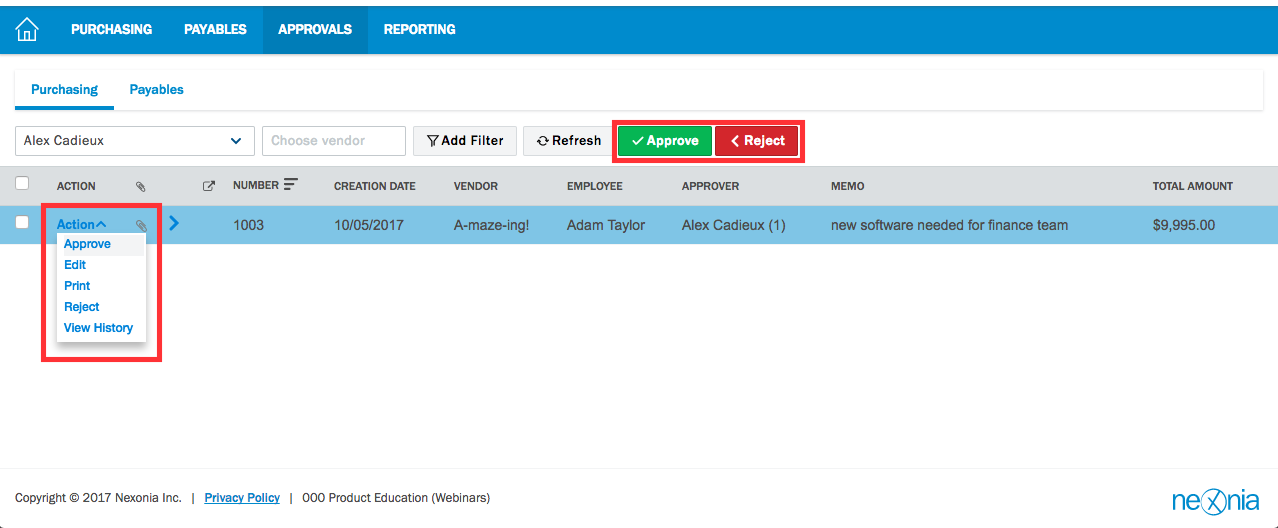
If you are rejecting an order, you will likely be prompted to fill in a comment. This is information that will be communicated to the original submitter.
Otherwise, approving the order will remove it from your approval queue and progress it in the approval workflow to the next step.
- Within the order, on the right hand side at both top and bottom will be Approve and Reject buttons to click on.
-
Once logged into Nexonia, from the home screen, either click on Purchasing along the navigation bar or click on the Purchase Orders icon on the welcome page.
On your Purchases page, you'll find the following information:
- Adding new Purchases Orders
- A filter to search for a specific Vendor's orders you've created previously
- Status icons
- Internal Nexonia PO reference number
- Vendor selected for the PO
- Employee's name who created the PO
- Approver's name assigned to review PO (if submitted)
- Memo information entered within the PO
- Total value of PO
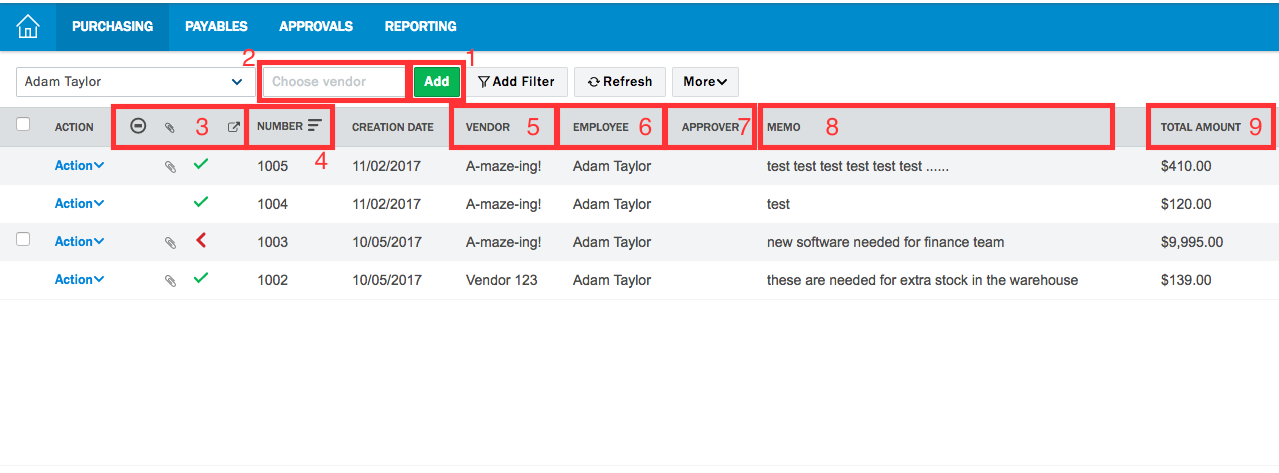
Click the green Add button to create a new purchase order. Double click on an existing order or click the action drop down on the left and select edit to make edits/changes to a purchase order.
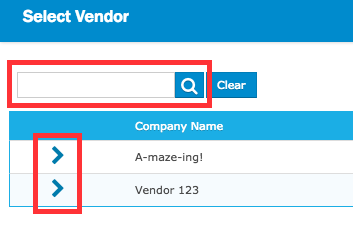
Begin by selecting a Vendor. Click on the magnifying glass next to Choose Vendor to bring up a list of available vendors in your organization.
Search for your vendor by either scrolling through the list or typing their name in the search field. Once you have found your vendor, click the arrow to populate them in the PO.
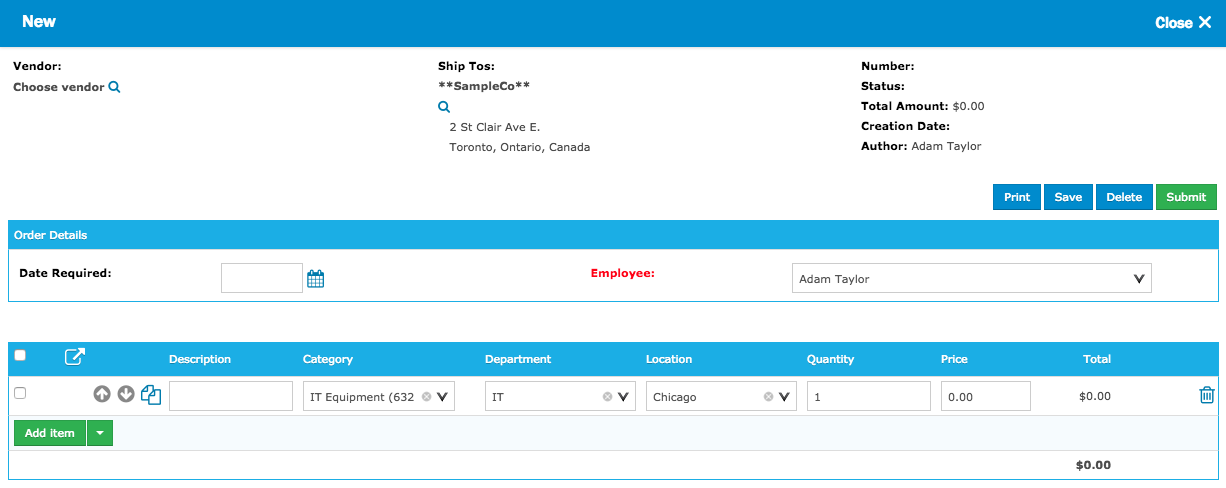
In the Order Details section, the fields you will be asked to fill may vary by organization (if you need help understanding what information needs to be filled in, please speak with your administrator). This information applies to the entire order and will not need to be specified at an item level. (ie. the order is being requested for a single department). Any fields highlighted in red text indicate a mandatory field.
Below the Order Details section will be the Items section. Again, the fields available for you may vary by organization. However, the information entered here can be different on a line by line level. Typically, at very least, you will need to fill in an item description, fill in a quantity and a price per unit.
 Note: The quantity will be multiplied by the price to calculate the total for the line item.
You can add more blank rows by clicking on the Add Item button. The drop down next to it allows you to add a bulk amount of blank rows.
Next, you may be required to enter a Memo for the purchase order. This is typically where additional details go that your approvers or finance teams need to be aware of.
Finally, if made available by your administrators, you can upload attachments to the purchase order after you have entered all the mandatory fields above. Click on Add Attachment > Choose File > Select your file > Open > Ok. You can add multiple attachments and delete ones no longer needed.
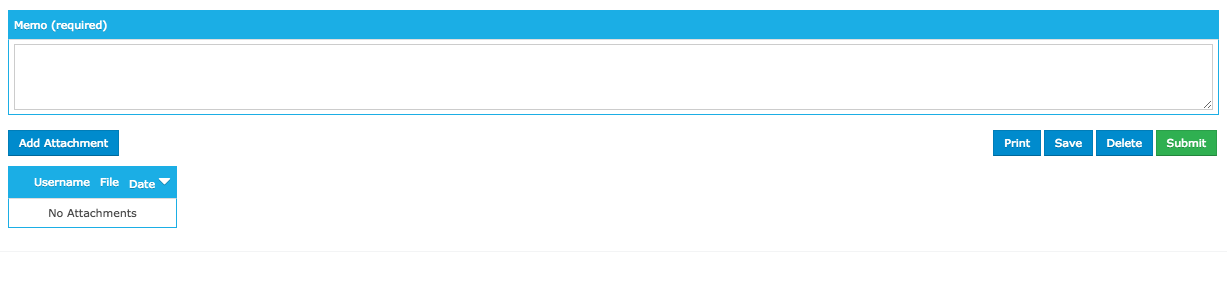
In the top & bottom right corners of the purchase order are options to:
- Print - allows you to print the purchase order
- Save - saves the purchase order in draft status allowing you to close out and come back to the order at a later time.
- Delete - deletes the entire purchase order
- Submit - submits your order into the approval workflow
-
A 24-minute recorded training on creating Purchases and Payables.
- Best practices to create, submit, and approve Purchase Orders
- Best practices to create and submit Payables
- Link Purchase Orders to Payable Items
- Manage bills and invoices sent by Vendors
Administrator Training for Purchasing & Payables Allowing Vendors to Create Bills by Email Approving Payables via Email Notification Enable Payables Approvals via Email Notification Enable Purchase Orders Approvals via Email Notification How to Add Payables/Purchasing Vendors
-
A 30 minute recorded training on how to manage Purchase Orders and Payables.
- Set and modify policy settings for Purchase Orders and Payables
- Review main administrator functions
- Manage data values, such as departments and locations
- Manage Workflow
- Manage Vendors
-
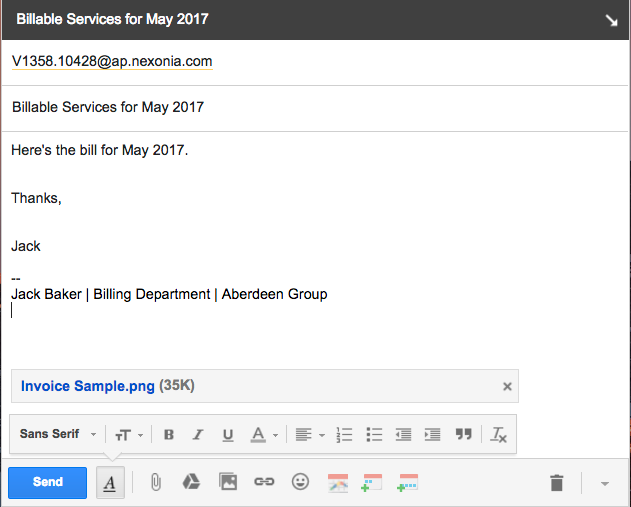
Nexonia’s Payables module allows vendors to email their bills to Nexonia, which will create the draft Payable Bill in your Nexonia account. Each vendor in Nexonia has a specific email address they can send to, which you can provide to them.
Where to Find the Email Address for the Vendor?
Emails addresses are automatically generated for each vendor you have in Nexonia. The address is stored in the vendor profile.
To access the email address, click on the Payables in the menu bar.
Click on the “Manage Vendors” button - this is only accessible to administrators and to any other roles they’ve granted permission to.

Scroll to your vendor and click on the “Manage” gear icon to access the vendor’s profile.

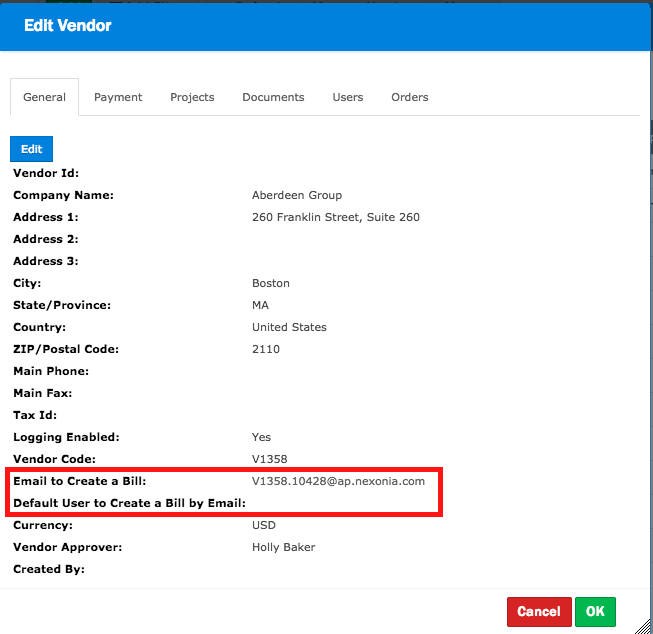
You should see the vendor’s profile now. The first tab on the left is General with the name of the Vendor under Company Name.
Towards the bottom of the menu, you should see the field Email to Create a Bill with the vendor specific email address. This is the email address you can provide to your vendor. The vendor can email their invoice or bill to this address which the bill as an attachment.
How Does the Vendor Email in the Bill?
Once you provide the email address to the vendor, they can email their invoices in to create the bill in Nexonia. The invoice would be attached to the email.
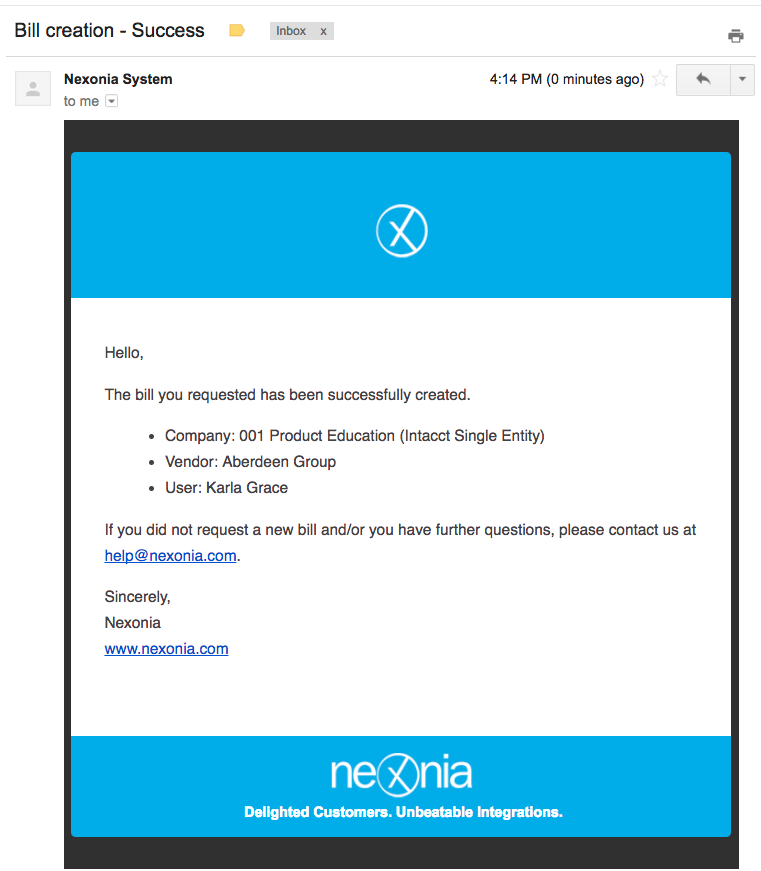
When the email is received, the vendor receives a confirmation email confirming Nexonia received the bill.
What Will The User See in Nexonia?
A draft of a payable bill will be created in the default user account. This bill will have:
- a bill number
- the vendor pre-populated
- email subject line will appear in the memo
- any invoice attachments

Which Nexonia User Account Will the Bill Arrive In?
The default user account is set in administrative settings for Payables:
Settings > Company > Payables > General
Edit the setting Default User to Create Bills by Email to designate whose account the bills should be created in.
 Tip: you could create a generic "dummy" user (ex. "AP Inbox") for the bills sent via email. That way, anyone with proxy or administrator access could easily see what's been received in Nexonia by filtering for that user in the Payables module.
 Note: You can also edit the Vendor’s profile to set a specific default user for that specific vendor.
-
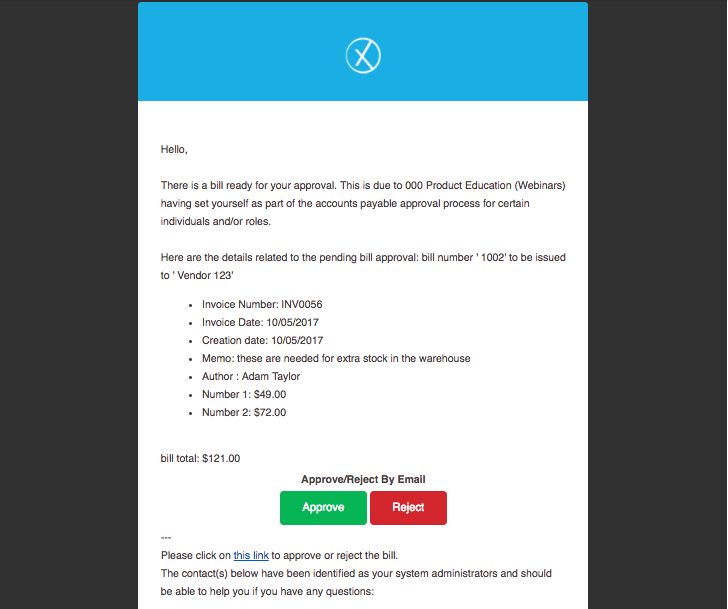
If your administrators have enabled the option to Approve or Reject by email (& the email notification to notify the Assignee when an AP bill has been Assigned), when an AP bill has been submitted to you, you will receive an email from Nexonia with the option to approve or reject in the email.
Tip: If the email notification is also configured to include attachments, you can open any attached documents that were included in the AP bill.Included in the email may be details such as:
- Requestor
- Invoice Number and Date
- Memo details
- Total amount
Click on the Approve or Reject button to take action, or click on the link further below to open the AP bill in Nexonia for additional review.
-
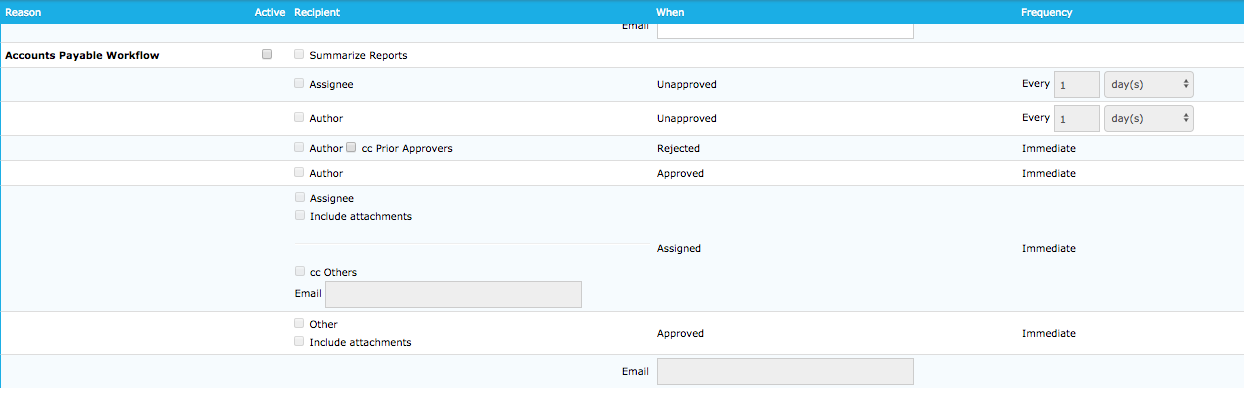
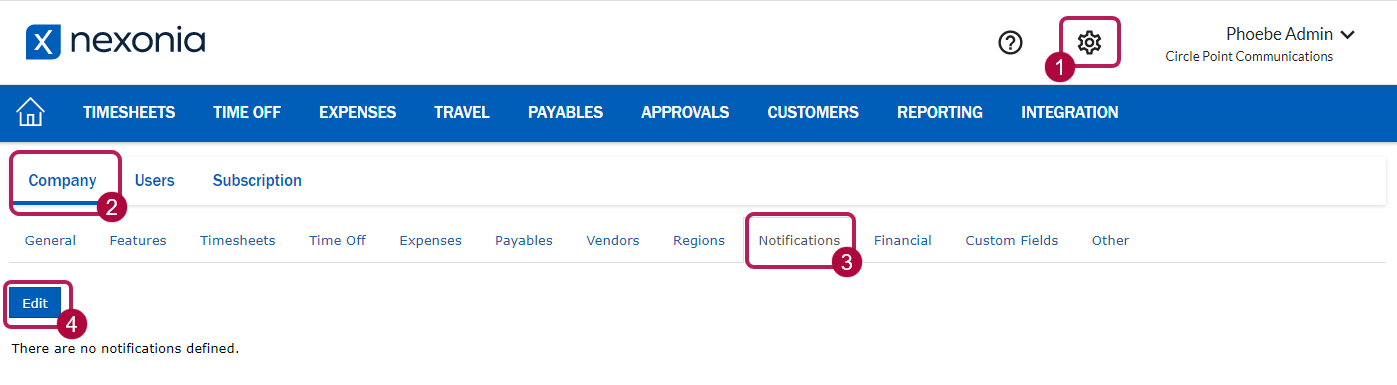
As a Nexonia administrator, you will be responsible for turning on the necessary email notification that your users should receive in order to approve or reject AP bills via email. Navigate to: Settings > Company > Notifications > Edit.

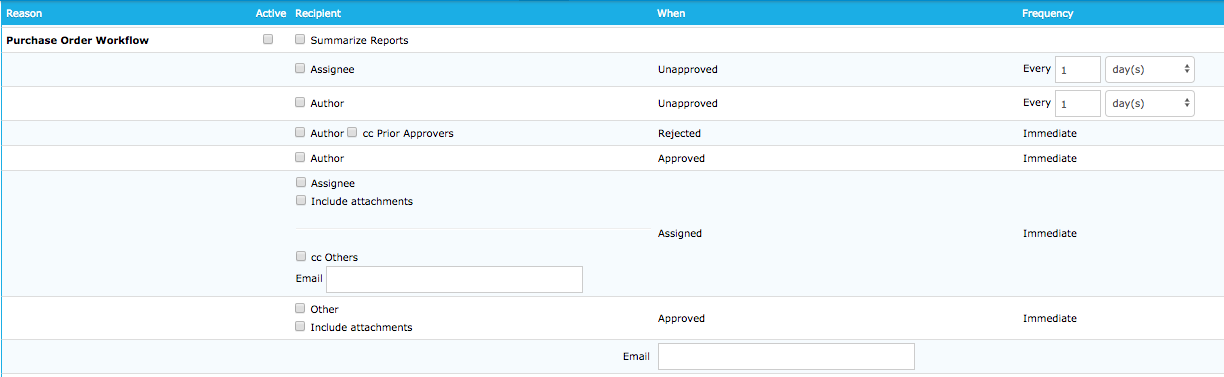
The notification necessary for Approvals via email is:
- Assignee receives notification immediately when a bill has been assigned to them.
- Can include attachments in the email (helpful when making decision strictly based on what information is in the email)
- Can cc Others (enter specific email addresses)
- Assignee receives notification immediately when a bill has been assigned to them.
-
As a Nexonia administrator, you will be responsible for turning on the necessary email notification that your users should receive in order to approve or reject Purchase Orders via email. Navigate to: Settings > Company > Notifications > Edit.
The notification necessary for Approvals via email is:
- Assignee receives notification immediately when an order has been assigned to them.
- Can include attachments in the email (helpful when making decision strictly based on what information is in the email)
- Can cc Others (enter specific email addresses)
- Assignee receives notification immediately when an order has been assigned to them.
-
For a Nexonia account integrated with Intacct/NetSuite, payables/purchasing Vendors can be integrated and imported directly from Intacct/NetSuite. However, for any other integrated or non-integrated accounts, Vendors are locally managed in Nexonia.
To create a Vendor for either Account Payables or Purchase Orders module in Nexonia, log in to Nexonia as an Administrator. Make sure, the Administrator user role has permission to add Vendor. It can be confirmed by going to Settings > Users > Roles > 'Administrator' role > Access Levels. On this page, in the Vendors table, 'Add' and 'Delete' sections are set to be 'Yes'.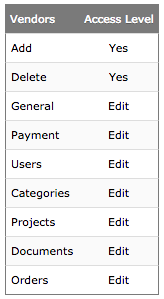
Now, to add a Vendor, navigate to:
Payables or Purchasing module (from the top menu) > Manage Vendors > Add. This will display the vendor record form. Fill up the necessary fields in this form and click on OK from the bottom to add the Vendor.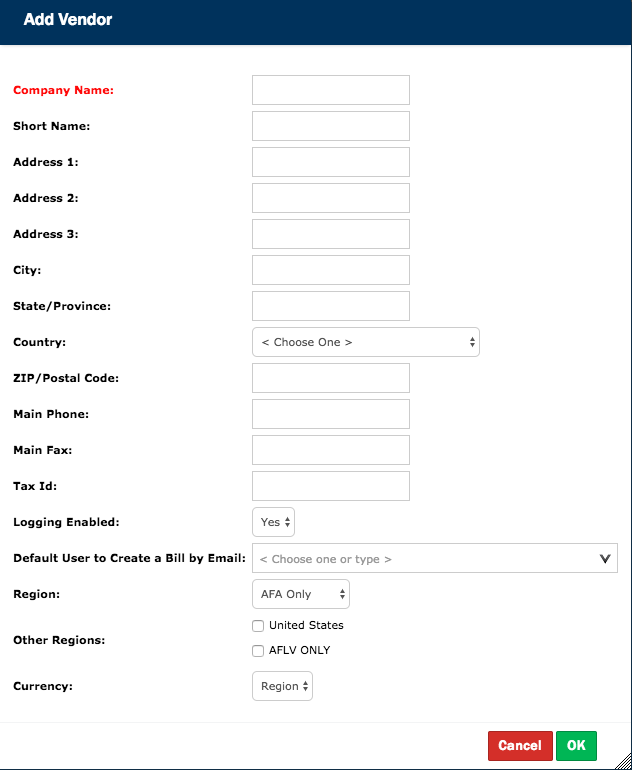
To mention, to edit/update the Vendor information, please, navigate to:
Payables or Purchasing module (from the top menu) > Manage Vendors > Find the Vendor > Click on Manage (gear icon) beside the name of the Vendor. This will expose the setting page for Vendor record.