Nexonia can generate a comma-separated value (.csv) formatted export file. This allows an administrator to export approved expenses for upload into your accounting software. In order to configure this type of export, the administrator will need to:
- Create a Nexonia reporting export template that matches the import template from your accounting system; and
- Configure the Nexonia data integration to run using that reporting export template.
This will allow you to run exports from the Integration module. Exported items will be logged and appended with an Export status, thereby preventing items from being exported twice in and creating duplicates. You can set up multiple filtered exports if needed, if you had one export for employee expenses and one for credit card expenses.
Creating Your Reporting Template (.CSV)
Here, we’ll walk through building the export template.
- Go to the Nexonia Reporting module.
- Click the Create Report
- As you click Apply in each tab, it’ll save changes you made as you go.

You’ll see the basic General information for this report:
Name: name for the report – best practice is to make it clear what it is, i.e. “Accounting Export Template”.
Description: description of the report, you can copy the name here if you want.
Type = Expense
Summary = No
Language = English

Click the Add button.
This will start the report creation process, and now you’ll see the expanded configuration options.
You’ll now use the 5 tabs to configure this export report:
- General
- Selection Criteria: defaults for the report
- Columns: this is where you’ll define the columns of data for this report
- Categories: used to create groupings of results, not typically relevant to export reports
- Order: order of the results, not typically relevant to export reports
Reporting: General Tab
You’ll see an expanded general tab. The only setting to know here is Shared, which can allow you to share this template with all users with access to reporting, or shared with specific roles.
Reporting: Selection Criteria
In normal reporting, this would be used to set filters and defaults for the information being pulled when you run the report as a regular “on demand” report. For our purposes, we don’t need to do anything here – any filtering of values will be done later in the Data Integration configuration for the export.
Reporting: Columns
This is the main tab you’ll need to work on, where you need to indicate which columns of data should be included and in what order to match the import template.
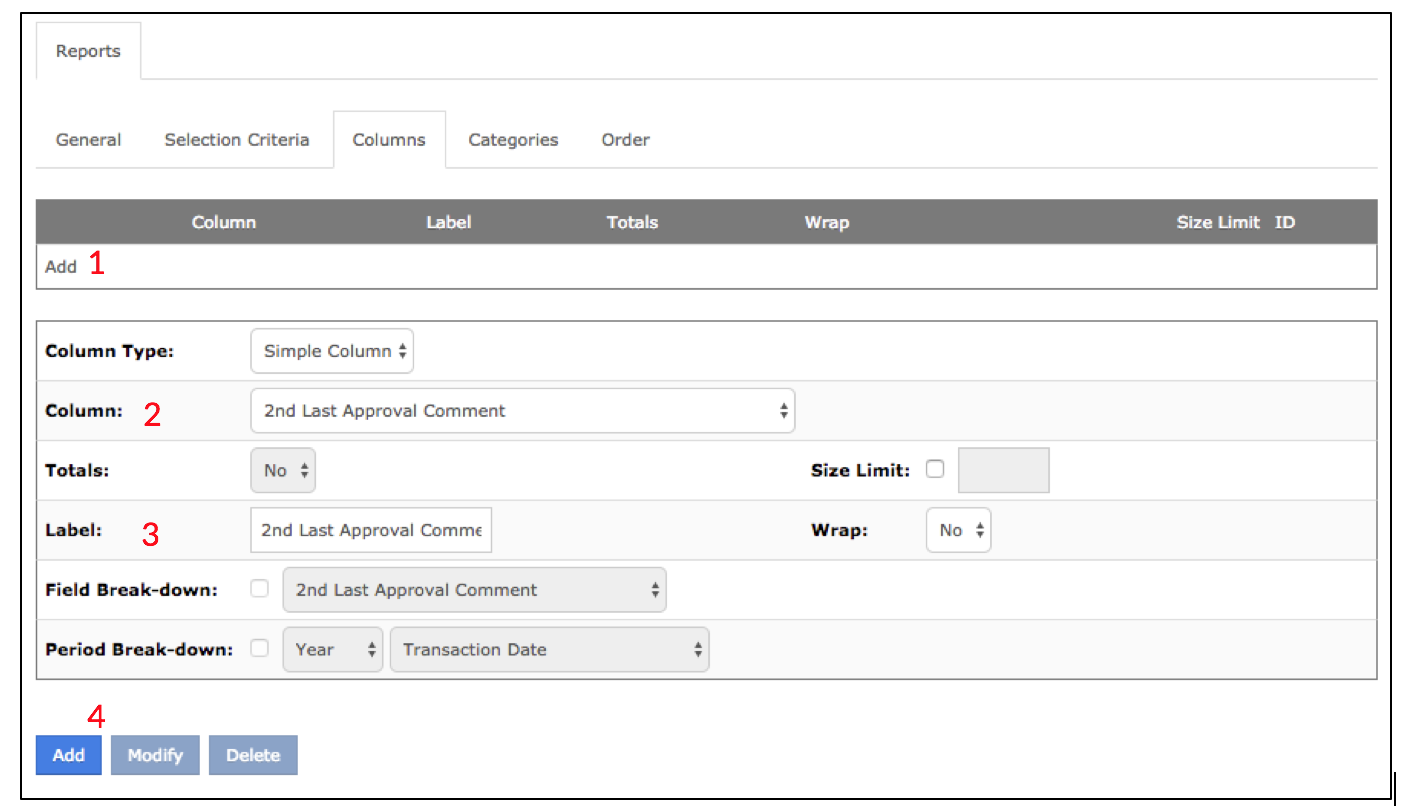
To add a column, click the “Add” (1) link.
Column Type: to add a column of data from Nexonia, leave as Simple Column. You’ll then use the Column (2) dropdown to select which Nexonia reporting value to use in the report:
Simple Column = (most common) allows you to insert a column from a Nexonia value.
Text = allows you to insert a column of pre-defined information into the report, such as a set A/R code. Enter the Text you need on each line item, and the Label for that column.
Label (3): can be used to label the column header with specific text you enter here. By default, it will populate the Nexonia name for the value, but you can modify that.
Click the Add (4): button to add the column to the report. You can also Modify or Delete a column.
Once you add a column, you’ll see it here in the template.

Reporting: Order
Here’s an example of a report that was created. Each column is shown with an Insert link if you wish to insert a new column of data. You can also use the arrows to shift the column order:

And here’s an example of the corresponding export file:

Reporting: Categories
In normal reporting, this would be used to group the results for sub-totals of the information being pulled when you run the report as a regular “on demand” report. For our purposes, we don’t need to do anything here.
In normal reporting, this would be used to order the results of the information being pulled when you run the report as a regular “on demand” report. For our purposes, we don’t need to do anything here. By default, the information runs in date order.
Your report template has now been created. The last step is to set up the export integration.
Data Integration: Exports
You can now configure the export using this template.
- Go to the Integration module.
- Click on the Integration Setup tab.
- Click Add Data Integration. The “Choose Data Type” window will appear.
- Choose Data Type = Expenses, click OK.
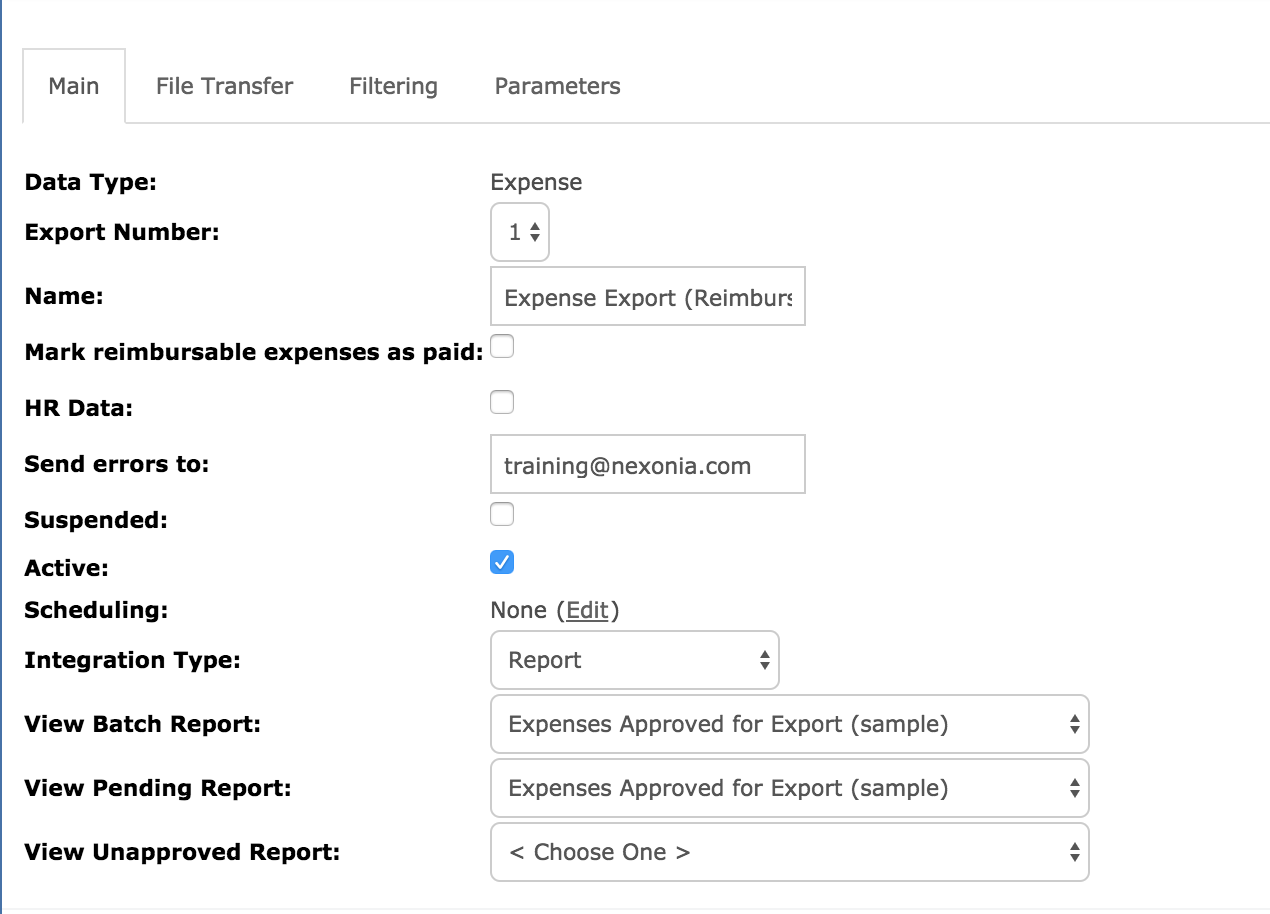
You’ll now see the Data Integration setup window:

Export Number: you can number the exports to identify which export it is. You’d want to number them if you had more than one export.
Name: name of your export
Mark as Paid: this is optional. If checked, when up run your export, any exported items will be marked as “Paid” in Nexonia with the export date as the Paid Date.
Send errors to: enter the email address that should be notified if there are export errors.
Active: check the box off to make this export active.
Integration Type: choose Report. A window will appear and ask you to click OK. This will create additional tabs to appear along the top of the integration window.
View Batch Report / View Pending Report : these are options to use reporting template to view batch or reports pending export. You can choose a reporting template in the dropdown menu.
The additional tabs are:
File Transfer:
Transfer Method:
- Manual Download = will allow you to download the export file when you generate it.
- Upload = allows you to map the export to an SFTP transfer
Generate Empty Files: only check this box if you want to generate empty files when you run the transfer
Filtering: this allows you to filter which expenses should be included in this export.
For example, if this export was specifically for company paid credit card expenses, you might want to filter by the Transaction Source for specific credit card feeds, or Item Types for only Company Paid expense items.
If this report was only for the Employee Reimbursable expenses, you’d filter Item Types for only Personal type of items.
If this report was for a specific region of the company, you’d want to filter by Region.
If this report was to export the Billable Customer expenses, then you’d filter only Billable
Parameters: this is where you indicate the template and format for this export.
Report: select the reporting template you want to use for this export.
Format: .CSV, HTML, PDF, XML (most likely you’ll use .csv)
Click the OK button to save the export settings.
Running the Export file
- Go to the Integration module.
- You should see a tab labelled “Expense Reports”.
- To the left, you’ll see Integration. If you have more than one export, you’ll need to choose which export to run in the dropdown.
- To run the report, click the Transfer Now
- You’ll see a window asking “Transfer the data now?”. Click OK.
- Once it runs, you’ll see a window allowing you to download the file.

Once you’ve run the export, it’ll be logged on Nexonia. You’ll see an Actions link for the export, with the options to:
Download – allows you to re-download the export file.
Undo – allows you to roll back the export file. This will undo the export status all the expense items in the export file. If you need to roll back the export on a specific report, this can be done from the Expenses module. Find the report, click the Actions link and “Reset Export” will be an option if you have Administrator rights.
View/View With – allows you to view the items that were included in the export.

Comments
0 comments
Article is closed for comments.