
These instructions will assist with building a mileage report which can be used by admins or shared with users so they can run a quick report on their mileage for a specific period.
The ability to build and run reports is linked to your Role permission. Administrators typically have this permission built in to their role, and can grant it to other roles if needed.
Link: Configuration Guide to Roles and User Permissions
Designing Your Report: Creating the Report Template
Login to Nexonia on the web and click on the Reporting module.
Click the Create Report button to start the report configuration.
You'll see the General tab appear. Enter the following:
- Name (e.g. "Mileage Report")
- Description
- Type - select Card Transactions
- Summary - select No
Click the Add button.
You should now see the five tabs for configuring the report:
- General - general information and sharing permissions
- Selection Criteria - report template filters and defaults
- Columns - data columns for the report
- Categories - data categorization for the report
- Order - order of the report results
Important: as you update the settings in each tab, it's important to hit Apply at the bottom of each tab to save your changes before moving to the next tab.
General
Most of the information will have been provided on your initial General screen. Here you can also configure:
- Shared - allows the report template to be private, shared with all other users or specific roles
- Header & Footer - you can enter information you'd like to see in the report header and footer
- Include Receipts (PDF) - gives you the option to include the linked map images for the mileage entries. Keep in mind this will increase the size of the report file.
Selection Criteria
This tab allows you filtering of the report data to be included. A number of fields can be set as hidden or visible to users running the report, set with defaults, or locked in with a predefined selection.
For this report, the key values are:
Date Range - establishes the date range range of entries being pulled when this report is run.
- Interval - you can default the period of time most commonly used when running the report: Last Month, Current Quarter, etc.
People - you can set whether the person running the report can select the people to be included in the report results, or lock down the values by using the "predefined" option.
Subset - default to which people will be included in the report. The most commonly used options:
- Default to user - select this if the report is intended so users can report on their own mileage.
- Default to user and subordinates - select this if the report is intended so managers can report on mileage for themselves and their subordinates.
- Default to all visible users - select to include all available users in the results. This would be useful if running department or company wide reporting.
Customers and Projects - disable this criteria if you want to always include all customer and project values.
Expense Category - here you would want to set the report to only include expenses from the mileage expense category(s).
- Select "Predefined".
- Choices = Manual, then click the "Change" link to select the Mileage expense category(s) to be included in this report.
Approval - default to "Approved"
Format - if there's a preference, you can set the default output format for this report.
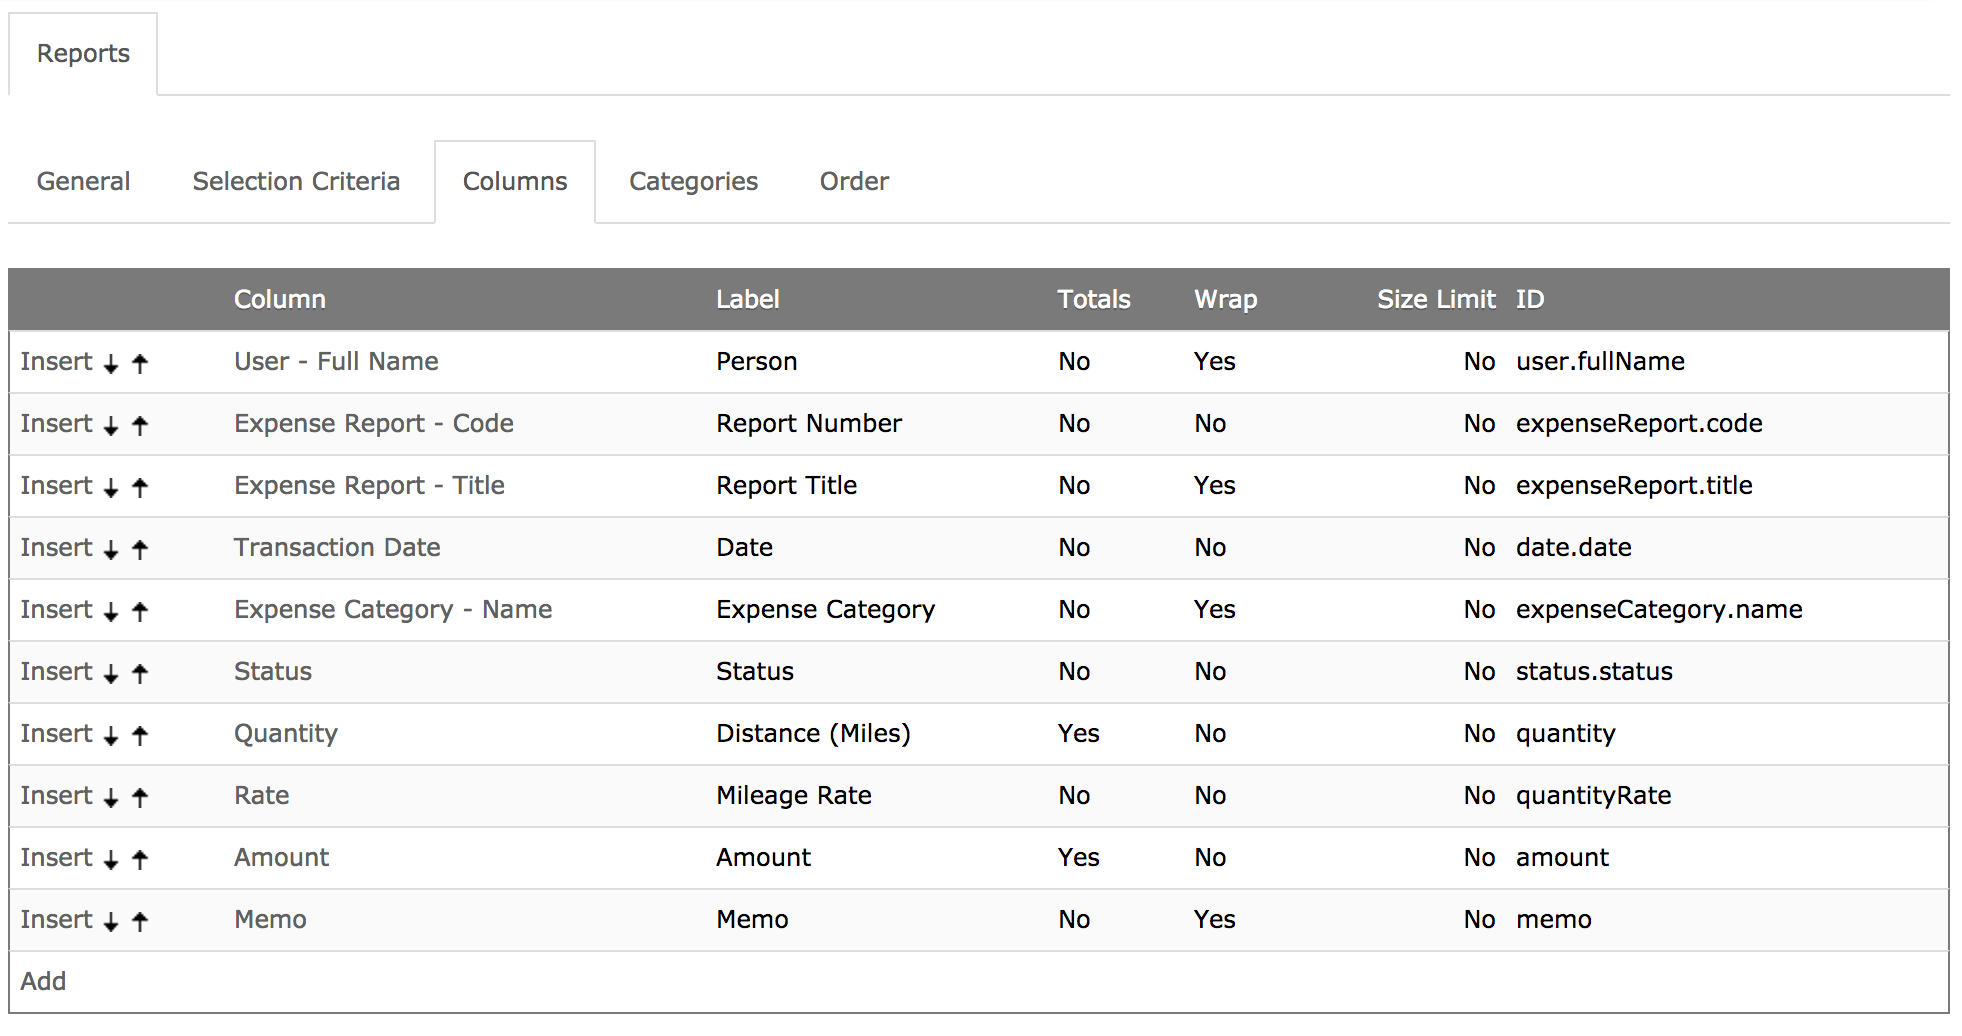
Columns (Data)
The Column tab is where you define what information you want to include in the report. We’ve included some columns of data that can be useful, but you can choose to add others, remove columns or sort them in a different order. Click Add and select the column value below.
| Column Name |
Value |
Purpose |
|---|---|---|
| User - Full Name | Person | Name of the employee |
| Expense Report - Code | Report Code | Expense report number |
| Expense Report - Title | Report Title | Expense report title |
|
Transaction Date |
Date |
Transaction date |
|
Expense Category - Name |
Expense Category |
Name of the expense category |
| Status | Status | Approval status |
| Quantity | Distance |
Total mileage distance. Note: displayed based on the distance unit of the category (miles or km) |
| Rate | Mileage Rate | Mileage rate for this expense. |
| Amount | Amount | Total amount for this expense. |
|
The following fields are optional depending on the amount of detail you need. |
||
|
Distance - Locations |
Distance - Locations |
Includes a list of all the addresses/waypoints entered for this trip. |
|
Distance - Origin Distance - Destination |
Start End |
Include these if you want to see the start and end points of the trip. |
|
Memo |
Memo |
Expense item memo |
|
Billable |
Billable |
Include if tracking mileage as being billable or not. |
Categories and Order
Categories: Categories can be used to group the results and create subtotals for the distance and amount:
- User - group the results by user
- Expense Category - group the results by expense category
- Department - group the results by department if using this dimension on your expense items.
Order: Order is what order are the report results being sorted. For example, you could sort the results by user, then by date.
You have now completed building your reporting template.
Running Your Report
Under the Reporting module, you should see the reporting template you have just built. If you’re not seeing it, double check you don’t have a filter enabled.
Click the Action link to the left of the reporting template and you should see a dropdown menu with your Run option.
You’ll now see your Selection Criteria for the report. Make any adjustments if needed, and then click Run.
Reading Your Report
Here’s an example of our Mileage Report, run as a .CSV and opened in Excel. You can now identify exactly where in the process your credit card transactions are, and if there’s anything outstanding before your billing date.

Here’s an example of our Mileage Report, run as a HTML or PDF.

Comments
0 comments
Article is closed for comments.