![]() Note: In order to create reports, your role permissions must allow you Design or Share access to Reports. If you need to learn more about your role, please speak with your administrator.
Note: In order to create reports, your role permissions must allow you Design or Share access to Reports. If you need to learn more about your role, please speak with your administrator.
The design and output of summarized reports are different from standard reports. The design will be covered in detail throughout the article. The output of a summary report will show a one line total value (meaning that there won't be the detail of each transaction or time entry). Examples of this could be:
- Monthly Spend Across Expense Categories
- Monthly User Timesheets
To access Nexonia's reporting tool, select Reporting along the navigation bar. Click on Create Report.

Enter in the following fields to create the report in Nexonia, then click Add.
- Name: Title of the report
- Description: A Description of the report can go here, its not mandatory
- Type: Select the type of report you would like to create. These values pull information from different areas of Nexonia (ie. Time[sheets] or Expenses)
- Summary: Yes will create a summarized report.
![]() Note: The Type & Summary options cannot be changed later.
Note: The Type & Summary options cannot be changed later.
![]() Note: An Expenses type of report can only generate results based off an existing expense item (company and/or employee paid). Card Transactions can report on any credit card transaction that exists in Nexonia (either linked to an expense or not).
Note: An Expenses type of report can only generate results based off an existing expense item (company and/or employee paid). Card Transactions can report on any credit card transaction that exists in Nexonia (either linked to an expense or not).
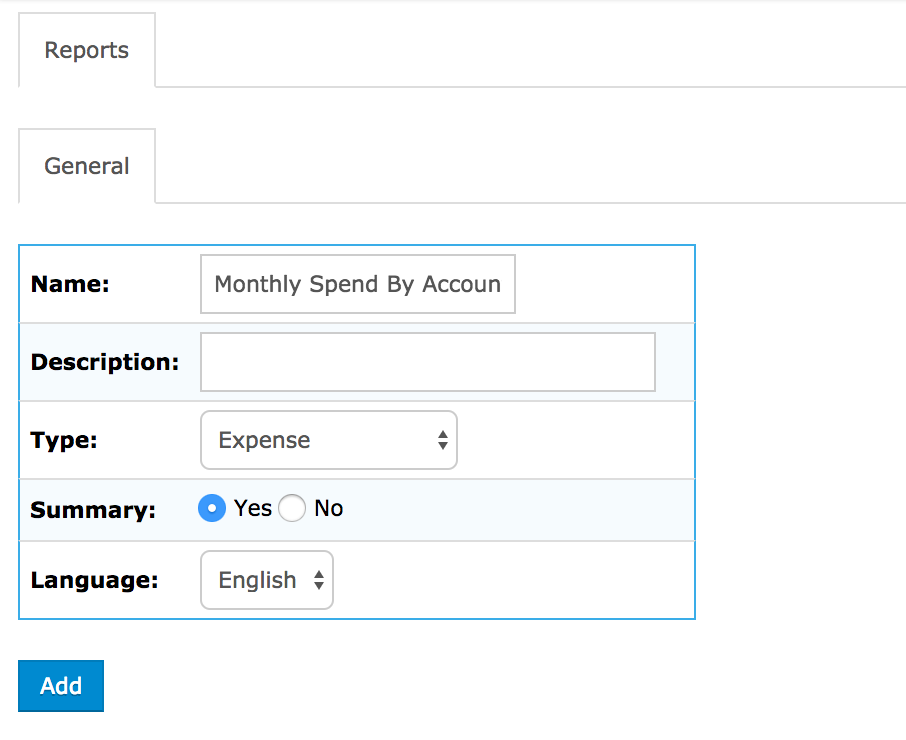
Upon creation, there are 5 tabs that are used to define the report and its behavior.
General
This is where the title and description can be edited along with adding keywords to the report. Here will also be the option to choose if you'd like to share the report so that users with other roles can run the same report.
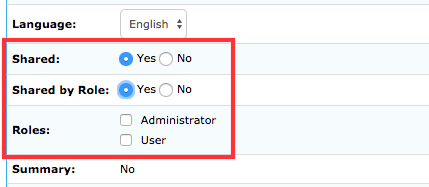
- Shared: No (default) means that only the author and administrators can run the report. Yes allows you to share the report so other users will be able to run the same report.
- Shared by Role: No (default) means that all users will be able to run the report because there is no filter set on who to share with. Yes allows you to pick which Nexonia roles to share the report with (who will have access to run the report).
- Roles: Check which roles the report should be shared with.
- Shared by Role: No (default) means that all users will be able to run the report because there is no filter set on who to share with. Yes allows you to pick which Nexonia roles to share the report with (who will have access to run the report).
- Header: Values entered here will appear at the top of the report.
- Footer: Values entered here will appear at the bottom of the report.
- Lines in Header (CSV): The value entered here determines the row number that data will start appearing in a CSV exported report.
- Include Receipts (only available in PDF): No (default) means that no receipts will be included in the report, All means that every receipt added will be included and Linked means that only the receipts that are linked to the reported expenses will be included.
- When Editable is checked, the user will be able to change this preference at the time of running the report.

Selection Criteria
In this section, you have the ability to define the parameters under which a report can be run. Most parameters have 3 options:
- Disabled: When selected, the user will not be prompted to make any selection or add any filter. For the output of the report, all data related to this parameter will be included.
- Selected when the report is run: When selected, a report default can be set, but the user will have the opportunity to update this parameter at the time of running the report.
- Predefined: The values to be included in the report must be defined here and will not be editable by the user when running the report.
![]() Note: The Customers and Projects values are sometimes re-labeled in the interface settings to suit your requirements. The below screenshot shows what the Nexonia Customer and Project root values are.
Note: The Customers and Projects values are sometimes re-labeled in the interface settings to suit your requirements. The below screenshot shows what the Nexonia Customer and Project root values are.

In linear fashion, the next tab to visit is Columns. However, most column options are restricted until the parent Category has been added to expose all of the column options. So here is where we will skip to the Categories section and return back to the Column section after.
Categories
In a summarized report, Categories serve a couple purposes.
- The main purpose is to expose column values to include a report. Think of which values are important for your report and ensure to turn on the category that represents that.
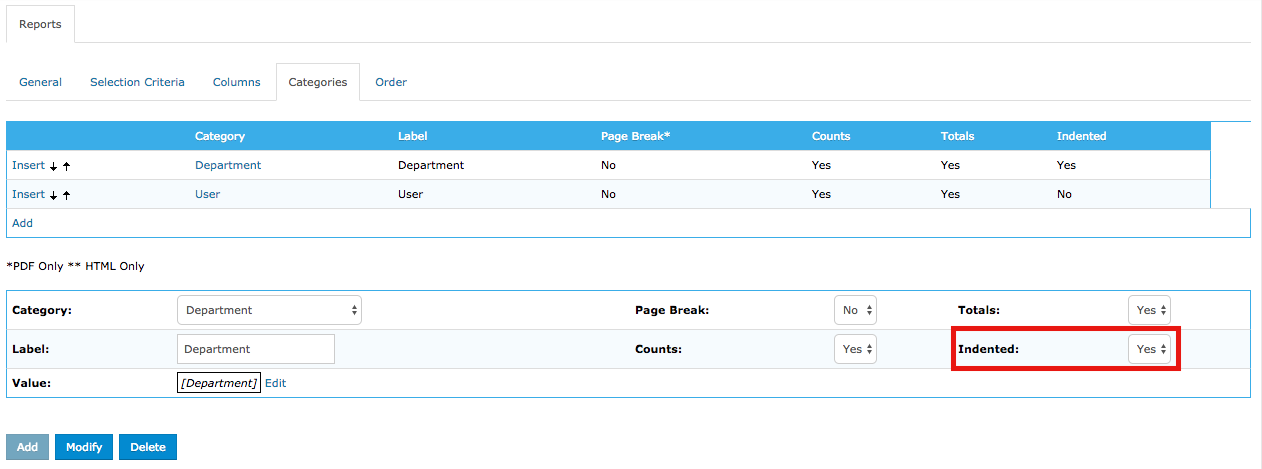
- The secondary purpose is to group results by whatever category values are selected. As an example, if we are reporting on the monthly spend across expense categories, we may want to group results together by department.
- Its likely your report will contain multiple categories. In this case, order them by importance of how grouping should be done. Another example here is we can start with Department, and within each Department we group by User.
To create a new category, click Add near the top, define the category by selecting a value from the Category dropdown, then click Add at the bottom.
![]() Note: If you would like to generate subtotals by any of the categories, you will need to set the Indented value to Yes.
Note: If you would like to generate subtotals by any of the categories, you will need to set the Indented value to Yes.
Columns
In this area, you will be able to define which values of information will be reported on. To create a new column, click Add. From the dropdown of options, you'll have a short list available plus the columns related to the parent categories you turned on previously.

To create more simple, straight forward reports, not all of the below options will be necessary to set. When creating new reports or modifying existing ones, typically only the Column and Label fields would be utilized.
- Column: The value selected here pulls from an existing Nexonia object (ie. Amount will report on the Total field from an expense item).
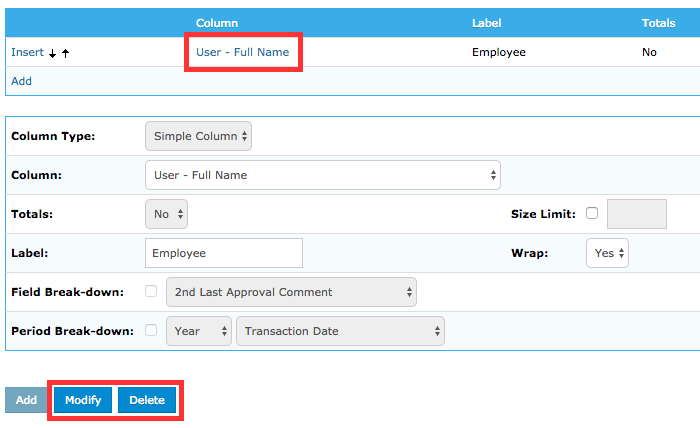
- Label: This is the output column header for the final report. Change this to reflect whatever is preferred to reference the column value (ie. User - Full Name is a Nexonia column, "Employee" is an example of a more common reference and label for this column)
Once the column has been defined click Add at the bottom. Repeat the process until all preferred columns are added.
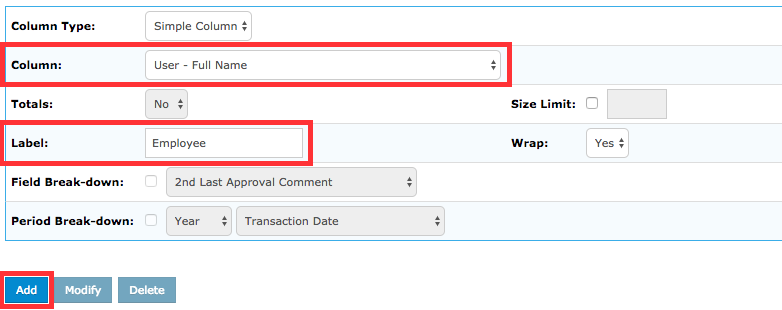
If any column need to be modified, click on the Column, change any values necessary, then click Modify at the bottom. To delete, click on the Column, then click Delete at the bottom.
Order
Defining an order value allows you to organize results based on specific criteria (ie. you can sort results by Status or Amount). If no order is set, the results will be sorted by date (oldest first).
![]() Note: If categories are set, they will be sorted alphabetically. The order value selected only applies to the results.
Note: If categories are set, they will be sorted alphabetically. The order value selected only applies to the results.
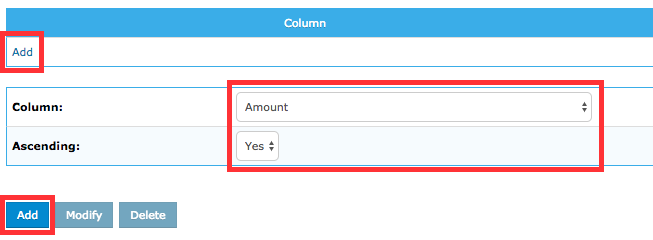
To create a new order value, click Add near the top, define the order using the Column dropdown. The results can be set to ascend or descend, then click Add at the bottom.

Comments
0 comments
Article is closed for comments.