These instructions will assist with building a basic credit card reconciliation report for corporate or business credit cards integrated with Nexonia. This report is best run as a .CSV file which you can open in a spreadsheet program like Excel, allowing you to easily view and filter the results.
The ability to build and run reports is linked to your Role permission. Administrators typically have this permission built in to their role, and can grant it to other roles if needed.
Link: Configuration Guide to Roles and User Permissions
Designing Your Report: Creating the Report Template
Login to Nexonia on the web and click on the Reporting module.
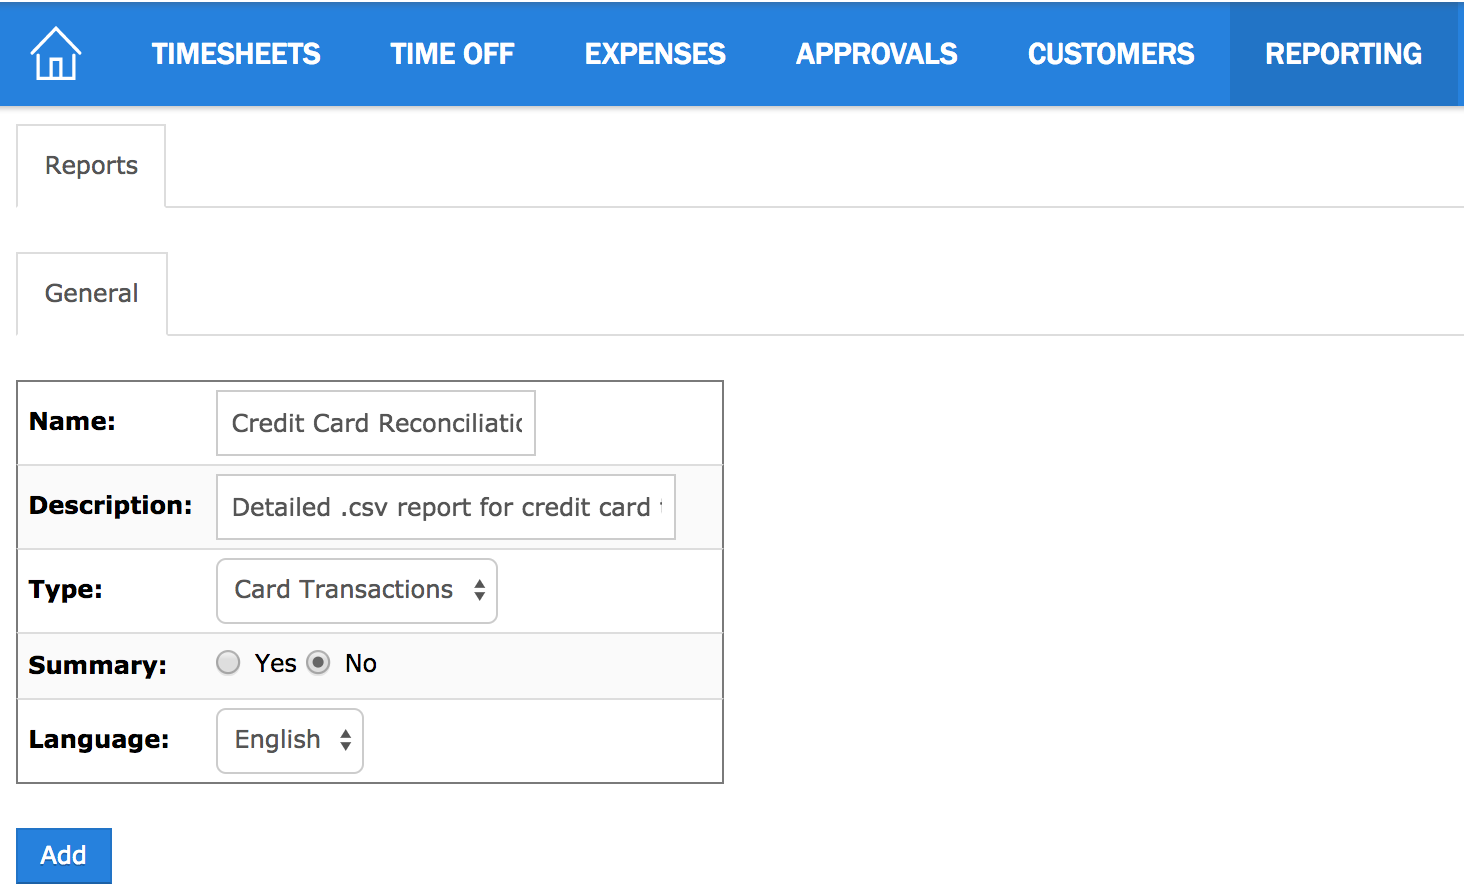
Click the Create Report button to start the report configuration.
You'll see the General tab appear. Enter the following:
- Name (e.g. "Credit Card Reconciliation Report")
- Description
- Type - select Card Transactions
- Summary - select No
Click the Add button.

You should now see the five tabs for configuring the report:
- General - general information and sharing permissions
- Selection Criteria - report template filters and defaults
- Columns - data columns for the report
- Categories - data categorization for the report
- Order - order of the report results
Important: as you update the settings in each tab, it's important to hit Apply at the bottom of each tab to save your changes before moving to the next tab.
General
Most of the information will have been provided on your initial General screen. Here you can also configure:
- Shared - allows the report template to be private, shared with all other users or specific roles
- Header & Footer - you can enter the information you'd like to see in the report header and footer
Selection Criteria
This tab allows you filtering of the report data to be included. A number of fields can be set as hidden or visible to users running the report, set with defaults, or locked in with a predefined selection.
For this report, the key values are:
Date Range - establishes the date range of entries being pulled when this report is run. The dates here would be the Transaction Dates.
Note: if you have the following information available in your credit card feed, you could choose to use an alternate date range instead of the default Date Range: Creation Date, Posted Date, Statement Date.
If you choose to use an alternative date range, it’s best to disable the default Date Range.

Card Transaction Sources - optional filter, can be used to filter specific credit card feeds to be included in this report. By default, all available corporate card feeds will be included in your reconciliation report.
Status - filters which transactions should be included in the report, based on transaction status:
- Open means the credit card transaction is assigned to a user but has not been added to an expense report as an expense item.
- Linked means the transaction has been added to an expense report and exists as an expense item.
- Ignored means a transaction has been ignored by the administrator and filtered from view. This is something only Administrators can do.
We recommend checking off “Open” and “Linked” as your defaults.
Format - output format for this report.
Columns (Data)
The Column tab is where you define what information you want to include in the report. We’ve included some columns of data that can be useful, but you can choose to add others, remove columns or sort them in a different order. Click Add and select the column value below.
| Column Name |
Value |
Purpose |
|---|---|---|
|
Card Source Name |
Credit Card Feed Name |
Which credit card feed is the card from |
|
Card - Name on Card |
Name on Card |
Cardholder’s name |
|
Statement Date |
Statement Date |
Statement Date |
|
Date |
Transaction Date |
Transaction Date |
|
User - Full Name |
Nexonia User Name |
Name of the Nexonia User who has been assigned that transaction |
|
Vendor |
Credit Card Vendor |
Merchant's name or Vendor Name |
|
Description |
Credit Card Description |
Description field from the card provider |
|
Amount |
Transaction Amount |
Amount of transaction |
|
Status |
Transaction Status |
Status of the credit card transaction |
|
Expense Report - Code |
Expense Report Code |
If the transaction has been linked, you’ll now see which expense report code it’s been linked to. |
|
Expense Report - Title |
Expense Report Title |
If the transaction has been linked, you'll see the title of the report. Also, a handy way to know if a transaction is on a user's Unfiled Expense section. |
|
Approval Status |
Expense Approval Status |
The status of the expense item the transaction has been linked to. |
|
Current Approver |
Current Approver |
If the expense item is unapproved, who is it currently assigned to? |
|
Exported |
Exported |
Was the approved transaction exported? |

Categories and Order
Categories: Categories are not used typically in a credit card reconciliation report. They only apply to the PDF and HTML formatted reports, and allow you to group together results to create sub-totals. You can leave this tab blank typically.
Order: Order is what order are the report results being sorted. For example, you could sort the results by Statement Date, then by User.
You have now completed building your reporting template.
Running Your Report
Under the Reporting module, you should see the reporting template you have just built. If you’re not seeing it, double-check you don’t have a filter enabled.
Click the Action link to the left of the reporting template and you should see a dropdown menu with your Run option.
You’ll now see your Selection Criteria for the report. Make any adjustments if needed, and then click Run.
Reading Your Report
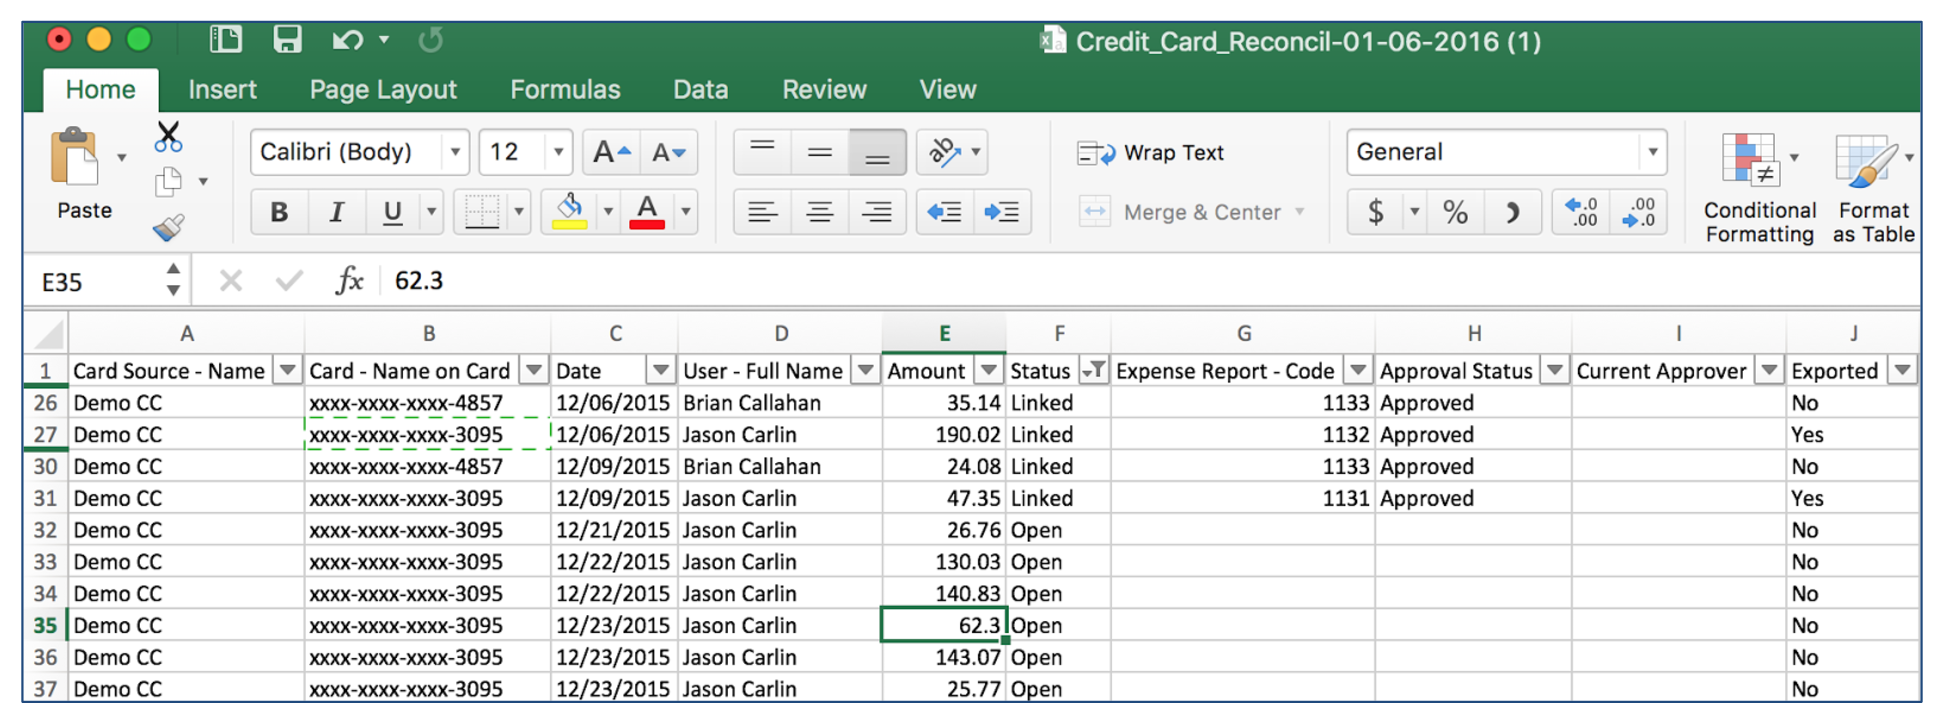
Here’s an example of our Reconciliation Report, run as a .CSV and opened in Excel. You can now identify exactly where in the process your credit card transactions are, and if there’s anything outstanding before your billing date.
Tip: Filters in Excel can be useful for identifying specific info, like all unexported or unapproved transactions.


Comments
0 comments
Article is closed for comments.