Nexonia has the ability to calculate tax amounts for expense items. Tax profiles are able to:
- calculate Receipt Taxes
- calculate Claimable Taxes (sometimes called “Input Tax Credit” or “ITC” or "Recoverable Tax")
- calculate Expense Category based variations on the taxes
Administrators can create multiple tax profiles as needed. Each tax profile can be updated with each year’s version of the tax rates and the effective date of those rates.
Tax profiles can also be filtered:
- based on the currency of the expense item (most common).
- user’s reimbursable currency.
- by region.
- by role.
Typically, the claimable tax amount that will be exported into your accounting or ERP platform as part of your existing export. The mapping of the tax values will be provided by you in the tax profile.
Configuring Taxes will require the following steps:
- Enabling the Value Added Tax feature on your account
- Defining your Tax Rules
- Creating the Tax Codes
- Creating the Tax Profile and Rate Versions
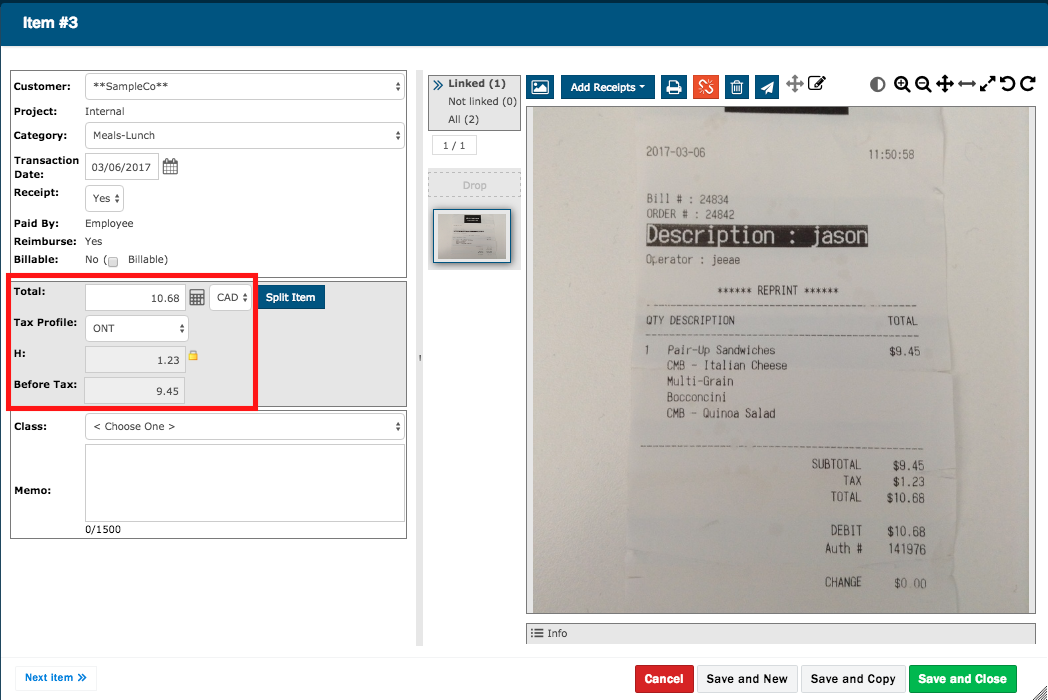
1. Enabling Value Added Taxes
Taxes are not enabled by default. To enable the value-added tax feature, the administrator can log in to Nexonia on the web and navigate to Settings > Company > Features.
Scroll to the section of features labelled “Expense Reports”.
Check off Track Value Added Taxes to enable the feature.
Scroll to the bottom of the Features list and click the Apply button.
2. Defining Tax Rules
The tax calculations required need to be provided by the customers. We recommend using the attached template “Policy Template with VAT” to organize the taxes requiring setup.
There are two key pieces to each VAT setup:
Tax Codes - the type of tax. This may be an internal code or one used in your accounting or ERP, which would be needed as part of the export parameters.
Tax Profiles - defined typically by region, a tax profile would include the version of the tax rates, effective date, category exemptions, which tax codes to use, and GL associations.
For example, for Ontario taxes in Canada you would set up two tax codes HST and HST - Claimable. Then, you’d define your tax profile called “Ontario” with the version of the tax rates.
Once the feature is enabled, you can set up taxes. Navigate to Settings > Company > Financial.
You should see two tabs: Tax Codes and Tax Profiles. We first need to set up the Tax Codes.
3. Creating the Tax Codes
Create a tax code for each receipt tax type and claimable/ITC tax type.

Fill in:
- Code - Accounting or ERP ID for the tax code
- Description
- Number - optional, can be used in reporting or exports
Click the Add button to add the Tax Code.
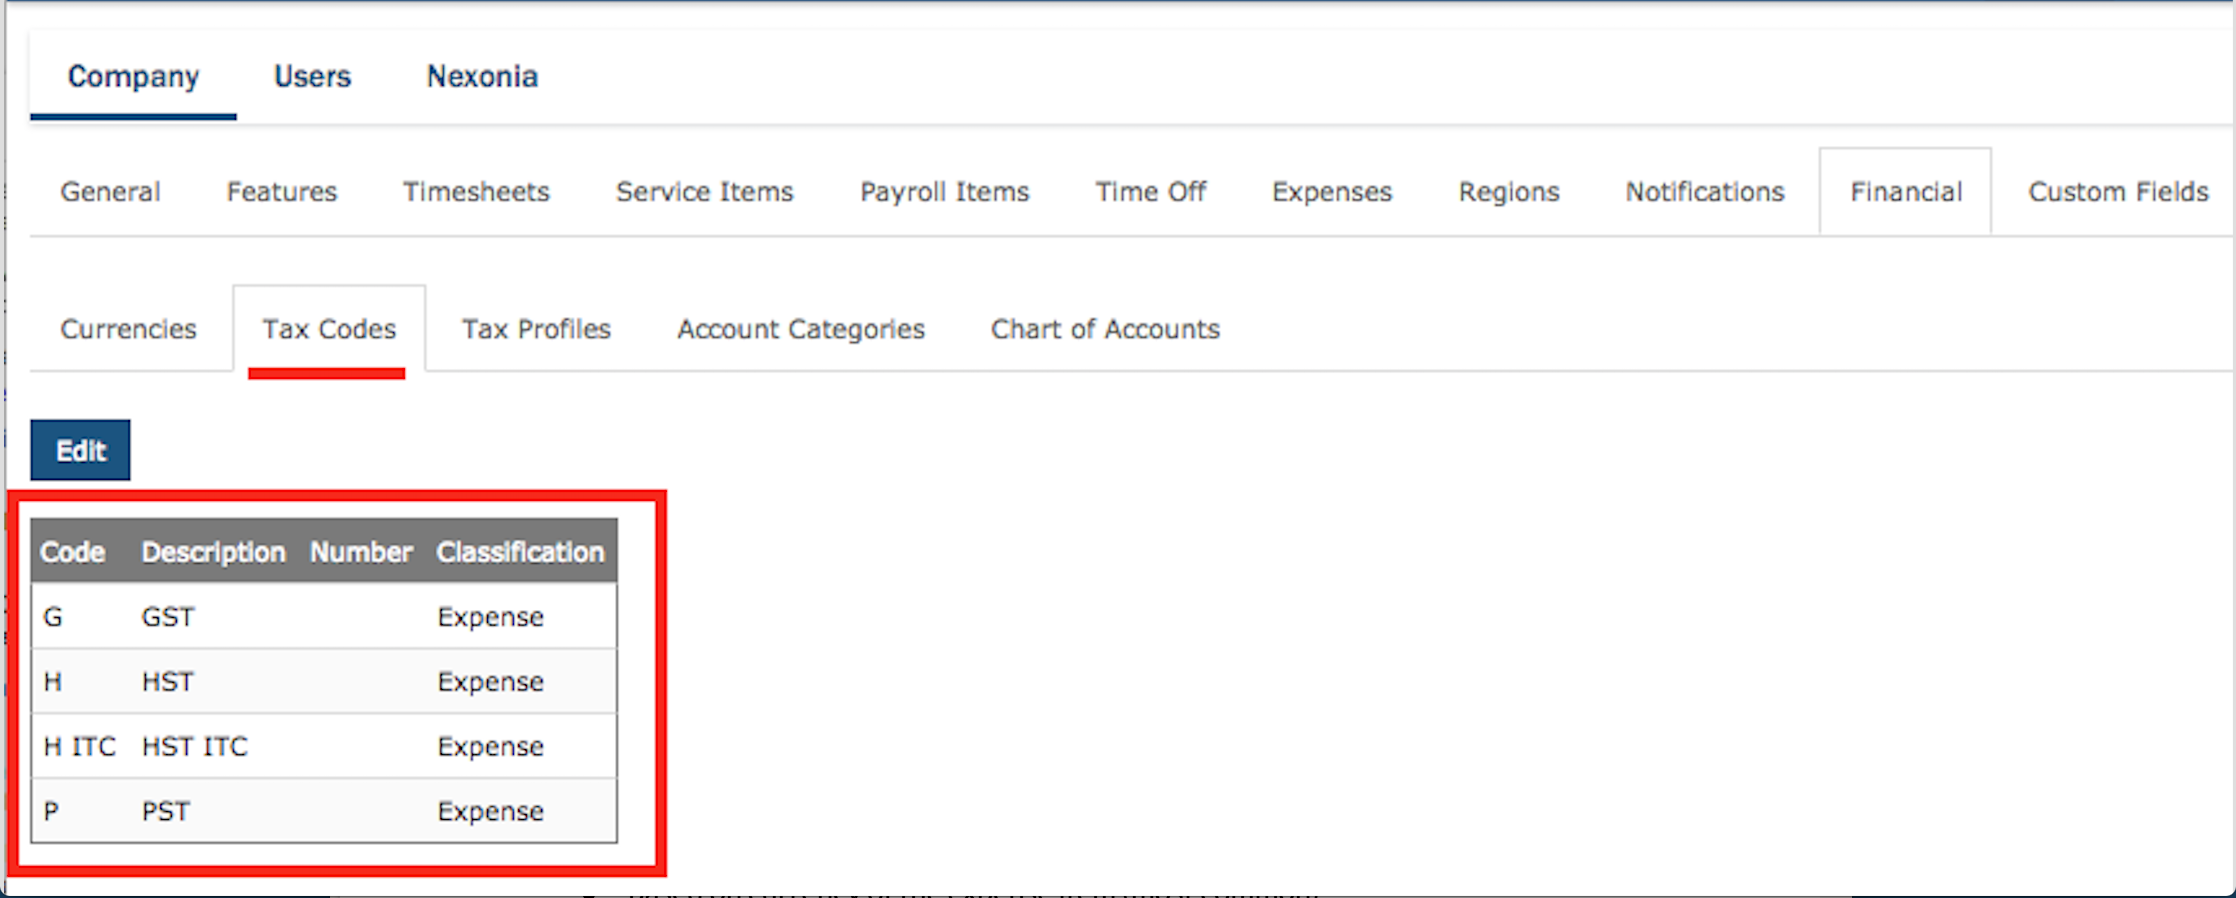
Examples of Tax Codes:
|
Code |
Description |
|
GST |
Goods and Services Tax |
|
GST-C |
Goods and Services Tax - Claimable |
|
HST |
Harmonized Sales Tax |
|
HST-C |
Harmonized Sales Tax - Claimable |
|
QST |
Quebec Sales Tax |
|
VAT |
Value Added Taxes |
|
VAT-C |
Value Added Taxes - Claimable |
4. Creating the Tax Profile:
Once you’ve created your Tax Codes, it’s time to create your Tax Profile. You’ll typically want to create a Tax Profile for each region you operate in, based on tax variations - in Canada, for example, you’d create a tax profile for each province you do business in.
Tip: once you create the initial Tax Profile, you can duplicate it and adjust the copy.
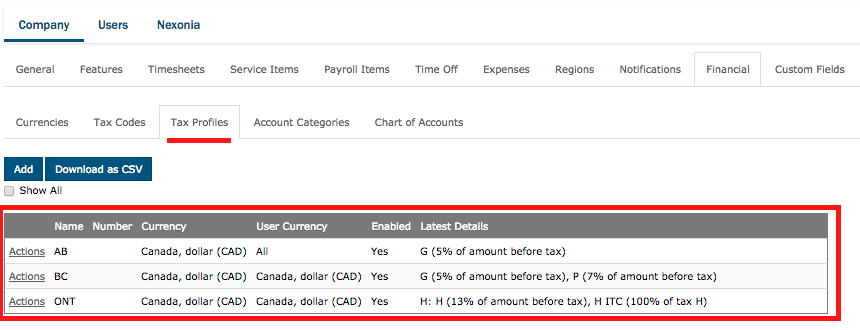
To create the tax profile:
Navigate to Settings > Company > Financial > Tax Profiles
Click the Add button to create the new profile.
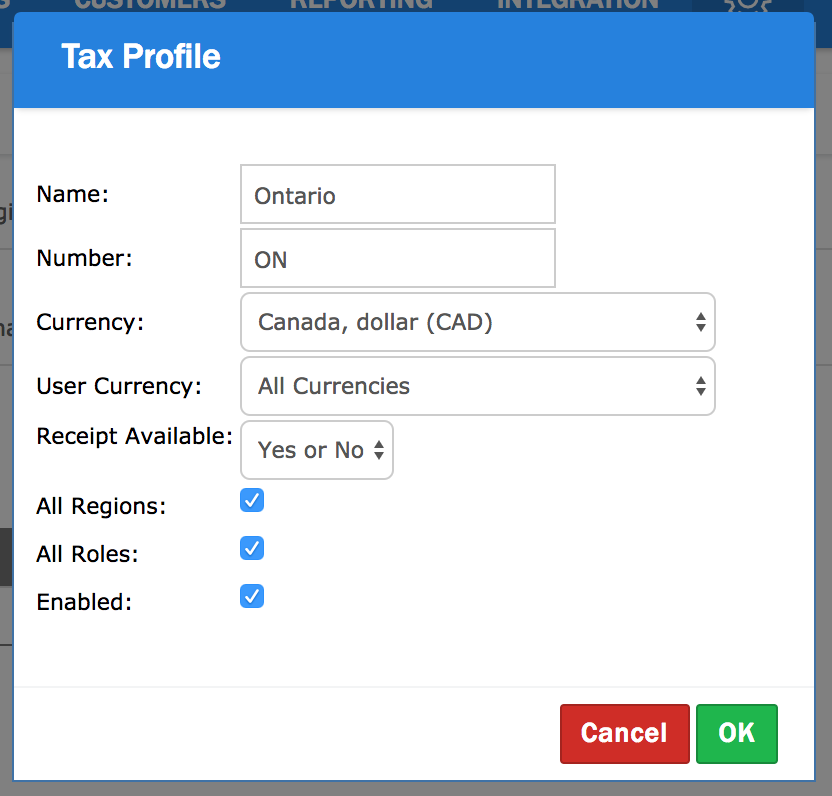
The general tax profile fields are:
-
Name (required)
-
Number (optional, but could be used for reporting purposes)
-
Currency - currency filter for this tax profile. For example, if this was a UK tax profile, you could filter it by UK Pounds (GBP).
-
User Currency - filter profile by user currency
-
Receipt Available - filter tax profile by receipt availability. Default is “Yes or No” and is commonly left this way.
-
All Regions - uncheck this box to filter tax profile by region
-
All Roles - uncheck this box to filter tax profile by roles
-
Enabled - if checked, this tax profile is active
Click the OK button to save and continue configuring the tax profile.
You should now see the Tax Profile window. The header of the profile will contain all the general information. We now need to add the Version, representing the tax rates.:
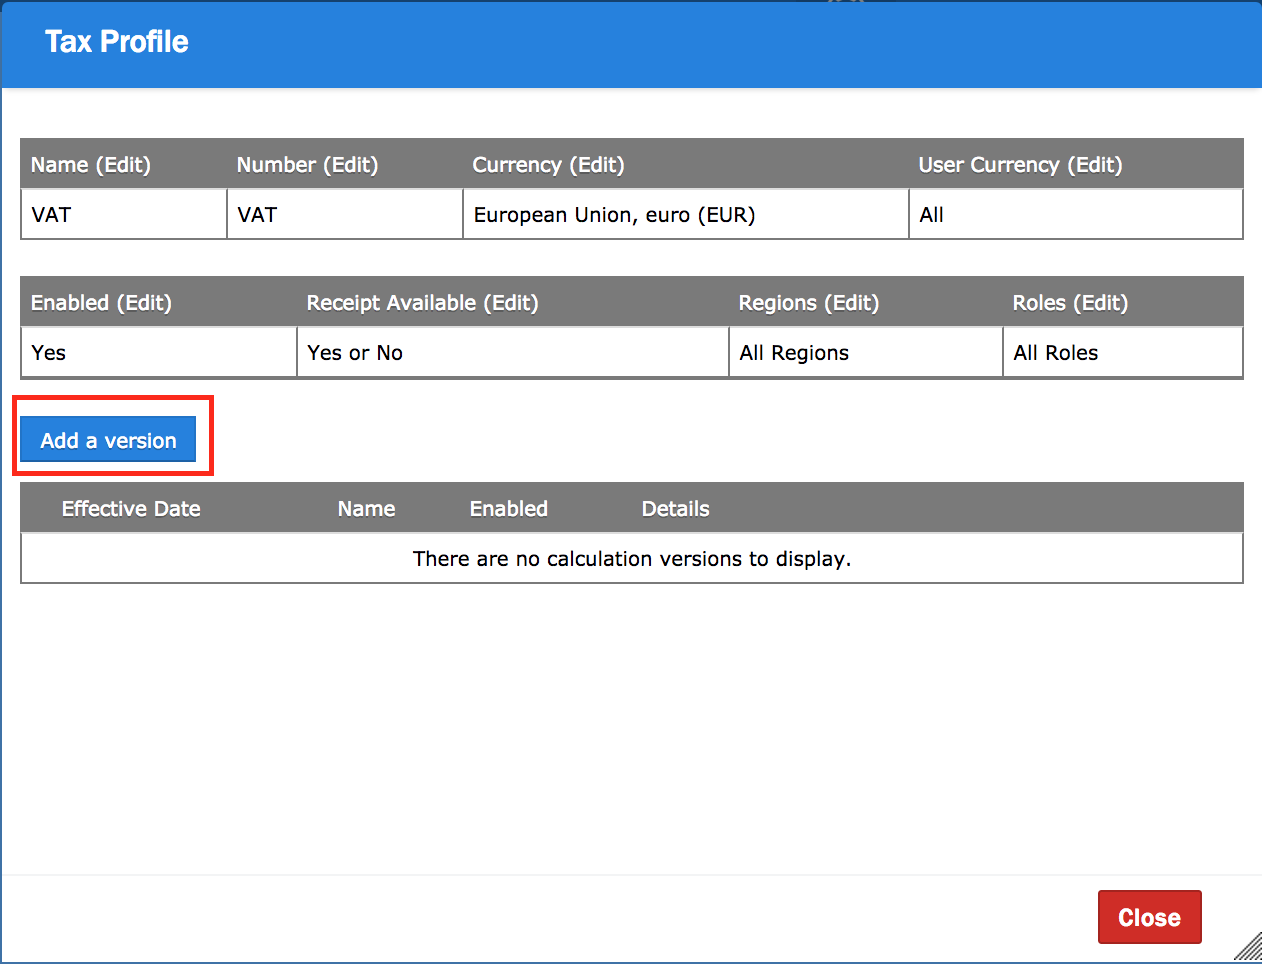
Tip: once you’ve created the initial version, you can copy it and update it each new tax year.
Click the Add Version button.
Enter the Effective Date for this version of the taxes, and the Name (typically including the year).
Click the OK button - you’ll then see the Details window.
Navigate to the section that says “Details” and click the Edit link next to it.
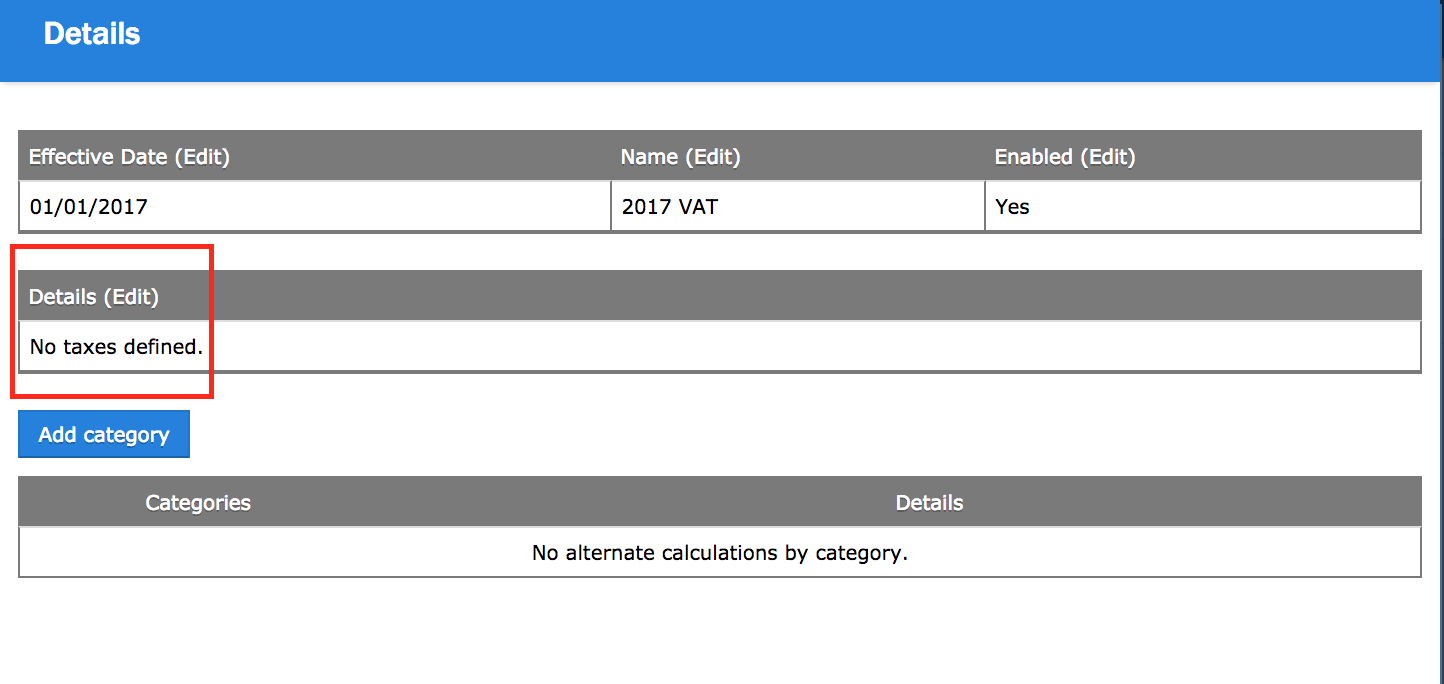
You’re now in the Taxes window where we configure the tax rates.
At the top is a Code field. Fill in the tax code which will need to be exported to your ERP or accounting system. The Number is optional and used for reporting.
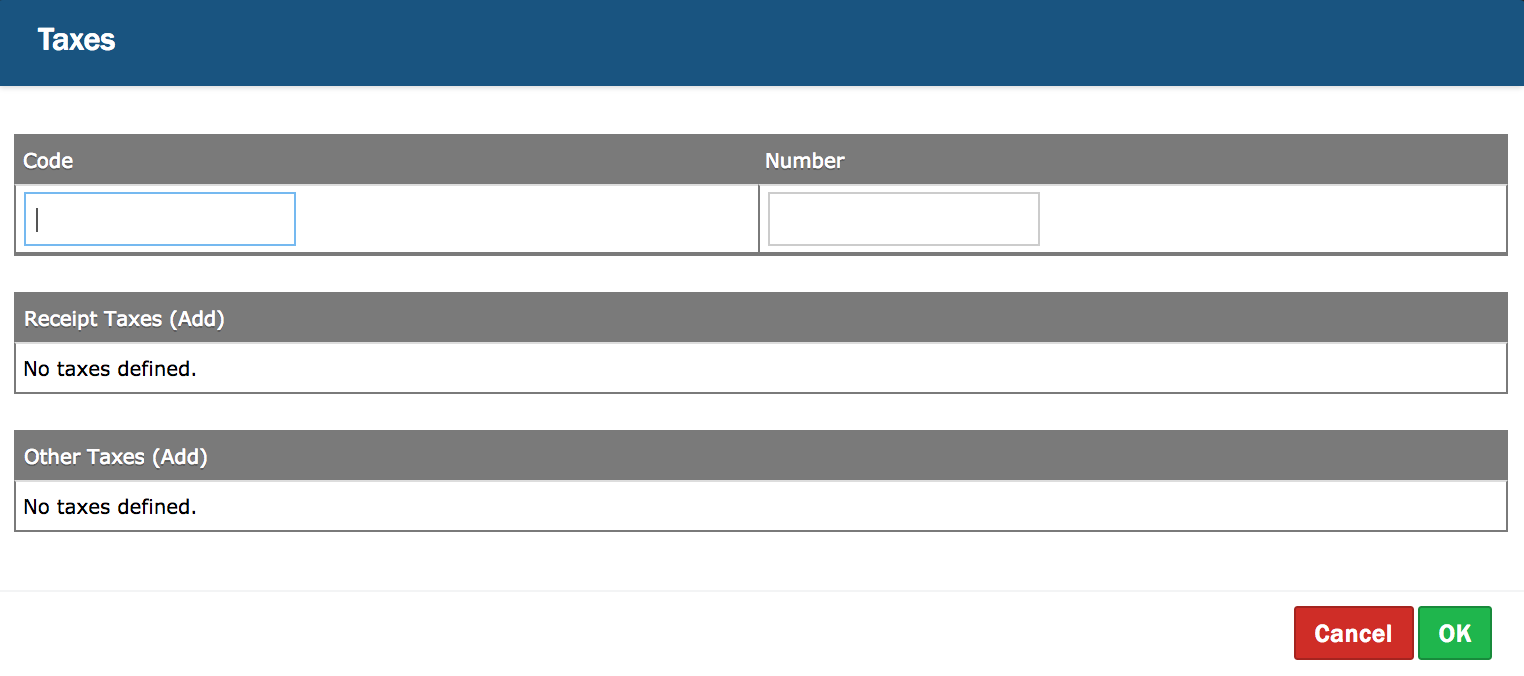
Navigate to the section “Receipt Taxes” and click the Add link.
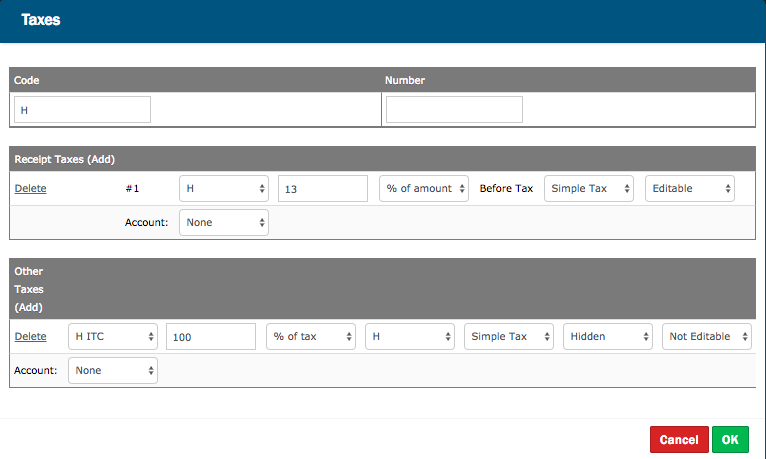
This is where we configure the tax calculation for the receipt taxes:
- Select the Tax Code to be applied from the dropdown.
- Enter the amount of the tax.
- Select if the amount is based on a % of the amount (default) or fixed.
- Select whether it is a Simple Tax (default) or Value Added Tax.
- Select whether the tax amount is Editable (default) or Not Editable by the user.
- Add an account if the customer needs to track what account they come from (rare).
Receipt taxes are typically % of the amount, simple tax, and editable unless required as otherwise. If there are multiple receipt taxes, you can add another Receipt Tax.
Example: here we’ve set up the receipt taxes to calculate 13% of the amount.

On the same screen, add the claimable taxes under Other Taxes:
- Select the Tax Code to be applied from the dropdown.
- Enter the amount of the tax calculation as a whole number (%) or fraction.
- Select how the amount is to be calculated:
- % of total
- % of total with tip
- % of tax
- Fraction of total
- Fraction of total with tip
- Fraction of tax
- Fixed
- Select whether it is a Simple Tax or Value Added Tax (common).
- Select if this tax amount should be Visible or Hidden (common) on the expense item.
- Select if this tax amount should be Editable or Not Editable (common).
- Select the account/GL associated with these claimable tax amounts (common).
Click the OK button to save this tax version. This will tax you back to the main page for the profile version. You can either click the Close button to close this tax window or add category exceptions to the tax rates, as detailed below.
Example: here we see the claimable "Other" tax will be calculated as the same amount as the receipt tax amount.
At this stage, the tax configuration is complete. However, you may want to also configure any category exceptions for the tax rates, which we cover below.
Category Exceptions
On the main page of the Tax Profile Version, you can add any expense category exceptions which should have a different tax rate.
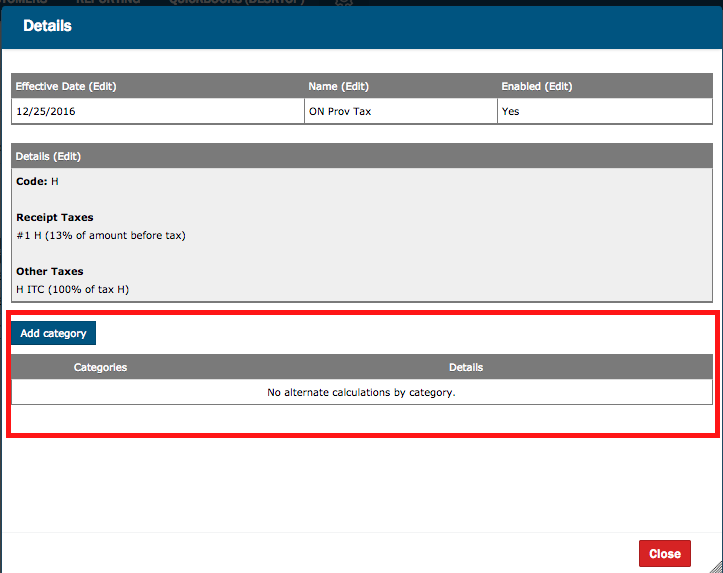
You can add as many as needed by following these steps:
Click the Add Category button. You should see a window with a copy of the tax rules.
Navigate to the top of the window to Categories and click the Edit link. Move the expense category(s) affected by this tax rate into the Selected column, and click the OK button to return to the Category Exception window.
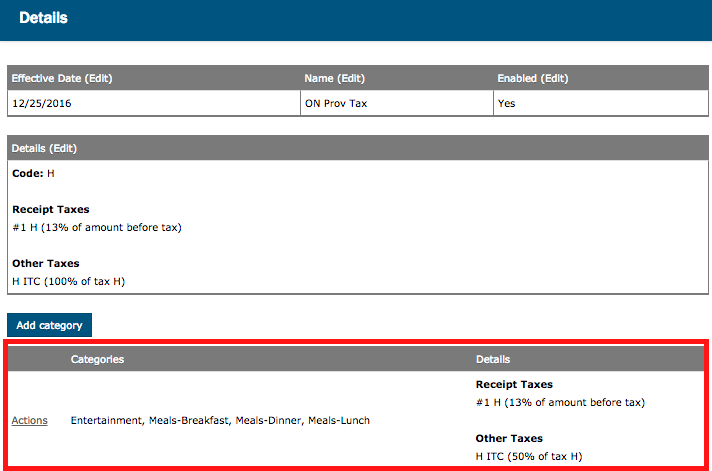
At the bottom of this, you’ll see the default tax profile configuration you’ve created. Adjust the settings to reflect the exception rule. Click OK to apply. Repeat if other exceptions are needed.
Example: here we want to make Meals and Entertainment only 50% claimable, so we’ve adjusted the “Other Taxes” to reflect that.

Comments
0 comments
Article is closed for comments.