
The Nexonia Expenses mobile application gives approvers the ability to review expenses submitted to them for approval. You can review submitted expenses and receipts, and choose to approve or reject expenses.
Notes:
- To process approvals, your mobile app must be connected to the internet. Expense approvals can be done offline, but won’t update the report until the app is connected to the internet and synced.
- The approval function is available on the Apple iOS and Android versions of Nexonia Expenses.
- The Approvals icon won't be visible the first time you log in to Nexonia. It will only be visible on your app homescreen after the first time an expense report is sent to you. After that point, the icon will always be visible unless you turn it off in your settings.
Expenses are submitted by users and move into the approval process. The expense approver gets notified via their email notifications and mobile notifications that expenses have been assigned to them for review.
Approving Expenses
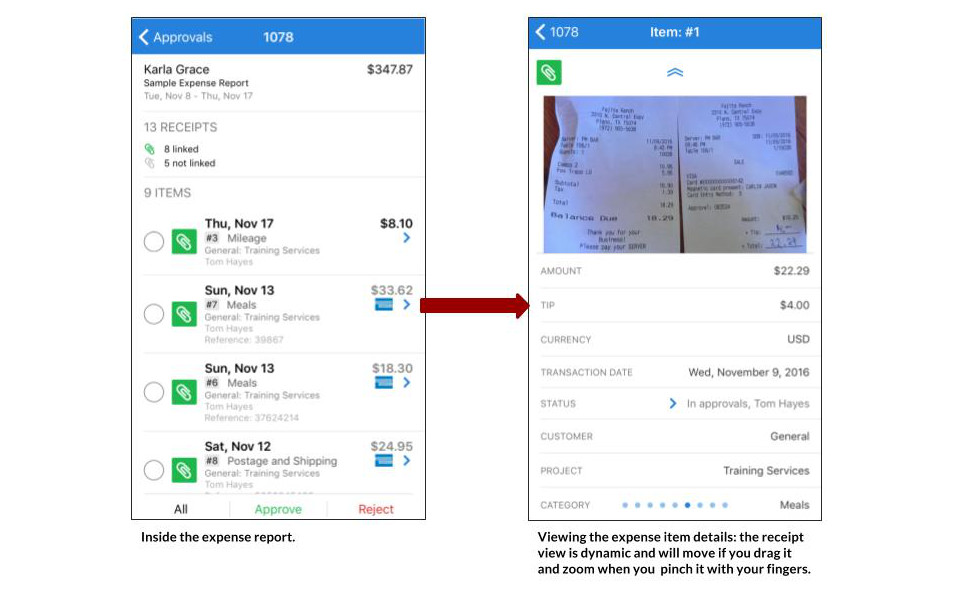
View the expense reports waiting for you by tapping the Approvals button on the mobile notification or tapping the Approvals icon on your home screen. Here we see two reports waiting for us to review. Once you tap Approvals, you’ll see any available reports you can review and you can drill down to the expense items within the report.
- Tap the report line to open the report and see all the details - expense items and linked receipts.
- Tap on the individual expense items to open the items and see the details.
When you're viewing the details inside the expense report, any items you can review will have a circle next to it – the circle allows you to select which items to approve or reject. Each report will show the Status to let you know what stage the items within it are at: Draft ●●●, Submitted >, Rejected < or Approved ✓.
Tap on an expense item to review the details. As an approver, you’ll only be able to select Submitted > items to review. For every expense item, you’ll be able to review the linked receipts and the expense details.
- Pinch the in-line receipt image with two fingers to zoom in or out.
- Swipe the expense item screen left to move to the next expense and right to the previous expense.
Policy Violations – If a submitted expense is flagged for a Policy Violation, you’ll see the policy notification as red text in the expense. Tapping it will bring up a more detailed message indicating why the item was flagged.

Approving Expenses is done from the Expense Report view. Select the items you want to process, tap Approve or Reject at the bottom of the screen, and then tap the confirmation message to process your approvals or rejections. Approving expenses will move the item to the next step of approvals, if there is one. Otherwise, once it's fully approved, the submitter will be notified and their report status will update to Approved ✓.
Rejecting an expense will require you to enter a comment, which will be communicated to the submitter. A rejected expense can be edited by the submitter and resubmitted once corrected.
You can approve or reject all the items in the report, or selectively approve or reject items:
Approve All / Reject All
To choose to approve or reject all the items at once:
- Tap All to select all items in the report.
- Tap Approve or Reject.
- Tap the confirmation message to process your action.

Selective Approval or Rejection
To choose specific items to approve or reject:
- Tap the circle of the expense item(s) you want to select to approve or reject.
- Tap Approve or Reject.
- Tap the confirmation message to process your action.
In the example below, we're rejecting the expense item for Gas.

Tip: You could use this method to reject an expense, then use the “Approve All” method to approve the remaining items.
Submitter’s View of Approved and Rejected Expenses
Approved Expenses - Once expenses have been reviewed and approved, the expense submitter will be alerted via email and mobile notifications. They’ll see the status of the expense item updated to Approved ✓.
Note: if the approval process involves multiple approvers, expense submitters will get the “approved” status and notifications once the expense is completely approved.

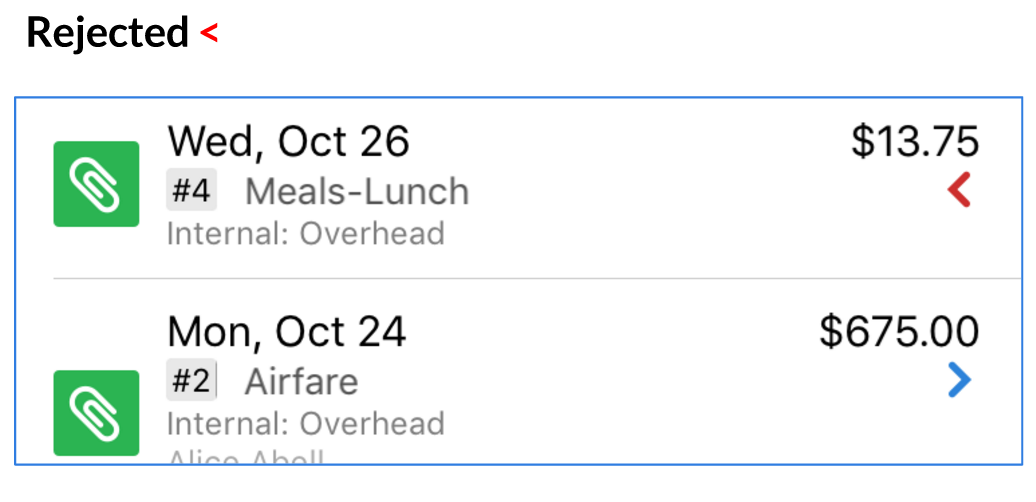
Rejected Expense - If an expense item has been rejected by the reviewer, it’ll be sent back to the expense submitter with a Rejected < status. An email will be sent to to the submitter and will include the rejection comment. Here, item #4 has been rejected.
If the item just needs some additional information, the submitter can edit the rejected item, and resubmit it for approval. If it’s an outright rejection and won’t be reimbursed, they can delete the item from the report.
Comments
0 comments
Article is closed for comments.